Outline
To require further study, which is ready to install on Monday win10 + ubuntu dual system, but half-way there have been various issues, after repeated reloading, on-line to find information back and forth for three days, and finally successfully installed. Although previously passed Kali Linux and Ubuntu are installed in a virtual machine, but the native experience is very poor, so plan to install dual system. On the one hand more immersive experience better, on the other hand, join in hand.
Benpian record the installation process, as well as installation problems encountered and solutions.
table of Contents
- Outline
- Environment: win10 (GPT + UEFI)
- Part I Preparations
- Part II installation work
- Part III midway problem
- 一、INFO: task xxxxxx: 634 blocked for more than 120 seconds.
- STEP 1. enter shell
- STEP 2. temporary modification ratio, shrink the file system cache size:
- STEP 3. permanent modification
- Second, the problem ran a successful, followed by another card logo issue:
- Third, the resolution of the problem immediately (this one only 800 * 600 resolution selection)
- Fourth, followed by a login screen can not enter the circulation system
- Fifth, the follow-up (escalation)
- Sixth, the side story
- Part IIII reference articles and recommended reading
Environment: win10 (GPT + UEFI)
Part I Preparations
First, make U disk boot disk
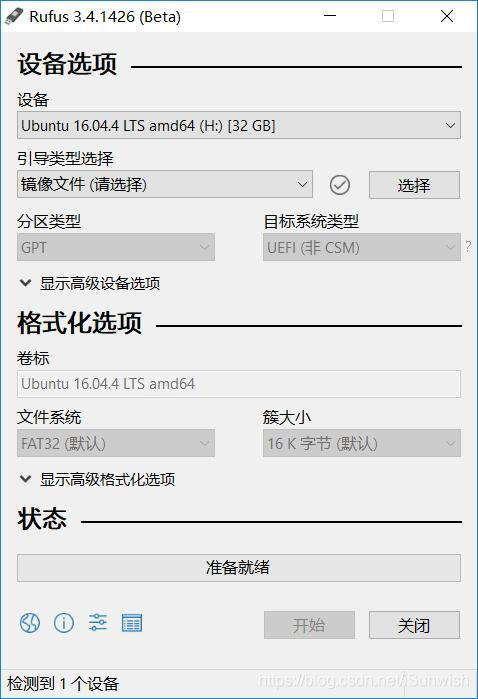
First prepare a U disk and download the good Ubuntu system image file you want to install, with this official recommendation Rufus making U disk boot disk tools.
After the computer plug in the U disk, Rufus will automatically detect and gives the default configuration information, disk partition mode selection GPT, the type of target system is UEFI (new computer last two years are generally GPT + UEFI, of course, does not preclude you from the computer is MBR + LEGACY, and if so to select a good correspondence with reference to the corresponding article installation)
Note: The figure is I've made a good interface screenshots Rufus U disk boot disk, so the partition type and target system type is gray, the Start button is disabled state, which can be seen, I made U disk is GPT partition type, system type for the UEFI.
Remember U disk data backup in advance, make a boot disk U disk all the original data will be erased
Will pop up after the start of a series of several warnings, all the way to default is just fine. Wait a little while after the progress bar finished run over, you can turn off the Refus.
Second, disk space allocation
The following allocation of disk space for the Ubuntu system.
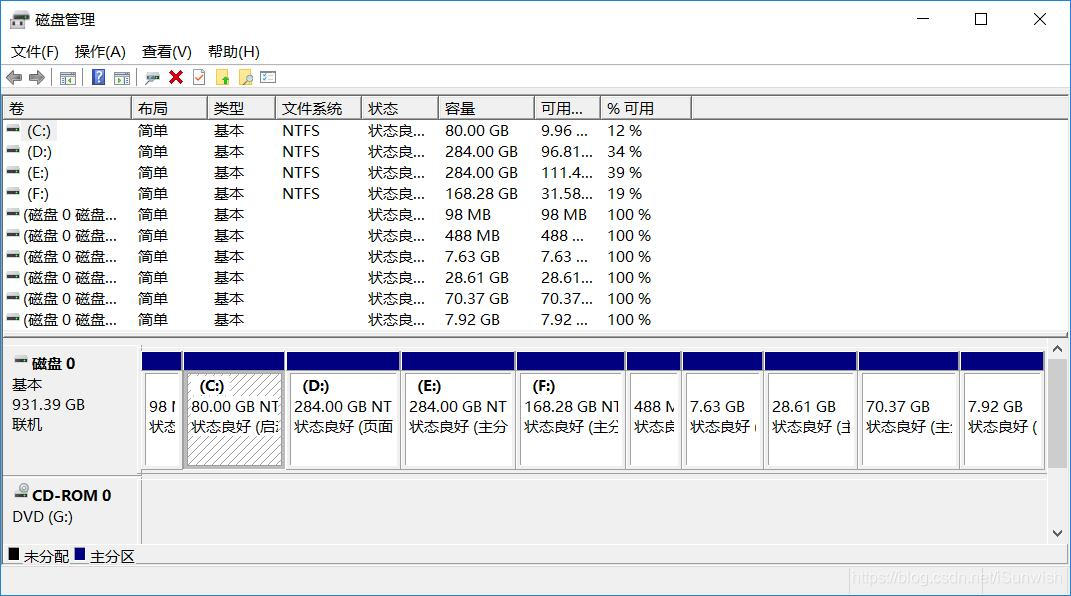
win + x to open the Disk Management tool, you can see the existing disk information, select the disk you want to extract the right space -> compressed volume, point to determine the size you want to set up compression. After completion of compression can be seen on a computer more than a piece of unallocated disk, here I am divided from 120G mechanical hard drive out, thus completing assigned.
After completion points on the other do not move here, do we follow when installing a specific partition.
Note: The figure is I have installed a dual system back to win after drawing the cut, so there are a lot of disk space and do not roll out of the points, on the computer you should only C / D / E / F These disks, compressed out volume called "unassigned."
Three, BIOS settings
Prior to making a good plug U disk, let's restart the computer, press F2 in the event of computer brand Logo enter the BIOS screen (usually F2, if not, then do try other F keys, and some computers are the Delete key), mainly to do the following two settings:
- The first item is set to start your U disk
Of course, you can refer to other online U disk boot method, here we are in the BIOS Boot page, find the Boot Opition, your U disk can be adjusted to the first item.
- Close Secure Boot Options
In the Advance page BIOS page to find Secure Boot, can be modified to Disable, the page where the different machines Secure Boot may differ, look just fine. This step is to turn off secure boot Ubuntu system can normally be written to disk.
After the completion of the above two points can be saved and restarted, the following entry installation.
Part II installation work
After the completion of the work, normally you restart the interface into the Ubuntu guide, the first experience is not installed, the second Ubuntu is installed, the third term is an OEM installation, are selected from the first or second row, here we direct election install Ubuntu installation interface.
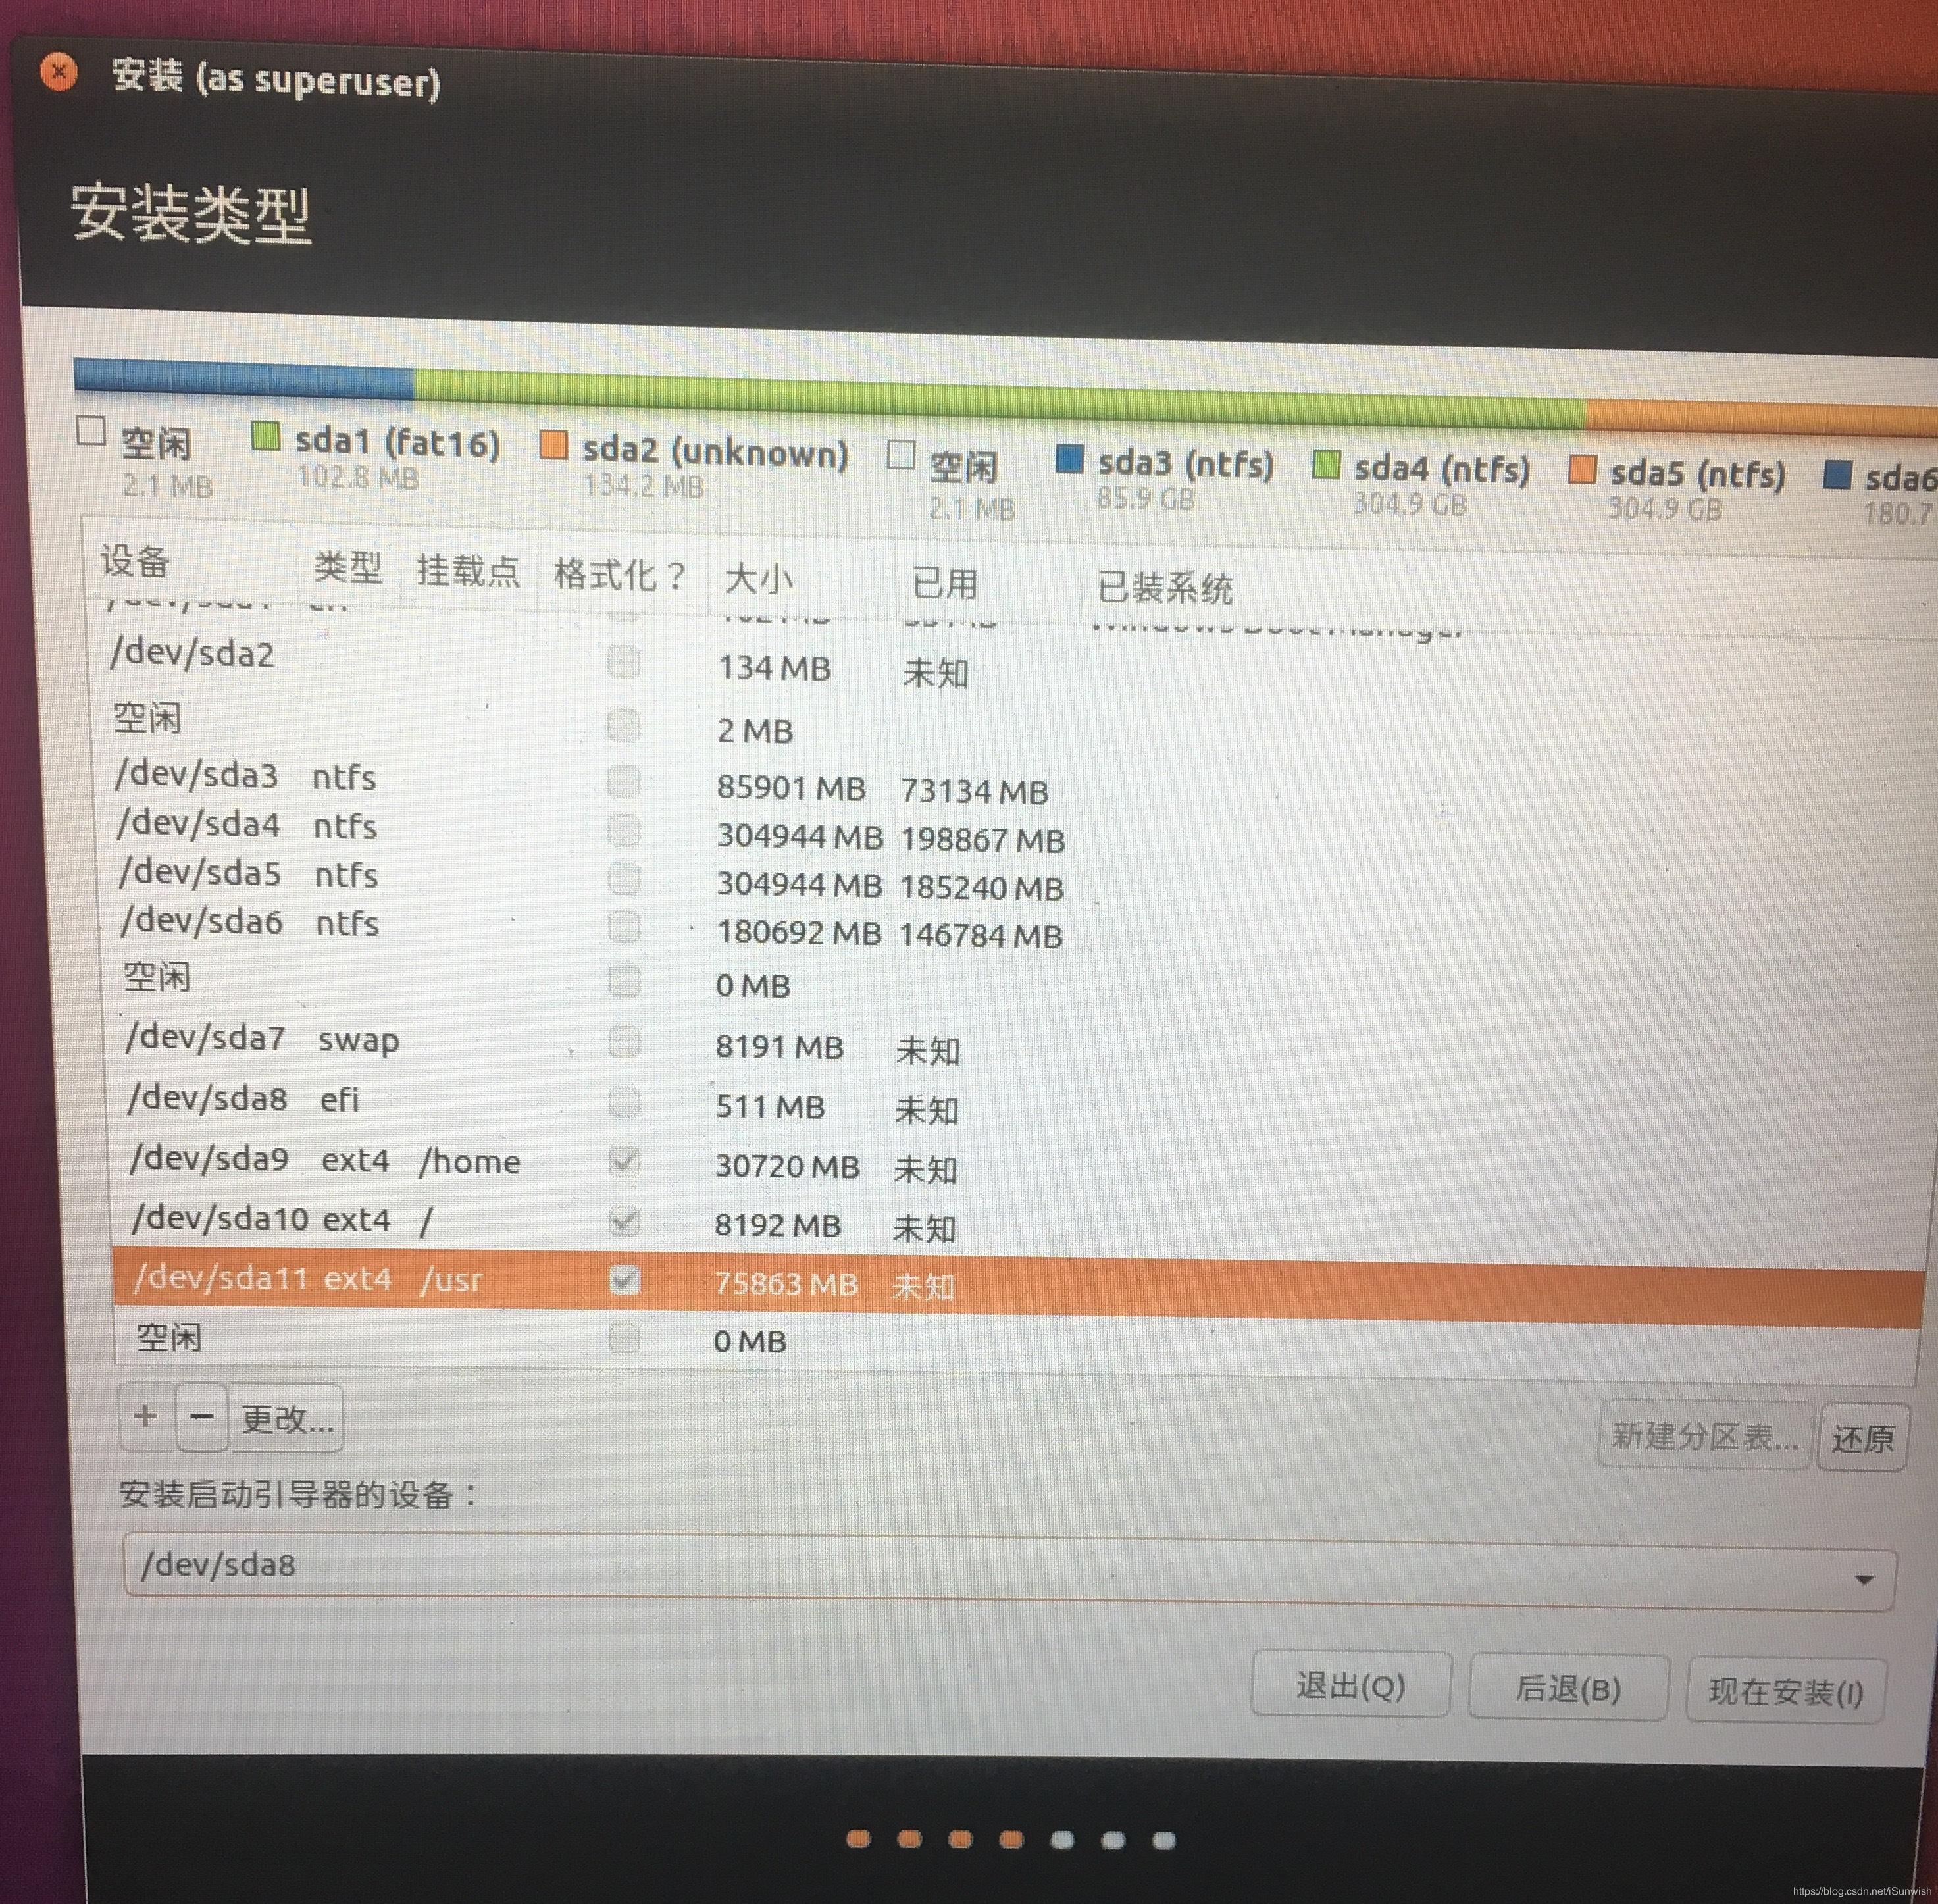
In front of all conventional installation process, you can not connect wifi, do not install third-party libraries, a key part of the partition, the Internet has been a lot of presentations and advice on Ubuntu partition, thus giving here my own assignment for reference only:
- EFI - logical partitions - 512MB
- The SWAP (swap) - primary partition - 8G
- / Home - primary partition - 30G
- / Usr - primary partition - 75G
- / - primary partition - 8G
Upon completion of the partition, the installation of equipment under the boot of Kai Be sure to select the EFI partition corresponding device!
After look at two confirmed Click the Install Now, after Shanghai default location on the line, and set username and password, and below is waiting to complete the installation. Will let you complete the installation reboot, unplug the U-hours restart. Note that this time, we have to enter a BIOS, mainly do two things:
- Before the start of the first term set back
You do not transferred back also, but it is recommended to set the reset after the work is completed.
- Select the Ubuntu boot sequence
Here your BIOS settings may not be this one, and no reboot grub interface directly into the win system, please refer to other articles online were UEFI boot.
If so far you can normally enter the system, and the system environment, everything is normal, then congratulations, successfully completed the win + ubuntu dual system installation, the following can refer to Part IIII in the recommended articles systematically landscaping and further configured;
if not, the following a list of problems I encountered during installation, and solutions, for reference.
Part III midway problem
一、INFO: task xxxxxx: 634 blocked for more than 120 seconds.
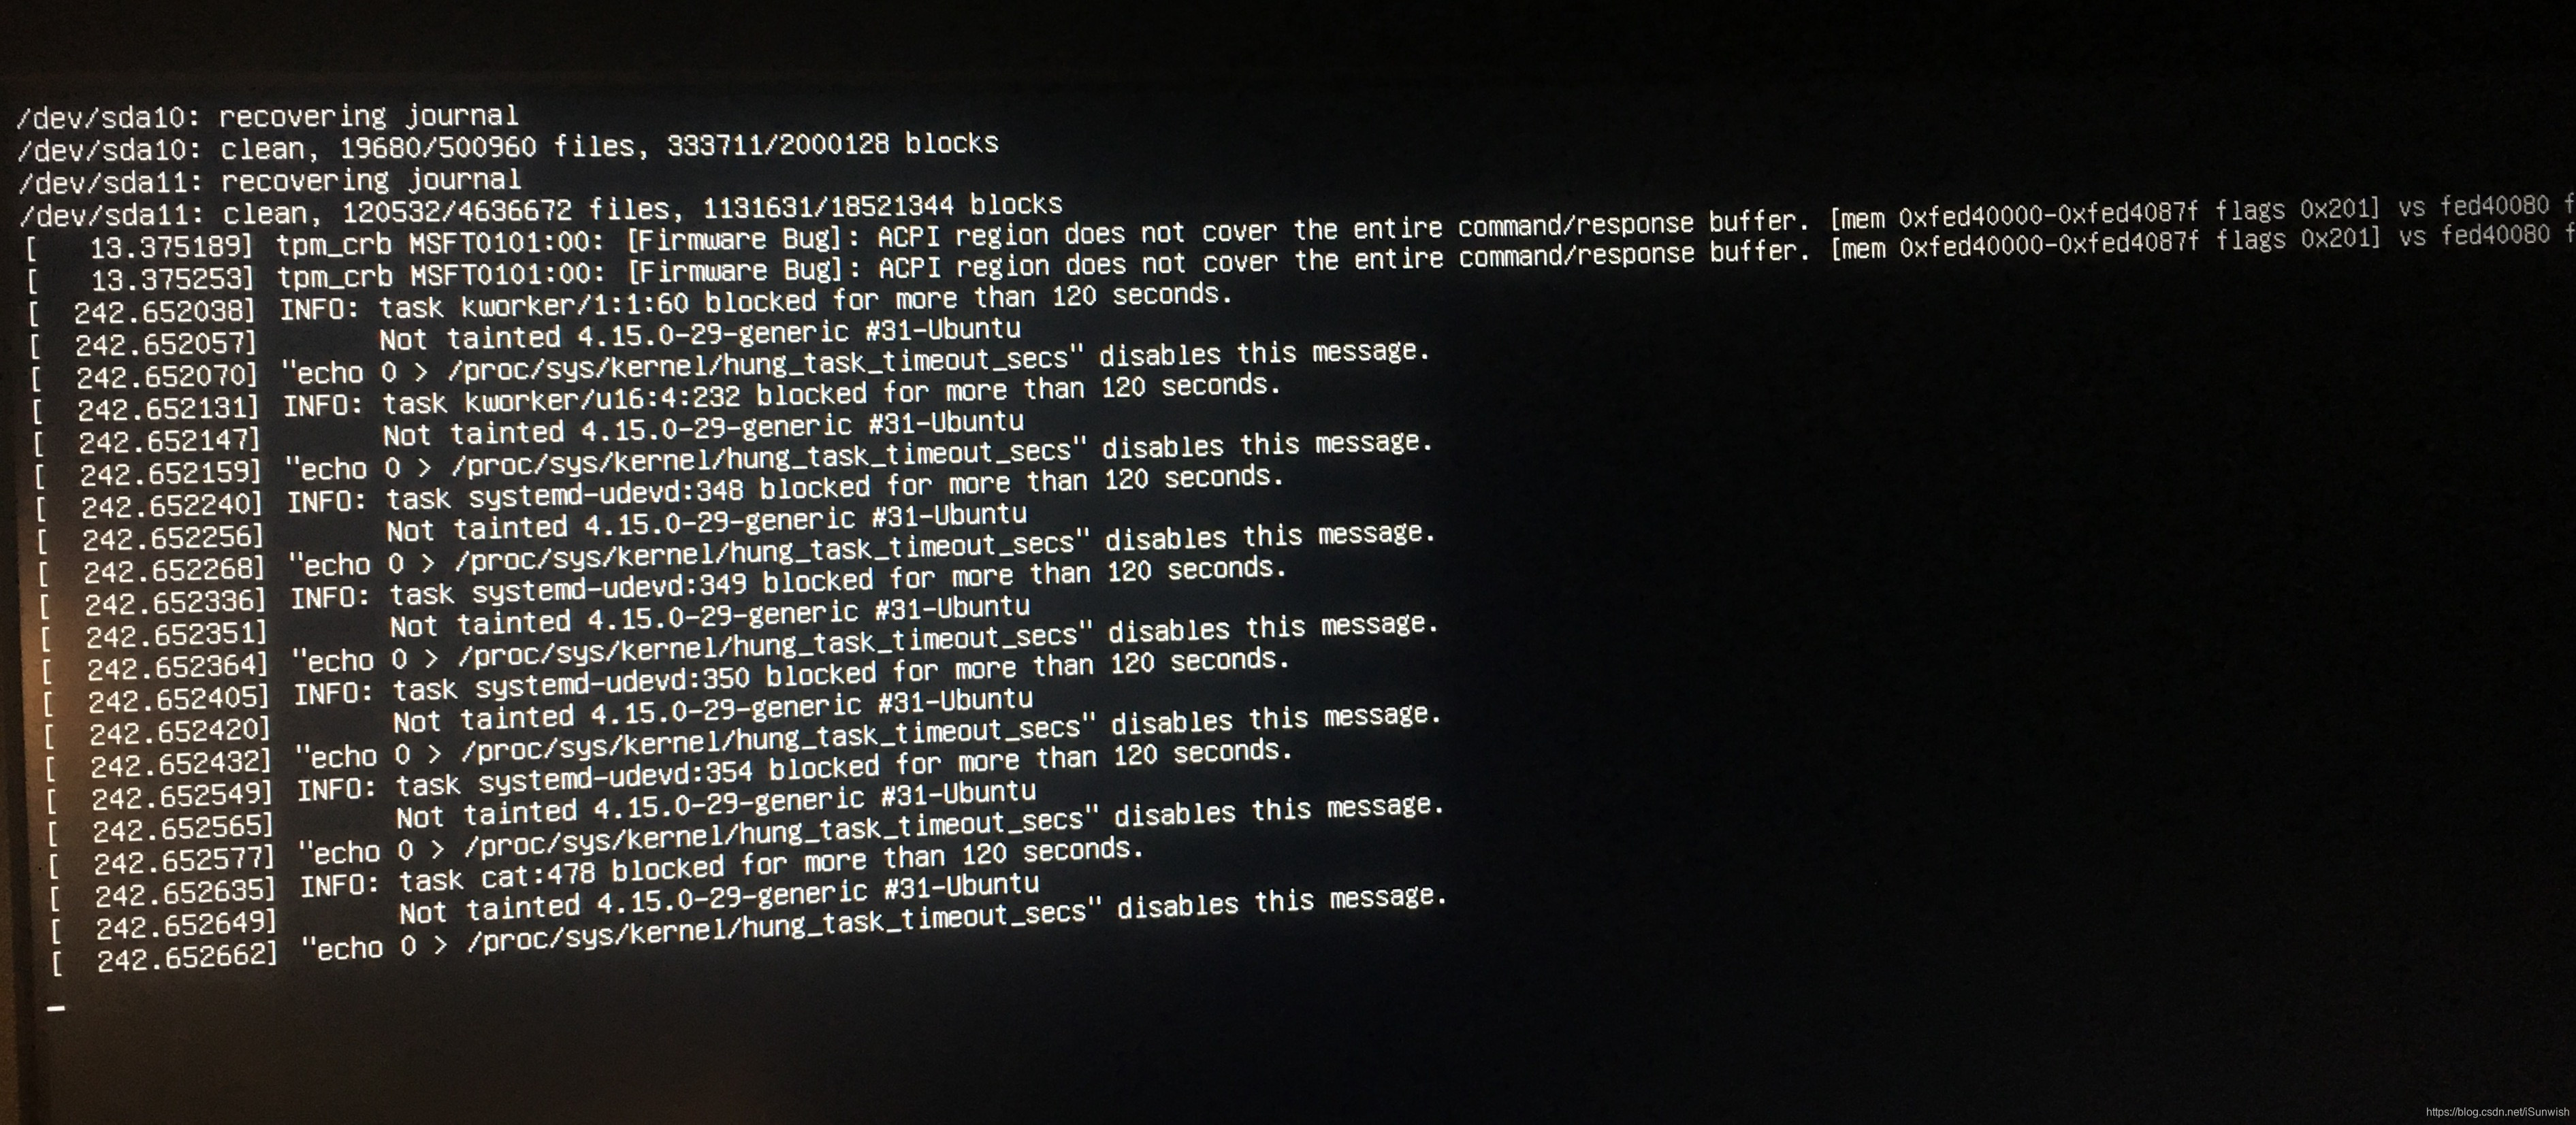
Bahrain system restart now click directly stuck does not move, so press the power button to force off and then open, the screen dark purple solid in the card, and after the restart, the state is shown in FIG., The error message is generally :
INFO: task xxxxxx: 634 blocked for more than 120 seconds.
Internet to find a lot of articles and posts, more consistent view is:
By default, Linux will use up to 40 percent of available memory as the file system cache. When this threshold is exceeded, the file system cache memory will be written to disk all, lead to subsequent IO request are synchronized. When the cache is written to disk, there is a default timeout of 120 seconds. The reason for the above problem is IO subsystem processing speed is not fast enough, not all the data in the cache is written to disk in 120 seconds. IO system response is slow, resulting in the accumulation of more and more requests, eventually occupied the entire system memory, cause the system to become unresponsive.
Solution:
STEP 1. enter shell
-
Reboot the system, hold down the shift key, to grub interface
-
Select ubuntu advanced options , move the highlight to recovery mode that item
-
The ro linux modify the line as rw, you can write
In terms of ro into the system, the file system will be readable only state not modify the contents
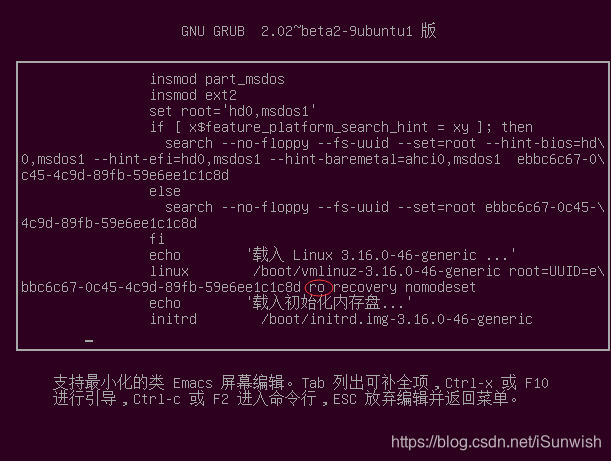
- After Ctrl + X or F10 boot into the following interface.
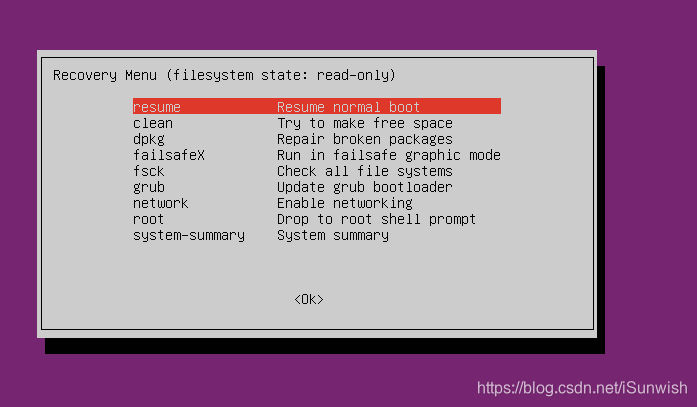
Move root Drop to root shell prompt after the row press the Tab key to move the cursor ok, then enter into the ubuntu i.e. as the root user can enter commands at the bottom of the window.
STEP 2. temporary modification ratio, shrink the file system cache size:
- In the shell input terminal
sysctl -a | grep dirty
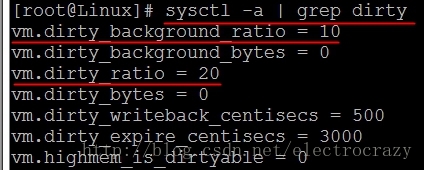
You can see the current setting: vm.dirty_background_ratio = 10, vm.dirty_ratio = 20, and led to the error we encountered.
- Enter the following two commands to modify the value of 5 and 10.
./sbin/sysctl -w vm.dirty_ratio=10
./sbin/sysctl -w vm.dirty_background_ratio=5  `
- After the change to continue the normal start ctrl + d
STEP 3. permanent modification
And finally into the system, but it is a recovery mode, and just modify only temporary operation, after the restart will still have the same problem.
For once, the following modifications kernel configuration, since the system can enter the normal.
- Ctrl + Alt + T to open a terminal
- cd into the / etc directory
- sudo edit sysctl.conf file
- Add the following code to the last:
vm.dirty_background_ratio = 5
vm.dirty_ratio = 10
- Save reboot the system, this error is no longer there.
Second, the problem ran a successful, followed by another card logo issue:

the reason:
General graphics card driver is the cause.
Resolution process:
- Power, in the choice of the system, and then press the keyboard cursor, select an E Ubuntu to enter the edit mode, a selection of edit Ubuntu, find "linux", in this paragraph plus backmost
acpi_osi=linux nomodeset
- Attach additional code (card brand):
acpi_osi=linux nomodeset (NVIDIA)
acpi_osi=linux i915.modeset=1 (Intel)
acpi_osi=linux xforcevesa (AMD)
- Then press F10 to save and start, you can enter the system.
- However, this has the disadvantage that every time you start the above operation must be repeated, it is a waste of time. Where after entering Ubuntu, find /boot/grub/grub.cfg open the file, find the content just modified, together with the same code, save it.
Third, the resolution of the problem immediately (this one only 800 * 600 resolution selection)
Normal, it should be set up which can set the resolution, but the option is only 800x600 findings, in accordance with the Internet, said terminal knock xrandr view the information found directly failed, it should be the graphics card driver problem. Do this step has been more impatient, do not want to toss, so finding a simple and crude solution:
- sudo 编辑 _etc_default/grub
- Find GRUB_GFXMODE = 800x600
- Modify the resolution you want
- Remove the front of the Notes symbol "#"
Because not noticed before himself in front of a comment symbol, the resolution is still the same after the finish, so he toss a long time, only to find, remove the perfect solution, I fainted.
- update immediately:
grub sudo update-grub
- Reboot, problem solved.
Fourth, followed by a login screen can not enter the circulation system
This question directly to reinstall the graphics card driver is like, including boot black operate the same way, a reference blog (note prepared in advance .run driver file):
Fifth, the follow-up (escalation)
As the pre-installed Ubuntu18.04 has been installed on (the issue is a case, then did not find a solution, Tan Shou), the follow-up to the modified Ubuntu 16.04, after the final Bahrain still want to upgrade to 18.04, but when prompted to upgrade themselves after they agreed to upgrade the system reported an internal error, not upgrade, I drop a nice, afraid I would not want to reinstall a 18.04?
Okay okay, crunching a lot after the discovery, open the software update, it will automatically detect and let you update the core component reboot after the update is complete, the system can be normal upgrade.
After several hours of long wait, the system upgrade is complete, no errors are encountered, so far, w + b dual system installation work, finally come to an end, Sahua.
Sixth, the side story
I do not know what caused a mysterious force, after 1050 Ti graphics Bahrain findings show serious dropped frames, drag the window, browse the web screen tearing issues there, and all the animation effects have disappeared (such as minimized windows without scaling effect but directly disappear automatically hide the side effects but did not move out of the direct directly display disappears), extreme affect the user experience, the internet did not find the relevant issues, especially the animation did not even seem to question people ask, we did not encounter to this issue, or that are they do not care, I do not know, but I have always been interactive experience requirements are very high, and this problem has not yet been solved, should also be caused by the graphics card driver, so there is time will remove the current nvidia 410, drive a drop of water to try, again after the update to resolve.
Part IIII reference articles and recommended reading
Reference article
- Linux system in the solution of 120 seconds and blocked for more than hung_task_timeout_secs
- ubuntu14.04.2 grub interface into the system in single-user mode
- linux Error "INFO: task xxxxxx:. 634 blocked for more 120 seconds than" three kinds of solutions
- Ubuntu 16.04 user login interface infinite loop problem solving
- Ubuntu16.04 + Cuda8.0 + Theano deep learning environment to build a
