今天,我们继续讲SpringBoot整合Redis ,也就缓存,它将与我们的Springboot整合

Redis 简介
Redis是当前比较热门的NOSQL系统之一,它是一个开源的使用ANSI c语言编写的
key-value存储系统(区别于MySQL的二维表格的形式存储。)。
和
Memcache类似,但很大程度补偿了Memcache的不足。和Memcache一样,Redis数据都是缓存在计算机内存中,不同的是,Memcache只能将数据缓存到内存中,无法自动定期写入硬盘,这就表示,一断电或重启,内存清空,数据丢失。所以Memcache的应用场景适用于缓存无需持久化的数据。而Redis不同的是它会周期性的把更新的数据写入磁盘或者把修改操作写入追加的记录文件,实现数据的持久化
特点
- Redis读取的速度是110000次/s,写的速度是81000次/s
原子 。 - Redis的所有操作都是原子性的,同时Redis还支持对几个操作全并后的原子性执行。
支持多种数据结构:string(字符串);list(列表);hash(哈希),set(集合);zset(有序集合) - 持久化,主从复制(集群)
- 支持过期时间,支持事务,消息订阅。
- 官方不支持window,但是又第三方版本。
好了,现在知道他是干什么来的 ,我开动吧,相信你也等急了
准备工作
本文使用 Linux 版本的 redis ,当然你也可以使用 Windows ,Windows的话,只需要点击


当然我们要复杂一点,不然写博客太没意思了,就以Linux版本为例
-
1.Linux系统
-
2.安装redis(也可以安装docker,然后再docker中装redis,本文章就直接用Linux安装redis做演示)
redis下载地址:http://download.redis.io/releases/redis-4.0.14.tar.gz
修改Redis,开启远程访问
默认Redis是不支持远程访问的 ,我们需要手动开启
找到redis中的redis.conf文件并编辑(在安装路径中找到)
vim ./redis.conf
找到bind 127.0.0.1并注释掉
-
默认127.0.0.1只能本地访问,注释掉即可ip访问
-
修改 protected-mode 属性值为no,注释掉并把保护模式禁用以后可以IP访问
-
修改daemonize属性将no 改为yes,将daemonize设置为yes即启动后台运行
-
开放6379端口
/sbin/iptables -I INPUT -p tcp --dport 6379 -j ACCEPT
- 最后一步,开启Redis
redis-server /myconf/redis.conf
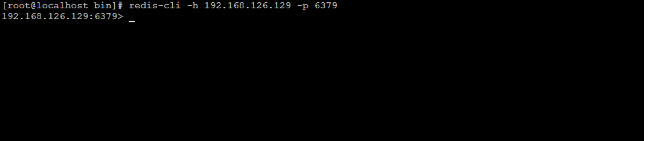
- 测试连接 redis-server默认在/usr/local/bin路径下,redis.conf在redis的安装路径下
redis-cli -h 192.168.126.129 -p 6379
redis-cli -h redis服务器IP -p 6379 -a 密码(没有设置redis密码不要写空,否则报错)
Quick Start
第一步 : 加依赖
<dependencies>
        <dependency>
            <groupId>org.springframework.boot</groupId>
            <artifactId>spring-boot-starter-web</artifactId>
        </dependency>

        <!-- mybatis 与 spring boot 2.x的整合包 -->
        <dependency>
            <groupId>org.mybatis.spring.boot</groupId>
            <artifactId>mybatis-spring-boot-starter</artifactId>
            <version>1.3.2</version>
        </dependency>

        <!--mysql JDBC驱动 -->
        <dependency>
            <groupId>mysql</groupId>
            <artifactId>mysql-connector-java</artifactId>
            <version>5.1.39</version>
        </dependency>

        <dependency>
            <groupId>org.springframework.boot</groupId>
            <artifactId>spring-boot-starter-test</artifactId>
            <scope>test</scope>
        </dependency>

        <dependency>
            <groupId>org.springframework.boot</groupId>
            <artifactId>spring-boot-starter-data-redis</artifactId>
        </dependency>

        <dependency>
            <groupId>org.springframework.boot</groupId>
            <artifactId>spring-boot-starter-cache</artifactId>
        </dependency>
    </dependencies>
application.yml
下面是springboot的配置文件application.yml,配置redis(里面都有注释解释)
server:
  port: 8081

#数据库连接
spring:
  datasource:
    url: jdbc:mysql://localhost:3306/mytest_springboot_cache?useUnicode=true
    driver-class-name: com.mysql.jdbc.Driver
    username: root
    password: root

  ## Redis 配置
  redis:
    ## Redis数据库索引(默认为0)
    database: 0
    ## Redis服务器地址
    host: 192.168.126.129
    ## Redis服务器连接端口
    port: 6379
    ## Redis服务器连接密码(默认为空)
    password:
    jedis:
      pool:
        ## 连接池最大连接数(使用负值表示没有限制)
        #spring.redis.pool.max-active=8
        max-active: 8
        ## 连接池最大阻塞等待时间(使用负值表示没有限制)
        #spring.redis.pool.max-wait=-1
        max-wait: -1
        ## 连接池中的最大空闲连接
        #spring.redis.pool.max-idle=8
        max-idle: 8
        ## 连接池中的最小空闲连接
        #spring.redis.pool.min-idle=0
        min-idle: 0
    ## 连接超时时间(毫秒)
    timeout: 1200

  #将themilef的默认缓存禁用,热加载生效
  thymeleaf:
    cache: false

  #mybatis的下划线转驼峰配置
  configuration:
    map-underscore-to-camel-case: true

    #另外一种打印语句的方式
    log-impl: org.apache.ibatis.logging.stdout.StdOutImpl

#打印sql时的语句
logging:
  level:
    com:
      acong:
        dao: debug
  file: d:/logs/bsbdj.log
接着是实体类,这个比较简单就不多说了
package com.spiritmark.springbootstudytest.bean;

import java.io.Serializable;

/**
 * @author spiritmark
 * create 2019-09-18-22:32
 */
public class User implements Serializable {

    private static final long serialVersionUID = 1L;
    private int uid;
    private String userName;
    private String passWord;
    private int salary;
    public int getUid() {
        return uid;
    }
    public void setUid(int uid) {
        this.uid = uid;
    }
    public String getUserName() {
        return userName;
    }
    public void setUserName(String userName) {
        this.userName = userName;
    }
    public String getPassWord() {
        return passWord;
    }
    public void setPassWord(String passWord) {
        this.passWord = passWord;
    }
    public int getSalary() {
        return salary;
    }
    public void setSalary(int salary) {
        this.salary = salary;
    }
    public User(int uid, String userName, String passWord, int salary) {
        super();
        this.uid = uid;
        this.userName = userName;
        this.passWord = passWord;
        this.salary = salary;
    }
    public User() {
        super();
    }
}
Controller
package com.spiritmark.springbootstudytest.controller;

import com.spiritmark.springbootstudytest.bean.User;
import com.spiritmark.springbootstudytest.service.UserService;
import org.springframework.beans.factory.annotation.Autowired;
import org.springframework.stereotype.Controller;
import org.springframework.web.bind.annotation.RequestMapping;
import org.springframework.web.bind.annotation.RequestParam;
import org.springframework.web.bind.annotation.ResponseBody;
import org.springframework.web.bind.annotation.RestController;

import java.util.HashMap;
import java.util.List;
import java.util.Map;

/**
 * @author spiritmark
 * create 2019-09-18-22:36
 */
@RestController
public class TestController {

    @Autowired
    private UserService userService;

    @RequestMapping("/queryAll")
    public List<User> queryAll(){
        List<User> lists = userService.queryAll();
        return lists;
    }

    @RequestMapping("/findUserById")
    public Map<String, Object> findUserById(@RequestParam int id){
        User user = userService.findUserById(id);
        Map<String, Object> result = new HashMap<>();
        result.put("uid", user.getUid());
        result.put("uname", user.getUserName());
        result.put("pass", user.getPassWord());
        result.put("salary", user.getSalary());
        return result;
    }

    @RequestMapping("/updateUser")
    public String updateUser(){
        User user = new User();
        user.setUid(1);
        user.setUserName("cat");
        user.setPassWord("miaomiao");
        user.setSalary(4000);

        int result = userService.updateUser(user);

        if(result != 0){
            return "update user success";
        }

        return "fail";
    }

    @RequestMapping("/deleteUserById")
    public String deleteUserById(@RequestParam int id){
        int result = userService.deleteUserById(id);
        if(result != 0){
            return "delete success";
        }
        return "delete fail";
    }
}
之前都是学过的内容,下面是新增的 也就是Redis配置redistemplate序列化
package com.spiritmark.springbootstudytest.config;

import com.fasterxml.jackson.annotation.JsonAutoDetect;
import com.fasterxml.jackson.annotation.PropertyAccessor;
import com.fasterxml.jackson.databind.ObjectMapper;
import org.springframework.cache.CacheManager;
import org.springframework.cache.annotation.CachingConfigurerSupport;
import org.springframework.cache.annotation.EnableCaching;
import org.springframework.context.annotation.Bean;
import org.springframework.context.annotation.Configuration;
import org.springframework.data.redis.cache.RedisCacheConfiguration;
import org.springframework.data.redis.cache.RedisCacheManager;
import org.springframework.data.redis.cache.RedisCacheWriter;
import org.springframework.data.redis.connection.RedisConnectionFactory;
import org.springframework.data.redis.core.*;
import org.springframework.data.redis.serializer.Jackson2JsonRedisSerializer;
import org.springframework.data.redis.serializer.StringRedisSerializer;

import java.time.Duration;

/**
 * @author spiritmark
 * create 2019-09-24-15:07
 */
@Configuration
@EnableCaching
public class RedisConfig extends CachingConfigurerSupport {

    /**
     * 选择redis作为默认缓存工具
     * @param redisConnectionFactory
     * @return
     */
    /*@Bean
    //springboot 1.xx
    public CacheManager cacheManager(RedisTemplate redisTemplate) {
        RedisCacheManager rcm = new RedisCacheManager(redisTemplate);
        return rcm;
    }*/
    @Bean
    public CacheManager cacheManager(RedisConnectionFactory redisConnectionFactory) {
        RedisCacheConfiguration redisCacheConfiguration = RedisCacheConfiguration.defaultCacheConfig()
                .entryTtl(Duration.ofHours(1)); // 设置缓存有效期一小时
        return RedisCacheManager
                .builder(RedisCacheWriter.nonLockingRedisCacheWriter(redisConnectionFactory))
                .cacheDefaults(redisCacheConfiguration).build();
    }

    /**
     * retemplate相关配置
     * @param factory
     * @return
     */
    @Bean
    public RedisTemplate<String, Object> redisTemplate(RedisConnectionFactory factory) {

        RedisTemplate<String, Object> template = new RedisTemplate<>();
        // 配置连接工厂
        template.setConnectionFactory(factory);

        //使用Jackson2JsonRedisSerializer来序列化和反序列化redis的value值(默认使用JDK的序列化方式)
        Jackson2JsonRedisSerializer jacksonSeial = new Jackson2JsonRedisSerializer(Object.class);

        ObjectMapper om = new ObjectMapper();
        // 指定要序列化的域,field,get和set,以及修饰符范围,ANY是都有包括private和public
        om.setVisibility(PropertyAccessor.ALL, JsonAutoDetect.Visibility.ANY);
        // 指定序列化输入的类型,类必须是非final修饰的,final修饰的类,比如String,Integer等会跑出异常
        om.enableDefaultTyping(ObjectMapper.DefaultTyping.NON_FINAL);
        jacksonSeial.setObjectMapper(om);

        // 值采用json序列化
        template.setValueSerializer(jacksonSeial);
        //使用StringRedisSerializer来序列化和反序列化redis的key值
        template.setKeySerializer(new StringRedisSerializer());

        // 设置hash key 和value序列化模式
        template.setHashKeySerializer(new StringRedisSerializer());
        template.setHashValueSerializer(jacksonSeial);
        template.afterPropertiesSet();

        return template;
    }

    /**
     * 对hash类型的数据操作
     *
     * @param redisTemplate
     * @return
     */
    @Bean
    public HashOperations<String, String, Object> hashOperations(RedisTemplate<String, Object> redisTemplate) {
        return redisTemplate.opsForHash();
    }

    /**
     * 对redis字符串类型数据操作
     *
     * @param redisTemplate
     * @return
     */
    @Bean
    public ValueOperations<String, Object> valueOperations(RedisTemplate<String, Object> redisTemplate) {
        return redisTemplate.opsForValue();
    }

    /**
     * 对链表类型的数据操作
     *
     * @param redisTemplate
     * @return
     */
    @Bean
    public ListOperations<String, Object> listOperations(RedisTemplate<String, Object> redisTemplate) {
        return redisTemplate.opsForList();
    }

    /**
     * 对无序集合类型的数据操作
     *
     * @param redisTemplate
     * @return
     */
    @Bean
    public SetOperations<String, Object> setOperations(RedisTemplate<String, Object> redisTemplate) {
        return redisTemplate.opsForSet();
    }

    /**
     * 对有序集合类型的数据操作
     *
     * @param redisTemplate
     * @return
     */
    @Bean
    public ZSetOperations<String, Object> zSetOperations(RedisTemplate<String, Object> redisTemplate) {
        return redisTemplate.opsForZSet();
    }
}
数据访问层
接着是Mapper持久层Dao,这里主要用注解写比较方便,也可以使用mybatis的xml配置文件写sql语句
package com.spiritmark.springbootstudytest.mapper;

import com.spiritmark.springbootstudytest.bean.User;
import org.apache.ibatis.annotations.*;

import java.util.List;

/**
 * @author SpiritMark
 * create 2019-09-18-22:32
 */
@Mapper
public interface UserDao {

    @Select("select * from user")
    List<User> queryAll();

    @Select("select * from user where uid = #{id}")
    User findUserById(int id);

    @Update("UPDATE USER SET username = CASE WHEN (#{userName} != NULL) AND (#{userName} != '') THEN #{userName},PASSWORD = CASE WHEN (#{passWord} != NULL) AND (#{passWord} != '') THEN #{passWord},salary = CASE WHEN (#{salary} != 0) THEN #{salary} WHERE uid = #{uid}")
    int updateUser(@Param("user") User user);

    @Delete("delete from user where uid = #{id}")
    int deleteUserById(int id);

}
service层,这里主要是使用redis模板来写
业务逻辑层,就是重点讲
RedisTemplate
package com.spiritmark.springbootstudytest.service;

import com.spiritmark.springbootstudytest.bean.User;
import com.spiritmark.springbootstudytest.mapper.UserDao;
import org.springframework.beans.factory.annotation.Autowired;
import org.springframework.data.redis.core.RedisTemplate;
import org.springframework.data.redis.core.ValueOperations;
import org.springframework.stereotype.Service;

import java.util.List;
import java.util.concurrent.TimeUnit;

/**
 * @author spiritmark
 * create 2019-09-18-22:33
 */
@Service
public class UserService {

    @Autowired
    private UserDao userDao;

    @Autowired
    private RedisTemplate redisTemplate;

    public List<User> queryAll() {
        return userDao.queryAll();
    }

    /**
     * 获取用户策略:先从缓存中获取用户,没有则取数据表中 数据,再将数据写入缓存
     */
    public User findUserById(int id) {
        String key = "user_" + id;

        ValueOperations<String, User> operations = redisTemplate.opsForValue();

        //判断redis中是否有键为key的缓存
        boolean hasKey = redisTemplate.hasKey(key);

        if (hasKey) {
            User user = operations.get(key);
            System.out.println("从缓存中获得数据:"+user.getUserName());
            System.out.println("------------------------------------");
            return user;
        } else {
            User user = userDao.findUserById(id);
            System.out.println("查询数据库获得数据:"+user.getUserName());
            System.out.println("------------------------------------");

            // 写入缓存
            operations.set(key, user, 5, TimeUnit.HOURS);
            return user;
        }
    }

    /**
     * 更新用户策略:先更新数据表,成功之后,删除原来的缓存,再更新缓存
     */
    public int updateUser(User user) {
        ValueOperations<String, User> operations = redisTemplate.opsForValue();
        int result = userDao.updateUser(user);
        if (result != 0) {
            String key = "user_" + user.getUid();
            boolean haskey = redisTemplate.hasKey(key);
            if (haskey) {
                redisTemplate.delete(key);
                System.out.println("删除缓存中的key-----------> " + key);
            }
            // 再将更新后的数据加入缓存
            User userNew = userDao.findUserById(user.getUid());
            if (userNew != null) {
                operations.set(key, userNew, 3, TimeUnit.HOURS);
            }
        }
        return result;
    }

    /**
     * 删除用户策略:删除数据表中数据,然后删除缓存
     */
    public int deleteUserById(int id) {
        int result = userDao.deleteUserById(id);
        String key = "user_" + id;
        if (result != 0) {
            boolean hasKey = redisTemplate.hasKey(key);
            if (hasKey) {
                redisTemplate.delete(key);
                System.out.println("删除了缓存中的key:" + key);
            }
        }
        return result;
    }

}
这里主要是使用RedisTemplate来对远程redis操作,每次访问controller暴露的接口,
- 首先判断redis缓存中是否存在该数据
- 若不存在就从数据库中读取数据,然后保存到redis缓存中
- 当下次访问的时候,就直接从缓存中取出来。这样就不用每次都执行sql语句,能够提高访问速度。
- 但是在保存数据到缓存中,通过设置键和值和超时删除,注意设置超时删除缓存时间不要太长,否则会给服务器带来压力。
执行spring boot的启动类,访问 http://localhost:8081/findUserById?id=1

再次访问 http://localhost:8081/findUserById?id=1就是从缓存中获取保存的数据

