准备资料
Ubuntu16.04或者其他版本
Python2.x或者Python3.x
boost_1_69_0或者其他版本 // https://www.boost.org/users/history/version_1_69_0.html
OpenCV3.4.3或者其他版本 // https://www.opencv.org/releases.html
pyboostcvconverter(大佬写的python boost opencv的转换器) // https://github.com/Algomorph/pyboostcvconverter
配置环境
安装Python
sudo apt install python3-dev build-essential
安装C++ boost
cd boost_1_69_0
./bootstrap.sh --with-python=python3.5 # python3.6->3.6
./b2
sudo ./b2 install
cmake pyboostcvconverter
在pyboostcvconverter目录下新建build文件夹
运行cmake-gui
where is source code: pyboostcvconverter根目录
where to build the binaries: pyboostcvconverter根目录刚新建的build目录
Configure && Generate
到此,cmake完成。就可以开始转换封装了。
开始封装
在pyboostcvconverter/src目录下有4个文件:
pyboost_cv2_converter.cpp pyboost_cv3_converter.cpp pyboost_cv4_converter.cpp python_module.cpp
到此就可以修改python_module.cpp来增加自己的C/C++代码(这边增加两个C++函数封装供python调用)代码如下:
cv::Mat to_gray(cv::Mat srcMat); // 转灰度
cv::Mat to_binary(cv::Mat srcMat, int t, int max);// 二值化
#define PY_ARRAY_UNIQUE_SYMBOL pbcvt_ARRAY_API

#include <boost/python.hpp>
#include <pyboostcvconverter/pyboostcvconverter.hpp>
#include <opencv2/opencv.hpp>

namespace pbcvt {

    using namespace boost::python;

/**
 * @brief Example function. Basic inner matrix product using explicit matrix conversion.
 * @param left left-hand matrix operand (NdArray required)
 * @param right right-hand matrix operand (NdArray required)
 * @return an NdArray representing the dot-product of the left and right operands
 */
    PyObject *dot(PyObject *left, PyObject *right) {

        cv::Mat leftMat, rightMat;
        leftMat = pbcvt::fromNDArrayToMat(left);
        rightMat = pbcvt::fromNDArrayToMat(right);
        auto c1 = leftMat.cols, r2 = rightMat.rows;
        // Check that the 2-D matrices can be legally multiplied.
        if (c1 != r2) {
            PyErr_SetString(PyExc_TypeError,
                            "Incompatible sizes for matrix multiplication.");
            throw_error_already_set();
        }
        cv::Mat result = leftMat * rightMat;
        PyObject *ret = pbcvt::fromMatToNDArray(result);
        return ret;
    }
/**
 * @brief Example function. Simply makes a new CV_16UC3 matrix and returns it as a numpy array.
 * @return The resulting numpy array.
 */

	PyObject* makeCV_16UC3Matrix(){
		cv::Mat image = cv::Mat::zeros(240,320, CV_16UC3);
		PyObject* py_image = pbcvt::fromMatToNDArray(image);
		return py_image;
	}

//
/**
 * @brief Example function. Basic inner matrix product using implicit matrix conversion.
 * @details This example uses Mat directly, but we won't need to worry about the conversion in the body of the function.
 * @param leftMat left-hand matrix operand
 * @param rightMat right-hand matrix operand
 * @return an NdArray representing the dot-product of the left and right operands
 */
    cv::Mat dot2(cv::Mat leftMat, cv::Mat rightMat) {
        auto c1 = leftMat.cols, r2 = rightMat.rows;
        if (c1 != r2) {
            PyErr_SetString(PyExc_TypeError,
                            "Incompatible sizes for matrix multiplication.");
            throw_error_already_set();
        }
        cv::Mat result = leftMat * rightMat;

        return result;
    }

    /**
     * \brief Example function. Increments all elements of the given matrix by one.
     * @details This example uses Mat directly, but we won't need to worry about the conversion anywhere at all,
     * it is handled automatically by boost.
     * \param matrix (numpy array) to increment
     * \return
     */
    cv::Mat increment_elements_by_one(cv::Mat matrix){
        matrix += 1.0;
        return matrix;
    }


// Edit by kaychan 2019-03-05
	cv::Mat to_gray(cv::Mat srcMat) { // 在此添加你的C/C++代码

		cv::Mat gray;
		cv::cvtColor(srcMat, gray, COLOR_BGR2GRAY);
		return gray;
	}


	cv::Mat to_binary(cv::Mat srcMat, int t, int max) {

		cv::Mat thresh;
		cv::threshold(srcMat, thresh, t, max, 0);
		return thresh;
	}

#if (PY_VERSION_HEX >= 0x03000000)

    static void *init_ar() {
#else
        static void init_ar(){
#endif
        Py_Initialize();

        import_array();
        return NUMPY_IMPORT_ARRAY_RETVAL;
    }

    BOOST_PYTHON_MODULE (pbcvt) {
        //using namespace XM;
        init_ar();

        //initialize converters
        to_python_converter<cv::Mat,pbcvt::matToNDArrayBoostConverter>();
        matFromNDArrayBoostConverter();

        //expose module-level functions
        def("dot", dot);
        def("dot2", dot2);
		def("makeCV_16UC3Matrix", makeCV_16UC3Matrix);

		//from PEP8 (https://www.python.org/dev/peps/pep-0008/?#prescriptive-naming-conventions)
        //"Function names should be lowercase, with words separated by underscores as necessary to improve readability."
        def("increment_elements_by_one", increment_elements_by_one);
	def("to_gray", to_gray); 	// 在此声明你的C/C++代码
	def("to_binary", to_binary);
    }

} //end namespace pbcvt
代码编写完成后,回到pyboostcvconverter目录,运行:
cmake .
make
这时候就会在当前目录下生成pbcvt.cpython-36m-x86_64-linux-gnu.so,就可以使用python import这个模块,然后使用python调用C/C++函数。

开始调用
到此可以使用python调用刚才编写的C/C++代码了,如下图:
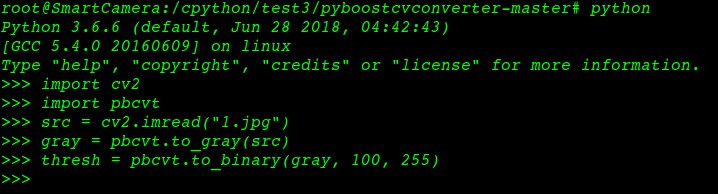
可以看到,to_gray,to_binary函数已经调用成功了。到此,可以根据自己的需求进行封装调用了···
更多
在Windows下cmake pyboostcvconverter:
打开cmd运行bootstrap.bat
b2 --with-python
b2 install
打开cmake添加entry:add entry:BOOST_ROOT=your_boost_root
到此就可以利用VS编译了。
