GlustefFS简介
GlusterFS是一个开源的分布式文件系统,在存储数据方面具有强大的横向扩展能力,通过扩展不同的节点可以支持数PB级别的存储容量
案例实施
必要的实验环境如下,我会演示node1服务器的,其他依次类推

还有一个 ,
client (192.168.100.106) (主机名随意 ) 不用做挂载光盘,一会测试用
上图,vm网络均为VM1,使用Xshell连接
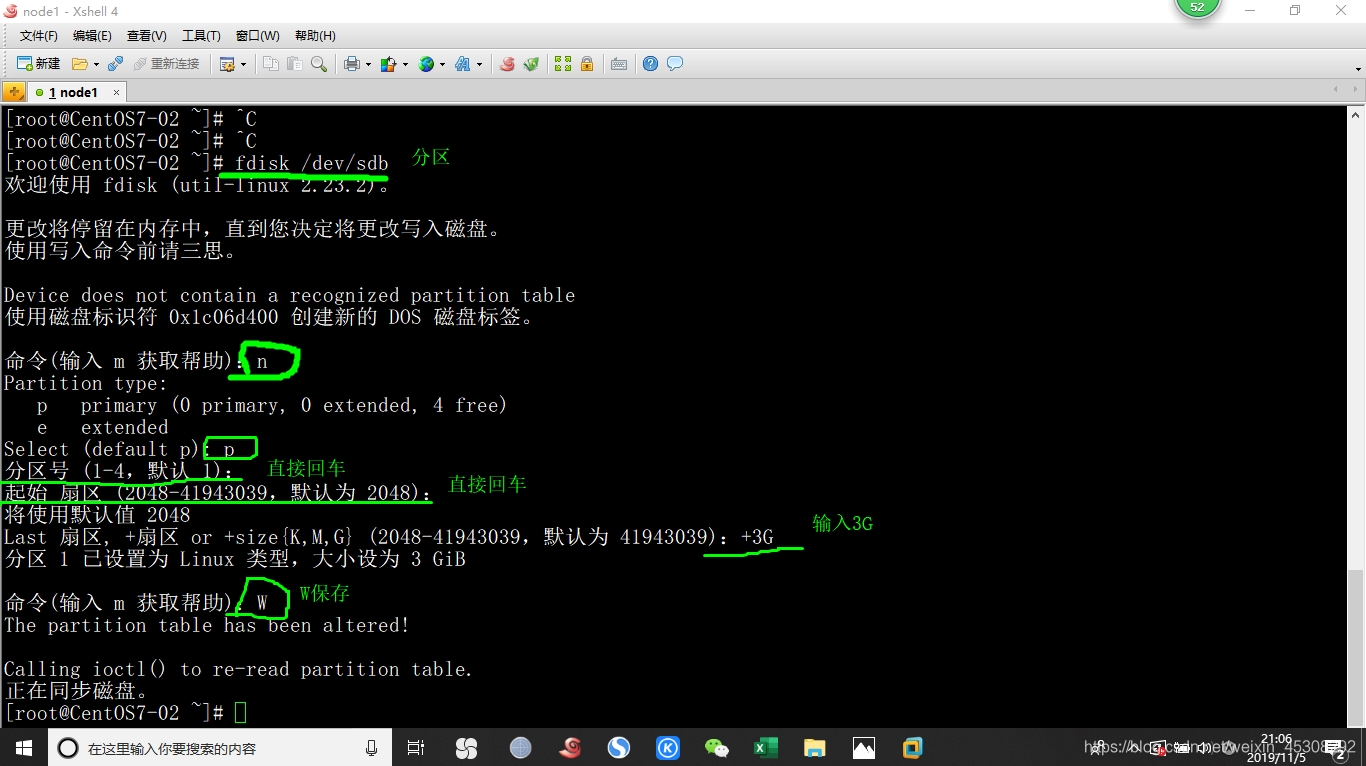
1)磁盘分区
我这里只演示,node1服务器的,主机名后面再进行更改
进入100.102
首先在虚拟机没有开机时,新添加4块SCSI硬盘,大小均为20GB,然后开机
一定要关机状态添加,然后再开机
如下图,磁盘分区的命令
如下图,格式化分区,并创建挂载目录,并挂载
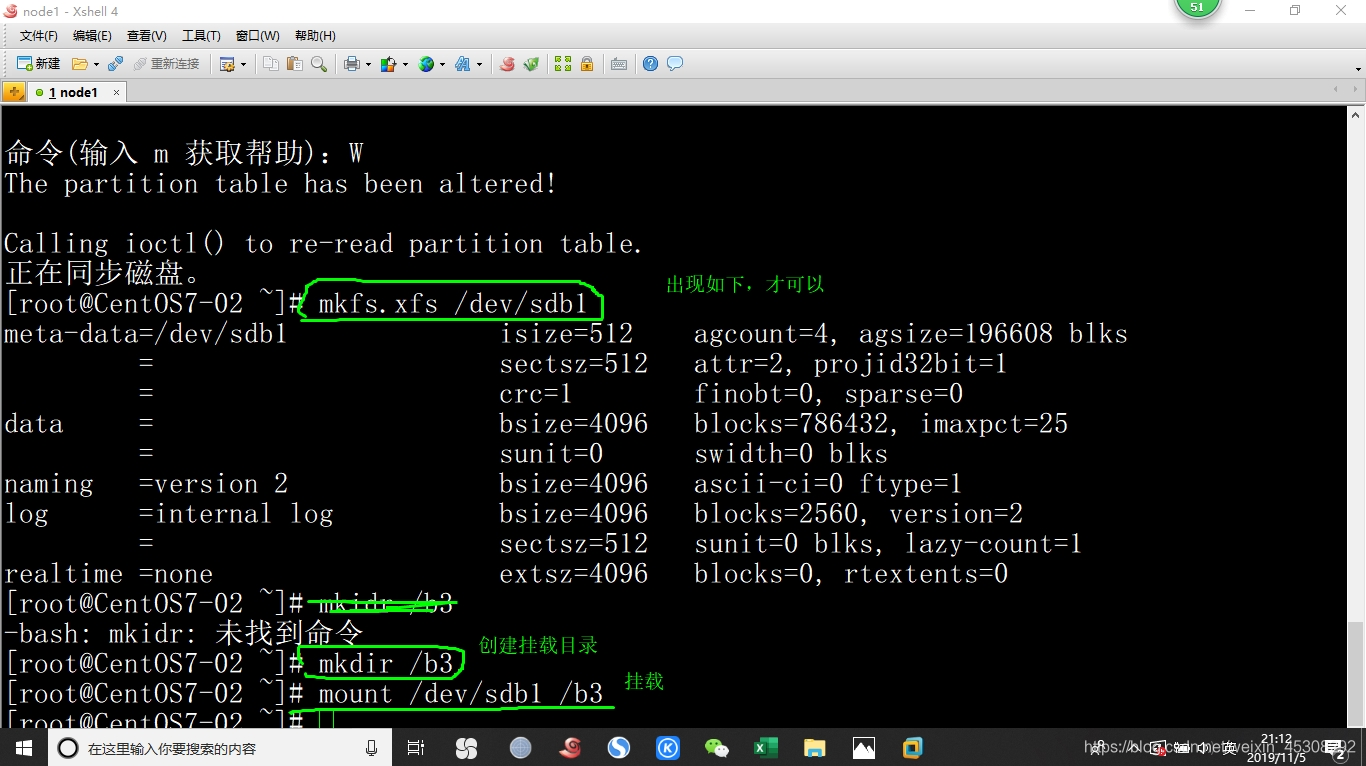
继续按我上面给的表格操作,不要忘了格式化就是mkfs命令,完了应该是如图下这样的

然后配置,开机自动挂载,因为要改主机名
[root@CentOS7-02 ~]# vim /etc/fstab (如图下)
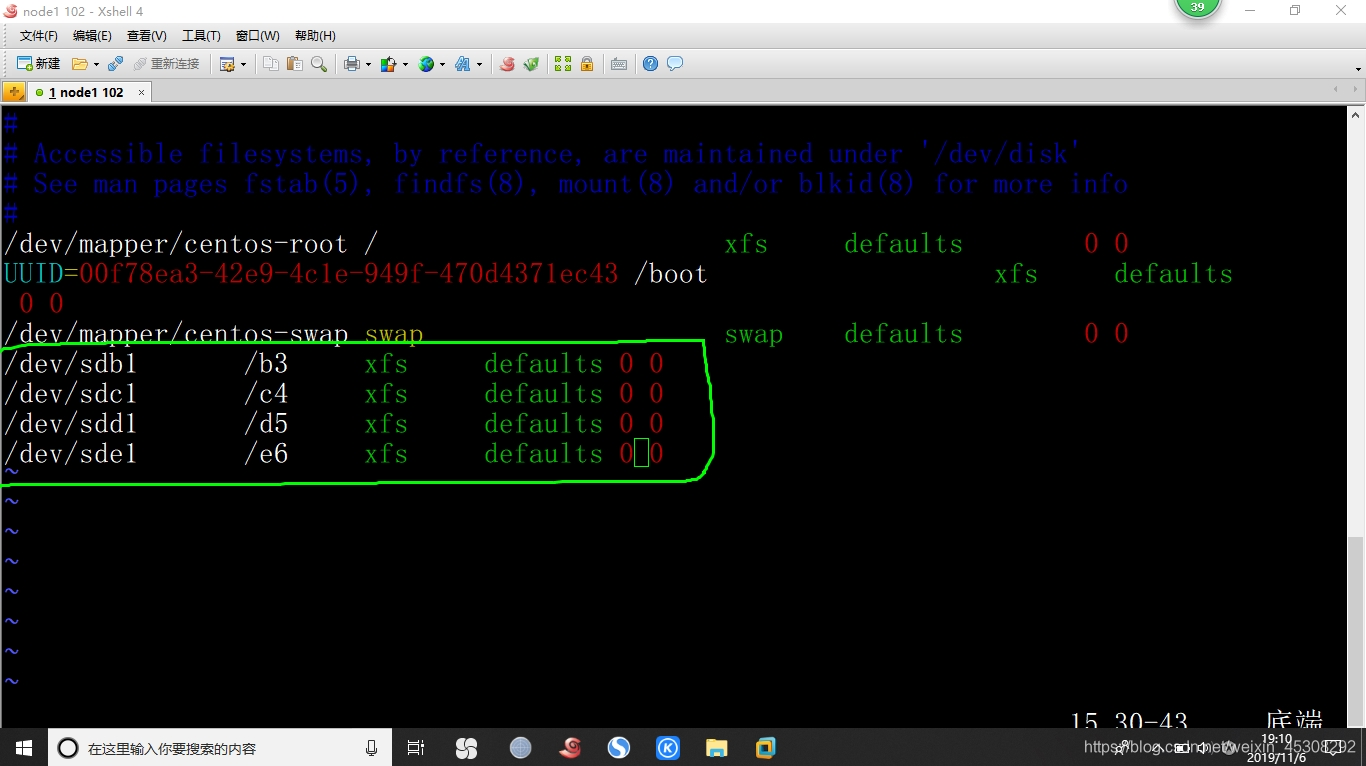
然后,其他三个服务器按照我上面表格,分区,挂载并开机自动挂载
2)更改主机名,并配置hosts文件
也在在node1~node4操作,修改对应主机名,hosts都要改,改成如下的,我以node1 100.102 为例
[root@CentOS7-02 ~]# vim /etc/hostname (删掉原来的)
node1
[root@CentOS7-02 ~]# vim /etc/hosts (添加如下)
node1 192.168.100.102
node2 192.168.100.103
node3 192.168.100.104
node4 192.168.100.105
[root@CentOS7-02 ~]# reboot (一定要重启,主机名才会生效)
[root@node1 ~]# df -hT (应该有刚刚磁盘挂载就对了)
再次重申然,这两步,都是要在4个节点中操作的
3)安装软件,在node1至node4中,并启动
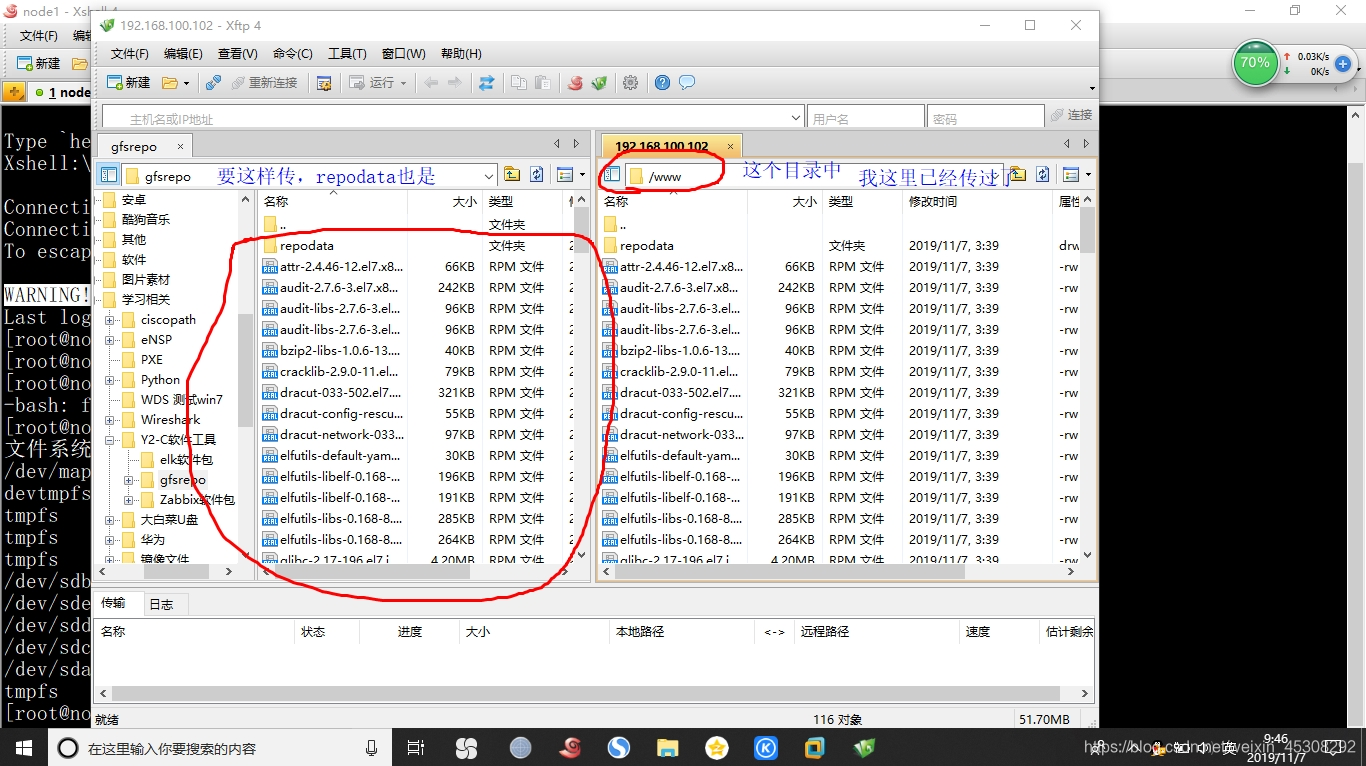
[root@node1 ~]# mkdir /www
[root@node1 ~]# cd /www
然后利用Xftp(就是上面绿色的小标),传入软件源,不要直接拖入,会不全)
[root@node1 www]# vim /etc/yum.repos.d/centOS7.repo (改成如下)
[local]
name=centos7
baseurl=file:///www
enabled=1
gpgcheck=0
[root@node1 www]# yum -y install glusterfs glusterfs-server glusterfs-fuse glusterfs-rdma
[root@node1 www]# systemctl start glusterd
[root@node1 www]# systemctl enable glusterd
四个节点都要安装,并启动
4)添加节点,node1~node4,
该操作在node1一个主机操作即可
[root@node1 ~]# gluster peer probe node1
peer probe: success. Probe on localhost not needed
[root@node1 ~]# gluster peer probe node2
peer probe: success.
[root@node1 ~]# gluster peer probe node3
peer probe: success.
[root@node1 ~]# gluster peer probe node4
peer probe: success.
(输入命令后,输出信息应该和我上面一样,如果不是,检查/etc/hosts文件)
5)查看群集状态
可以在每个节点中查看,这里是node1
[root@node1 ~]# gluster peer status
Number of Peers: 3
Hostname: node2
Uuid: a6632a96-2820-4608-aec0-ee70b876c007
State: Peer in Cluster (Connected)
Hostname: node3
Uuid: 80b90aa5-6f46-4dd9-9f37-a32e03621d6c
State: Peer in Cluster (Connected)
Hostname: node4
Uuid: 8581f87a-48fd-40b4-9c44-6cd481e3b534
State: Peer in Cluster (Connected)
在哪个节点中查看,不会显示出自己,如果输出和我上面不一样,请检查hosts文件
创建卷
1)创建分布式卷
可以在其他节点操作,我这里以node1 100.102中操作
[root@node1 ~]# gluster volume create dis-volume node1:/e6 node2:/e6 force
volume create: dis-volume: success: please start the volume to access data
(没有指定类型,默认是分布式卷)
[root@node1 ~]# gluster volume info dis-volume (查看)
Volume Name: dis-volume
Type: Distribute
Volume ID: 7440507d-8df6-4769-acf2-6575e0206df8
Status: Created
Snapshot Count: 0
Number of Bricks: 2
Transport-type: tcp
Bricks:
Brick1: node1:/e6 (node1,的e6挂载点)
Brick2: node2:/e6 (node2,的e6挂载点)
Options Reconfigured:
transport.address-family: inet
nfs.disable: on
[root@node1 ~]# gluster volume start dis-volume (启动,一定要启动,不然会有问题)
volume start: dis-volume: success
2)创建条带卷
[root@node1 ~]# gluster volume create stripe-volume stripe 2 node1:/d5 node2:/d5 force
volume create: stripe-volume: success: please start the volume to access data
( 类型为stripe,数据为2,后面跟了 两个 brick,所以是条带卷)
[root@node1 ~]# gluster volume info stripe-volume
(我这里,只打出了主要的项,全的有点多)
Volume Name: stripe-volume
Type: Stripe
Bricks:
Brick1: node1:/d5
Brick2: node2:/d5
[root@node1 ~]# gluster volume start stripe-volume
volume start: stripe-volume: success
3)创建复制卷
[root@node1 ~]# gluster volume create rep-volume replica 2 node3:/d5 node4:/d5 force
volume create: rep-volume: success: please start the volume to access data
(指定类型为replica(复制卷),数据为2,后面跟了2个brick ,复制卷)
[root@node1 ~]# gluster volume info rep-volume
Volume Name: rep-volume
Type: Replicate
Bricks:
Brick1: node3:/d5
Brick2: node4:/d5
[root@node1 ~]# gluster volume start rep-volume
volume start: rep-volume: success
4)创建分布式条带卷
[root@node1 ~]# gluster volume create dis-stripe stripe 2 node1:/b3 node2:/b3 node3:/b3 node4:/b3 force
volume create: dis-stripe: success: please start the volume to access data
(指定类型为stripe(条带),数值2,最少4个brick server(节点) 2的2倍,)
[root@node1 ~]# gluster volume info dis-stripe
Volume Name: dis-stripe
Type: Distributed-Stripe
Bricks:
Brick1: node1:/b3
Brick2: node2:/b3
Brick3: node3:/b3
Brick4: node4:/b3
[root@node1 ~]# gluster volume start dis-stripe
volume start: dis-stripe: success
5)创建分布式复制卷
[root@node1 ~]# gluster volume create dis-rep replica 2 node1:/c4 node2:/c4 node3:/c4 node4:/c4 force
volume create: dis-rep: success: please start the volume to access data
(类型为replica,数值为2,后面跟了4个 brick server 2的两倍,分布式复制卷
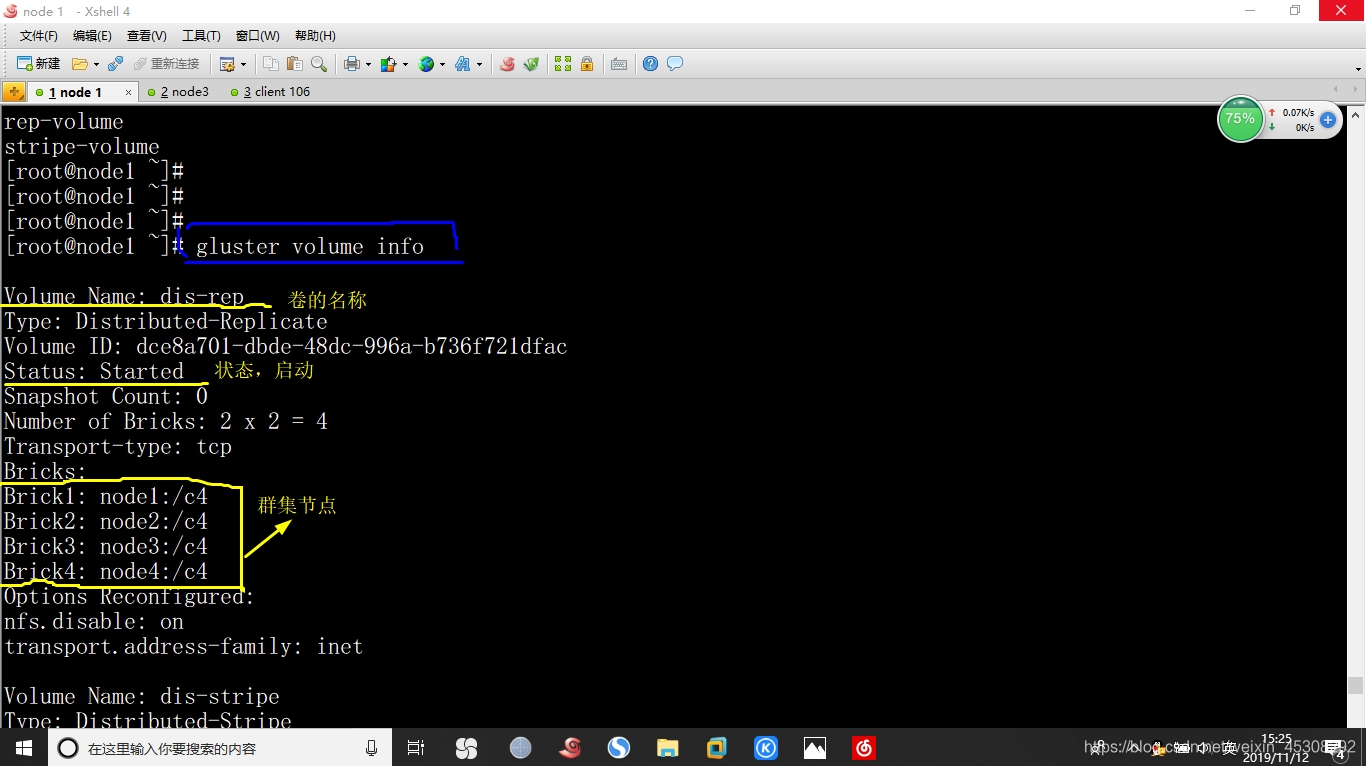
[root@node1 ~]# gluster volume info dis-rep
Volume Name: dis-rep
Type: Distributed-Replicate
Bricks:
Brick1: node1:/c4
Brick2: node2:/c4
Brick3: node3:/c4
Brick4: node4:/c4
[root@node1 ~]# gluster volume start dis-rep
volume start: dis-rep: success
部署Gluster客户端
这时就用到,刚刚的 192.168.100.106 客户机了
进入
1)安装客户端软件
同上面的,node1中配置那个YUM源一样,只是安装命令是下面这个
[root@centos7-06 www]# yum -y install glusterfs glusterfs-fuse
2)创建挂载目录
[root@centos7-06 www]# yum -y install glusterfs glusterfs-fuse
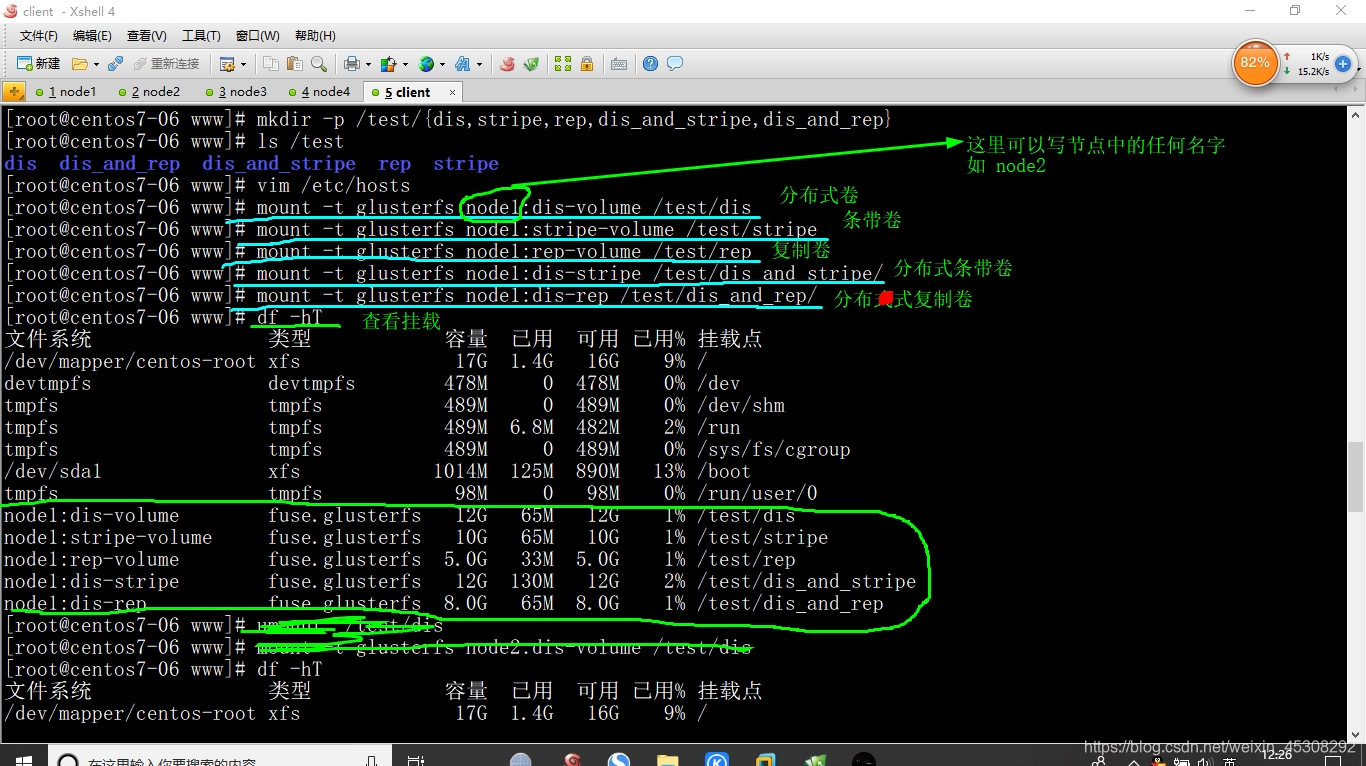
[root@centos7-06 www]# mkdir -p /test/{dis,stripe,rep,dis_and_stripe,dis_and_rep}
[root@centos7-06 www]# ls /test
dis dis_and_rep dis_and_stripe rep stripe
3)修改hosts文件
[root@centos7-06 www]# vim /etc/hosts (添加如下)
192.168.100.102 node1
192.168.100.103 node2
192.168.100.104 node3
192.168.100.105 node4
4)挂载 Gluster 文件系统
[root@centos7-06 www]# mount -t glusterfs node1:dis-volume /test/dis
[root@centos7-06 www]# mount -t glusterfs node1:stripe-volume /test/stripe
[root@centos7-06 www]# mount -t glusterfs node1:rep-volume /test/rep
[root@centos7-06 www]# mount -t glusterfs node1:dis-stripe /test/dis_and_stripe/
[root@centos7-06 www]# mount -t glusterfs node1:dis-rep /test/dis_and_rep/
5)开机自动挂载,实验环境可以不做
在client中操作
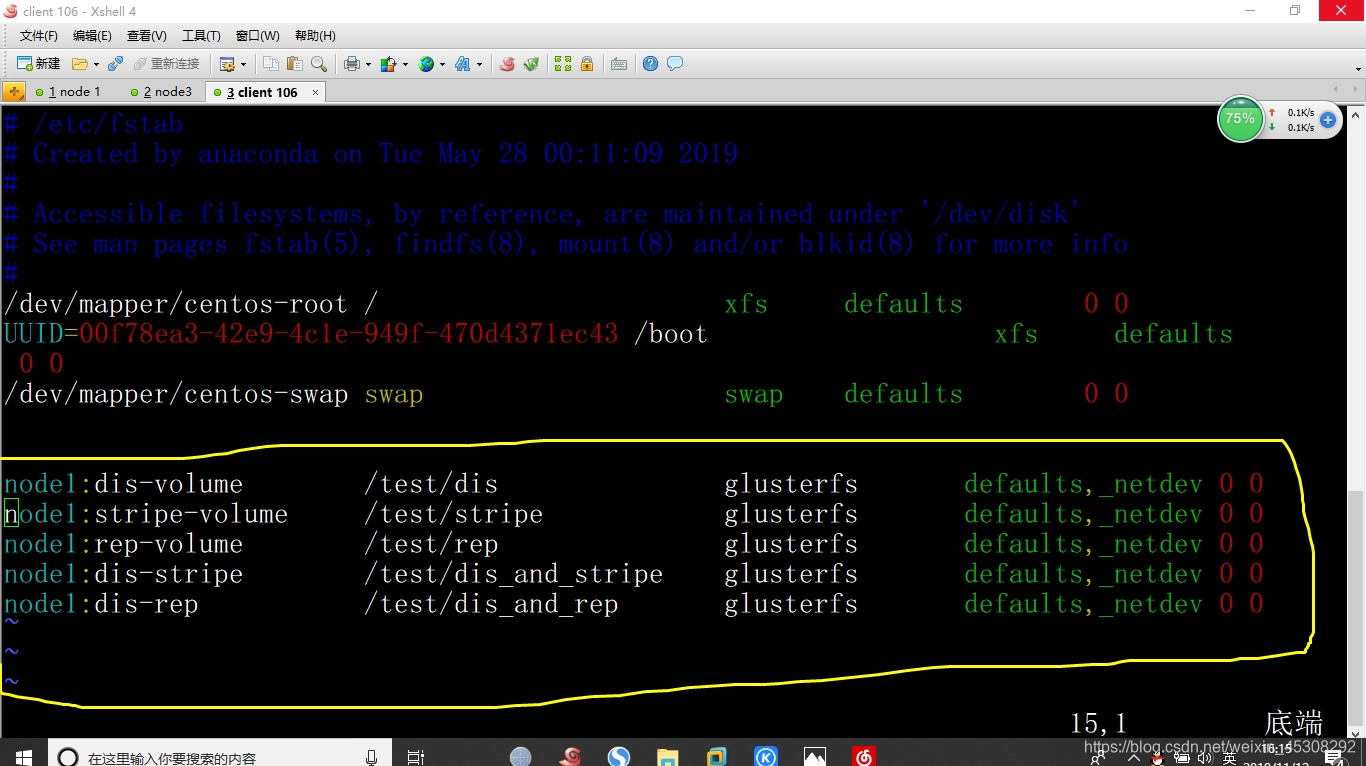
[root@centos7-06 ~]# vim /etc/fstab (添加如下)
测试Gluster文件系统
还是,在客户机100.106中操作,在这里写入,后面查看后台的分布情况
1)卷中写入文件
随意,找一个txt文档,后缀改为log,可以去网上下载,最好大一点的,
[root@centos7-06 ~]# cd /root/
把刚刚的找的文件重命名,并拖入5份到Xshell中
[root@centos7-06 ~]# ll -h demo*
-rw-r--r-- 1 root root 21M 11月 11 21:04 demo1.log
-rw-r--r-- 1 root root 21M 11月 11 21:04 demo2.log
-rw-r--r-- 1 root root 21M 11月 11 21:04 demo3.log
-rw-r--r-- 1 root root 21M 11月 11 21:04 demo4.log
-rw-r--r-- 1 root root 21M 11月 11 21:04 demo5.log
2)查看文件分布
在client100.106中复制,
复制到刚刚的挂载目录中,因为是挂载到本地使用的,其实是放在了后端的存储服务器中
[root@centos7-06 ~]# cp demo* /test/dis
[root@centos7-06 ~]# cp demo* /test/stripe/
[root@centos7-06 ~]#cp demo* /test/rep/
[root@centos7-06 ~]# cp demo* /test/dis_and_stripe/
[root@centos7-06 ~]# cp demo* /test/dis_and_rep/
到节点node1至node4节点中查看
注意看前面的主机名,我不会再重复在哪个node中查看了
这里说一下,为什么是查看这些目录,创建GFS文件系统时,使用的是这些目录,所以是像如下查看
1.查看分布式卷分布
[root@node1 ~]# ll -h /e6
总用量 81M #大小没有变,没有demo5.log
-rw-r--r-- 2 root root 21M 11月 12 05:14 demo1.log
-rw-r--r-- 2 root root 21M 11月 12 05:14 demo2.log
-rw-r--r-- 2 root root 21M 11月 12 05:14 demo3.log
-rw-r--r-- 2 root root 21M 11月 12 05:14 demo4.log
[root@node2 ~]# ll -h /e6
总用量 21M #在这里,分布式成功
-rw-r--r-- 2 root root 21M 11月 12 05:14 demo5.log
2.查看条带卷文件分布
[root@node1 ~]# ll -lh /d5
总用量 51M #数据变小了,被分片了,还是5个
-rw-r--r-- 2 root root 11M 11月 12 05:14 demo1.log
-rw-r--r-- 2 root root 11M 11月 12 05:14 demo2.log
-rw-r--r-- 2 root root 11M 11月 12 05:14 demo3.log
-rw-r--r-- 2 root root 11M 11月 12 05:14 demo4.log
-rw-r--r-- 2 root root 11M 11月 12 05:14 demo5.log
[root@node2 ~]# ll -h /d5
总用量 50M #如下
-rw-r--r-- 2 root root 10M 11月 12 05:14 demo1.log
-rw-r--r-- 2 root root 10M 11月 12 05:14 demo2.log
-rw-r--r-- 2 root root 10M 11月 12 05:14 demo3.log
-rw-r--r-- 2 root root 10M 11月 12 05:14 demo4.log
-rw-r--r-- 2 root root 10M 11月 12 05:14 demo5.log
3.查看复制卷文件分布
[root@node3 ~]# ll -h /d5
总用量 101M #大小没变,没有分片,复制卷
-rw-r--r-- 2 root root 21M 11月 12 05:15 demo1.log
-rw-r--r-- 2 root root 21M 11月 12 05:15 demo2.log
-rw-r--r-- 2 root root 21M 11月 12 05:15 demo3.log
-rw-r--r-- 2 root root 21M 11月 12 05:15 demo4.log
-rw-r--r-- 2 root root 21M 11月 12 05:15 demo5.log
[root@node4 ~]# ll -h /d5
总用量 101M #大小没变,没有分片,冗余上面的
-rw-r--r-- 2 root root 21M 11月 12 05:15 demo1.log
-rw-r--r-- 2 root root 21M 11月 12 05:15 demo2.log
-rw-r--r-- 2 root root 21M 11月 12 05:15 demo3.log
-rw-r--r-- 2 root root 21M 11月 12 05:15 demo4.log
-rw-r--r-- 2 root root 21M 11月 12 05:15 demo5.log
4.查看分布式条带卷文件分布
[root@node1 ~]# ll -h /b3
总用量 41M #分片了,然后还有分布,在后面
-rw-r--r-- 2 root root 11M 11月 12 05:15 demo1.log
-rw-r--r-- 2 root root 11M 11月 12 05:15 demo2.log
-rw-r--r-- 2 root root 11M 11月 12 05:15 demo3.log
-rw-r--r-- 2 root root 11M 11月 12 05:15 demo4.log
[root@node2 ~]# ll -h /b3
总用量 40M #分片了,
-rw-r--r-- 2 root root 10M 11月 12 05:15 demo1.log
-rw-r--r-- 2 root root 10M 11月 12 05:15 demo2.log
-rw-r--r-- 2 root root 10M 11月 12 05:15 demo3.log
-rw-r--r-- 2 root root 10M 11月 12 05:15 demo4.log
[root@node3 ~]# ll -h /b3
总用量 11M #分布,并且分片
-rw-r--r-- 2 root root 11M 11月 12 05:15 demo5.log
[root@node4 ~]# ll -h /b3
总用量 10M #分布,分片
-rw-r--r-- 2 root root 10M 11月 12 05:15 demo5.log
5.查看分布式复制卷文件分布
[root@node1 ~]# ll -h /c4
总用量 81M #大小没变,5.log没有在后面,分布
-rw-r--r-- 2 root root 21M 11月 12 05:16 demo1.log
-rw-r--r-- 2 root root 21M 11月 12 05:16 demo2.log
-rw-r--r-- 2 root root 21M 11月 12 05:16 demo3.log
-rw-r--r-- 2 root root 21M 11月 12 05:16 demo4.log
[root@node2 ~]# ll -h /c4
总用量 81M #大小没变,冗余上面的1~4.log,
-rw-r--r-- 2 root root 21M 11月 12 05:16 demo1.log
-rw-r--r-- 2 root root 21M 11月 12 05:16 demo2.log
-rw-r--r-- 2 root root 21M 11月 12 05:16 demo3.log
-rw-r--r-- 2 root root 21M 11月 12 05:16 demo4.log
[root@node3 ~]# ll -h /c4
总用量 21M #分布了,5.log大小没变,
-rw-r--r-- 2 root root 21M 11月 12 05:16 demo5.log
[root@node4 ~]#ll -h /c4
总用量 21M #冗余,上面5.log
-rw-r--r-- 2 root root 21M 11月 12 05:16 demo5.log
3)破坏测试
挂起node2节点,在client 100.106中测试文件
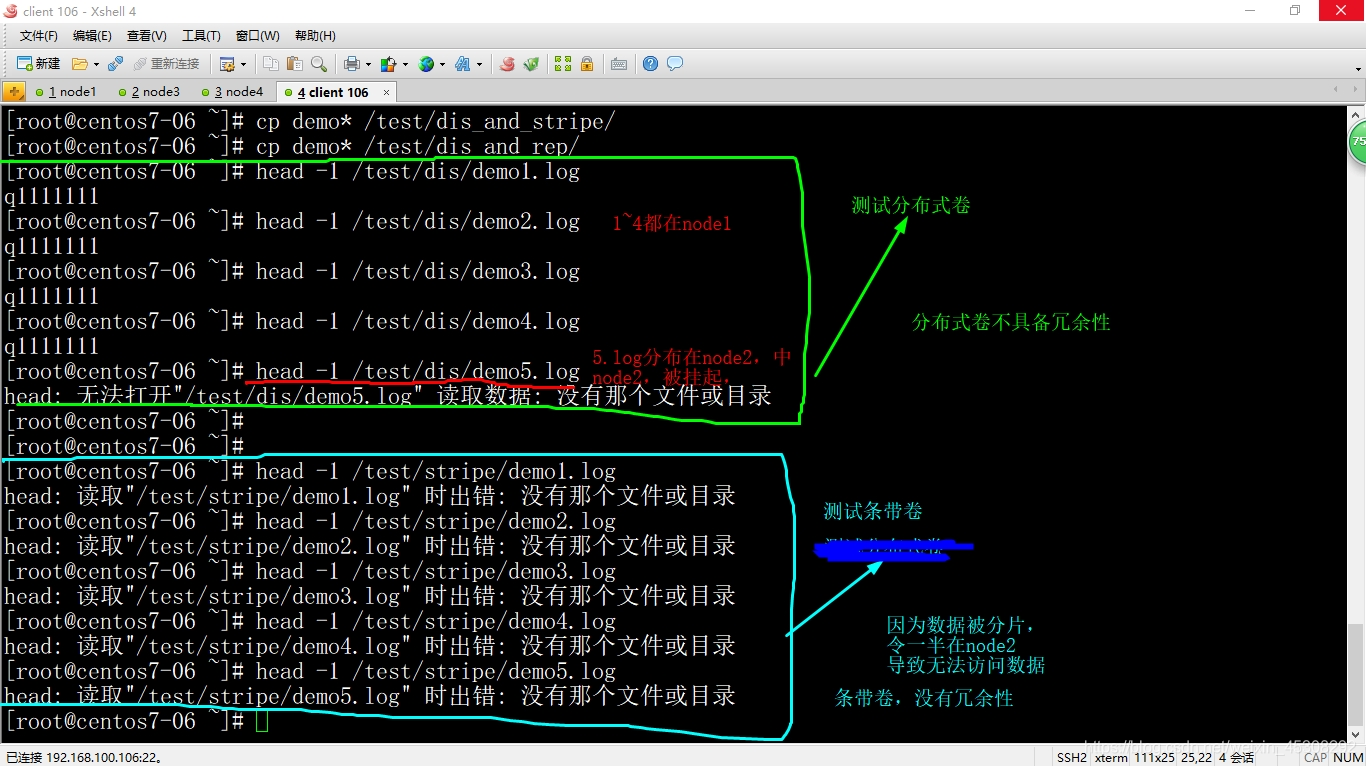
1.测试分布式卷和条带卷,注意看下图
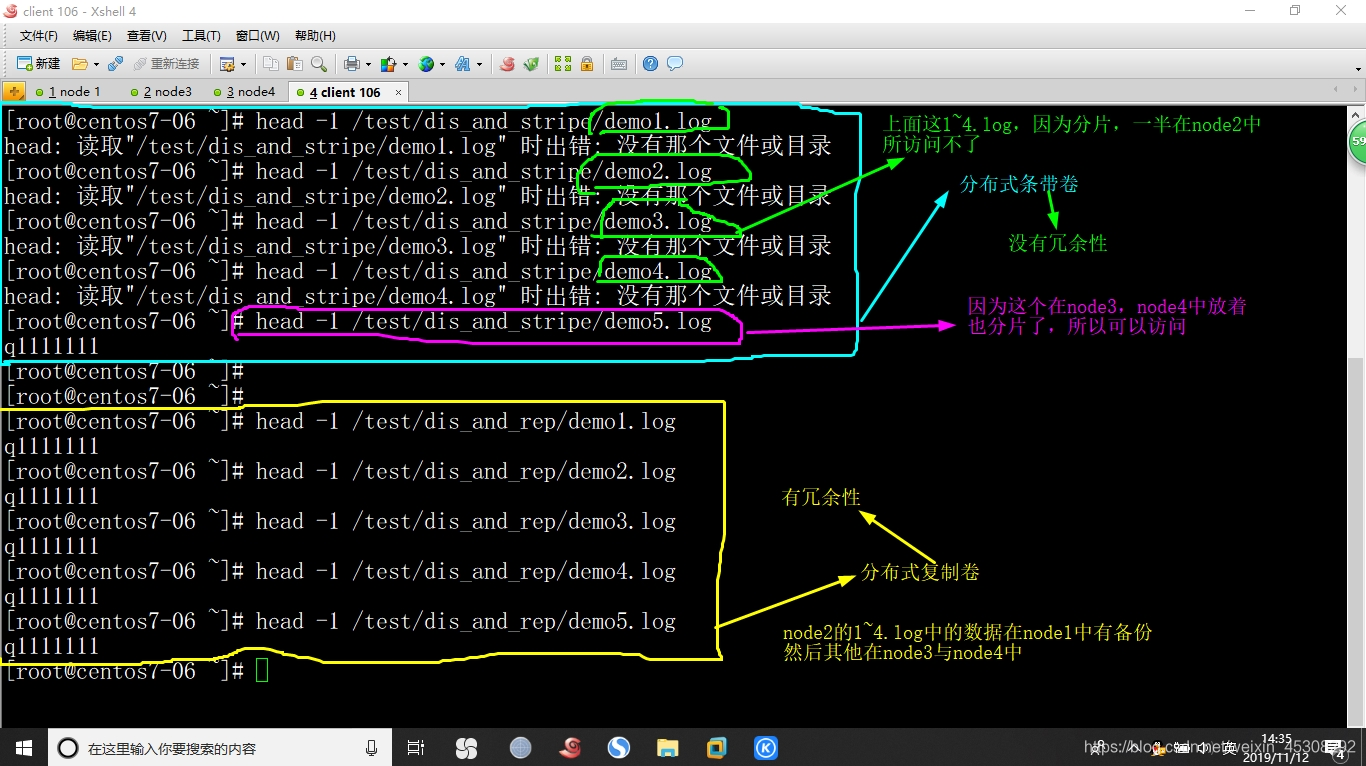
2.测试分布试条带卷,与分布式复制卷,注意看图
继续挂起node4节点,node2节点还是挂起状态不变
3.测试复制卷数据
[root@centos7-06 ~]# head -1 /test/rep/demo1.log
q1111111
[root@centos7-06 ~]# head -1 /test/rep/demo2.log
q1111111
[root@centos7-06 ~]# head -1 /test/rep/demo3.log
q1111111
[root@centos7-06 ~]# head -1 /test/rep/demo4.log
q1111111
[root@centos7-06 ~]# head -1 /test/rep/demo5.log
q1111111
因为node4复制卷中的数据,node3中有备份,所以不会丢失,有冗余性
4.测试分布式条带卷数据是否可以访问
[root@centos7-06 ~]# head -1 /test/dis_and_stripe/demo1.log
head: 读取"/test/dis_and_stripe/demo1.log" 时出错: 没有那个文件或目录
[root@centos7-06 ~]# head -1 /test/dis_and_stripe/demo2.log
head: 读取"/test/dis_and_stripe/demo2.log" 时出错: 没有那个文件或目录
[root@centos7-06 ~]# head -1 /test/dis_and_stripe/demo3.log
head: 读取"/test/dis_and_stripe/demo3.log" 时出错: 没有那个文件或目录
[root@centos7-06 ~]# head -1 /test/dis_and_stripe/demo4.log
head: 读取"/test/dis_and_stripe/demo4.log" 时出错: 没有那个文件或目录
[root@centos7-06 ~]# head -1 /test/dis_and_stripe/demo5.log
q1111111
##(这里实际已经没有了,只是系统有缓存,进入相应挂载目录查看,没有了)
[root@centos7-06 ~]# cd /test/dis_and_stripe/
[root@centos7-06 dis_and_stripe]# ls
解释
(因为node4中有5.log另一半文件,node4挂起所以5.log也不能访问了,没有冗余性)
5.测试分布式复制卷数据
[root@centos7-06 ~]# head -1 /test/dis_and_rep/demo1.log
q1111111
[root@centos7-06 ~]# head -1 /test/dis_and_rep/demo2.log
q1111111
[root@centos7-06 ~]# head -1 /test/dis_and_rep/demo3.log
q1111111
[root@centos7-06 ~]# head -1 /test/dis_and_rep/demo4.log
q1111111
[root@centos7-06 ~]# head -1 /test/dis_and_rep/demo5.log
q1111111
##虽然node2和node4都挂起了,node2的数据在node1有备份,node4的数据在node3中有备份,具有冗余性
其他的维护命令
将挂起的node1与node4恢复状态
这些命令在node1~node4中都可以使用,本例在node1
1)查看GlusterFS卷
1.查看卷的列表
[root@node1 ~]# gluster volume list
dis-rep
dis-stripe
dis-volume
rep-volume
stripe-volume
2.查看所有卷的的信息
[root@node1 ~]# gluster volume info
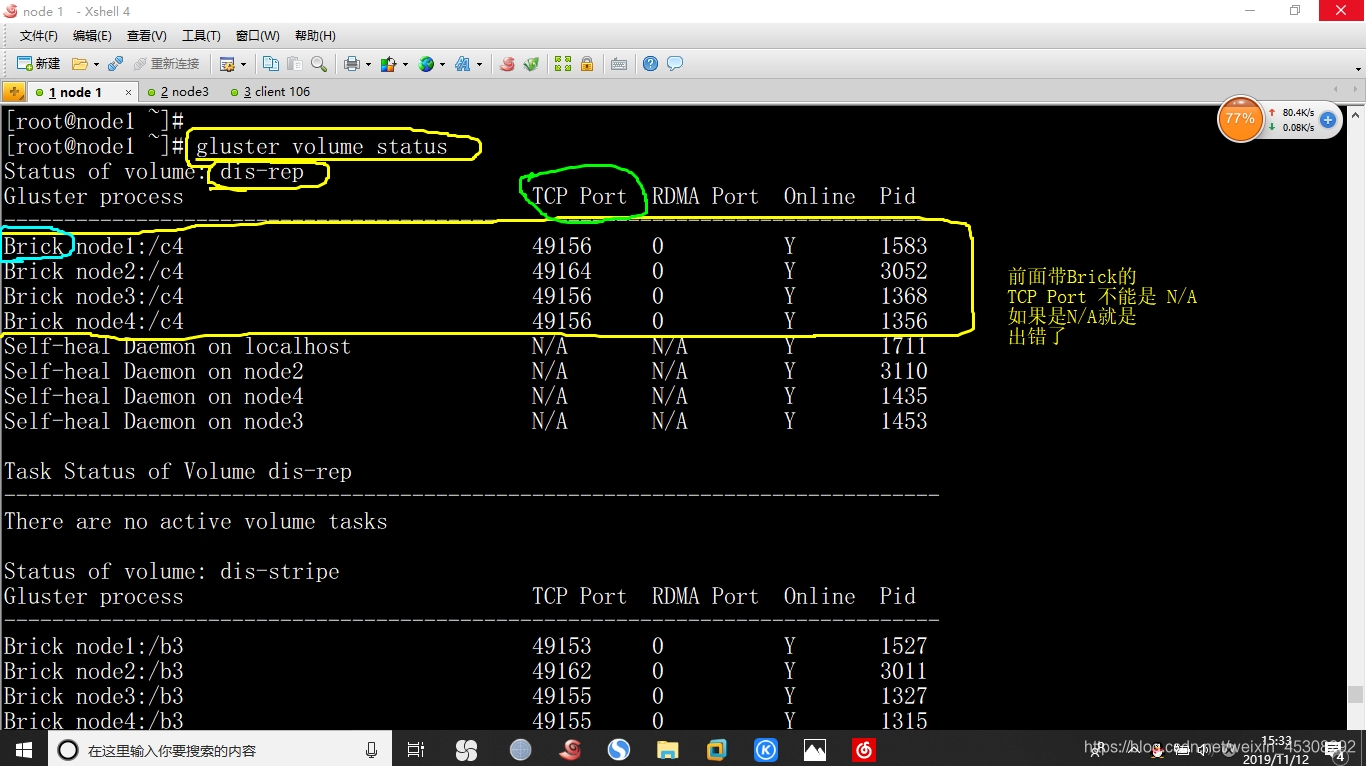
3.查看卷的状态
[root@node1 ~]# gluster volume status
2)停止/删除卷
[root@node1 ~]# gluster volume stop dis-volume (删除之前,需要先停止卷)
Stopping volume will make its data inaccessible. Do you want to continue? (y/n) y
volume stop: dis-volume: success
[root@node1 ~]# gluster volume delete dis-volume (删除卷)
Deleting volume will erase all information about the volume. Do you want to continue? (y/n) y
volume delete: dis-volume: success
3)设置卷的访问控制
只允许192.168.100.0网段客户机访问dis-rep卷
[root@node1 ~]# gluster volume set dis-rep auth.allow 192.168.100.*
volume set: success
可能出现的故障排错
如果中途node节点虚拟机重启了,会发现客户机挂载不上了,
首先在所有node节点中都运行,如下命令查看,应该都是开的才对
[root@node1 ~]# systemctl status glusterd
如果不是开的,打开这个服务
然后,到随意的node中运行如下命令,停止卷再启动,就可以挂载上了
所有的卷都要停止再启动才可以全部挂载上
[root@node1 ~]# gluster volume stop dis-rep
Stopping volume will make its data inaccessible. Do you want to continue? (y/n) y
volume stop: dis-rep: success
[root@node1 ~]# gluster volume start dis-rep
volume start: dis-rep: success
然后,有的时候,虚拟机没有重启,就是挂载不上
首先检查客户机hosts文件,如果不行,一般都是node那里没有启动卷,启动即可
可以通过这个命令查看卷的状态,然后启动相应的卷
[root@node1 ~]# gluster volume info
[root@node1 ~]# gluster volume start dis-rep
volume start: dis-rep: success
