一,分布式文件系统理论基础
1.1 分布式文件系统出现
- 计算机通过文件系统管理,存储数据,而现在数据信息爆炸的时代中人们可以获取的数据成指数倍的增长,单纯通过增加硬盘个数来扩展计算机文件系统的存储容量的方式,已经不能满足目前的需求。
- 分布式文件系统可以有效解决数据的存储和管理难题,将固定于某个地点的某个文件系统,扩展到任意多个地点/多个文件系统,众多的节点组成一个文件系统网络。每个节点可以分布在不同的地点,通过网络进行节点间的通信和数据传输。人们在使用分布式文件系统时,无需关心数据是存储在哪个节点上,或者是从哪个节点从获取的,只需要像使用本地文件系统一样管理和存储文件系统中的数据。
1.2 典型代表NFS
NFS(Network File System)即网络文件系统,它允许网络中的计算机之间通过TCP/IP网络共享资源。在NFS的应用中,本地NFS的客户端应用可以透明地读写位于远端NFS服务器上的文件,就像访问本地文件一样。NFS的优点如下:
(1)节约使用的磁盘空间
客户端经常使用的数据可以集中存放在一台机器上,并使用NFS发布,那么网络内部所有计算机可以通过网络访问,不必单独存储。
(2)节约硬件资源
NFS还可以共享软驱,CDROM和ZIP等的存储设备,减少整个网络上的可移动设备的数量。
(3)用户主目录设定
对于特殊用户,如管理员等,为了管理的需要,可能会经常登陆到网络中所有的计算机,若每个客户端,均保存这个用户的主目录很繁琐,而且不能保证数据的一致性。实际上,经过NFS服务的设定,然后在客户端指定这个用户的主目录位置,并自动挂载,就可以在任何计算机上使用用户主目录的文件。
1.3 面临的问题
存储空间不足,需要更大容量的存储
直接用NFS挂载存储,有一定风险,存在单点故障
某些场景不能满足需求,大量的访问磁盘IO是瓶颈
1.4 GlusterFS概述
- GlusterFS是Scale-Out存储解决方案Gluster的核心,它是一个开源的分布式文件系统,具有强大的横向扩展能力,通过扩展能够支持数PB存储容量和处理数千客户端。GlusterFS借助TCP/IP或InfiniBand RDMA网络将物理分布的存储资源聚集在一起,使用单一全局命名空间来管理数据。
- GlusterFS支持运行在任何标准IP网络上标准应用程序的标准客户端,用户可以在全局统一的命令空间中使用NFS/CIFS等标准协议来访问应用程序。GlusterFS使得用户可摆脱原有的独立,高成本的封闭存储系统,能够利用普通廉价的存储设备来部署可集中管理,横向扩展,虚拟化的存储池,存储容量可扩展至TB/PB级。
- 目前glusterfs已被redhat收购,它的官方网站是:http://www.gluster.org/
超高性能(64个节点时吞吐量也就是带宽甚至达到32GB/s)

1.5 GlusterFS企业主要应用场景
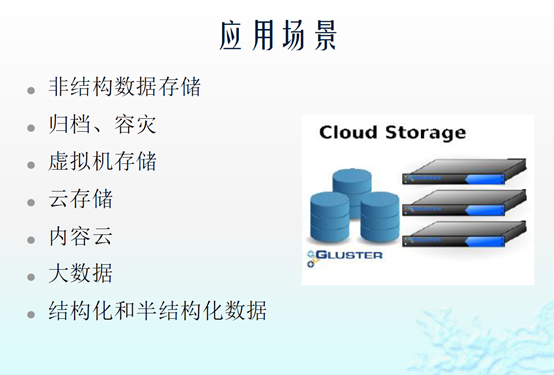

理论和实践上分析,GlusterFS目前主要适用大文件存储场景,对于小文件尤其是海量小文件(小于1M),存储效率和访问性能都表现不佳。海量小文件LOSF问题是工业界和学术界公认的难题,GlusterFS作为通用的分布式文件系统,并没有对小文件作额外的优化措施(小于1M),性能不好也是可以理解的。
- Media
文档,图片,音频,视频
- Shared storage
云存储,虚拟化存储,HPC(高性能计算)
- Big data
日志文件,RFID(射频识别)数据
二,部署安装
2.1 GlusterFS 安装前的准备
- 电脑一台,内存>=4G,可用磁盘空间大于50G
- 安装VMWARE Workstation虚拟机软件
- 安装好四台CentOS-6-x86_64(6.2-6.8都可以)的虚拟机
- 基本系统:1核CPU+1024M内存+10G硬盘
- 网络选择:网络地址转换(NAT)
- 关闭iptables和SELinux
- 预装glusterfs软件包
| 描述 |
IP |
主机名 |
需求 |
| Linux_node1 |
10.1.1.136 |
Glusterfs01 |
多添加两块各10G的sdb和sdc |
| Linux_node2 |
10.1.1.137 |
Glusterfs02 |
多添加两块各10G的sdb和sdc |
| Linux_node3 |
10.1.1.138 |
Glusterfs03 |
多添加两块各10G的sdb和sdc |
| Linux_node4 |
10.1.1.139 |
Glusterfs04 |
多添加两块各10G的sdb和sdc |
- #为了实验的准确性,请尽量和我用一个版本的Linux操作系统
- #并用实验给的rpm包作为yum源
以下01上的操作步骤,其他三台服务器也要做
[root@Glusterfs01 ~]# cat /etc/redhat-release
CentOS release 6.5 (Final)
[root@Glusterfs01 ~]# uname -r
2.6.32-431.el6.x86_64
[root@Glusterfs01 ~]# cd rpm/
[root@Glusterfs01 rpm]# ls
dbench-4.0-12.el6.x86_64.rpm
glusterfs-3.7.20-1.el6.x86_64.rpm
glusterfs-api-3.7.20-1.el6.x86_64.rpm
glusterfs-api-devel-3.7.20-1.el6.x86_64.rpm
glusterfs-cli-3.7.20-1.el6.x86_64.rpm
glusterfs-client-xlators-3.7.20-1.el6.x86_64.rpm
glusterfs-coreutils-0.0.1-0.1.git0c86f7f.el6.x86_64.rpm
glusterfs-coreutils-0.2.0-1.el6_37.x86_64.rpm
glusterfs-devel-3.7.20-1.el6.x86_64.rpm
glusterfs-extra-xlators-3.7.20-1.el6.x86_64.rpm
glusterfs-fuse-3.7.20-1.el6.x86_64.rpm
glusterfs-ganesha-3.7.20-1.el6.x86_64.rpm
glusterfs-geo-replication-3.7.20-1.el6.x86_64.rpm
glusterfs-libs-3.7.20-1.el6.x86_64.rpm
glusterfs-rdma-3.7.20-1.el6.x86_64.rpm
glusterfs-resource-agents-3.7.20-1.el6.noarch.rpm
glusterfs-server-3.7.20-1.el6.x86_64.rpm
keyutils-1.4-5.el6.x86_64.rpm
keyutils-libs-1.4-5.el6.x86_64.rpm
libaio-0.3.107-10.el6.x86_64.rpm
libevent-1.4.13-4.el6.x86_64.rpm
libgssglue-0.1-11.el6.x86_64.rpm
libntirpc-1.3.1-1.el6.x86_64.rpm
libntirpc-devel-1.3.1-1.el6.x86_64.rpm
libtirpc-0.2.1-13.el6_9.x86_64.rpm
nfs-utils-1.2.3-75.el6_9.x86_64.rpm
nfs-utils-lib-1.1.5-13.el6.x86_64.rpm
python-argparse-1.2.1-2.1.el6.noarch.rpm
python-gluster-3.7.20-1.el6.noarch.rpm
pyxattr-0.5.0-1.el6.x86_64.rpm
rpcbind-0.2.0-13.el6_9.1.x86_64.rpm
rsync-3.0.6-12.el6.x86_64.rpm
userspace-rcu-0.7.16-2.el6.x86_64.rpm
userspace-rcu-0.7.7-1.el6.x86_64.rpm
userspace-rcu-devel-0.7.16-2.el6.x86_64.rpm
userspace-rcu-devel-0.7.7-1.el6.x86_64.rpm
[root@Glusterfs01 rpm]# yum -y install createrepo
[root@Glusterfs01 rpm]# createrepo -v .
2.2 GlusterFS 安装
2.2.1 修改主机名
略
2.2.2 添加hosts文件实现集群主机之间相互能够解析
[root@Glusterfs01 ~]# vim /etc/hosts
[root@Glusterfs01 ~]# cat /etc/hosts
127.0.0.1 localhost localhost.localdomain localhost4 localhost4.localdomain4
::1 localhost localhost.localdomain localhost6 localhost6.localdomain6
10.1.1.136 glusterfs01
10.1.1.137 glusterfs02
10.1.1.138 glusterfs03
10.1.1.139 glusterfs04
2.2.3 关闭selinux和防火墙
[root@Glusterfs01~]# service iptables stop
[root@Glusterfs01 ~]# chkconfig iptables off
[root@Glusterfs01 ~]# setenforce 0
setenforce: SELinux is disabled
关闭selinux:sed -i 's#SELINUX=enforcing#SELINUX=disabled#' /etc/sysconfig/selinux
2.2.4 利用教程附带的rpm软件包组,充当本地定制化yum源
[root@Glusterfs01 rpm]# cd /etc/yum.repos.d/
[root@Glusterfs01 yum.repos.d]# vim CentOS-Media.repo
[root@Glusterfs01 yum.repos.d]# cat CentOS-Media.repo | grep -v "#"
[c6-media]
name=CentOS-$releasever - Media
baseurl=file:///media/CentOS/
file:///media/cdrom/
file:///media/cdrecorder/
gpgcheck=1
enabled=0
gpgkey=file:///etc/pki/rpm-gpg/RPM-GPG-KEY-CentOS-6
[rpm]
name=rpm
baseurl=file:///root/rpm
gpgcheck=0
enabled=1
[root@Glusterfs01 yum.repos.d]# yum -y clean all && yum makecache
[root@Glusterfs01 yum.repos.d]# yum -y install glusterfs-server glusterfs-cli glusterfs-geo-r
eplication
2.3 配置glusterfs
2.3.1 查看glusterfs版本信息
[root@Glusterfs01 ~]# which glusterfs
/usr/sbin/glusterfs
[root@Glusterfs01 ~]# glusterfs -V
glusterfs 3.7.20 built on Jan 30 2017 15:39:27
Repository revision: git://git.gluster.com/glusterfs.git
Copyright (c) 2006-2013 Red Hat, Inc. <http://www.redhat.com/>
GlusterFS comes with ABSOLUTELY NO WARRANTY.
It is licensed to you under your choice of the GNU Lesser
General Public License, version 3 or any later version (LGPLv3
or later), or the GNU General Public License, version 2 (GPLv2),
in all cases as published by the Free Software Foundation.
2.3.2 启动停止服务
[root@Glusterfs01 ~]# /etc/init.d/glusterd status
glusterd is stopped
[root@Glusterfs01 ~]# /etc/init.d/glusterd start
Starting glusterd: [ OK ]
[root@Glusterfs01 ~]# /etc/init.d/glusterd stop
Stopping glusterd: [ OK ]
[root@Glusterfs01 ~]# /etc/init.d/glusterd start
Starting glusterd: [ OK ]
[root@Glusterfs01 ~]# chkconfig glusterd on #添加开机启动
2.3.3 存储主机加入信任存储池
虚拟机添加信任存储池
特别提示:只需要让一个虚拟机进行添加操作即可。但自己并不需要添加信任自己
确保所有的虚拟机的glusterd服务都处于开启状态,然后执行如下操作
[root@Glusterfs01 ~]# gluster peer probe glusterfs02
peer probe: success.
[root@Glusterfs01 ~]# gluster peer probe glusterfs03
peer probe: success.
[root@Glusterfs01 ~]# gluster peer probe glusterfs04
peer probe: success.
2.3.4 查看虚拟机信任状态添加结果
[root@Glusterfs01 ~]# gluster peer status
Number of Peers: 3
Hostname: glusterfs02
Uuid: 7dd28ae9-f31d-4b86-9c82-1e40afac7968
State: Peer in Cluster (Connected)
Hostname: glusterfs03
Uuid: 6cb71933-f9d1-436d-90e0-06d505f9838b
State: Peer in Cluster (Connected)
Hostname: glusterfs04
Uuid: d983c0c1-5f58-4e2b-87ec-9448b3fa49e6
State: Peer in Cluster (Connected)
这时我们可以查看每台虚拟机的信任状态,他们此时彼此都应该已经互有信任记录了
2.3.5 配置前的准备工作
在企业里我们还需要分区然后才能进行格式化。但是我们这里就省略了,我们直接格式化每台虚拟机的那块10G硬盘。
[root@Glusterfs01 ~]# ll /dev/sd*
brw-rw---- 1 root disk 8, 0 Jan 1 00:55 /dev/sda
brw-rw---- 1 root disk 8, 1 Jan 1 00:55 /dev/sda1
brw-rw---- 1 root disk 8, 2 Jan 1 00:55 /dev/sda2
brw-rw---- 1 root disk 8, 16 Jan 1 00:55 /dev/sdb
brw-rw---- 1 root disk 8, 32 Jan 1 00:55 /dev/sdc
[root@Glusterfs01 ~]# mkfs.ext4 /dev/sdb
mke2fs 1.41.12 (17-May-2010)
/dev/sdb is entire device, not just one partition!
Proceed anyway? (y,n) y
Filesystem label=
OS type: Linux
Block size=4096 (log=2)
Fragment size=4096 (log=2)
Stride=0 blocks, Stripe width=0 blocks
655360 inodes, 2621440 blocks
131072 blocks (5.00%) reserved for the super user
First data block=0
Maximum filesystem blocks=2684354560
80 block groups
32768 blocks per group, 32768 fragments per group
8192 inodes per group
Superblock backups stored on blocks:
32768, 98304, 163840, 229376, 294912, 819200, 884736, 1605632
Writing inode tables: done
Creating journal (32768 blocks): done
Writing superblocks and filesystem accounting information: done
This filesystem will be automatically checked every 22 mounts or
180 days, whichever comes first. Use tune2fs -c or -i to override.
在四台机器上执行mkdir -p /gluster/brick1 建立挂在块设备的目录
挂载磁盘到文件系统(4台都做,步骤相同)
[root@Glusterfs01 ~]# mkdir -p /gluster/brick1
[root@Glusterfs01 ~]# mount /dev/sdb /gluster/brick1
[root@Glusterfs01 ~]# df -h
Filesystem Size Used Avail Use% Mounted on
/dev/mapper/vg_mini-lv_root 36G 1.1G 33G 4% /
tmpfs 931M 0 931M 0% /dev/shm
/dev/sda1 485M 33M 427M 8% /boot
/dev/sr0 4.2G 4.2G 0 100% /media/cdrom
/dev/sdb 9.9G 151M 9.2G 2% /gluster/brick1
继续重复以上步骤,将第二块磁盘sdc格式化,并挂载到每台虚拟机的/gluster/brick2上
4台虚拟机加入开机自动挂载
[root@Glusterfs01 ~]# echo "mount /dev/sdb /gluster/brick1" >> /etc/rc.local
[root@Glusterfs01 ~]# echo "mount /dev/sdc /gluster/brick2" >> /etc/rc.local
2.3.6 创建volume分布式卷
- 基本卷:
- 分布式卷(Distributed):(相当于raid0读写速度)
- 复制卷(Replicated):(相当于raid1)
- 条带式卷(Striped):(针对大文件才会用)
- 复合卷:
- 分布式复制卷(Distributed Replicated):(相当于raid1+0)
- 分布式条带卷(Distributed Striped):(针对大文件)
- 复制条带卷(Replicated Striped):
- 分布式复制条带卷(Distributed Replicated Striped):(最安全的)
创建分布式卷(在glusterfs01上操作)
[root@Glusterfs01 ~]# gluster volume create gs1 glusterfs01:/gluster/brick1 gluste
rfs02:/gluster/brick1 forcevolume create: gs1: success: please start the volume to access data
启动创建的卷(在glusterfs01上操作)
[root@Glusterfs01 ~]# gluster volume start gs1
volume start: gs1: success
然后我们发现4台虚拟机都能看到如下信息(在任意虚拟机上操作)
[root@Glusterfs03 ~]# gluster volume info
Volume Name: gs1 #卷名
Type: Distribute #分布式
Volume ID: cfca2f8b-a522-49ae-9f46-b1f50ac61f81 #ID号
Status: Started #启动状态
Number of Bricks: 2 #一共两个块设备
Transport-type: tcp #tcp的连接方式
Bricks: #块信息
Brick1: glusterfs01:/gluster/brick1
Brick2: glusterfs02:/gluster/brick1
Options Reconfigured:
performance.readdir-ahead: on
2.3.7 volume的两种挂载方式
(1)以glusterfs方式挂载
挂载卷到目录(在glusterfs01上操作),将本地的分布式卷gs1挂载到/mnt目录下
[root@Glusterfs01 ~]# mount -t glusterfs 127.0.0.1:/gs1 /mnt
[root@Glusterfs01 ~]# df -h
Filesystem Size Used Avail Use% Mounted on
/dev/mapper/vg_mini-lv_root 36G 1.1G 33G 4% /
tmpfs 931M 0 931M 0% /dev/shm
/dev/sda1 485M 33M 427M 8% /boot
/dev/sr0 4.2G 4.2G 0 100% /media/cdrom
/dev/sdb 9.9G 151M 9.2G 2% /gluster/brick1
/dev/sdc 9.9G 151M 9.2G 2% /gluster/brick2
127.0.0.1:/gs1 20G 302M 19G 2% /mnt #挂载成功,我们看到磁盘空间已经整合
在挂载好的/mnt目录里创建实验文件(在glusterfs01上操作)
[root@Glusterfs01 ~]# touch /mnt/{1..5}
[root@Glusterfs01 ~]# ls /mnt
1 2 3 4 5 lost+found
在其他虚拟机上挂载分布式卷gs1,查看同步挂载结果
[root@Glusterfs04 ~]# mount -t glusterfs 127.0.0.1:/gs1 /mnt
[root@Glusterfs04 ~]# df -h
Filesystem Size Used Avail Use% Mounted on
/dev/mapper/vg_mini-lv_root 36G 1.1G 33G 4% /
tmpfs 931M 0 931M 0% /dev/shm
/dev/sda1 485M 33M 427M 8% /boot
/dev/sr0 4.2G 4.2G 0 100% /media/cdrom
/dev/sdb 9.9G 151M 9.2G 2% /gluster/brick1
/dev/sdc 9.9G 151M 9.2G 2% /gluster/brick2
127.0.0.1:/gs1 20G 302M 19G 2% /mnt
[root@Glusterfs04 ~]# ls /mnt
1 2 3 4 5 lost+found
去其他节点上看这5个文件到底在哪
[root@Glusterfs01 ~]# ll -d /gluster/brick1
drwxr-xr-x 5 root root 4096 Jan 1 04:25 /gluster/brick1
[root@Glusterfs01 ~]# ls /gluster/brick1
1 5 lost+found
[root@Glusterfs02 ~]# ls /gluster/brick1
2 3 4 lost+found
我们发现文件都是分布式写的,互相不重复,就意味着可以它可以并发写,但是这种情况下坏一个数据就完了,就相当于raid0,分布卷直接组5张盘的话,就会同时往5个盘里写,读写速度是5倍。但是其中坏一个盘数据就完了,这就是分布卷。
(2)以NFS方式进行挂载
在挂载之前我们先来看一下如何打开glusterfs的NFS挂载方式
在glusterfs01上执行如下操作
[root@Glusterfs01 ~]# gluster volume status #查看分布式卷的状态
Status of volume: gs1
Gluster process TCP Port RDMA Port Online Pid
------------------------------------------------------------------------------
Brick glusterfs01:/gluster/brick1 49152 0 Y 2815
Brick glusterfs02:/gluster/brick1 49152 0 Y 2035
NFS Server on localhost N/A N/A N N/A #本地分布式卷NFS挂载未开启
NFS Server on glusterfs02 N/A N/A N N/A
NFS Server on glusterfs03 N/A N/A N N/A
NFS Server on glusterfs04 N/A N/A N N/A
Task Status of Volume gs1
------------------------------------------------------------------------------
There are no active volume tasks
以上结果是是什么原因呢?
如果NFS Server的挂载端口显示N/A表示未开启挂载功能,这是由于要先进行nfs挂载是需要装两个nfs的软件包的rpcbind和nfs-utils
当然就算系统装了这两个软件包,那么我们也需要开启rpcbind服务,然后在重启glusterfs服务才能够进行nfs挂载的操作。
现在我们就来开启glusterfs01的nfs挂载功能,如下:
在glusterfs01上执行如下操作
[root@Glusterfs01 ~]# rpm -qa nfs-utils #查看是否安装nfs-utils
nfs-utils-1.2.3-75.el6_9.x86_64
[root@Glusterfs01 ~]# rpm -qa rpcbind #查看是否安装rpcbind
rpcbind-0.2.0-13.el6_9.1.x86_64
[root@Glusterfs01 ~]# /etc/init.d/rpcbind status #查看rpcbind服务状态
rpcbind is stopped
[root@Glusterfs01 ~]# /etc/init.d/rpcbind start #开启rpcbind服务
Starting rpcbind: [ OK ]
[root@Glusterfs01 ~]# /etc/init.d/glusterd stop #停止glusterd服务
Stopping glusterd: [ OK ]
[root@Glusterfs01 ~]# /etc/init.d/glusterd start #开启glusterd服务
Starting glusterd: [ OK ]
这里需要等几秒再查看,就会发现nfs挂载方式开启了
[root@Glusterfs01 ~]# gluster volume status
Status of volume: gs1
Gluster process TCP Port RDMA Port Online Pid
------------------------------------------------------------------------------
Brick glusterfs01:/gluster/brick1 49152 0 Y 2815
Brick glusterfs02:/gluster/brick1 49152 0 Y 2035
NFS Server on localhost 2049 0 Y 3352 #已经开启
NFS Server on glusterfs03 N/A N/A N N/A
NFS Server on glusterfs04 N/A N/A N N/A
NFS Server on glusterfs02 N/A N/A N N/A
Task Status of Volume gs1
------------------------------------------------------------------------------
There are no active volume tasks
为了验证再起一台虚拟机,充当realserver,web节点,把realserver节点打开
WebClient 10.1.1.140
接下来,我们尝试在准备好的第五台虚拟机WebClient上进行nfs方式的挂载
在WebClient上进行如下操作(客户端要有nfs-utils)
[root@WebClient ~]# rpm -qa nfs-utils
[root@WebClient ~]# mount /dev/sr0 /media/cdrom/
mount: block device /dev/sr0 is write-protected, mounting read-only
[root@WebClient ~]# yum -y install nfs-utils
[root@WebClient ~]# mount -t nfs 10.1.1.136:/gs1 /mnt #以nfs方式远程挂载分布式卷
mount.nfs: rpc.statd is not running but is required for remote locking.
mount.nfs: Either use '-o nolock' to keep locks local, or start statd.
mount.nfs: an incorrect mount option was specified
[root@WebClient ~]# mount -o nolock -t nfs 10.1.1.136:/gs1 /mnt #根据提示我们加上-o nolock参数
[root@WebClient ~]# df -hT
Filesystem Type Size Used Avail Use% Mounted on
/dev/mapper/vg_mini-lv_root ext4 36G 1.1G 33G 4% /
tmpfs tmpfs 931M 0 931M 0% /dev/shm
/dev/sda1 ext4 485M 33M 427M 8% /boot
/dev/sr0 iso9660 4.2G 4.2G 0 100% /media/cdrom
10.1.1.136:/gs1 nfs 20G 301M 19G 2% /mnt
[root@WebClient ~]# ls /mnt #挂载成功
1 2 3 4 5 lost+found
2.3.8 创建分布式复制卷
在glusterfs任意虚拟机上进行如下操作
[root@Glusterfs01 ~]# gluster volume create gs2 replica 2 glusterfs03:/gluster
/brick1 glusterfs04:/gluster/brick1 forcevolume create: gs2: success: please start the volume to access data
[root@Glusterfs01 ~]# gluster volume info gs2
Volume Name: gs2
Type: Replicate #复制卷
Volume ID: 44a22292-faa6-4dd1-8ed5-9038e8e01d1f
Status: Created
Number of Bricks: 1 x 2 = 2
Transport-type: tcp
Bricks:
Brick1: glusterfs03:/gluster/brick1
Brick2: glusterfs04:/gluster/brick1
Options Reconfigured:
performance.readdir-ahead: on
[root@Glusterfs01 ~]# gluster volume start gs2 #启动卷
volume start: gs2: success
[root@Glusterfs01 ~]# umount /mnt
[root@Glusterfs01 ~]# df -hT
Filesystem Type Size Used Avail Use% Mounted on
/dev/mapper/vg_mini-lv_root ext4 36G 1.1G 33G 4% /
tmpfs tmpfs 931M 0 931M 0% /dev/shm
/dev/sda1 ext4 485M 33M 427M 8% /boot
/dev/sr0 iso9660 4.2G 4.2G 0 100% /media/cdrom
/dev/sdb ext4 9.9G 151M 9.2G 2% /gluster/brick1
/dev/sdc ext4 9.9G 151M 9.2G 2% /gluster/brick2
[root@Glusterfs01 ~]# mount -t glusterfs 127.0.0.1:gs2 /mnt
[root@Glusterfs01 ~]# df -hT
Filesystem Type Size Used Avail Use% Mounted on
/dev/mapper/vg_mini-lv_root ext4 36G 1.1G 33G 4% /
tmpfs tmpfs 931M 0 931M 0% /dev/shm
/dev/sda1 ext4 485M 33M 427M 8% /boot
/dev/sr0 iso9660 4.2G 4.2G 0 100% /media/cdrom
/dev/sdb ext4 9.9G 151M 9.2G 2% /gluster/bri
ck1/dev/sdc ext4 9.9G 151M 9.2G 2% /gluster/bri
ck2127.0.0.1:gs2 fuse.glusterfs 9.9G 151M 9.2G 2% /mnt
创建文件测试
[root@Glusterfs01 ~]# touch /mnt/{1..6}
[root@Glusterfs01 ~]# ls /mnt/
1 2 3 4 5 6 lost+found
再看看它是怎么存的
[root@Glusterfs03 ~]# ls /gluster/brick1
1 2 3 4 5 6 lost+found
[root@Glusterfs04 ~]# ls /gluster/brick1
1 2 3 4 5 6 lost+found
复制卷,这就是raid1。安全,但是容量减半
分布式复制卷,这里测试只用了两个,如果用四个就会出现它是两两组合的,两个之间是共享,两个1之间又是0,又是分布式的。这就是分布式复制卷。
2.3.9 创建分布式条带卷
[root@Glusterfs01 ~]# gluster volume create gs3 stripe 2 glusterfs01:/gluste
r/brick2 glusterfs02:/gluster/brick2 forcevolume create: gs3: success: please start the volume to access data
[root@Glusterfs01 ~]# gluster volume start gs3
volume start: gs3: success
[root@Glusterfs01 ~]# gluster volume info gs3
Volume Name: gs3
Type: Stripe #条带卷
Volume ID: d3f57ff2-6968-46eb-8ab4-e0bfef747551
Status: Started
Number of Bricks: 1 x 2 = 2
Transport-type: tcp
Bricks:
Brick1: glusterfs01:/gluster/brick2
Brick2: glusterfs02:/gluster/brick2
Options Reconfigured:
performance.readdir-ahead: on
三,进行条带卷的数据写入测试
[root@Glusterfs01 ~]# umount /mnt
[root@Glusterfs01 ~]# mount -t glusterfs 127.0.0.1:/gs3 /mnt
[root@Glusterfs01 ~]# ls /mnt/
lost+found
[root@Glusterfs01 ~]# df -Th
Filesystem Type Size Used Avail Use% Mounted on
/dev/mapper/vg_mini-lv_root ext4 36G 1.1G 33G 4% /
tmpfs tmpfs 931M 0 931M 0% /dev/shm
/dev/sda1 ext4 485M 33M 427M 8% /boot
/dev/sr0 iso9660 4.2G 4.2G 0 100% /media/cdrom
/dev/sdb ext4 9.9G 151M 9.2G 2% /gluster/brick1
/dev/sdc ext4 9.9G 151M 9.2G 2% /gluster/brick2
127.0.0.1:/gs3 fuse.glusterfs 20G 302M 19G 2% /mnt
创建大小为256M的文件
[root@Glusterfs01 ~]# dd if=/dev/zero of=/mnt/test bs=1024 count=262144
262144+0 records in
262144+0 records out
268435456 bytes (268 MB) copied, 22.295 s, 12.0 MB/s
[root@Glusterfs01 ~]# ls /mnt
lost+found test
[root@Glusterfs01 ~]# du -sh /mnt/test
256M /mnt/test
[root@Glusterfs01 ~]# ls /gluster/brick2
lost+found test
[root@Glusterfs01 ~]# du -sh /gluster/brick2/test
129M /gluster/brick2/test
条带卷会把大文件给分半,之前的分布式卷他是按文件个数,不会把单个文件给拆分,但是条带卷针对大文件它会分半,所以条带卷是专门针对大文件大数据用的
综上,我们得知:
分布式卷的数据存储方式是将数据平均写入到每个整合的磁盘中,类似于raid0,写入速度快,但这样磁盘一旦损坏没有纠错能力。
分布式复制卷的数据存储方式为,每个整合的磁盘中都写入同样的数据内容,类似于raid1,数据非常安全,读取性能高,占磁盘容量。
我们发现分布式条带卷,是将数据的容量平均分配到了每个整合的磁盘节点上。大幅提高大文件的并发读访问。
四,存储卷中brick块设备的扩容
4.1 分布式复制卷的扩容
先将各个虚拟机上挂载的卸载掉,免得有处于使用状态的
[root@Glusterfs01 ~]# umount /mnt
[root@Glusterfs01 ~]# gluster volume add-brick gs2 replica 2 glusterfs03:/gluster/brick2 gluste
rfs04:/gluster/brick2 force #添加两个块
volume add-brick: success
[root@Glusterfs01 ~]# gluster volume info gs2
Volume Name: gs2
Type: Distributed-Replicate
Volume ID: 44a22292-faa6-4dd1-8ed5-9038e8e01d1f
Status: Started
Number of Bricks: 2 x 2 = 4 #已经扩容
Transport-type: tcp
Bricks:
Brick1: glusterfs03:/gluster/brick1
Brick2: glusterfs04:/gluster/brick1
Brick3: glusterfs03:/gluster/brick2
Brick4: glusterfs04:/gluster/brick2
Options Reconfigured:
performance.readdir-ahead: on
特别提示:
对分布式复制卷和分布式条带卷进行扩容时,要特别注意,如果创建卷之初的时候选择的是replica 2 或者stripe 2。那么扩容时,就必须一次性扩容两个或两个的倍数的块设备。
例如你给一个分布式复制卷的replica为2,你在增加bricks的时候数量必须为2,4,6,8等。
4.2 查看扩容后的容量并进行写入测试
在WebClient上挂载gs2并查看挂载目录的容量
[root@WebClient ~]# mount -o nolock -t nfs 10.1.1.136:/gs2 /mnt
[root@WebClient ~]# df -Th
Filesystem Type Size Used Avail Use% Mounted on
/dev/mapper/vg_mini-lv_root ext4 36G 1.1G 33G 4% /
tmpfs tmpfs 931M 0 931M 0% /dev/shm
/dev/sda1 ext4 485M 33M 427M 8% /boot
/dev/sr0 iso9660 4.2G 4.2G 0 100% /media/cdrom
10.1.1.136:/gs2 nfs 20G 301M 19G 2% /mnt
我们再次写入数据
在WebClient上进行数据写入操作
[root@Glusterfs01 ~]# gluster volume info gs2
Volume Name: gs2
Type: Distributed-Replicate
Volume ID: 44a22292-faa6-4dd1-8ed5-9038e8e01d1f
Status: Started
Number of Bricks: 2 x 2 = 4
Transport-type: tcp
Bricks:
Brick1: glusterfs03:/gluster/brick1
Brick2: glusterfs04:/gluster/brick1
Brick3: glusterfs03:/gluster/brick2
Brick4: glusterfs04:/gluster/brick2
Options Reconfigured:
performance.readdir-ahead: on
看真实存储
[root@Glusterfs03 ~]# ls /gluster/brick1
1 2 3 4 5 6 lost+found
[root@Glusterfs03 ~]# ls /gluster/brick2
lost+found
[root@Glusterfs04 ~]# ls /gluster/brick1
1 2 3 4 5 6 lost+found
[root@Glusterfs04 ~]# ls /gluster/brick2
lost+found
brick2都是空的也就是说,我们启用的新节点没有进行复制
现在往里面写入数据,从11写到20,看它是怎么存的
[root@WebClient ~]# touch /mnt/{11..20}
[root@WebClient ~]# ls /mnt
1 11 12 13 14 15 16 17 18 19 2 20 3 4 5 6 lost+found
再看看他是怎么存的
[root@Glusterfs03 ~]# ls /gluster/brick1
1 11 12 13 14 15 16 17 18 19 2 20 3 4 5 6 lost+found
[root@Glusterfs03 ~]# ls /gluster/brick2
lost+found
[root@Glusterfs04 ~]# ls /gluster/brick1
1 11 12 13 14 15 16 17 18 19 2 20 3 4 5 6 lost+found
[root@Glusterfs04 ~]# ls /gluster/brick2
lost+found
没有写到brick2里面去,因为我们添加节点没有进行同步操作,现在咱们把新的节点加进去了,但是他的这个gs2还不认得,我们需要做一次磁盘平衡
通过对扩容的gs2进行写入测试,我们发现数据并没有被写入到新加入的块设备中,这是为什么?
这是因为,为了数据的安全,新扩容块设备的卷,默认必须先做一次磁盘平衡(块设备同步),如此才能正常开始使用。
4.3 进行磁盘存储的平衡
注意:平衡布局是很有必要的,因为布局结构是静态的,当新的bricks加入现有卷,新创建的文件会分布到旧的bricks中,所以需要平衡布局结构,使新加入的bricks生效。布局平衡只是使新布局生效,并不会在新的布局移动老的数据,如果你想在新布局生效后,重新平衡卷中的数据,还需要对卷中的数据进行平衡。
对gs2进行磁盘存储平衡
[root@Glusterfs01 ~]# gluster volume rebalance gs2 start
volume rebalance: gs2: success: Rebalance on gs2 has been started successfully. Use
rebalance status command to check status of the rebalance process.ID: 94c7cd2b-4a1f-4609-b371-06e18e077b1f
检查gs2块设备磁盘平衡结果
[root@Glusterfs03 ~]# ls /gluster/brick1
12 14 15 16 17 2 3 4 6 lost+found
[root@Glusterfs03 ~]# ls /gluster/brick2
1 11 13 18 19 20 5 lost+found
[root@Glusterfs04 ~]# ls /gluster/brick1
12 14 15 16 17 2 3 4 6 lost+found
[root@Glusterfs04 ~]# ls /gluster/brick2
1 11 13 18 19 20 5 lost+found
执行磁盘存储平衡以后,我们发现数据被复制成了4份在4个块设备中
在测试一下
[root@WebClient ~]# touch /mnt/{30..35}
[root@WebClient ~]# ls /mnt
1 12 14 16 18 2 3 31 33 35 5 lost+found
11 13 15 17 19 20 30 32 34 4 6
[root@Glusterfs03 ~]# ls /gluster/brick1
12 14 15 16 17 2 3 30 31 32 33 34 35 4 6 lost+found
[root@Glusterfs03 ~]# ls /gluster/brick2
1 11 13 18 19 20 5 lost+found
[root@Glusterfs04 ~]# ls /gluster/brick1
12 14 15 16 17 2 3 30 31 32 33 34 35 4 6 lost+found
[root@Glusterfs04 ~]# ls /gluster/brick2
1 11 13 18 19 20 5 lost+found
之前做过磁盘平衡,现有数据平衡了,新写数据不平衡了。我们发现没有往里面写!为什么呢??
因为没做磁盘平衡之前,那边将gs2已经挂载上了,挂载过去的话实际上它的后方是端口对端口,也就是说他之前挂载过,只识别了03和04的brick1的端口,后来磁盘平衡以后由于我没有卸载再挂,所以它还是识别那两个端口(猜的,不然解释不通)
解决方法:磁盘平衡以后要重新挂载gs2
[root@WebClient ~]# umount /mnt
[root@WebClient ~]# mount -t nfs -o nolock 10.1.1.136:/gs2 /mnt
[root@WebClient ~]# rm -rf /mnt/*
[root@WebClient ~]# ls /mnt
[root@WebClient ~]# touch /mnt/{1..10}
[root@Glusterfs03 ~]# ls /gluster/brick1
10 2 3 4 6
[root@Glusterfs03 ~]# ls /gluster/brick2
1 5 7 8 9
[root@Glusterfs04 ~]# ls /gluster/brick1
10 2 3 4 6
[root@Glusterfs04 ~]# ls /gluster/brick2
1 5 7 8 9
成功了,扩容正常。
六,构建企业级分布式存储
6.1 硬件要求
一般选择2U的机型,磁盘STAT盘4T,如果I/O要求比较高,可以采购SSD固态硬盘。为了充分保证系统的稳定性和性能,要求所有glusterfs服务器硬件配置尽量一致,尤其是硬盘数量和大小。机器的RAID卡需要带电池,缓存越大,性能越好。一般情况下,建议做RAID10,如果出于空间要求考虑,需要做RAID5,建议最好能有1-2块硬盘的热备盘。
6.2 系统要求和分区划分
系统要求使用CentOS6.x,安装完成后升级到最新版本,安装的时候,不要使用LVM,建议/boot分区200M,根分区100G,swap分区和内存一样大小,剩余空间给gluster使用,划分单独的硬盘空间。系统安装软件没有特殊要求,建议除了开发工具和基本的管理软件,其他软件一律不装。
6.3 网络环境
网络要求全部千兆环境,gluster服务器至少有2块网卡,1块网卡绑定供gluster使用,剩余一块分配管理网络ip,用于系统管理。如果有条件购买万兆交换机,服务器配置万兆网卡,存储性能会更好。网络方面如果安全性要求高,可以多网卡绑定。
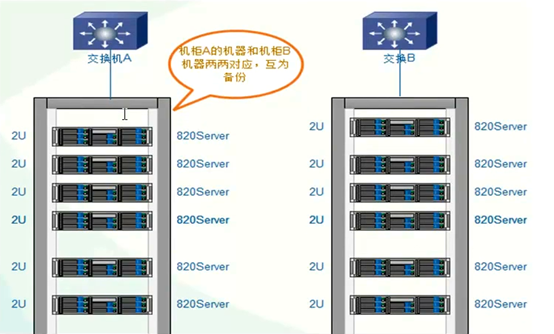
6.4 服务器摆放分布
服务器主备机器要放在不同的机柜,连接不同的交换机,即使一个机柜出现问题,还有一份数据正常访问。
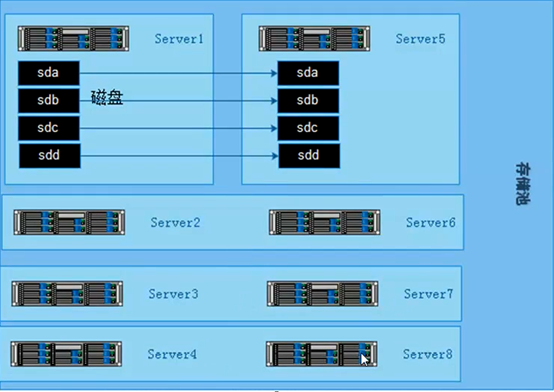
6.5 构建高性能,高可用存储
一般在企业中,采用的是分布式复制卷,因为有数据备份,数据相对安全,分布式条带卷目前对glusterfs来说没有完全成熟,存在一定的是数据安全风险。
6.5.1 开启防火墙端口
一般在企业应用中Linux防火墙是打开的,开通服务器之间访问的端口
iptables -I INPUT -p tcp --dport 24007:24011 -j ACCEPT
iptables -I INPUT -p tcp --dport 49152:49162 -j ACCEPT
[root@Glusterfs01 ~]# cat /etc/glusterfs/glusterd.vol
volume management
type mgmt/glusterd
option working-directory /var/lib/glusterd
option transport-type socket,rdma
option transport.socket.keepalive-time 10
option transport.socket.keepalive-interval 2
option transport.socket.read-fail-log off
option ping-timeout 0
option event-threads 1
# option base-port 49152 #默认端口可以在这里改,因为这个端口可能会和企业里的kvm端口冲突
end-volume
6.5.2 Glusterfs文件系统优化
| 参数项目 |
说明 |
缺省值 |
合法值 |
| Auth.allow |
IP访问授权 |
*(allow all) |
IP地址 |
| Cluster.min-free-disk |
剩余磁盘空间阈值 |
10% |
百分比 |
| Cluster.stripe-block-size |
条带大小 |
128KB |
字节 |
| Network.frame-timeout |
请求等待时间 |
1800s |
0-1800 |
| Network.ping-timeout |
客户端等待时间 |
42s |
0-42 |
| Nfs.disabled |
关闭NFS服务 |
Off |
Off|on |
| Performance.io-thread-count |
IO线程数 |
16 |
0-65 |
| Performance.cache-refresh-timeout |
缓存校验周期 |
1s |
0-61 |
| Performance.cache-size |
读缓存大小 |
32MB |
字节 |
Performance.quick-read:优化读取小文件的性能
Performance.read-ahead:用预读的方式提高读取的性能,有利于应用频繁持续性的访问文件,当应用完成当前数据块读取的时候,下一个数据块就已经准备好了。
Performance.write-behind:写入数据时,先写入缓存内,再写入硬盘内,以提高写入的性能。
Performance.io-cache:缓存已经被读过的。
调整方法:
Glusster volume set <卷> <参数>
6.5.3 监控及日常维护
使用Zabbix自带模板即可。Cpu,内存,主机存活,磁盘空间,主机运行时间,系统load。日常情况要查看服务器的监控值,遇到报警要及时处理。
以下命令在复制卷的场景下才会有
gluster volume status gs2 查看节点NFS是否在线(开没开端口)
gluster volume heal gs2 full 启动完全修复
gluster volume heal gs2 info 查看需要修复的文件
gluster volume heal gs2 info healed 查看修复成功的文件
gluster volume heal gs2 info heal-failed 查看修复失败文件
gluster volume heal gs2 info split-brain 查看脑裂的文件
gluster volume quota gs2 enable --激活quota功能
gluster volume quota gs2 disable --关闭quota功能
gluster volume quota gs2 limit-usage /data 10GB --/gs2/data 目录限制
gluster volume quota gs2 list --quota 信息列表
gluster volume quota gs2 list /data --限制目录的quota信息
gluster volume set gs2 features.quota-timeout 5 --设置信息的超时事实上时间
gluster volume quota gs2 remove /data -删除某个目录的quota设置
备注:quota 功能,主要是对挂载点下的某个目录进行空间限额。如:/mnt/glusterfs/data目录,而不是对组成卷组的空间进行限制
七 生产环境遇到常见故障处理
7.1 硬盘故障
因为底层做了raid配置,有硬件故障,直接更换硬盘,会自动同步数据。(raid5)
7.2 一台主机故障
一台节点故障的情况包括以下类型:
1,物理故障
2,同时有多块硬盘故障,造成是数据丢失
3,系统损坏不可修复
解决方法:
找一台完全一样的机器,至少要保证硬盘数量和大小一致,安装系统,配置和故障机同样的ip,安装gluster软件,保证配置一样,在其他健康的节点上执行命令gluster peer status,查看故障服务器的uuid
例如:
[root@Glusterfs03 ~]# gluster peer status
Number of Peers: 3
Hostname: glusterfs01
Uuid: 6ccc0f39-79e1-4e68-9574-62d3e68ddc9c
State: Peer in Cluster (Connected)
Hostname: glusterfs02
Uuid: 7dd28ae9-f31d-4b86-9c82-1e40afac7968
State: Peer in Cluster (Connected)
Hostname: glusterfs04
Uuid: d983c0c1-5f58-4e2b-87ec-9448b3fa49e6
State: Peer in Cluster (Connected)
修改新加机器的/var/lib/glusterd/glusterd.info和故障机器的一样
[root@Glusterfs04 ~]# cat /var/lib/glusterd/glusterd.info
UUID=d983c0c1-5f58-4e2b-87ec-9448b3fa49e6
operating-version=30712
在新机器挂载目录上执行磁盘故障的操作(任意节点)
[root@Glusterfs04 ~]# gluster volume heal gs2 full
Launching heal operation to perform full self heal on volume gs2 has been
successful
就会自动开始同步,但是同步的时候会影响整个系统的性能
可以查看状态
[root@Glusterfs04 ~]# gluster volume heal gs2 info
Brick glusterfs03:/gluster/brick1
Status: Connected
Number of entries: 0
Brick glusterfs04:/gluster/brick1
Status: Connected
Number of entries: 0
Brick glusterfs03:/gluster/brick2
Status: Connected
Number of entries: 0
Brick glusterfs04:/gluster/brick2
Status: Connected
Number of entries: 0