0、写在前面
作为一个前端小白,第一次接触vue,今天简单了解了一下基于vue文件的组件以及路由的简单流程,如有错误,还请指出。
1、项目总览
1.1、项目目录
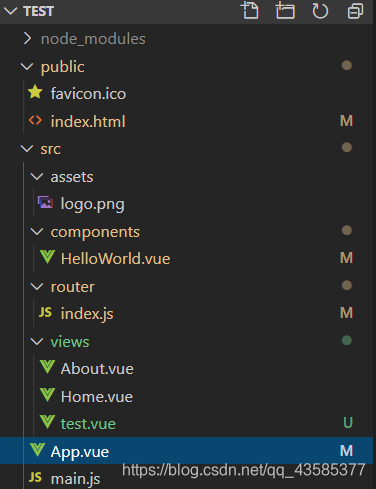
| 目录/文件 | 说明 |
|---|---|
| assets | 放置一些图片,如logo等。 |
| components | 放置了一个组件 |
| router | 放置路由JavaScript文件:index.js |
| views | 放置一些视图组件 |
| App.vue | 项目入口文件,我们也可以直接将组件写这里,而不使用 components 目录 |
| main,js | 项目的核心文件 |
| index.html | 首页入口文件,可以添加一些 meta 信息或统计代码啥的。 |
1.2、详细代码与注释
index.html
<!DOCTYPE html>
<html lang="en">
  <head>
    <meta charset="utf-8">
    <meta http-equiv="X-UA-Compatible" content="IE=edge">
    <meta name="viewport" content="width=device-width,initial-scale=1.0">
    <link rel="icon" href="<%= BASE_URL %>favicon.ico">
    <title><%= htmlWebpackPlugin.options.title %></title>
  </head>
  <body>
    <noscript>
      <strong>We're sorry but <%= htmlWebpackPlugin.options.title %> doesn't work properly without JavaScript enabled. Please enable it to continue.</strong>
    </noscript>
    <!-- 浏览器访问index页面,会自动调用app组件 -->
    <div id="app"></div>
    <!-- built files will be auto injected -->
  </body>
</html>
App.vue
<template>
  <div id="app">
    <div id="nav">
      <!-- const routes = [
            {
              path: '/',
              name: 'Home',
              component: Home
            },
            {
              path: '/about',
              name: 'About',
              component: () => import(/* webpackChunkName: "about" */ '../views/About.vue')
            },
            {
              path: '/test',
              name: 'Test',
              component: () => import('../views/test.vue')
            }

] -->
      <!-- 这里匹配到了在路由文件中定义的组件链接 -->
      <router-link to="/">Home</router-link> |
      <router-link to="/about">About</router-link> |
      <router-link to="/test">Test</router-link>
      <!-- <router-link to="/"> 通过标签中的path,路由会匹配到相应的组件 -->
      <!-- <router-link> 默认会被渲染成一个 `<a>` 标签 -->
    </div>
    <!-- 路由出口 -->
    <!-- 路由匹配到的组件将渲染在这里 -->
    <router-view/>
  </div>
</template>

<style>
#app {
  font-family: Avenir, Helvetica, Arial, sans-serif;
  -webkit-font-smoothing: antialiased;
  -moz-osx-font-smoothing: grayscale;
  text-align: center;
  color: #2c3e50;
}

#nav {
  padding: 30px;
}

#nav a {
  font-weight: bold;
  color: #2c3e50;
  text-decoration: none;
}

#nav a.router-link-exact-active {
  color: #42b983;
}
</style>
HelloWorld.vue
<template>
  <div class="hello">
    <h1>{{ msg }}</h1>
  </div>
</template>

<script>
// 这个函数的作用是:可以使组件在外部文件引用
export default {
  name: 'HelloWorld',
  data () {
    return {
      msg: 'Hello Vue!'
    }
  }
}
</script>

<!-- Add "scoped" attribute to limit CSS to this component only -->
<style scoped>
h3 {
  margin: 40px 0 0;
}
ul {
  list-style-type: none;
  padding: 0;
}
li {
  display: inline-block;
  margin: 0 10px;
}
a {
  color: #42b983;
}
</style>
Home.vue
<template>
  <div class="home">
    <img alt="Vue logo" src="../assets/logo.png">
    <HelloWorld msg/>
  </div>
</template>

<script>
// 引入HelloWorld组件
import HelloWorld from '@/components/HelloWorld.vue'

// 这个函数的作用是:可以使组件在外部文件引用
export default {
  name: 'Home',
  components: {
    HelloWorld
  }
}
</script>
About.vue
<template>
  <div class="about">
    <h1>This is an about page</h1>
  </div>
</template>
Test.vue
<!-- 自己添加的 -->
<template>
<div class="test">
    <h1>
        Hello Router!
    </h1>
</div>
</template>

<script>
export default {
  name: 'Test'
}
</script>
router.js
import Vue from 'vue'
import VueRouter from 'vue-router'
import Home from '../views/Home.vue'
import Test from '../views/test.vue'

Vue.use(VueRouter)

const routes = [
  {
    // 路径
    path: '/',
    // 名称
    name: 'Home',
    // 组件名
    component: Home
  },
  {
    path: '/about',
    name: 'About',
    // 虽然About.vue并没有被导出,可以使用如下方式定义路由组件
    component: () => import(/* webpackChunkName: "about" */ '../views/About.vue')
  },
  {
    path: '/test',
    name: 'Test',
    component: Test
  }

]

const router = new VueRouter({
  routes
})

export default router
我对流程的理解都写在注释里了。
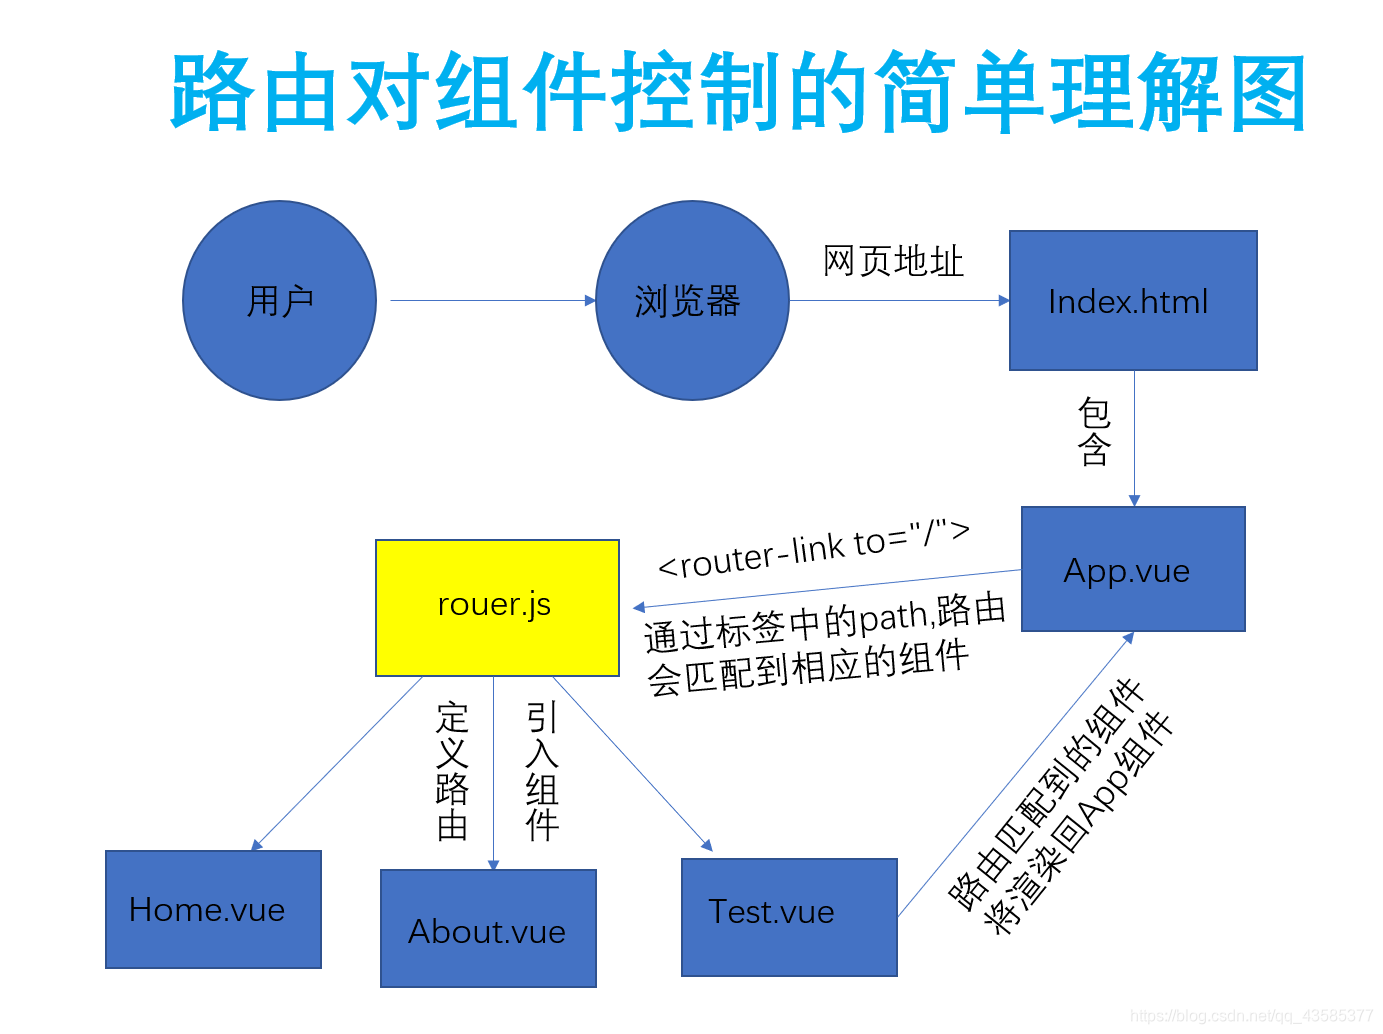
2、理解逻辑图
自己画了一个图,帮助理解,如有错误还请指正