Spring Boot 2.2.4.RELEASE
数据库表准备
数据库表定义:
mysql> desc t_user;
+----------+--------------+------+-----+---------+----------------+
| Field    | Type         | Null | Key | Default | Extra          |
+----------+--------------+------+-----+---------+----------------+
| id       | int(11)      | NO   | PRI | NULL    | auto_increment |
| username | varchar(255) | YES  |     | NULL    |                |
| password | varchar(255) | YES  |     | NULL    |                |
| phone    | varchar(20)  | YES  |     | NULL    |                |
+----------+--------------+------+-----+---------+----------------+
4 rows in set (0.00 sec)
mysql> show create table t_user \G
*************************** 1. row ***************************
       Table: t_user
Create Table: CREATE TABLE `t_user` (
  `id` int(11) NOT NULL AUTO_INCREMENT COMMENT '用户 ID',
  `username` varchar(255) CHARACTER SET utf8 COLLATE utf8_bin DEFAULT NULL COMMENT '用户名',
  `password` varchar(255) DEFAULT NULL COMMENT '密码',
  `phone` varchar(20) DEFAULT NULL COMMENT '手机号码',
  PRIMARY KEY (`id`)
) ENGINE=InnoDB AUTO_INCREMENT=1 DEFAULT CHARSET=utf8
1 row in set (0.00 sec)
项目结构
新建 Spring Boot 项目,引入依赖:
<?xml version="1.0" encoding="UTF-8"?>
<project xmlns="http://maven.apache.org/POM/4.0.0" xmlns:xsi="http://www.w3.org/2001/XMLSchema-instance"
    xsi:schemaLocation="http://maven.apache.org/POM/4.0.0 https://maven.apache.org/xsd/maven-4.0.0.xsd">
    <modelVersion>4.0.0</modelVersion>
    <parent>
        <groupId>org.springframework.boot</groupId>
        <artifactId>spring-boot-starter-parent</artifactId>
        <version>2.2.4.RELEASE</version>
        <relativePath /> <!-- lookup parent from repository -->
    </parent>
    <groupId>com.mk</groupId>
    <artifactId>spring-boot-mybatis-druid</artifactId>
    <version>0.0.1-SNAPSHOT</version>
    <name>spring-boot-mybatis-druid</name>
    <description>MyBatis + Druid</description>

    <properties>
        <java.version>1.8</java.version>
        <mysql-connector-java.version>5.1.40</mysql-connector-java.version>
        <mybatis-spring-boot-starter.version>2.1.1</mybatis-spring-boot-starter.version>
        <druid-spring-boot-starter.version>1.1.21</druid-spring-boot-starter.version>
    </properties>

    <dependencies>
        <dependency>
            <groupId>org.springframework.boot</groupId>
            <artifactId>spring-boot-starter-web</artifactId>
        </dependency>
        <dependency>
            <groupId>org.mybatis.spring.boot</groupId>
            <artifactId>mybatis-spring-boot-starter</artifactId>
            <version>${mybatis-spring-boot-starter.version}</version>
        </dependency>

        <dependency>
            <groupId>org.springframework.boot</groupId>
            <artifactId>spring-boot-devtools</artifactId>
            <scope>runtime</scope>
            <optional>true</optional>
        </dependency>
        <dependency>
            <groupId>mysql</groupId>
            <artifactId>mysql-connector-java</artifactId>
            <version>${mysql-connector-java.version}</version>
            <scope>runtime</scope>
        </dependency>
        <dependency>
            <groupId>org.springframework.boot</groupId>
            <artifactId>spring-boot-configuration-processor</artifactId>
            <optional>true</optional>
        </dependency>
        <dependency>
            <groupId>org.projectlombok</groupId>
            <artifactId>lombok</artifactId>
            <optional>true</optional>
        </dependency>
        <dependency>
            <groupId>org.springframework.boot</groupId>
            <artifactId>spring-boot-starter-test</artifactId>
            <scope>test</scope>
            <exclusions>
                <exclusion>
                    <groupId>org.junit.vintage</groupId>
                    <artifactId>junit-vintage-engine</artifactId>
                </exclusion>
            </exclusions>
        </dependency>

        <!-- https://mvnrepository.com/artifact/com.alibaba/druid-spring-boot-starter -->
        <dependency>
            <groupId>com.alibaba</groupId>
            <artifactId>druid-spring-boot-starter</artifactId>
            <version>${druid-spring-boot-starter.version}</version>
        </dependency>
    </dependencies>
</project>
application.yml 文件,配置 Druid 数据源和 MyBatis:
spring:
  datasource:
    druid:
      #-- 基本属性
      driver-class-name: com.mysql.jdbc.Driver
      url: jdbc:mysql://127.0.0.1:3306/security?useUnicode=true&characterEncoding=utf8&serverTimezone=UTC&useSSL=true
      username: root
      password: root
      #-- 连接池配置
      initial-size: 5
      min-idle: 5
      max-active: 20
      max-wait: 30000 # 获取连接等待超时的时间
      time-between-eviction-runs-millis: 2000 # 间隔多久才进行一次检测,检测需要关闭的空闲连接,单位是毫秒
      min-evictable-idle-time-millis: 600000 # 一个连接在池中最小生存的时间,单位是毫秒
      max-evictable-idle-time-millis: 900000
      validation-query: select '1'
      test-while-idle: true
      test-on-borrow: false
      test-on-return: false
      pool-prepared-statements: true
      max-open-prepared-statements: 20
      max-pool-prepared-statement-per-connection-size: 20
      #-- 监控统计拦截的 filters,'wall' 用于防火墙
      filters: stat,wall,slf4j
      #-- 监控配置
      web-stat-filter: # WebStatFilter 配置
        enabled: true
        url-pattern: /*
        exclusions: '*.js,*.gif,*.jpg,*.png,*.css,*.ico,/druid/*'
      stat-view-servlet: # StatViewServlet 配置
        enabled: true
        url-pattern: /druid/*
        reset-enable: false
        login-username: admin
        login-password: 123456
#        allow: 127.0.0.1
#        deny: 192.168.1.6
#      aop-patterns: # Spring 监控配置
#      - com.mk.service.*
      filter:
        stat: # 慢 SQL 记录
          slow-sql-millis: 3000
          log-slow-sql: true

#-- MyBatis
mybatis:
  mapper-locations: # SQL 映射文件的位置
  - classpath:mapper/*Mapper.xml
  configuration:
    log-impl: org.apache.ibatis.logging.slf4j.Slf4jImpl
logback 日志配置:
<?xml version="1.0" encoding="UTF-8"?>
<configuration scan="true" scanPeriod="60 seconds" debug="false">
    <!-- 定义日志文件的输出路径 -->
    <property name="USER_HOME" value="G:/log" />

    <!-- 输出到控制台 -->
    <appender name="STDOUT" class="ch.qos.logback.core.ConsoleAppender">
        <encoder>
            <pattern>%d{HH:mm:ss.SSS} %-5level [%-24thread] %logger - %msg%n</pattern>
        </encoder>
    </appender>

    <!-- 基于大小以及时间的轮转策略 -->
    <!-- 参考:http://www.logback.cn/04%E7%AC%AC%E5%9B%9B%E7%AB%A0Appenders.html -->
    <appender name="ROLLING" class="ch.qos.logback.core.rolling.RollingFileAppender">
        <!-- 要写入文件的名称。如果文件不存在,则新建。 -->
        <file>${USER_HOME}/logback.log</file>
        <rollingPolicy class="ch.qos.logback.core.rolling.SizeAndTimeBasedRollingPolicy">
            <fileNamePattern>${USER_HOME}/%d{yyyyMMdd}/logback-%d{yyyy-MM-dd}.%i.log</fileNamePattern>
            <maxFileSize>20KB</maxFileSize>
            <!-- 最多保留多少数量的归档文件,将会异步删除旧的文件。 -->
            <maxHistory>30</maxHistory>
            <!-- 所有归档文件总的大小。当达到这个大小后,旧的归档文件将会被异步的删除。 -->
            <totalSizeCap>1000MB</totalSizeCap>
        </rollingPolicy>

        <encoder>
            <pattern>%d{HH:mm:ss.SSS} %-5level [%-24thread] %logger - %msg%n</pattern>
        </encoder>
    </appender>

    <logger name="com.mk.dao" level="DEBUG" ></logger>

    <!-- 日志输出级别 -->
    <root level="info">
        <appender-ref ref="ROLLING" />
        <appender-ref ref="STDOUT" />
    </root>
</configuration>
实体类:
import java.io.Serializable;

import lombok.Getter;
import lombok.Setter;
import lombok.ToString;

@Getter
@Setter
@ToString
public class User implements Serializable {

    private static final long serialVersionUID = -6114733185992816268L;

    private Integer id;
    private String username;
    private String password;
    private String phone;
}
DAO 层,即 mapper 接口:
import org.apache.ibatis.annotations.Insert;
import org.apache.ibatis.annotations.Select;

import com.mk.domain.User;

public interface UserMapper {

    @Insert("insert into t_user(id,username,password,phone) values(#{id},#{username},#{password},#{phone})")
    int add(User record);

    @Select("select * from t_user where id=#{id}")
    User selectById(Integer id);
}
因为只是简单的演示,所以直接使用注解,并没有相应的 SQL 映射文件。
业务层接口及其实现类:
import com.mk.domain.User;

public interface UserService {

    int add(User record);

    User selectById(Integer id);
}
import org.springframework.beans.factory.annotation.Autowired;
import org.springframework.stereotype.Service;

import com.mk.dao.UserMapper;
import com.mk.domain.User;
import com.mk.service.UserService;

@Service
public class UserServiceImpl implements UserService {

    @Autowired
    private UserMapper userMapper;

    @Override
    public int add(User record) {
        return this.userMapper.add(record);
    }

    @Override
    public User selectById(Integer id) {
        return this.userMapper.selectById(id);
    }
}
控制器:
import org.springframework.beans.factory.annotation.Autowired;
import org.springframework.web.bind.annotation.GetMapping;
import org.springframework.web.bind.annotation.PathVariable;
import org.springframework.web.bind.annotation.RestController;

import com.mk.domain.User;
import com.mk.service.UserService;

@RestController
@RequestMapping("/user")
public class UserController {

    @Autowired
    private UserService userService;

    @GetMapping("select/by/{id}")
    public User selectById(@PathVariable Integer id) {
        return this.userService.selectById(id);
    }
}
在启动类上使用 @MapperScan 注解,扫描 mapper 接口,见第 6 行:
import org.mybatis.spring.annotation.MapperScan;
import org.springframework.boot.SpringApplication;
import org.springframework.boot.autoconfigure.SpringBootApplication;

@SpringBootApplication
@MapperScan(basePackages = { "com.mk.dao" })
public class SpringBootMybatisDruidApplication {

    public static void main(String[] args) {
        SpringApplication.run(SpringBootMybatisDruidApplication.class, args);
    }
}
修改测试类,向数据表中插入测试数据:
import org.junit.jupiter.api.Test;
import org.springframework.beans.factory.annotation.Autowired;
import org.springframework.boot.test.context.SpringBootTest;

import com.mk.dao.UserMapper;
import com.mk.domain.User;

@SpringBootTest
class SpringBootMybatisDruidApplicationTests {

    @Autowired
    private UserMapper userMapper;

    @Test
    void contextLoads() {
        User user = new User();
        user.setId(0);
        user.setUsername("druid");
        user.setPassword("123456");
        user.setPhone("12345678910");
        this.userMapper.add(user);
    }
}
控制台输出:
22:15:11.295 DEBUG [main                    ] com.mk.dao.UserMapper.add - ==>  Preparing: insert into t_user(id,username,password,phone) values(?,?,?,?)
22:15:11.739 DEBUG [main                    ] com.mk.dao.UserMapper.add - ==> Parameters: 0(Integer), druid(String), 123456(String), 12345678910(String)
22:15:11.844 DEBUG [main                    ] com.mk.dao.UserMapper.add - <==    Updates: 1
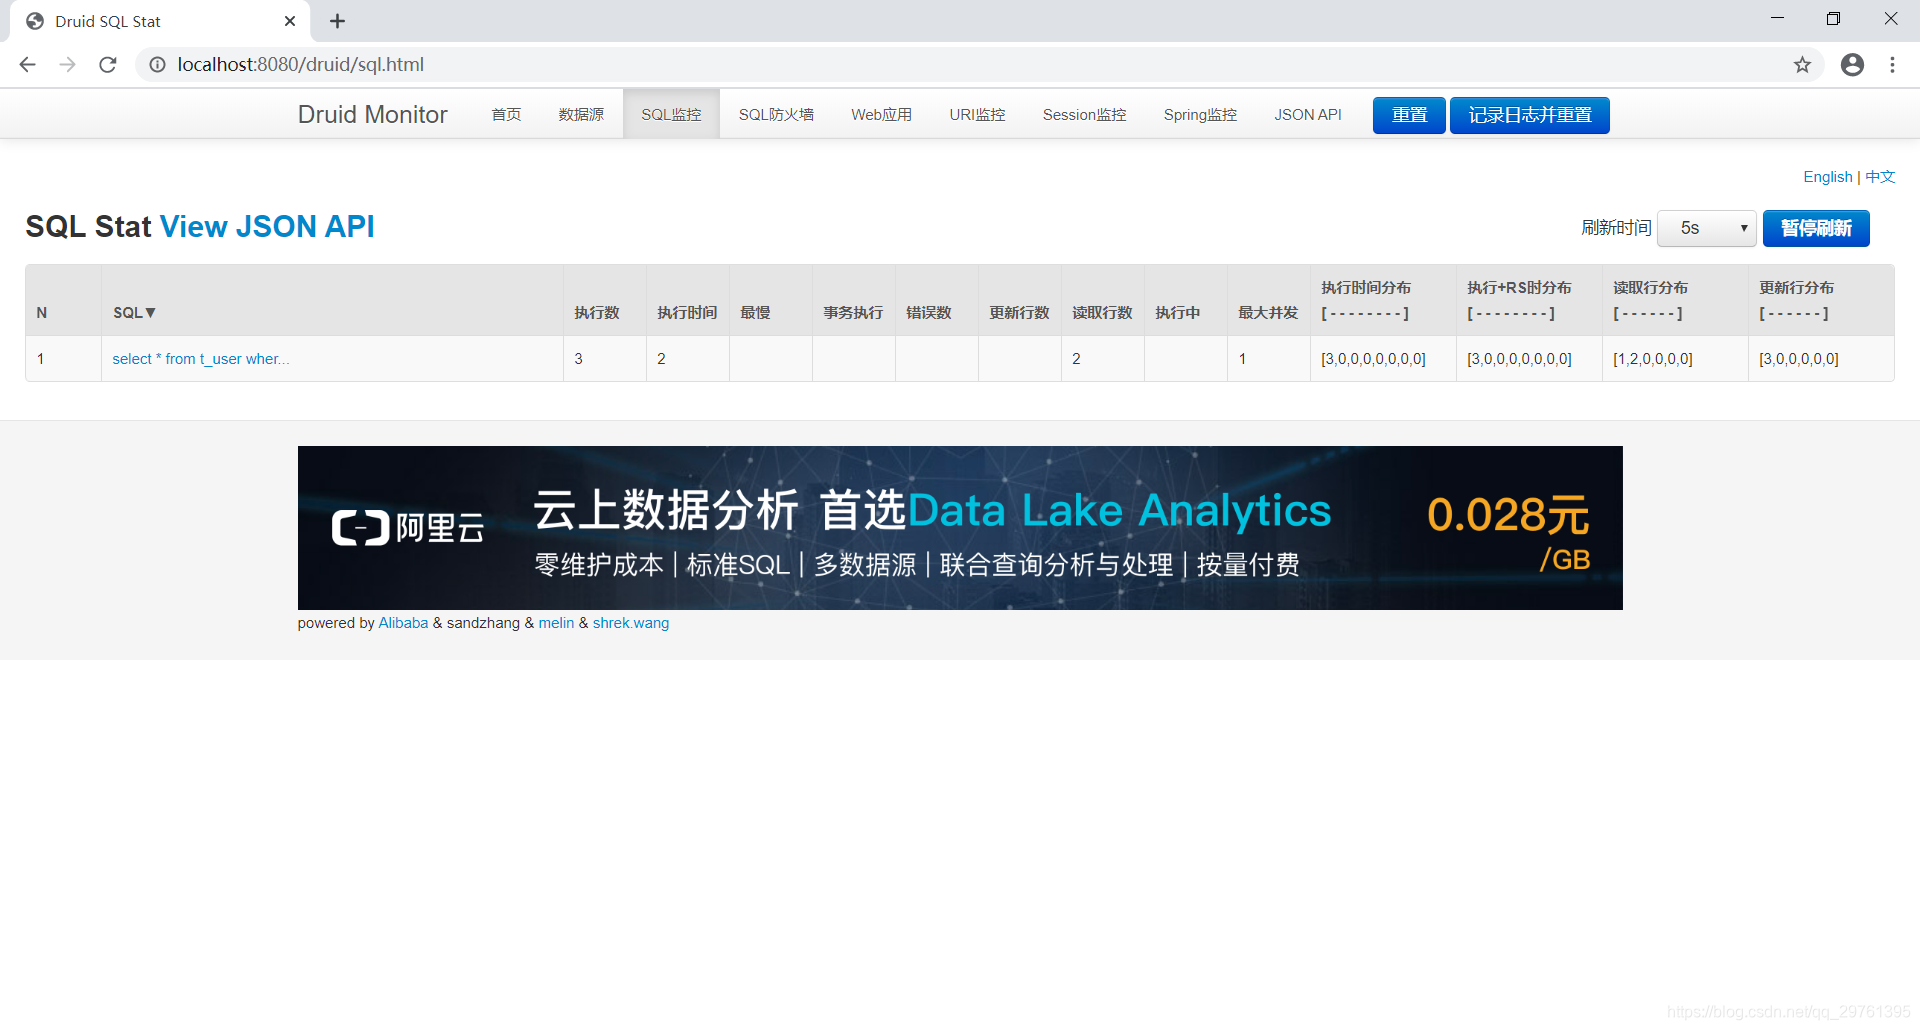
启动项目,访问 http://localhost:8080/druid 并登录,用户名和密码见 application.yml 文件的配置。进入 Druid 的监控页面:
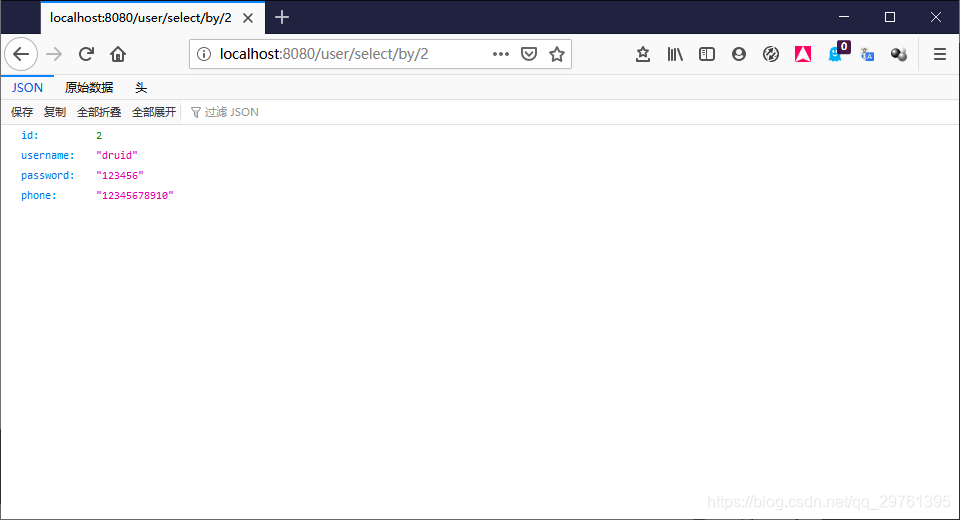
访问 http://localhost:8080/user/select/by/2,可以查询相应 ID 的用户信息:
注意:URL 路径中最后一个参数对应用户 ID。
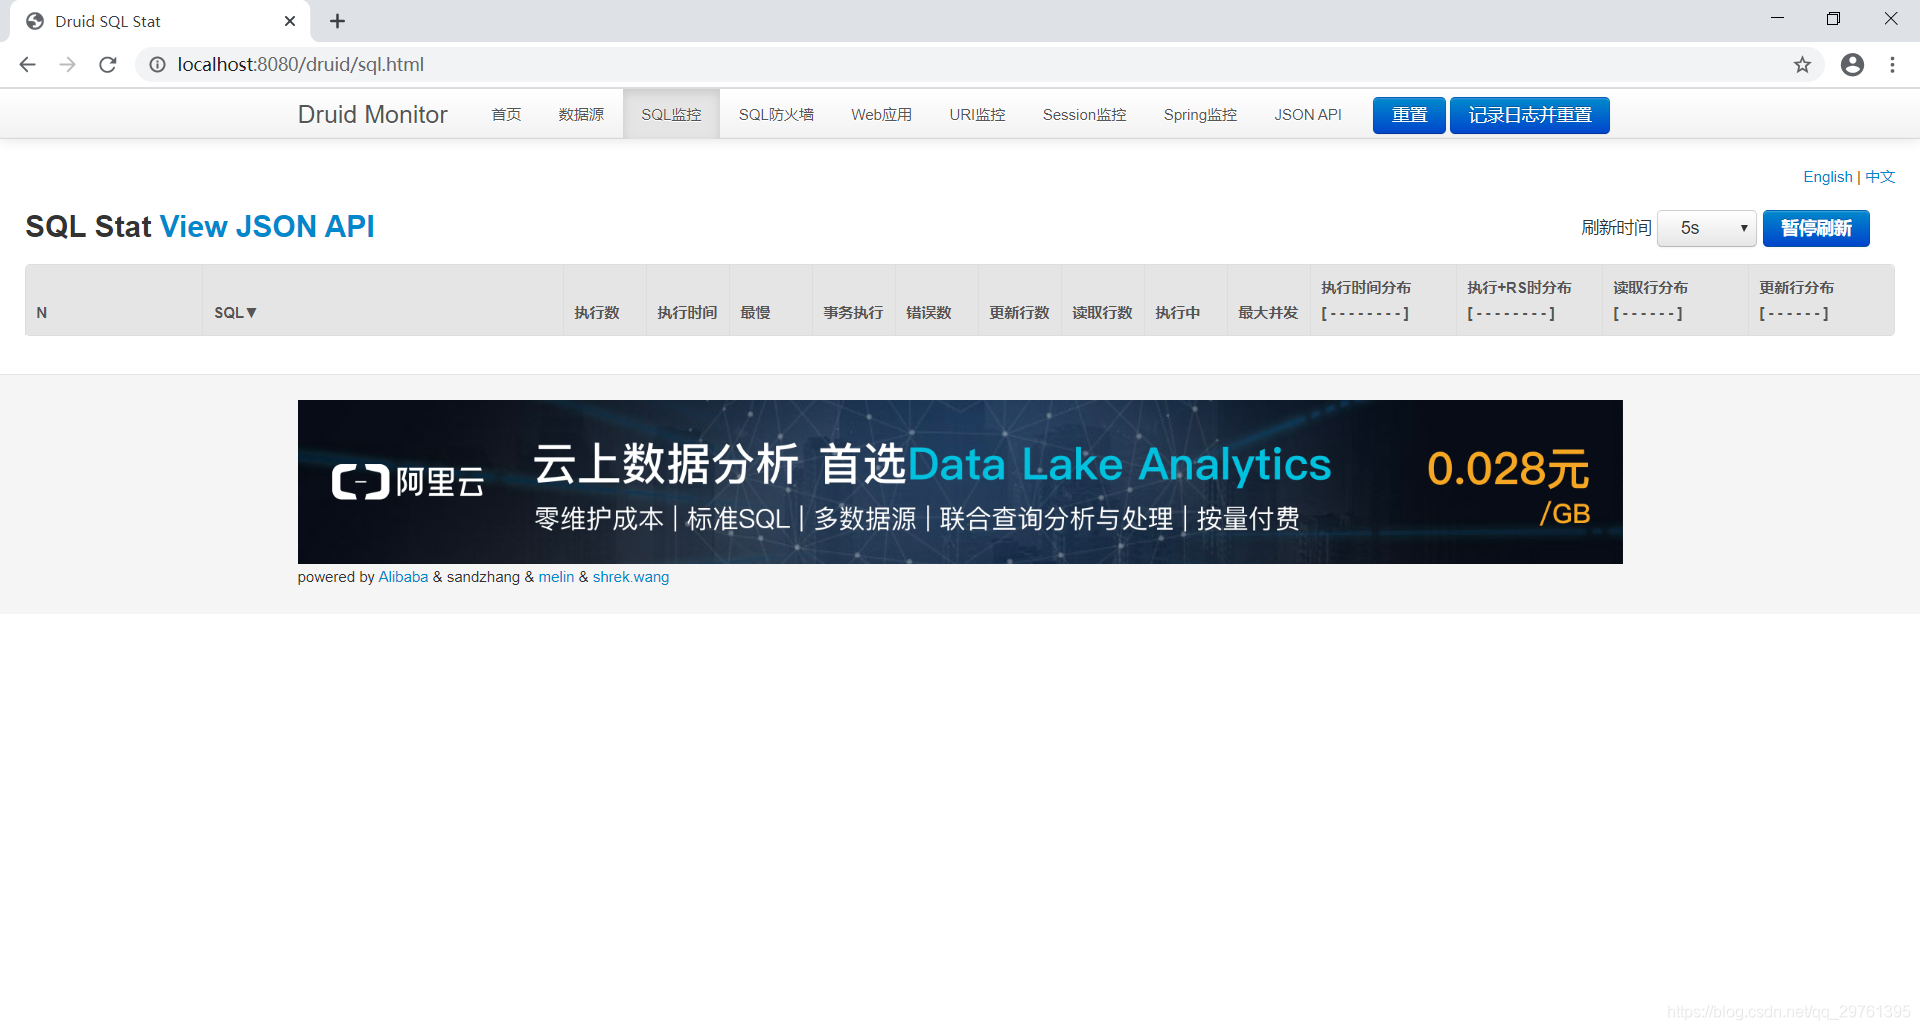
执行 SQL 之后,查看 Druid 监控页面: