文章目录
一、SSH 框架整合
1、SSH 整合概述
SSH框架整合思路:使用SSH三大框架时
- Struts2 是作用于控制层负责对请求进行统一处理和分发,Struts2 会根据请求地址去创建对应的Action的对象,并执行相应的方法。
- Hibernate 作为ORM框架致力于简化数据层操作。
- 所谓的SSH三大框架的整合其实就是通过 Spring 的IOC来创建 Struts2 中的 Action 对象以及Hibernate 中的 SessionFactory 对象。
二、SSH 框架整合步骤
1、在 WEB 项目中加载 Spring 框架
Spring提供了一个监听器 ContextLoaderListener,该监听器实现了ServletContextListener 接口,在服务器启动时,该监听器就会执行,执行该监听器的目的是读取applicationContext.xml 文件,并根据文件的配置创建项目中所需要的对象并完成依赖注入。
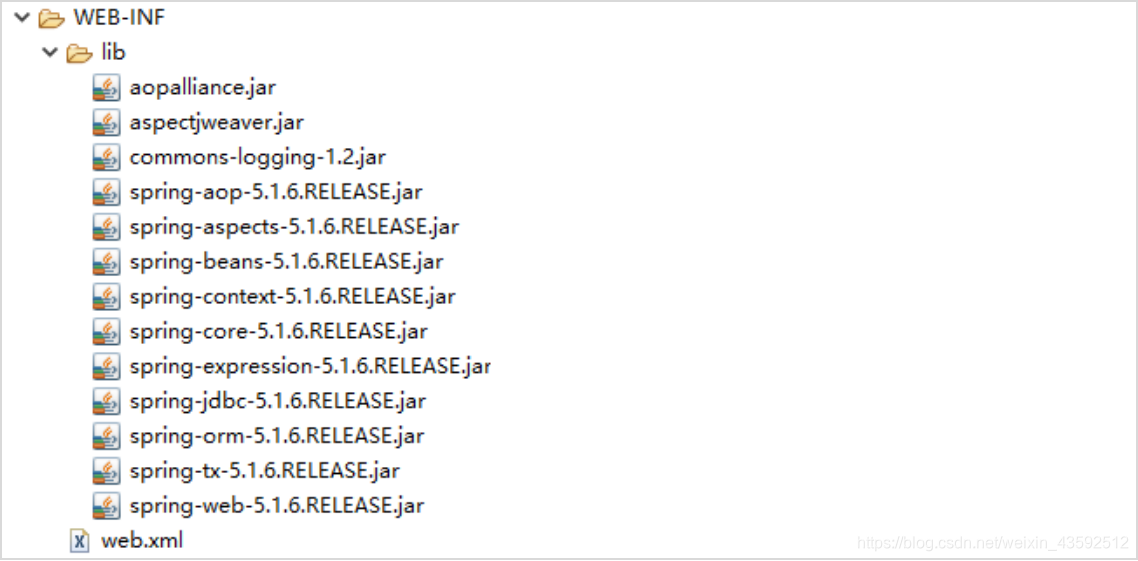
(1)导入spring框架中所需的jar包
(2)在 web.xml 中加载 spring 提供的监听器
<listener>
	<listener-class>org.springframework.web.context.ContextLoaderListener</listener-class>
</listener>
(3)ContextLoaderListener 在执行时会默认去读取WEB-INF下的 applicationContext.xml文件,如果想自定义配置文件名称需要使用<context-param>标签配置上下文参数,配置的上下文参数在监听器中可以获取。
<context-param>
	<param-name>contextConfigLocation</param-name>
	<param-value>classpath:application.xml</param-value>
</context-param>
参数名称contextConfigLocation,参数值classpath:文件名称,表示该文件处于src目录之下。
(4)根据第三步的配置在适当的位置新建applicationContext.xml文件,在 xml 文件中引入beans、aop、context、tx的命名空间。
<?xml version="1.0" encoding="UTF-8"?>
<beans xmlns="http://www.springframework.org/schema/beans"
	xmlns:xsi="http://www.w3.org/2001/XMLSchema-instance"
	xmlns:context="http://www.springframework.org/schema/context"
	xmlns:aop="http://www.springframework.org/schema/aop"
	xmlns:tx="http://www.springframework.org/schema/tx"
	xsi:schemaLocation="http://www.springframework.org/schema/beans
		http://www.springframework.org/schema/beans/spring-beans-4.0.xsd
		http://www.springframework.org/schema/context
		http://www.springframework.org/schema/context/spring-context-4.0.xsd
		http://www.springframework.org/schema/aop
		http://www.springframework.org/schema/aop/spring-aop-4.0.xsd
		http://www.springframework.org/schema/tx
		http://www.springframework.org/schema/tx/spring-tx-4.0.xsd">
</beans>
2、使用 Spring 框架整合 Struts2
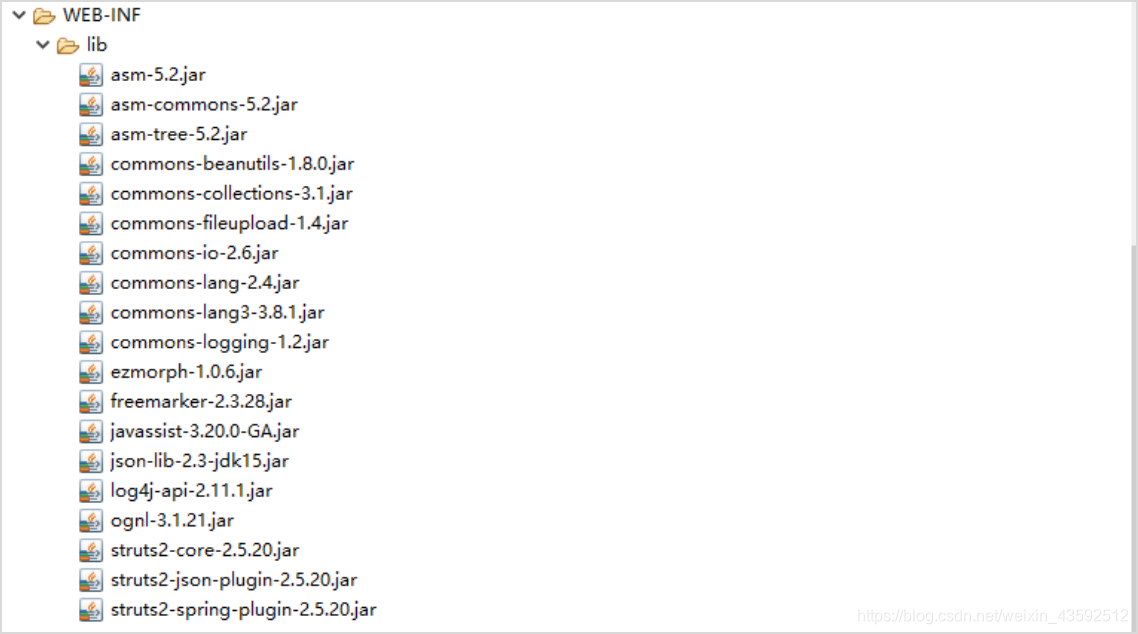
(1)导入 Struts2 所需的jar包,本次要导入到项目中的jar包包括 Struts2 本身所需要的包、JSON的相关包、Struts2-Spring 的整合插件包。
(2)在 web.xml 中加载 Struts2 的核心控制器
<!-- 加载Struts2的核心控制器,过滤器 -->
<filter>
    <filter-name>filter</filter-name>
    <filter-class>org.apache.struts2.dispatcher.filter.StrutsPrepareAndExecuteFilter</filter-class>
</filter>
<filter-mapping>
    <filter-name>filter</filter-name>
    <url-pattern>/*</url-pattern>
</filter-mapping>
(3)在 src 下新建struts.xml文件,并配置 action 标签,和以前单独使用 Struts2 时相比有两点不同,首先 Action 类以前是 Struts2 框架负责创建,使用 Spring 以后需要将该对象的创建工作交给 Spring 来负责,所以需要在Action类上添加@Controller注解或者在applicationContext.xml中使用<bean>标签来创建Action对象。
注解方式:
@Controller
@Scope("prototype")
public class InsertAction extends ActionSupport{
	//新增方法
	public String insert() {
		System.out.println("执行新增操作");
		return Action.SUCCESS;
	}
}
@Scope("prototype")是设置 Spring 创建 Action 对象时采用非单例模式。
使用注解方式需要在applicationContext.xml文件中配置扫包地址:
<!-- 配置Spring扫描包的地址 -->
<context:component-scan base-package="com.ssh"></context:component-scan>
标签配置方式:
<bean id="insertAction" class="com.ssh.action.InsertAction" scope="prototype"></bean>
第二点不同在于 struts.xml 文件中,单独使用 Struts2 时,action 标签中的 class 属性表达的是处理该请求时需要执行的类的名称,Struts2 会创建该类型的对象,但是一旦和 Spring 整合之后该类对象已经被 Spring 创建,这时在 class 中直接写 Spring 容器中对象的 bean id 即可。
<struts>
    <package name="default" namespace="/" extends="struts-default">
        <action name="insert" class="insertAction" method="insert">
            <result name="success">success.jsp</result>
        </action>
    </package>
</struts>
除此之外使用 Struts2 的过程和以前单独使用没有什么区别。
3、使用 Spring 框架整合 Hibernate
Spring 整合 Struts2 完毕以后就可以按照以前 Spring 中注解的方式来实现对象创建和依赖注入工作了。
由于在数据层实现类中需要使用 Session 对象来执行 Hibernate 的增删改查,这时我们可以使用 Spring 的IOC来帮助我们创建 Session 对象并将 Session 对象注入到数据层对象中。
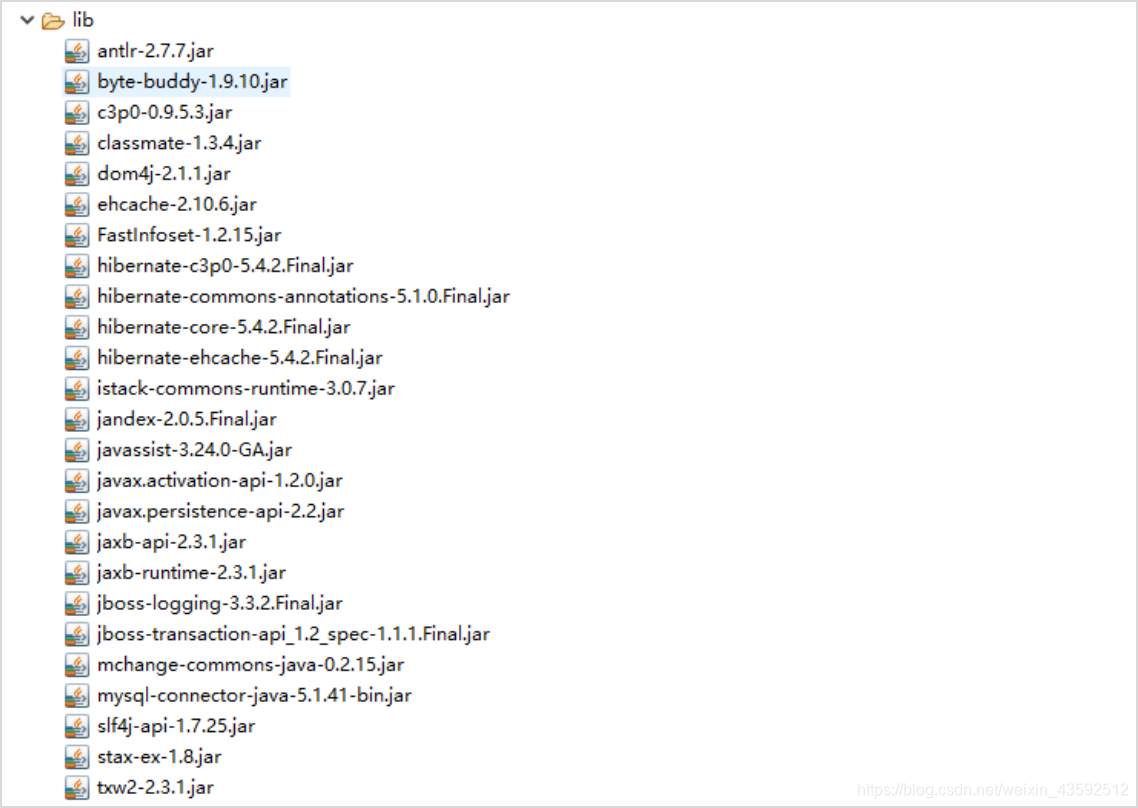
(1)导入 Hibernate 的必要包、C3P0的包、数据库驱动包,如果有使用 Hibernate 二级缓存的需求还需要导入第三方的二级缓存依赖包。
(2)新建测试实体类 Products类,并添加 Hibernate 的必要注解。
@Entity
public class Products {
	@Id
	@GeneratedValue(strategy=GenerationType.IDENTITY)
	private int p_id;
	private String p_name;
	private double p_price;
	private int p_count;
	private String p_class;
	private String p_attribute;
	private int p_typeid;
	//省略get、set方法
	@Override
	public String toString() {
		return "Products [p_id=" + p_id + ", p_name=" + p_name + ", p_price=" + p_price + ", p_count=" + p_count
				+ ", p_class=" + p_class + ", p_attribute=" + p_attribute + ", p_typeid=" + p_typeid + "]";
	}
}
(3)创建 Session 对象依赖于 SessionFactory 对象,创建 SessionFactory 对象依赖于数据源对象,本案例中采用C3P0连接池作为数据源,如果要换其他的连接池,只需要更改数据源的配置即可,其他模块保持不变。
数据源配置:
在配置数据源时需要用到很多的常量例如数据库连接信息,连接池的基本信息等等,这些信息最好是保存在外部的资源文件中,便于统一的管理。
① jdbc.properties 文件
#jdbc连接信息
jdbc.driverClass=com.mysql.jdbc.Driver
jdbc.jdbcUrl=jdbc:mysql://localhost:3306/shop?useUnicode=true&characterEncoding=utf-8
jdbc.user=root
jdbc.password=admin
#c3p0各项属性
c3p0.minPoolSize=10
c3p0.maxPoolSize=50
c3p0.initialPoolSize=20
c3p0.maxIdleTime=60
c3p0.acquireIncrement=1
c3p0.checkoutTimeout=6000
c3p0.idleConnectionTestPeriod=600
② 资源文件准备好以后,就可以在applicationContext中引入资源文件,便于后续的使用,在前面的学习过程中我们使用了一个资源文件加载器来加载资源文件。
<!-- 配置加载器加载资源文件 -->
<bean class="org.springframework.beans.factory.config.PropertyPlaceholderConfigurer">
    <property name="location" value="classpath:jdbc.properties"></property>
</bean>
Spring-Context 包提供了上述加载器的简写:
<context:property-placeholder location="classpath:jdbc.properties"/>
③ 使用bean标签配置数据源
<bean id="pool" class="com.mchange.v2.c3p0.ComboPooledDataSource">
	<!-- 提供数据库连接信息和连接池的常用信息 -->
	<!-- 驱动类 -->
	<property name="driverClass" value="${jdbc.driverClass}" />
	<!-- 连接数据库的地址 -->
	<property name="jdbcUrl" value="${jdbc.jdbcUrl}" />
	<!-- 连接数据库的用户名 -->
	<property name="user" value="${jdbc.user}" />
	<!-- 连接数据库的密码 -->
	<property name="password" value="${jdbc.password}" />
	<!-- c3p0类 -->
	<!-- 最大连接数 -->
	<property name="maxPoolSize" value="${c3p0.maxPoolSize}"></property>
	<!-- 最小连接数 -->
	<property name="minPoolSize" value="${c3p0.minPoolSize}"></property>
	<!-- 初始化连接数 -->
	<property name="initialPoolSize" value="${c3p0.initialPoolSize}"></property>
	<!-- 自增长连接数 -->
	<property name="acquireIncrement" value="${c3p0.acquireIncrement}"></property>
	<!-- 连接对象空闲时间  超出10分钟销毁 -->
	<property name="maxIdleTime" value="${c3p0.maxIdleTime}"></property>
	<!-- 连接数据库的等待时间 超出等待时间 抛出异常 -->
	<property name="checkoutTimeout" value="${c3p0.checkoutTimeout}"></property>
	<!-- 检查连接的间隔时间 -->
	<property name="idleConnectionTestPeriod" value="${c3p0.idleConnectionTestPeriod}"></property>
</bean>
(4)使用 bean 标签配置 SessionFactory 对象
<bean id="sessionFactory" class="org.springframework.orm.hibernate5.LocalSessionFactoryBean">
	<!-- 注入连接池,包含了数据库用户名,密码等等信息 -->
	<property  name="dataSource" ref="pool"/>
	<!-- 配置Hibernate的其他的属性 -->
	<property  name="hibernateProperties">
	<props>
		<prop key="hibernate.dialect">org.hibernate.dialect.MySQL55Dialect</prop>
		<prop key="hibernate.show_sql">true</prop>
		<prop key="hibernate.format_sql">true</prop>
		<prop key="hibernate.hbm2ddl.auto">update</prop>
		<prop key="hibernate.current_session_context_class">
			org.springframework.orm.hibernate5.SpringSessionContext</prop>
	</props>
	</property>
	<!--配置实体类所在包名  -->
	<property name="packagesToScan" value="com.ssh.entity"/>
</bean>
配置完sessionFactory之后就可以将该对象注入到数据层对象中以便于获取Session对象。
4、使用 SpringAOP 实现声明式事务管理
<!--事务管理器 通知-->
<bean id="txManger" class="org.springframework.orm.hibernate5.HibernateTransactionManager">
	<property name="sessionFactory" ref="sessionFactory"></property>
</bean>

<!-- 事务通知: 拦截到指定的方法后进行怎样的事务管理 -->
<!-- 注意: 需要引入事务管理器类(拦截到指定的方法,且指定对指定的方法如何管理事务后,再应用事务管理器事务控制代码!) -->
<!-- save* delete* update* 表示对所有的以save、update、delete开头的方法采用读写事务! -->
<!-- * 最后一个* 表示上面都不满足情况的其他方法,采用的事务只读的! -->
<tx:advice id="txAdvice" transaction-manager="txManger">
	<tx:attributes>
		<tx:method name="save*" read-only="false" propagation="REQUIRED"/>
		<tx:method name="delete*" read-only="false" />
		<tx:method name="update*" read-only="false" />
		<tx:method name="*" read-only="true" />
	</tx:attributes>
</tx:advice>
<!-- Aop 配置 = 切入点表达式(指定给哪些对象生成代理对象) + 应用上面的事务通知 -->
<!-- 需要引入事务通知控制,以及通过切入点表达式指定拦截的方法 -->
<aop:config>
	<aop:advisor advice-ref="txAdvice" pointcut="execution(* com.woniu.service.impl.*.*(..))" />
</aop:config>
(1)在使用声明式事务以后,在业务层中不需要在手动的处理事务,也不能在业务层中进行异常处理,如果在业务层处理了异常,异常增强处理会以为捕获不到异常而失效,事务也就不会回滚,在选择 openSession 和 getCurrentSession 时,如果执行增删改使用 getCurrentSession,执行查询使用 openSession,注意 openSession 获取到的是全新的 Session 对象,并且开启了自动提交。getCurrentSession 会从 Session 容器中获取已将创建好的 Session 对象,该 Session 对象在一个线程 中都是唯一的,并且关闭了自动提交。
(2)<tx:method >标签中的 propagation 属性用于定义事务传播机制,主要用在业务层方法相互调用时的事务处理方式。默认值为REQUIRED,该属性的可选值如下:
- REQUIRED:支持当前事务,当前没有事务,就新建一个事务。这是最常见的选择。
- SUPPORTS:支持当前事务,如果当前没有事务,就以非事务方式执行。
- MANDATORY:支持当前事务,如果当前没有事务,就抛出异常。
- REQUIRED_NEW:新建事务,如果当前存在事务,把当前事务挂起。
- NOT_SUPPORTED:以非事务方式执行操作,如果当前存在事务,就把当前事务挂起。
- NEVER:以非事务方式执行,如果当前存在事务,则抛出异常。
- NESTED:如果当前事务存在,则在嵌套事务中执行。如果当前没有事务,就新建一个事务。
(3)三种读写事务的详细说明:
- REQUIRED,场景:业务A方法调用B方法。A已经是 REQUIRED 事务,B采用 REQUIRED
在该场景中由于两个业务方法使用了同一个事务,所以任何一个业务方法出现异常都会回滚两个业务中的数据操作。 - PROPAGATION_REQUIRED_NEW,场景:业务A方法调用B方法。A已经是REQUIRED事务,B采用PROPAGATION_REQUIRED_NEW。
在该场景中业务A方法和业务B方法都拥有独立的事务,所以无论其中哪个数据方法出现异常都只会回滚自己的数据操作。 - PROPAGATION_NESTED,场景:业务A方法调用B方法。A已经是REQUIRED事务,B采用PROPAGATION_NESTED。
当B方法事务提交完成时是把B方法之前包括A的操作进行提交。当B回滚时只是B自己的数据操作回滚不会影响到A的数据操作。
(4)在添加好声明式事务管理以后,在数据层执行增删改时要使用 currentSession 方法来获取 session 对象,同时一定要注意业务层的方法命名规范。
5、使用 OpenSessionInView 延迟加载后 session 的关闭问题
(1)Hibernate 为了降低数据库压力,在设计时对于数据的查询采用了延迟查询的方式,也就是当数据被真正使用时,Hibernate 才会去执行查询,但是在WEB项目中数据真正使用往往发生在JSP解析阶段或者是格式化JSON的阶段。在这时 session 往往已经关闭了,这时程序就会出现异常。
这时我们可以采用 Spring 提供的 OpenSessionInView 的方式将 session 的关闭工作放在执行完控制层代码以后。Spring 提供了一个过滤器来实现该功能。
<filter>
	<filter-name>hibernateFilter</filter-name>
	<filter-class>org.springframework.orm.hibernate5.support.OpenSessionInViewFilter</filter-class>
	<!-- singleSession默认为true,若设为false则等于没用OpenSessionInView -->
	<init-param>
		<param-name>singleSession</param-name>
		<param-value>true</param-value>
	</init-param>
</filter>
<filter-mapping>
	<filter-name>hibernateFilter</filter-name>
	<url-pattern>*.action</url-pattern>
</filter-mapping>
