配置spring容器
一、创建配置文件,并导入约束(4个)
beans|context|aop|tx

applicationContext.xml:
<?xml version="1.0" encoding="UTF-8"?>
<beans xmlns:xsi="http://www.w3.org/2001/XMLSchema-instance"
		xmlns="http://www.springframework.org/schema/beans"
		xmlns:context="http://www.springframework.org/schema/context"
		xmlns:aop="http://www.springframework.org/schema/aop"
		xmlns:tx="http://www.springframework.org/schema/tx"
		xsi:schemaLocation="http://www.springframework.org/schema/beans http://www.springframework.org/schema/beans/spring-beans-4.2.xsd
							http://www.springframework.org/schema/context http://www.springframework.org/schema/context/spring-context-4.2.xsd
							http://www.springframework.org/schema/aop http://www.springframework.org/schema/aop/spring-aop-4.2.xsd
							http://www.springframework.org/schema/tx http://www.springframework.org/schema/tx/spring-tx-4.2.xsd ">

	<!-- action -->
	<!-- 注意:Action对象作用范围一定是多例的.这样才符合struts2架构 -->
	<bean name="userAction" class="cn.shop.web.action.UserAction" ></bean>

 </beans>
二、配置spring随项目启动
web.xml:
<!-- 让spring随web启动而创建的监听器 -->
<listener>
  	<listener-class>org.springframework.web.context.ContextLoaderListener</listener-class>
</listener>
<!-- 配置spring配置文件位置参数 -->
<context-param>
  	<param-name>contextConfigLocation</param-name>
  	<param-value>classpath:applicationContext.xml</param-value>
</context-param>
配置struts2
一、配置struts2主配置文件
struts.xml:
<?xml version="1.0" encoding="UTF-8"?>
  <!DOCTYPE struts PUBLIC
	"-//Apache Software Foundation//DTD Struts Configuration 2.3//EN"
	"http://struts.apache.org/dtds/struts-2.3.dtd">

<struts>
	<package name="crm" namespace="/" extends="struts-default" >
		<action name="UserAction_*" class="cn.shop.web.action.UserAction" method="{1}" >
			<result name="success" >/success.jsp</result>
		</action>
	</package>
</struts>
二、配置struts2核心过滤器到web.xml
<!-- struts2核心过滤器 -->
<filter>
  	<filter-name>struts2</filter-name>
  	<filter-class>org.apache.struts2.dispatcher.ng.filter.StrutsPrepareAndExecuteFilter</filter-class>
</filter>
<filter-mapping>
  	<filter-name>struts2</filter-name>
  	<url-pattern>/*</url-pattern>
</filter-mapping>
struts2与spring整合
一、导包
struts2-spring-plugin-2.3.24.jar
二、配置常量
struts.xml:
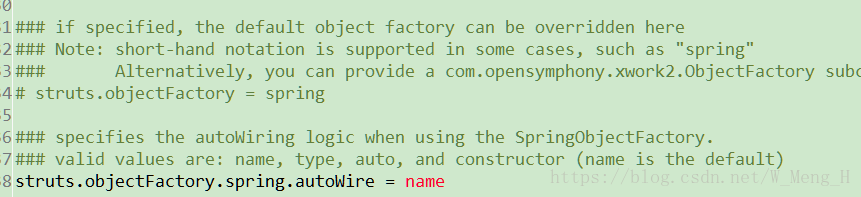
<!-- #  struts.objectFactory = spring	将action的创建交给spring容器
	struts.objectFactory.spring.autoWire = name spring负责装配Action依赖属性
-->
<constant name="struts.objectFactory" value="spring"></constant>
三、struts2与spring整合
整合方案1:struts2自己创建action,spring负责组装依赖属性
struts.xml:
<!-- 整合方案1:class属性上仍然配置action的完整类名
	struts2仍然创建action,由spring负责组装Action中的依赖属性
-->
<action name="UserAction_*" class="cn.shop.web.action.UserAction" method="{1}" >
	<result name="success" >/success.jsp</result>
</action>
不推荐理由:最好由spring完整管理action的生命周期,spring中功能才应用到Action上
整合方案2:spring负责创建action以及组装
applicationContext.xml:
<!-- action -->
<!-- 注意:Action对象作用范围一定是多例的.这样才符合struts2架构 -->
<bean name="userAction" class="cn.shop.web.action.UserAction" scope="prototype" >
	<property name="userService" ref="userService" ></property>
</bean>
struts.xml:
<!--
    整合方案2:class属性上填写spring中action对象的BeanName
	完全由spring管理action生命周期,包括Action的创建
	注意:需要手动组装依赖属性
-->
<action name="UserAction_*" class="userAction" method="{1}" >
	<result name="success" >/success.jsp</result>
</action>