以下是从网上搜集到的内容
概念:
1、 DC AND AD
DC是Domain Controller的缩写,即域控制器,AD是active directory的缩写,即活动目录.
Domain Controller是一台计算机,实现用户,计算机,目录的统一管理.
AD(活动目录)是一种存储协议,基于LDAP.
两者完全是两种概念,DC也可以不基于AD实现,比如基于数据库或文件,当然目前微软还没有这样的实现.
在对等网模式下,任何一台电脑只要接入网络,其他机器就都可以访问共享资源,如共享上网等。尽管
对等网络上的共享文件可以加访问密码,但是非常容易被破解。在由Windows 9x构成的对等网中,数据的传输是非常不安全的。
不过在“域”模式下,至少有一台服务器负责每一台联入网络的电脑和用户的验证工作,相当于一个单位的门卫一样,称为“域控制器(Domain Controller,简写为DC)”。
域控制器中包含了由这个域的账户、密码、属于这个域的计算机等信息构成的数据库。当电脑联入网络时,域控制器首先要鉴别这台电脑是否是属于这个域的,用户使用的登录账号是否存在、密码是否正确。如果以上信息有一样不正确,那么域控制器就会拒绝这个用户从这台电脑登录。不能登录,用户就不能访问服务器上有权限保护的资源,他只能以对等网用户的方式访问Windows共享出来的资源,这样就在一定程度上保护了网络上的资源。
要把一台电脑加入域,仅仅使它和服务器在
网上邻居中能够相互“看”到是远远不够的,必须要由
网络管理员进行相应的设置,把这台电脑加入到域中。这样才能实现文件的共享。
2、LDAP
LDAP是轻量目录访问协议,英文全称是Lightweight Directory Access Protocol,一般都简称为LDAP。
LDAP协议是跨平台的和标准的协议,因此应用程序就不用为LDAP目录放在什么样的服务器上操心了。实际上,LDAP得到了业界的广泛认可,因为它是Internet的标准。厂商都很愿意在产品中加入对LDAP的支持,因为他们根本不用考虑另一端(客户端或服务端)是怎么样的。LDAP服务器可以是任何一个开放源代码或商用的LDAP目录服务器(或者还可能是具有LDAP界面的关系型数据库),因为可以用同样的协议、客户端连接软件包和查询命令与LDAP服务器进行交互。与LDAP不同的是,如果软件厂商想在软件产品中集成对DBMS的支持,那么通常都要对每一个数据库服务器单独定制。不象很多商用的关系型数据库,你不必为LDAP的每一个客户端连接或许可协议付费。大多数的LDAP服务器安装起来很简单,也容易维护和优化。
3、目录系统协议(DSP:Directory System Protocol)
主要控制两个或多个目录系统代理间、目录用户代理和目录系统代理间的交互操作。具体实现过程是:终端用户在不知道某特定信息的具体位置的情况下,就可以访问目录中的信息。
4、目录优势
开发方式
如果需要开发一种提供公共信息查询的系统一般的设计方法可能是采用基于WEB的数据库设计方式,即前端使用浏览器而后端使用WEB服务器加上关系数据库。后端在Windows的典型实现可能是Windows NT + IIS + Acess数据库或者是SQL SERVER,IIS和数据库之间通过ASP技术使用ODBC进行连接,达到通过填写表单查询数据的功能;
目录服务
后端在Linux系统的典型实现可能是Linux+ Apache + postgresql,Apache和数据库之间通过PHP3提供的函数进行连接。使用上述方法的缺点是后端关系数据库的引入导致系统整体的性能降低和系统的管理比较繁琐,因为需要不断的进行数据类型的验证和事务的完整性的确认;并且前端用户对数据的控制不够灵活,用户权限的设置一般只能是设置在表一级而不是设置在记录一级。
目录服务的推出主要是解决上述数据库中存在的问题。目录与关系数据库相似,是指具有描述性的基于属性的记录集合,但它的数据类型主要是字符型,为了检索的需要添加了BIN(二进制数据)、CIS(忽略大小写)、CES(大小写敏感)、TEL(电话型)等语法(Syntax),而不是关系数据库提供的整数、浮点数、日期、货币等类型,同样也不提供象关系数据库中普遍包含的大量的函数,它主要面向数据的查询服务(查询和修改操作比一般是大于10:1),不提供事务的回滚(rollback)机制,它的数据修改使用简单的锁定机制实现All-or-Nothing,它的目标是快速响应和大容量查询并且提供多目录服务器的信息复制功能。
现在该说说LDAP目录到底有些什么优势了。现在LDAP的流行是很多因素共同作用的结果。可能LDAP最大的优势是:可以在任何计算机平台上,用很容易获得的而且数目不断增加的LDAP的客户端程序访问LDAP目录。而且也很容易定制应用程序为它加上LDAP的支持。
访问控制
LDAP提供很复杂的不同层次的访问控制或者ACI。因这些访问可以在服务器端控制,这比用客户端的软件保证数据的安全可安全多了。
用LDAP的ACI,可以完成:
l给予用户改变他们自己的电话号码和家庭地址的权限,但是限制他们对其它数据(如,职务名称,经理的登录名,等等)只有“只读”权限。
l 给予“HR-admins"组中的所有人权限以改变下面这些用户的信息:经理、工作名称、员工号、部门名称和部门号。但是对其它域没有写权限。
l 禁止任何人查询LDAP服务器上的用户口令,但是可以允许用户改变他或她自己的口令。
l 给予经理访问他们上级的家庭电话的只读权限,但是禁止其他人有这个权限。
l 给予“host-admins"组中的任何人创建、删除和编辑所有保存在LDAP服务器中的与计算机主机有关的信息
l 通过Web,允许“foobar-sales"组中的成员有选择地给予或禁止他们自己读取一部分客户联系数据的读权限。这将允许他们把客户联系信息下载到本地的笔记本电脑或个人数字
助理(PDA)上。(如果销售人员的软件都支持LDAP,这将非常有用)
l 通过Web,允许组的所有者删除或添加他们拥有的组的成员。例如:可以允许销售经理给予或禁止销售人员改变Web页的权限。也可以允许邮件假名(mail aliase)的所有者不
经过IT技术人员就直接从邮件假名中删除或添加用户。“公用”的邮件列表应该允许用户从邮件假名中添加或删除自己(但是只能是自己)。也可以对IP地址或主机名加以限制。例
如,某些域只允许用户IP地址以192.168.200.*开头的有读的权限,或者用户反向查找DNS得到的主机名必须为*.foobar.com。
使用权限
LDAP允许你根据需要使用ACI(一般都称为ACL或者访问控制列表)控制对数据读和写的权限。例如,设备管理员可以有权改变员工的工作地点和办公室号码,但是不允许改
变记录中其它的域。ACI可以根据谁访问数据、访问什么数据、数据存在什么地方以及其它对数据进行访问控制。因为这些都是由LDAP目录服务器完成的,所以不用担心在客户端的
应用程序上是否要进行安全检查。
LDAP(Lightweight Directory Access Protocol)是目录服务在TCP/IP上的实现(RFC 1777 V2版和RFC 2251 V3版)。它是对X500的目录协议的移植,但是简化了实现方法,
所以称为轻量级的目录服务。在LDAP中目录是按照树型结构组织,目录由条目(Entry)组成,条目相当于关系数据库中表的记录;条目是具有区别名DN(Distinguished Name)的
属性(Attribute)集合,DN相当于关系数据库表中的主键(Primary Key);属性由类型(Type)和多个值(Values)组成,相当于关系数据库中的域(Field)由域名和数据类型组
成,只是为了方便检索的需要,LDAP中的Type可以有多个Value,而不是关系数据库中为降低数据的冗余性要求实现的各个域必须是不相关的。LDAP中条目的组织一般按照地理位置
和组织关系进行组织,非常的直观。LDAP把数据存放在文件中,为提高效率可以使用基于索引的文件数据库,而不是关系数据库。LDAP协议集还规定了DN的命名方法、存取控制方
法、搜索格式、复制方法、URL格式、开发接口等。
LDAP对于这样存储这样的信息最为有用,也就是数据需要从不同的地点读取,但是不需要经常更新。
例如,这些信息存储在LDAP目录中是十分有效的:
l 公司员工的电话号码簿和组织结构图
l 客户的联系信息
l 计算机管理需要的信息,包括NIS映射、email假名,等等
l软件包的配置信息
l 公用证书和安全密匙
什么时候该用LDAP存储数据
大多数的LDAP服务器都为读密集型的操作进行专门的优化。因此,当从LDAP服务器中读取数据的时候会比从专门为OLTP优化的关系型数据库中读取数据快一个数量级。也是因为
专门为读的性能进行优化,大多数的LDAP目录服务器并不适合存储需要经常改变的数据。例如,用LDAP服务器来存储电话号码是一个很好的选择,但是它不能作为电子商务站点的数
据库服务器。
如果下面每一个问题的答案都是“是”,那么把数据存在LDAP中就是一个好主意。
l 需要在任何平台上都能读取数据吗?
l 每一个单独的记录项是不是每一天都只有很少的改变?
l 可以把数据存在平面数据库(flat database)而不是关系型数据库中吗?换句话来说,也就是不管什么范式不范式的,把所有东西都存在一个记录中(差不多只要满足第一范式)。
最后一个问题可能会唬住一些人,其实用平面数据库去存储一些关系型的数据也是很一般的。例如,一条公司员工的记录就可以包含经理的登录名。用LDAP来存储这类信息是很方
便的。一个简单的判断方法:如果可以把数据存在一张张的卡片里,就可以很容易地把它存在LDAP目录里。
5、NIS (Network Information Service网络信息服务)
概述
(Network Information Service)
NIS是Sun Microsystem于1985年发布的一项目录服务技术(Diretory Service),用来集中控制几个系统管理数据库的网络用品。NIS简化了UNIX和LINUX桌面客户的管理工作,客户端利用它可以使用中心服务器的管理文件。桌面系统的用户无需建立他们自己的/etc/passwd,他们只简单的使用维护在NIS服务器的文件即可。
提到NIS不得不先说明一下WINDOWS2000的域控制器,在局域网内有一台WIN2000域控制器,下面有一些机器加入到这个域中,在下的机器登录时,有一个选项是选择登入到本机还是登入到域内,登入本地的密码由本机控制,但是如果登入域内,密码由域控制器负责管理。
LINUX也是操作系统,跟WIN2000没有本质的区别,所以仔细读上段话,就能理解NIS是原理是什么样了,这时出现了一个重要的文件/etc/nsswitch.conf
运行流程
事实上, NIS
[1] 的运作流程一点也不困难。一个不是很庞大的网络中,大约会有一部NIS Server ,并且同时有很多部的 NIS Client 。 NIS Server 与 NIS Client 的架构,整体架构有点像底下的图示:
如图示。NIS 提供的 /etc/passwd,/etc/group 以及 /etc/hosts 等 ASCII 格式档案的信息, NIS Server 会将前述几个ASCII 档案内容复制成为 DBM 数据库格式的档案,当用户藉由个人计算机联机到 NISClient主机尝试登入时, NIS Client 将会到 NIS Server 去查寻该用户的账号与密码,以做为用户登入验证的依据。
NIS Server 将自己系统内的 /etc/passwd, /etc/group,/etc/hosts 等制作成为 DBM 的数据库格式档案;
NIS Client 若有用户登入的要求时,会前往 NIS Server搜寻数据库里面数据做为验证用。
每次更动 NIS Server 上面的用户数据时,则 NIS Server需要重新制作 DBM 数据库档案!
需要设定的有:NIS Server 端;
NIS Client 端。
RPC
Sun 公司开发的服务器软件NFS,由RPC (Remote Procedure Call)所统一管理。 NIS 也是使用 RPC 来管理。
架构
NIS Server 在整个网域之中,一般比较小型的网域常见的方法。万一,如果网域里面有几乎100 部以上的主机,这个时候,只有一部NIS Server 可能无法提供快速的数据查寻与响应的状态!这时需要 NIS Sever的 master 与 slave 的架构。
slave藉由将来自 master主机的数据加以更新到自己的数据库当中,并且提供与master 相同的查寻功能!这个 NIS 的 master 与 slave 架构则完全相同。NIS Server 的 master 先将自己的账号、密码相关档案制作成为数据库档案(databasefile);NIS Server 的 master 将自己的数据库档案传送到 slave上面;NIS Server 的 slave 接收来自‘信任的 NIS Server master主机’的数据后,更新自己的数据库,使自己的数据库与 master 主机的数据同步;网域当中的所有 NIS Client 查寻 NIS Server 时,会找寻‘最先回应的那一部NIS 主机的数据库内容’。
所以,我们可以知道的是,NIS 的 master 与 slave 架构主要在分散查寻 NIS时候的主机负荷,因此,除非您的网域真的很大,否则是没有必要架设 NIS Slave与 master 的架构的啦!底下我们没有架设 master 与 slave 。只有一部主要的master 而已。
套件安装
NIS是一个客户机/服务器系统,ypbind是定义NIS服务器的客户端进程。一旦确定了服务器位置,客户机绑定到了服务器上,所以客户端的住处查询都发往服务器。ypserv是回答客户端查询的服务器进程。
基本上, NIS 建议直接使用原版光盘上面给我们的 RPM 来安装即可。
yp-tools :提供 NIS 相关的查寻指令功能
ypbind :提供 NISClient 端的设定套件
ypserv :提供 NISServer 端的设定套件
portmap :就是 RPM 一定需要的数据啊!
结构
NIS Server 主要以 ypserv 这个套件提供的数据来进行设定,主要内容有:
/etc/ypserv.conf :就是主要的设定档了
/usr/sbin/ypserv :主要的服务(daemon)执行档
/usr/sbin/rpc.yppasswdd:RPC的服务啰!
/usr/sbin/rpc.ypxfrd :同样的, RPC 的服务啰!
/usr/lib/yp/ypinit :建立 NIS 数据库的执行程序
所以,事实上我们最重要的就是设定 ypserv.conf 这个档案而已啦!至于 RPC的设定,就直接启动他即可!另外,还有 yp-tools 会提供的相关数据喔:
/usr/bin/yppasswd :更改你在NIS database (NIS Server 所制作的数据库) 的密码
/usr/bin/ypchsh :同上,但是是更改shell
/usr/bin/ypchfn :同上,但是是更改一些使用者的讯息!
配置客户端
进程ypbind这客户机的NIS域定位服务器,NIS域包括所有NIS服务器和客户机。它与DNS不同,尽管有些管理员将NIS域名等同于DNS的域名。NIS域名只对那NIS服务器和客户机起作用。
有两种方式配置NIS域名:
nisdomainname 定义显示NIS域名
yp.conf文件配置NIS域名。
#nisdomainname gogo
#nisdomainname
gogo
默认地,ypbind使用nisdomainname命令返回NIS域名,向NIS服务器发出请求时在网络内广播该地址。
yp.conf文件
/etc/yp.conf定义了yp.conf配置。如果找不到yp.conf文件,ypconf进程使用nisdomainname 命令返回的NIS域名,广播定位NIS服务器。ypbind将绑定到第一个相应请求的服务器上。
ypserver hostname
domain nisdomain broadcast | server hostname
========
hostname,nisdomain字符为变量。
使用ypserver配置选项为客户机指定服务器。yp.conf文件包括ypserver选项时,客户机使用命令nisdomainname返回的NIS域名,向ypserver命令的hostname字段指定的服务器发出请求。/etc/hosts文件中必须包含该主机的IP地址,还记得我说过什么了吗,DNS是取代的HOSTS的,在DNS中设定也是可以的。ypserver选项强制客户机连接到特定的服务器上。
在yp.conf文件中使用domain选项定义了NIS域名,指出客户机是广播定位还是直接向服务器发送请求。
example:
#/etc/yp.conf
#
domain first server jh
=========
first作为域名,jh是这个域的服务器 jh在hosts中必须有相对应的IP地址
或者jh IN A 192.168.1.1还记得这条指令是干什么的吗?
------------------------
创建NIS服务器
安装ypserv
rpm -ivh ypserv*
-----------
NIS服务器提供的数据库,称为NIS映射表.
创建独立服务器
如果用户只有一个NIS域服务器,建立独立服务器,如果用户NIS域中有多个服务器,就需要选择其中一个作为该域的主服务器。其他作为从服务器。
用户可以使用make命令初始化独立服务器,建立NIS映射表,文件/var/yp/Makefile包含了创建数据库的命令。
example:
#nsidomainname first
#cd /var/yp
#make
gamke[1]:Entering directory '/var/yp/terns'
Updateing passd.byname......
Updateing passwd.byuid......
服务器
使用ypinit命令初始化主服务器,常见NIS映射表。默认地.ypinit同make命令给出的操作一样。要创建相对于从服务器的主服务器,用户需要编辑/var/yp/Makefile文件。在Makefile文件中找到NOPUSH设置为NOPUSH=false.
修改后,运行ypinit -m
exmpale:
#nisdomwiname first
#cd /var/yp
#/usr/lib/yp/ypinit m
...........
next host to add:1111.first .my home.c om
next host to add:2222.first .my home. c om
..............
............
..............
is this correct? [y/n]y
..........
.........
updateing passwd.byname.........
.............
..........
...........
从服务器配置比主服务器简单。主服务器保存了所有的映射表。从服务器只需知道哪个是主服务器即可。ypinit -s 配置从服务器。
example:
#/usr/lib/yp/ypinit -s salve
salve的IP地址也必须保存在hosts中。
----------
安全性
用户可以在/var/yp/securenets文件中定义服务器的安全性能。
example:
255.255.255.0 192.168.1.0
授权192.168.1.0子网的用户可以访问服务器。
-----------------
ypserv.conf文件
用户必须使用securenets文件,未必用ypserv.conf定义安全性。
语法如下:
host:map:security:[mangle[]]
字段如下
host 授权或禁止访问的计算机,它由地址/掩码对确定.例如 192.168.1.0/255.255.255.0 . *表示所有主机
map 该字段表示访问的NIS映射表项名称。例如:passwd.byuid。*表示映射表 中所有的字段都可用。
security 授权访问类型
none 允许访问,不加强安全性。
port 允许特权端口访问。只接收源端口小于1024的连接。
deny 禁止访问。
des 访问时需要数字加密标准(DES)认证。
[mangle[]] 指定应该在发出响应之前用“X”覆盖掉的字段(不明白)
example:
# Host : MAP : Security : mangle
192.168.1.0/255.255.255.0 : * :none :no
* :* :deny :no
启动服务器
/etc/init.d/ypserv restart
启动NIS客户端
/etc/init.d/ypbind restart
测试NIS
NIS客户端应该绑定到服务器。ypwhich命令可以检测客户端是否正确的连接到服务器。
如果客户机正确的绑定到服务器,用ypcat检测服务器提供的信息。
NIS与DNS是两会事,大家一定要搞清楚。虽然都有可能涉及到域名。但确实是两会事,他们之间会有一些连系。但绝不可以混在一起。切记,切记。
====================================
nsswitch.conf文件
nsswitch.conf文件不仅能处理主机表和DNS之间的优先次序,还能处理其它的问题。它为几个不同的系统管理数据库定义来源(多看几篇这句话,“几个不同的系统管理数据库”,可以是DNS,NIS,大家想一想)
由nsswitch.conf控制的数据库
alias EMAIL别名
ehters 用于RARP的以太网地址。
hosts 主机名和IP地址
password 用户帐号信息。
还有许多,没有列出来。
使用不带NIS的nsswitch.conf example:
password: files
shadow: files
...........
hosts: dns files
#这句很重要,dns在先,files在后,这里的files指的是/etc/hosts文件,如果有客户端查询的时候,先找dns,再找files。顺序很重要。
aliases: files
.........
.........
.........
使用带NIS的nsswitch.conf example:
hosts: files nis dns
protocols: nis files
.........
........
........
控制选择过程
nsswitch.conf文件提供了几个可用于查询测试的状态关键字:
success(成功) 查询返回所期望的结果。该状态的缺省的动作是返回结果给提交查询的应用程序(想一下,在我的DNS第二讲,说到解析器,就可以是提交查询的应用程序,不过他是DNS查询是了),然后退出查询过程。
nofound(没有找到) 虽然查询工作正常,但所期望值没有找到。缺省的动作是查询下一行的源。
unavail(不可用) 提交查询的源不可用。例,名称服务器没有运行。
tryagain(重度) 源暂时不可用。缺省的动作是继续向下一个源提交查询。
有两个关键字可以识别缺省的动作:return和continue。return告诉解析器返回值给应用程序并结束查询。continue告诉解析器继续向下一个源提交查询。
状态和动作关键字可以结合起来,加到nsswitch.conf文件的源单中,以控制查询过程何时移到下一个源。
状态检查的语法是:
[ ( ! ? status=action ) + ]
问号(?)代表任何状态值;叹号(!)对状态值取反。!SUCCESS是不成功的意思。方括号"[]"用于包括整个条件语句。圆括号"()"是可选的,只用来包含每个测试条件,可以有多个条件,每个条件用圆括号包含,之间用加号连接。
例如:
[ ( NOFOUND=RETURN ) + ( TRYAGAIN+TRETURN) ]
其实就是C语言中的“与”“或”“非”的关系。
下面是nsswitch.conf中的主机一行:
hosts: dns [ !UNAVAIL=return ] files
说明了UNAVAIL之外的所有状态,解析器应该将返回值给应用程序,然后退出。
只有当DNS名称服务器没有运行的时候,解析器才能向主机表查询。如果有条件语句改变,缺省的动作卞会起作用,UNAVAI的缺省动作是continue。
nsswich.conf文件已经取代了hosts.conf,因为它可以提供更多的资源控制方式。LINUX系统中通常这两个文件都有,但实际上起作用的是nsswitch.conf文件。
6、SMB(Server Message Block)通信协议
是微软(Microsoft)和英特尔(Intel)在1987年制定的协议,主要是作为Microsoft网络的通讯协议。SMB 是在会话层(session layer)和表示层(presentation layer)以及小部分应用层(application layer)的协议。
SMB使用了NetBIOS的应用程序接口 (Application Program Interface,简称API)。另外,它是一个开放性的协议,允许了协议扩展——使得它变得更大而且复杂;大约有65个最上层的作业,而每个作业都超过120个函数,甚至Windows NT也没有全部支持到,最近微软又把 SMB 改名为 CIFS(Common Internet File System),并且加入了许多新的特色。
7、Samba
是在Linux和UNIX系统上实现SMB协议的一个免费软件,由服务器及客户端程序构成。SMB(Server Messages Block,信息服务块)是一种在局域网上共享文件和打印机的一种通信协议,它为局域网内的不同计算机之间提供文件及打印机等资源的共享服务。SMB协议是客户机/服务器型协议,客户机通过该协议可以访问服务器上的共享文件系统、打印机及其他资源。通过设置“NetBIOS over TCP/IP”使得Samba不但能与局域网络主机分享资源,还能与全世界的电脑分享资源。
About Samba
Samba is the standard Windows interoperability suite of programs for Linux and Unix.
Samba is Free Software licensed under the GNU General Public License, the Samba project is a member of the Software Freedom Conservancy.
Since 1992, Samba has provided secure, stable and fast file and print services for all clients using the SMB/CIFS protocol, such as all versions of DOS and Windows, OS/2, Linux and many others.
Samba is an important component to seamlessly integrate Linux/Unix Servers and Desktops into Active Directory environments. It can function both as a domain controller or as a regular domain member.
二、linux 加入到WINDOWS AD 域 (网上收集的两篇,这是其中之一)
对于帐户统一管理系统或软件来说,在 Linux 下你可能知道 NIS、OpenLDAP、samba 或者是 RedHat、IBM 的产品,在 Windows 下当然就是最出名的活动目录 (Active Directory)(AD)了,这里就来探讨一下如何让 Linux 的计算机加入 AD 域。
首先,先简单介绍一下 AD 域。自 Windows 2000 以来,AD 一直是 Windows 的身份验证和目录服务,AD 基于 LDAP 实现其功能,其使用 DNS 进行主机名的解析,使用 Kerberos V5 进行用户身份验证,使用 LDAP V3 进行统一的帐户管理。
目标:在 AD 域中,将 Linux 服务器加入 AD,以使 Domain Admins 用户组成员可以登录操作 Linux 服务器,不需要在 Linux 服务器中单独创建帐户。
环境:一台 Windows Server 2012 R2 操作系统的服务器,安装有 AD 并作为域控制器(Domain Controller)(DC),同时也作为 DNS 服务器和时间服务器;
Windows 服务器地址为 192.168.2.122,域名为 contoso.com,主机名为 ad.contoso.com;
一台 RedHat Enterprise Linux 6.x 的服务器,请自行配置好网络及 YUM 源。
Linux 服务器地址为 192.168.2.150,主机名为 lemon20.contoso.com。
1、安装所需软件:
# yum -y install samba samba-client samba-common samba-winbind samba-winbind-clients krb5-workstation ntpdate
2、设置服务自启动并启动服务:
# chkconfig smb on
# chkconfig winbind on
# service smb start
# service winbind start
3、修改 /etc/hosts 文件,添加主机对应记录:
127.0.0.1 localhost localhost.localdomain
localhost4 localhost4.localdomain4::1
localhost localhost.localdomain localhost6 localhost6.localdomain6
192.168.2.150 lemon20.contoso.com lemon20
4、设置 DNS 地址并与 AD 服务器同步时间:
# echo "nameserver 192.168.2.122" >> /etc/resolv.conf# ntpdate ad.contoso.com
5、设置 Kerberos 票据(可选):
销毁已经存在的所有票据:
# kdestroy
查看当前是否还存在票据:
# klist klist: No credentials cache found (ticket cache FILE:/tmp/krb5cc_0)
生成新的票据,注意域名大写。
# kinit [email protected]
# klistTicket cache: FILE:/tmp/krb5cc_0Default principal: [email protected] starting Expires Service principal08/02/16 22:35:26 08/03/16 08:35:29 krbtgt/ [email protected] until 08/09/16 22:35:26
6、以命令方式设置 samba 与 Kerberos,并加入 AD 域:
#authconfig --enablewinbind --enablewins --enablewinbindauth --smbsecurity ads --smbworkgroup=CONTOSO --smbrealm CONTOSO.COM --smbservers=ad.contoso.com --enablekrb5 --krb5realm=CONTOSO.COM --krb5kdc=ad.contoso.com --krb5adminserver=ad.contoso.com --enablekrb5kdcdns --enablekrb5realmdns --enablewinbindoffline --winbindtemplateshell=/bin/bash --winbindjoin=administrator --update --enablelocauthorize --enablemkhomedir --enablewinbindusedefaultdomain
注意命令中的大小写,此步骤也可以使用 authconfig-tui 完成。
7、增加 sudo 权限(可选):
# visudo
加入下列设置:
%MYDOMAIN//domain/ admins ALL=(ALL) NOPASSWD: ALL
8、确认是否正确加入 AD 域:
查看 AD 的相关信息
# net ads info
查看 MYDOMAIN/USERID 的使用者帐户
# wbinfo -u
三、linux 加入到WINDOWS AD 域 (网上收集的两篇,这是其中之一,图是我自己的图,原图复制不过来)
samba服务通过ad域进行用户验证。在查资料的过程中发现。关于linux加入windows域,网上资料不少,但是按着网上的说法做大多不成功,甚至很多人估计都不知道自己在说什么,最后一个net ads join就认为已经成功加入到域了,可是然后呢?作为域内的一个成员,普通的机器要可以提供域内的用户登陆;作为samba服务要把共享加入到目录中,这样才起到加入域的作用嘛。笔者经过反复实验,终于把linux加入到windows域一些细节记录下来,不敢独享,特拿出。
笔者用的linux为centos5.3。ad域为win2k3 sp2。域为:Rainbird.net
Win2k3:
Name:ad1
Ip:192.168.1.241
Dns:192.168.1.241
Centos5.3:
Name:Filesrv
Ip:192.168.1.246
Dns:192.168.1.241
Ok,let’s go!
1.samba服务器软件需求
krb5-workstation-1.2.7-19
pam_krb5-1.70-1
krb5-devel-1.2.7-19
krb5-libs-1.2.7-19
samba-3.0.5-2
[root@filesrv CentOS]# rpm -qa|grep krb5
krb5-auth-dialog-0.7-1
krb5-libs-1.6.1-25.el5
krb5-devel-1.6.1-25.el5
pam_krb5-2.2.14-1
krb5-workstation-1.6.1-25.el5
[root@filesrv CentOS]# rpm -qa|grep samba
samba-swat-3.0.28-0.el5.8
samba-common-3.0.28-0.el5.8
samba-client-3.0.28-0.el5.8
samba-3.0.28-0.el5.8
如果centos在安装的时候没有取消默认选中的”Base”,则krb5的包是默认全部安装
如果没有选择安装samba可以这样安装
[root@filesrv CentOS]# rpm -ivh xinetd-2.3.14-10.el5.i386.rpm
[root@filesrv CentOS]# rpm -ivh --aid samba*.rpm
2.配置kerberos和samba
因为笔者用的系统为centos所以为保证一次成功的准确率,这里就使用字符界面下的图形工具来配置了。
运行setup工具
[root@localhost~]#setup
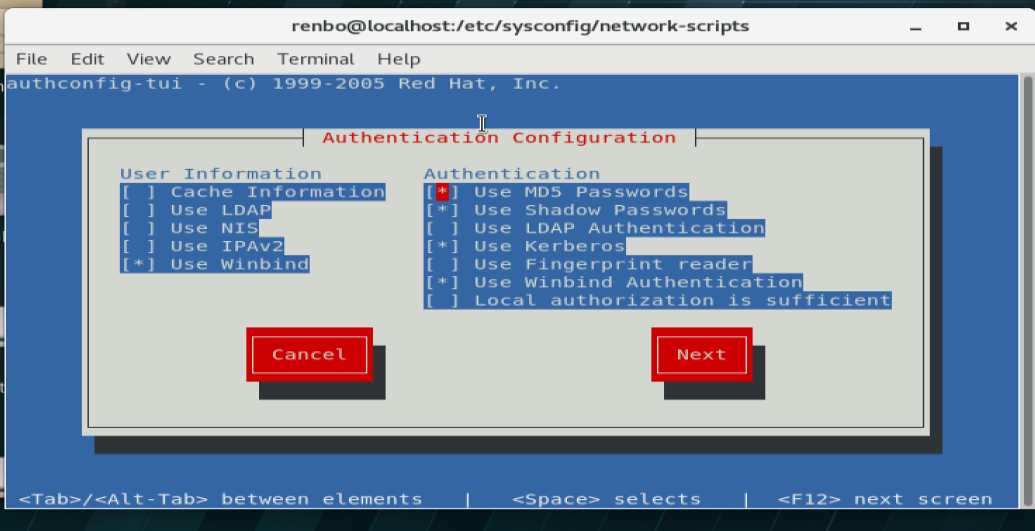
认证配置
选择:
“use winbind”
“use kerberos”
“use winbind authertication”
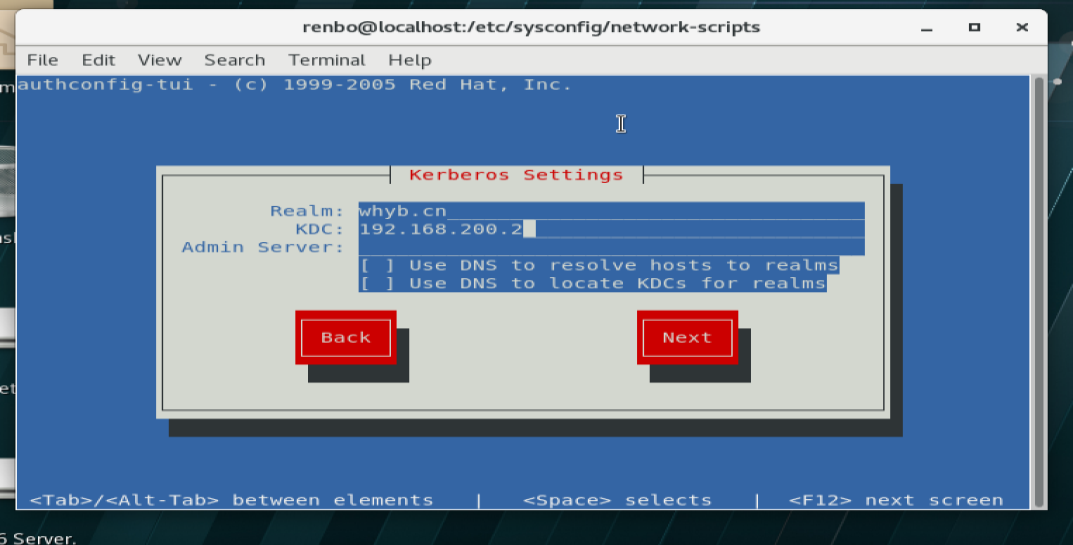
删除admin server 其余的改成真实情况
Realm为域名,KDC为域服务器的ip
配置winbind
Domain为你的域的,左面第一个”.”前面的东东
选择”join domain”,提示是否先保存配置信息,肯定是yes了
嘿嘿,看到这个画面是不是想到了xp机器加入到域的情景?没错就是那个!输入ad域的管理员密码吧J
不出意外的话,你就到达了最后一个界面,肯定ok,然后退出了。
一般来说,只要两台机器的时间上下不差五分钟,且项都配置正确的话,你就会看到下面这个图片。看到这个图片说明你的linux成功加入到ad域啦!
OK,用图形的好处就是方便快捷,但是这样只适合rh系统。别的linux系统咋办呢?别急。这个工具其实就是编辑以下三个配置文件:
/etc/nsswitch.conf
passwd: files winbind(就是先读files 然后再通过winbind认证)
shadow: files winbind
group: files winbind
/etc/krb5.conf
[logging]
default = FILE:/var/log/krb5libs.log
kdc = FILE:/var/log/krb5kdc.log
admin_server = FILE:/var/log/kadmind.log
[libdefaults]
default_realm = RAINBIRD.NET(默认的域名)
dns_lookup_realm = false
dns_lookup_kdc = false
ticket_lifetime = 24h
forwardable = yes
[realms]
EXAMPLE.COM = {
kdc = kerberos.example.com:88
admin_server = kerberos.example.com:749
default_domain = example.com
}
RAINBIRD.NET = {
kdc = 192.168.1.241:88(域服务器)
kdc = 192.168.1.241
}
[domain_realm]
.example.com = EXAMPLE.COM
example.com = EXAMPLE.COM
rainbird.net = RAINBIRD.NET
.rainbird.net = RAINBIRD.NET
[appdefaults]
pam = {
debug = false
ticket_lifetime = 36000
renew_lifetime = 36000
forwardable = true
krb4_convert = false
}
/etc/samba/smb.conf
workgroup = RAINBIRD//域名
password server = 192.168.1.241//域服务器
realm = RAINBIRD.NET
security = ads//必须启用
idmap uid = 16777216-33554431
idmap gid = 16777216-33554431
template shell = /bin/bash
winbind use default domain = false (改成true)
winbind offline logon = false(改成true)
template homedir = /home/%U
winbind separator = /
winbind enum users = Yes
winbind enum groups = Yes
红色部分就是工具自动修改的了,但是smb.conf修改的不彻底,还不能满足我们的要求,怎么办呢?手动把蓝色部分加上,并把那两个false改成ture,然后设置samba的开机自动启动chkconfig smb on,service smb on启动服务,然后就是手工把linux加入到windows了
The workgroup in /etc/samba/smb.conf does not match the short
domain name obtained from the server.
Using the name [RAINBIRD] from the server.
You should set "workgroup = RAINBIRD" in /etc/samba/smb.conf.
Using short domain name -- RAINBIRD
Joined 'FILESRV' to realm 'RAINBIRD.NET'
提示“Joined”哟,不是这个提示就是有问题,再仔细检查。
OK,重启linux,这时候用一个域用户登陆linux如果提示用户或密码验证失败,说明你重启之前的东西没配置对。仔细检查一下哪里不对呢?
如果提示如下,那么恭喜你,可以继续下一个话题了。
3.自动创建用户目录.
用到的文件pam_mkhomedir.so
在/etc/pam.d/sysconf-auth文件中的sesson部分添加一行
session required pam_mkhomedir.so silent skel=/etc/skel umask=0077
silent不打印创建目录信息
skel 告诉pam_mkhomedir.so拷贝/etc/skel里的文件到新创建的目录里.
umask 是创建的目录的权限
创建哪个目录是在smb.conf里的template homedir定义的
如图:
保存退出,重启一下X-window。再次用域用户登陆,是不是成功看到了久违的linux桌面呢?
四、https://raymii.org/s/tutorials/SAMBA_Share_with_Active_Directory_Login_on_Ubuntu_12.04.html
Samba Shares with Active Directory Login on Ubuntu 12.04
This tutorial shows you how to set up a SAMBA server which authenticates all users to an Active Directory, including group based permissions. It uses Samba, Winbind, Kerberos and nsswitch. This allows you to have a Linux machine serving files via SMB, where your authentication and autorization for the files and folders is done via Active Directory.
We are actually doing two things, we bind a Linux machine to the Active Directory (but we disable shell access for the users), and we then configure Samba to accept these users to the shares we set up.
Introduction
The data used in this tutorial:
- Active Directory Domain: example.org
- Realm/workgroup: example
- Active Directory Server IP: 10.0.23.1 (Also DNS and NTP)
- Share 1: Marketing
- Allowed AD group: marketing
- Share 2: Research
- Allowed AD groups: research, development
- Share 3: Dropbox
- Allowed AD groups: Everyone with a domain account, Domain Users.
- Share 4: CEO
This setup is tested with the following software:
- Ubuntu 12.04
- Samba 3.6.3
- Active Directory on Windows Server 2008 mixed with Windows Server 2012.
- Active Directory on Windows Server 2003 mixed with Windows Server 2008.
Overview
A summary of the steps we are going to do:
- Install Packages
- Configure NTP & DNS
- Configure Kerberos
- Configure nsswitch
- Configure Samba
- Join the Domain
- Configure Samba shares
- Test the setup
You need to have a privileged account to join the Active Directory Domain.
Install Packages
On a freshly installed Ubuntu Server 12.04 we need to install the following packages to get started:
apt-get install ntp krb5-user samba smbfs smbclient winbind
krb5, Kerberos will ask some questions about your domain and a privileged user. You can enter through this, we are going to put our own config files.
Configure NTP & DNS
Active Directory (Kerberos in general) is very picky about the system time, so configure NTP to sync the time against your Active Directory NTP server. Edit /etc/ntp.conf:
server 10.0.23.1
Now also edit your /etc/resolv.conf (or /etc/network/interfaces) file and change the DNS to your Active Directory DNS servers:
# /etc/resolv.conf
nameserver 10.0.23.1
search example.org

# /etc/network/interfaces
iface eth0 inet static
    [...]
    dns-nameservers 10.0.23.1
    dns-search example.org
We do this because Active Directory uses DNS for a lot of things. You can also setup your standard DNS servers to use an Active Directory DNS server as first upstream.
Configure Kerberos
What is Kerberos?
Kerberos is a computer network authentication protocol which works on the basis of "tickets" to allow nodes communicating over a non-secure network to prove their identity to one another in a secure manner. Its designers aimed it primarily at a clientserver model and it provides mutual authenticationboth the user and the server verify each other's identity.
A good article on how Kerberos is used in Active Directory can be found here: http://technet.microsoft.com/en-us/library/bb742516.aspx
We need to set up Kerberos so that we can bind our machine against Active Directory and let users access the Samba share via the AD. Edit the /etc/krb5.conf file, remove everything and place the following in it, changing the EXAMPLE.ORG domain to your own Active Directory Domain:
[libdefaults]
  ticket_lifetime = 24h
  default_realm = EXAMPLE.ORG
  forwardable = true

[realms]
  EXAMPLE.ORG = {
    kdc = 10.0.23.1
    default_domain = EXAMPLE.ORG
  }

[domain_realm]
  .example.org = EXAMPLE.ORG
  example.org = EXAMPLE.ORG

[kdc]
  profile = /etc/krb5kdc/kdc.conf

[appdefaults]
  pam = {
    debug = false
    ticket_lifetime = 36000
    renew_lifetime = 36000
    forwardable = true
    krb4_convert = false
  }

[logging]
  kdc = FILE:/var/log/krb5kdc.log
  admin_server = FILE:/var/log/kadmin.log
  default = FILE:/var/log/krb5lib.log
We are now going to test Kerberos by getting a ticket for the Active Directory Administrator User. Make sure you have the password ready:
kinit Administrator
Password for [email protected]:
Now we check if we got a valid ticket:
klist
Ticket cache: FILE:/tmp/krb5cc_0
Default principal: [email protected]

Valid starting    Expires           Service principal
27/06/2013 07:17  27/06/2013 17:17  krbtgt/[email protected]
        renew until 28/06/2013 07:17
If this is not correct, check your Kerberos and DNS and NTP (time) settings and try again.
Configure nsswitch
nsswitch is used to tell the system that the Active Directory users are also valid users. We are going to configure it to also accept winbind users, which is what Samba uses after it has bound to the domain.
Edit the /etc/nsswitch.conf and change the passwd, shadow and group lines to look like this:
passwd:         compat winbind
group:          compat winbind
shadow:         compat winbind
Note that this might not work for you. If you have issues with the users later on, change these lines to this:
 passwd:            files winbind
 shadow:            files winbind
 group:             files winbind
The NetBSD man page explains more than the Ubuntu man page: http://www.daemon-systems.org/man/nsswitch.conf.5.html
Configure Samba (#1)
Now we need to set up Samba to also support the domain. Edit /etc/samba/smb.conf and remove everything, then place the following in it:
[global]
    # No .tld
    workgroup = EXAMPLE
    # Active Directory System
    security = ads
    # With .tld
    realm = EXAMPLE.ORG
    # Just a member server
    domain master = no
    local master = no
    preferred master = no
    # Disable printing error log messages when CUPS is not installed.
    printcap name = /etc/printcap
    load printers = no
    # Works both in samba 3.2 and 3.6.
    idmap backend = tdb
    idmap uid = 10000-99999
    idmap gid = 10000-99999
    # no .tld
    idmap config EXAMPLE:backend = rid
    idmap config EXAMPLE:range = 10000-9999
    winbind enum users = yes
    winbind enum groups = yes
    # This way users log in with username instead of [email protected]
    winbind use default domain = yes
    # Inherit groups in groups
    winbind nested groups = yes
    winbind refresh tickets = yes
    winbind offline logon = true
    # Becomes /home/example/username
    template homedir = /home/%D/%U
    # No shell access
    template shell = /bin/false
    client use spnego = yes
    client ntlmv2 auth = yes
    encrypt passwords = yes
    restrict anonymous = 2
    log file = /var/log/samba/samba.log
    log level = 2
Save the file and restart all the daemons:
/etc/init.d/winbind restart
/etc/init.d/nmbd restart
/etc/init.d/smbd restart
Join the domain
Make sure you still have a valid Kerberos ticket. If not, do a new kinit Administrator. Then execute the following command:
net ads join -U administrator
Output is like this:
Enter Administrator's password:
Using short domain name -- EXAMPLE
Joined 'HOSTNAME' to realm 'Example.org'
DNS Update for hostname.example.org failed: ERROR_DNS_GSS_ERROR
DNS update failed!
The DNS error can be ignored, make sure you create an A record and a PTR record manually.
Restart all the daemons again:
/etc/init.d/winbind restart
/etc/init.d/nmbd restart
/etc/init.d/smbd restart
Also update PAM:
pam-auth-update
Now see if you can list the domain users and groups:
wbinfo -u # lists all the users in the domain
wbinfo -g # lists all the groups in the domain
And also check if winbind and nsswitch are correctly working:
getent passwd # should return a list with all users on the local system and from the active directory
getent group # should return a list with all groups and their members, both from the local system and the active directory
If this does not work, go back to the nsswitch configuration section and change the compat to files.
Configure Samba (#2): Shares
This setup reflects an average business. Two departments with their own share, and one dump folder for everyone. And a folder for the CEO so that he feels special. Do note that it is a good idea to clean the Dropbox every night with a cronjob, but let your users know that that happens.
We are going to create the shares. First create the folders on the system:
mkdir -p /sharing/{marketing,research,ceo,dropbox}
chmod -R 0770 /sharing/
chgrp -R "Domain Users" /sharing/
Add the shares to /etc/samba/smb.conf:
[Marketing]
    comment = Marketing
    path = /sharing/marketing/
    valid users = @EXAMPLE\marketing
    force group = marketing
    writable = yes
    read only = no
    force create mode = 0660
    create mask = 0777
    directory mask = 0777
    force directory mode = 0770
    access based share enum = yes
    hide unreadable = yes

[Research]
    comment = Research
    path = /sharing/research
    valid users = @EXAMPLE\development, @EXAMPLE\research
    force group = "domain users"
    writable = yes
    read only = no
    force create mode = 0660
    create mask = 0777
    directory mask = 0777
    force directory mode = 0770
    access based share enum = yes
    hide unreadable = yes

[Dropbox]
    comment = Daily Emptied Dropbox
    path = /sharing/dropbox
    valid users = "@EXAMPLE\Domain Users"
    force group = "domain users"
    writable = yes
    read only = no
    force create mode = 0660
    create mask = 0777
    directory mask = 0777
    force directory mode = 0770
    access based share enum = yes
    hide unreadable = yes

[CEO]
    comment = CEO Only
    path = /sharing/ceo
    valid users = EXAMPLE\ceo
    force group = "domain users"
    writable = yes
    read only = no
    force create mode = 0660
    create mask = 0777
    directory mask = 0777
    force directory mode = 0770
    access based share enum = yes
    hide unreadable = yes
As you can see, an active directory group is defined with an @, and a user without. Also, when there are spaces in the groupname, you escape that with quotes: "@EXAMPLE\Domain Users".
You can find a lot of information on the smb.conf file in the man page: https://www.samba.org/samba/docs/man/manpages-3/smb.conf.5.html
Why do we force the mode on files and folders? Because of problems with MS word, according to the Samba documentation: https://www.samba.org/samba/docs/man/Samba-HOWTO-Collection/AccessControls.html#id2615334
Afterwards restart samba:
/etc/init.d/smbd restart
Create a few accounts in the groups used (set expiry date to 1 day so you don't forget to remove them) and use those accounts to test the shares. Create files and folders as one user, try to edit and remove them as another user. Also try to access the shares with a non-privileged user.
If you run into errors, check your log files in /var/log/samba. Make sure that the capitalization and spelling is correct in the valid users part of the samba config file, and also check the permissions on the folders themselves with ls -la. You can set valid users = any to make check if there are errors or not. The testparm command is also very helpful for the samba config file part.