(文章来自作者维护的社区微信公众号【虚拟化云计算】)

我们知道CUDA是由NVIDIA推出的通用并行计算架构,使用该架构能够在GPU上进行复杂的并行计算。在有些场景下既需要使用虚拟机进行资源的隔离,又需要使用物理GPU进行大规模的并行计算。本文就进行相关的实践:
把NVIDIA显卡透传到虚拟机内部,然后使用CUDA平台进行GPU运算的实践。
显卡型号:NVIDIA的Tesla P4
物理主机查看显卡:
# lspci | grep NVIDIA
81:00.0 3D controller: NVIDIA Corporation Device 1bb3 (rev a1)
#
把pci显卡从主机上分离:
# virsh nodedev-list
pci_0000_81_00_0
#virsh nodedev-dettach pci_0000_81_00_0
虚拟机直接指定此pci显卡: (在 /etc/libvirt/qemu/)
<devices>
......
<hostdev mode='subsystem' type='pci' managed='yes'>
<source>
<address domain='0x0000' bus='0x81' slot='0x00' function='0x0'/>
</source>
<address type='pci' domain='0x0000' bus='0x00' slot='0x10' function='0x0'/>
</hostdev>
</devices>
虚拟机内部查看是否有显卡:
# lspci | grep NVIDIA
00:10.0 3D controller: NVIDIA Corporation Device 1bb3 (rev a1)
#
虚拟机内准备环境:
ubuntu16.04
# apt-get install gcc
# apt-get install linux-headers-$(uname -r)
虚拟机内CUDA Toolkit 9.1 Download:
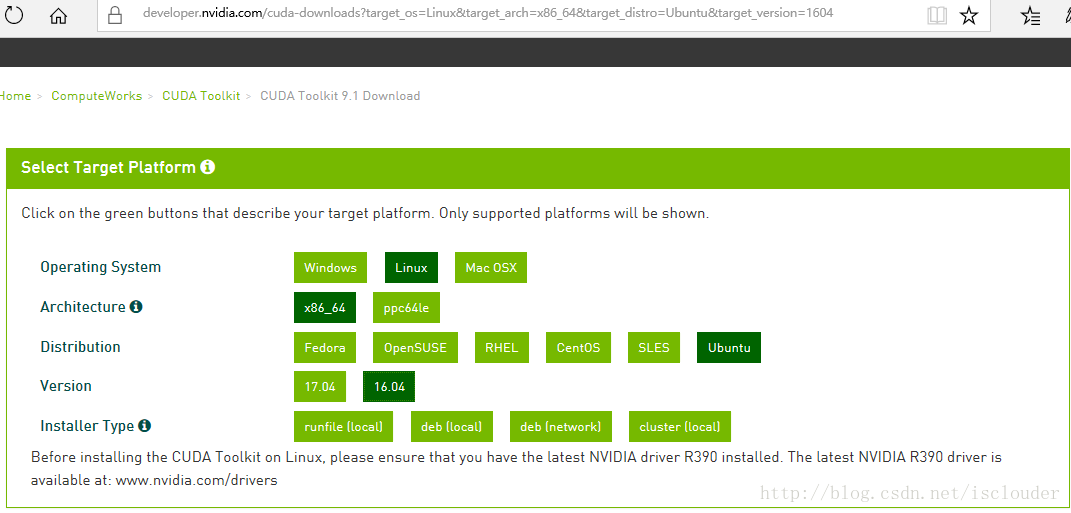
虚拟机内CUDA Toolkit
Install
:
# dpkg -i cuda-repo-ubuntu1604-9-1-local_9.1.85-1_amd64.deb
# apt-key add /var/cuda-repo-9-1-local/7fa2af80.pub
# apt-get update
# apt-get install cuda
GPU运算示例
代码:
//add.cu
#include <iostream>
#include <math.h>
// Kernel function to add the elements of two arrays
__global__
void add(int n, float *x, float *y)
{
for (int i = 0; i < n; i++)
y[i] = x[i] + y[i];
}
int main(void)
{
int N = 1<<20;
float *x, *y;
// Allocate Unified Memory – accessible from CPU or GPU
cudaMallocManaged(&x, N*sizeof(float));
cudaMallocManaged(&y, N*sizeof(float));
// initialize x and y arrays on the host
for (int i = 0; i < N; i++) {
x[i] = 1.0f;
y[i] = 2.0f;
}
// Run kernel on 1M elements on the GPU
add<<<1, 1>>>(N, x, y);
// Wait for GPU to finish before accessing on host
cudaDeviceSynchronize();
// Check for errors (all values should be 3.0f)
float maxError = 0.0f;
for (int i = 0; i < N; i++)
maxError = fmax(maxError, fabs(y[i]-3.0f));
std::cout << "Max error: " << maxError << std::endl;
// Free memory
cudaFree(x);
cudaFree(y);
return 0;
}
虚拟机内编译运行:
#
/usr/local/cuda-9.1/bin/
nvcc add.cu -o add_cuda
# ./add_cuda
# /usr/local/cuda-9.1/bin/nvprof ./add_cuda
运行结果:

从运算结果看出,我们在虚拟机内部运行的程序确是执行在Tesla P4上。之后我们就可以在虚拟机内部运行深度学习的算法了。