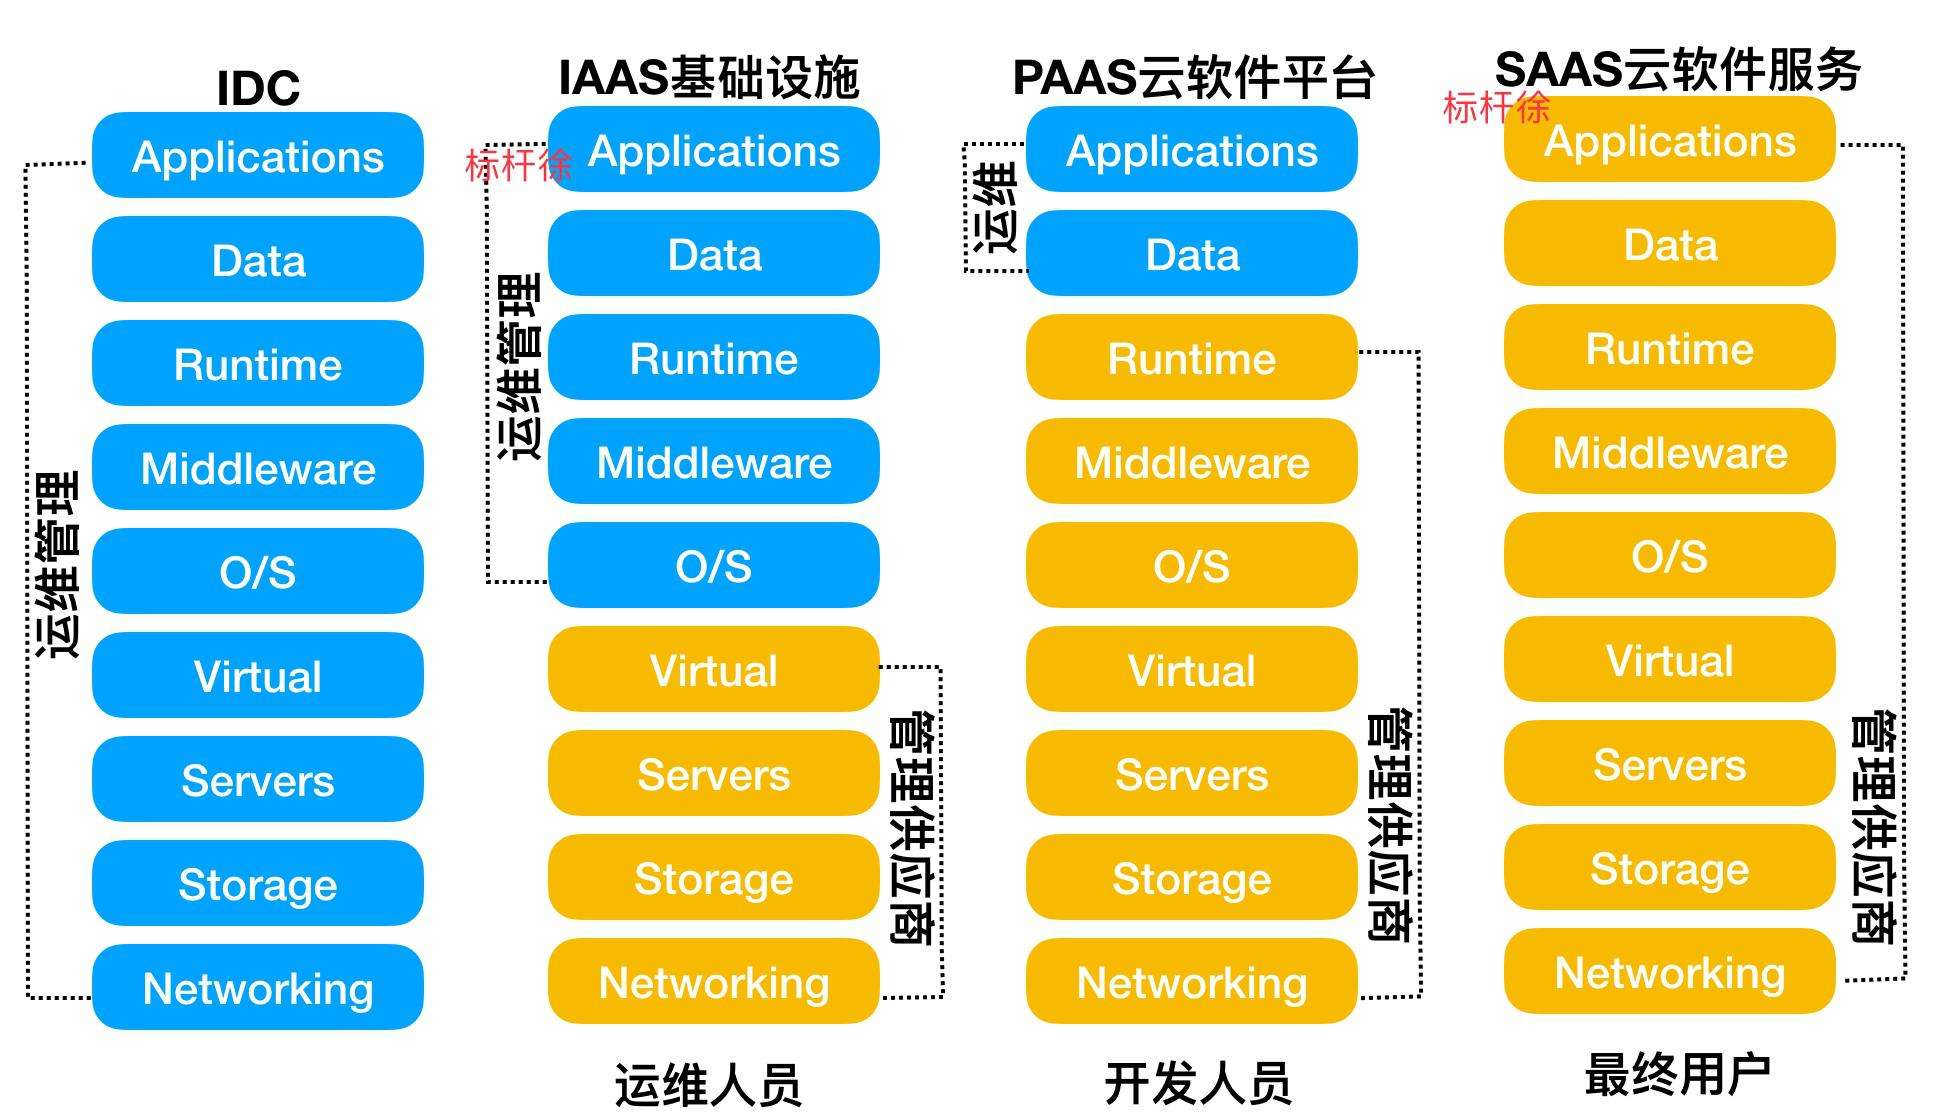
什么是云计算?
资源使用和交付模式,并不是技术,分为公有云,私有云,混合云,依赖虚拟化技术,从而实现弹性扩展
云计算 iaas pass saas图层
- Iaas(基础设施即服务Infrastructure as a Servic)
- Paas(平台即服务Platform-as-a-Service)
- Saas(软件即服务Software-as-a-Service)

KVM
KVM是开源软件,全称是kernel-based virtual machine(基于内核的虚拟机)。
是x86架构且硬件支持虚拟化技术(如 intel VT 或 AMD-V)的Linux全虚拟化解决方案。
它包含一个为处理器提供底层虚拟化 可加载的核心模块kvm.ko(kvm-intel.ko或kvm-AMD.ko)。
KVM还需要一个经过修改的QEMU软件(qemu-kvm),作为虚拟机上层控制和界面。
KVM能在不改变linux或windows镜像的情况下同时运行多个虚拟机,(它的意思是多个虚拟机使用同一镜像)并为每一个虚拟机配置个性化硬件环境(网卡、磁盘、图形适配器……)。
在主流的Linux内核,如2.6.20以上的内核均已包含了KVM核心

kvm安装
1.是否支持虚拟化
因特尔 vmx amd svm
[root@localhost ~]# grep -E '(vmx|svm)' /proc/cpuinfo
如果是vmware虚拟机,请在配置cpu选择intel VT-X/EPT或 AMD-V/RVI
如果输出的信息中有vmx,说明intel处理器支持完全虚拟化。如果显示svm,说明是AMD的处理器支持虚拟化。
2.安装kvm和其他虚拟化所需管理软件包
[root@localhost ~]# yum install qemu-kvm qemu-kvm-tools virt-manager libvirt virt-install -y
软件包名称介绍:
Kvm:软件包中含有KVM内核模块,它在默认linux内核中提供kvm管理程序
Libvirts:安装虚拟机管理工具,使用virsh等命令来管理和控制虚拟机。
Bridge-utils:设置网络网卡桥接。
Virt-*:创建、克隆虚拟机命令,以及图形化管理工具virt-manager
Qemu-img:安装qemu组件,使用qemu命令来创建磁盘等
3.加载kvm模块,查看kvm模块是否被加载
[root@localhost ~]# lsmod | grep kvm
kvm_intel             170181  0
kvm                   554609  1 kvm_intel
这里最好reboot,在查看一下,是否随着系统重启也是支持的
4.启动libvirtd,管理虚拟机和其他虚拟化功能

包括一个API库,一个守护程序(libvirtd)和一个命令行工具(virsh),libvirt的主要目标是为各种虚拟化工具提供一套方便、可靠的编程接口,用一种单一的方式管理多种不同的虚拟化提供方式
[root@localhost ~]# systemctl enable libvirtd.service
[root@localhost ~]# systemctl start libvirtd.service
5.准备想要虚拟出的操作系统,iso镜像文件
[root@localhost ~]# dd if=/dev/cdrom of=/opt/CentOS-7.3.iso
6.创建镜像文件,虚拟机使用的磁盘镜像文件,实际是个空间
[root@localhost ~]# qemu-img create -f raw /opt/CentOS-7.3-x86_64.raw 8G
Formatting '/opt/CentOS-7.3-x86_64.raw', fmt=raw size=8589934592
[root@localhost ~]# ls -lh /opt/CentOS-7.3-x86_64.raw
-rw-r--r--. 1 root root 8.0G Dec 16 08:02 /opt/CentOS-7.3-x86_64.raw
创建磁盘 -f 文件格式 路径 磁盘大小
7.创建虚拟机,cpu默认是一个
[root@localhost ~]# virt-install --name CentOS-7.3-x86_64 --virt-type kvm --ram 1024 --cdrom=/opt/CentOS-7.3.iso --disk path=/opt/CentOS-7.3-x86_64.raw
 --network=default --graphics vnc,listen=0.0.0.0 --noautoconsole

Starting install...
Domain installation still in progress. You can reconnect to
the console to complete the installation process.
8.查看是否监听5900端口
[root@localhost opt]# netstat -ntlp
Active Internet connections (only servers)
Proto Recv-Q Send-Q Local Address           Foreign Address         State       PID/Program name
tcp        0      0 0.0.0.0:5900            0.0.0.0:*               LISTEN      20009/qemu-kvm
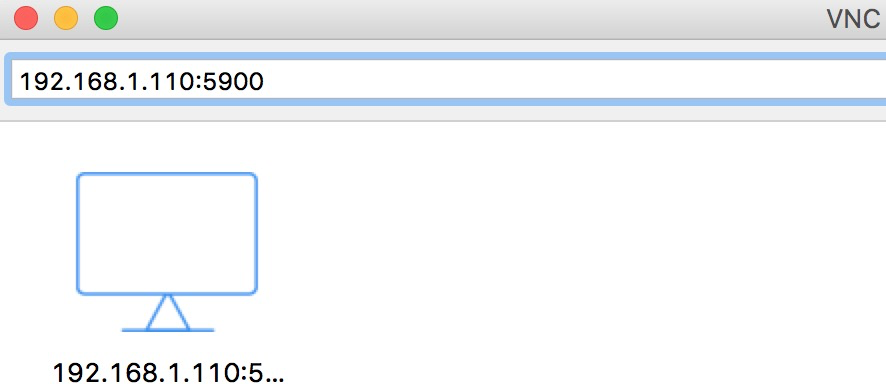
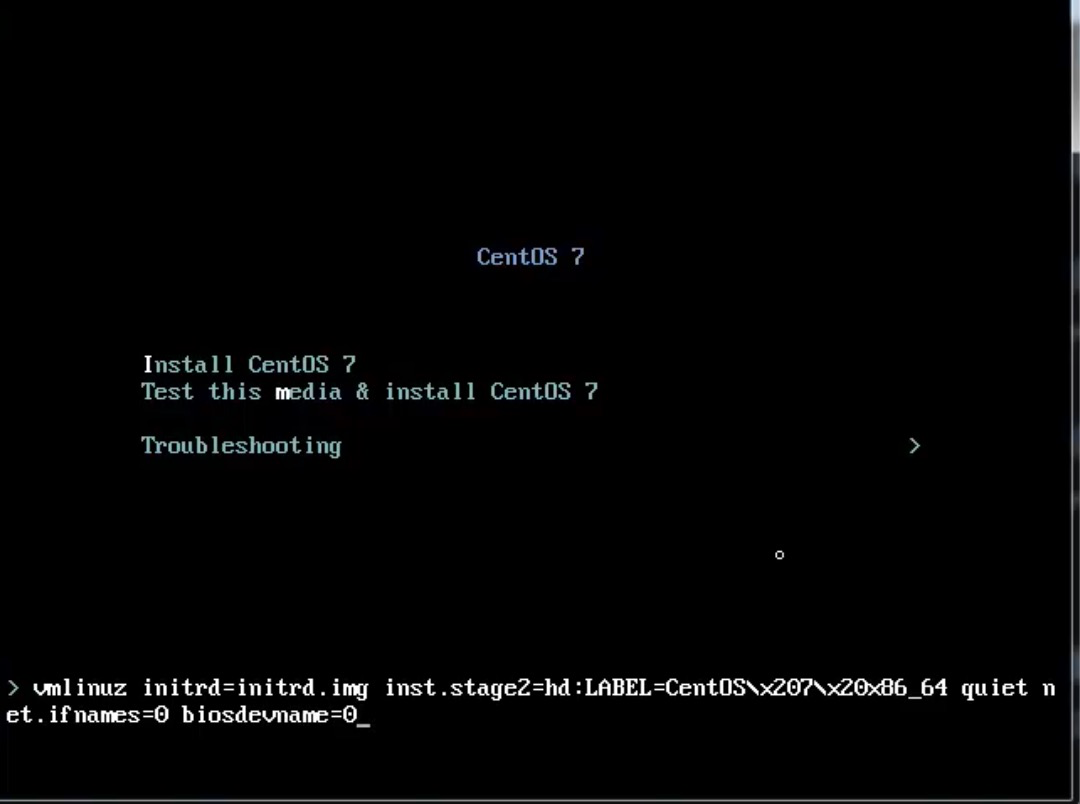
9.vnc 下载客户端,利用vnc链接,你就会看到安装centos7.3的界面
https://www.realvnc.com/en/connect/download/viewer/macos/
10.如果按tab键,输入net.ifnames=0 biosdevname=0 ,网卡就会是eth0
宿主机与虚拟机网络问题
1.宿主机网络状态
[root@localhost ~]# ps aux|grep kvm
就是一个进程
[root@localhost ~]# cat /etc/libvirt/qemu/CentOS-7.3-x86_64-2.xml
<!--
WARNING: THIS IS AN AUTO-GENERATED FILE. CHANGES TO IT ARE LIKELY TO BE
OVERWRITTEN AND LOST. Changes to this xml configuration should be made using:
  virsh edit CentOS-7.3-x86_64-2
or other application using the libvirt API.
-->
这个文件时自动生成的,如果你非要修改它,请virsh edit CentOS-7.3-x86_64-2

[root@localhost ~]# virsh edit CentOS-7.3-x86_64-2
与进程参数是一样的,这是配置里面的网络,默认会多出一个叫virbr0:虚拟网卡

    <interface type='network'>
      <mac address='52:54:00:89:e2:81'/>
      <source network='default'/>
      <model type='virtio'/>
      <address type='pci' domain='0x0000' bus='0x00' slot='0x03' function='0x0'/>
    </interface>

[root@localhost ~]# ifconfig
virbr0: flags=4163<UP,BROADCAST,RUNNING,MULTICAST>  mtu 1500
        inet 192.168.122.1  netmask 255.255.255.0  broadcast 192.168.122.255
        ether 52:54:00:25:22:31  txqueuelen 1000  (Ethernet)
        RX packets 0  bytes 0 (0.0 B)
        RX errors 0  dropped 0  overruns 0  frame 0
        TX packets 0  bytes 0 (0.0 B)
        TX errors 0  dropped 0 overruns 0  carrier 0  collisions 0

默认是nat网络,我们在下边会说到如何改成桥接
[root@localhost ~]# iptables -t nat -vnL
2.虚拟机网络状态
1.启动虚拟机
[root@localhost ~]# virsh list --all
 Id    Name                           State
----------------------------------------------------
 -     CentOS-7.3-x86_64              shut off
 -     CentOS-7.3-x86_64-2            shut off

[root@localhost ~]# virsh start  CentOS-7.3-x86_64-2
Domain CentOS-7.3-x86_64-2 started

2.vnc继续链接,我们看下虚拟机的网卡
[root@localhost ~]# ifconfig
virbr0: flags=4163<UP,BROADCAST,RUNNING,MULTICAST>  mtu 1500
        inet 192.168.122.1  netmask 255.255.255.0  broadcast 192.168.122.255
3.上面的网卡virbr0都是192.168.122.1,为什么会这样,是默认dnsmasq起了个dhcp
[root@localhost ~]# ps aux|grep dns
nobody    10384  0.0  0.0  53884  1112 ?        S    07:37   0:00 /usr/sbin/dnsmasq --conf-file=/var/lib/libvirt/dnsmasq/default.conf --leasefile-ro --dhcp-script=/usr/libexec/libvirt_leaseshelper
root      10385  0.0  0.0  53856   564 ?        S    07:37   0:00 /usr/sbin/dnsmasq --conf-file=/var/lib/libvirt/dnsmasq/default.conf --leasefile-ro --dhcp-script=/usr/libexec/libvirt_leaseshelper
root      31126  0.0  0.0 112708   976 pts/2    R+   08:40   0:00 grep --color=auto dns

[root@localhost ~]# cat /var/lib/libvirt/dnsmasq/default.conf
##WARNING:  THIS IS AN AUTO-GENERATED FILE. CHANGES TO IT ARE LIKELY TO BE
##OVERWRITTEN AND LOST.  Changes to this configuration should be made using:
##    virsh net-edit default
## or other application using the libvirt API.
##
## dnsmasq conf file created by libvirt
strict-order
pid-file=/var/run/libvirt/network/default.pid
except-interface=lo
bind-dynamic
interface=virbr0
dhcp-range=192.168.122.2,192.168.122.254
dhcp-no-override
dhcp-authoritative
dhcp-lease-max=253
dhcp-hostsfile=/var/lib/libvirt/dnsmasq/default.hostsfile
addn-hosts=/var/lib/libvirt/dnsmasq/default.addnhosts
kvm管理
cpu热修改只能加不能减,不能超过设置的最大数
配置cpu的2种方法
1. 通过启动时候命令行指定
2. 通过xml指定,可以热修改

通过xml文件更改
1.将cpu调成最大四个,当前一个
[root@localhost ~]# virsh edit CentOS-7.3-x86_64-2
  <vcpu placement='auto' current='1'>4</vcpu>

2.重启生效
[root@localhost ~]# virsh shutdown  CentOS-7.3-x86_64-2
Domain CentOS-7.3-x86_64-2 is being shutdown

[root@localhost ~]# virsh list --all
 Id    Name                           State
----------------------------------------------------
 -     CentOS-7.3-x86_64-2              shut off
[root@localhost ~]# virsh start  CentOS-7.3-x86_64-2
Domain CentOS-7.3-x86_64-2 started

3.登录到虚拟机,查看cpu个数

4.热修改将cpu设置成2个
[root@localhost ~]# virsh setvcpus  CentOS-7.3-x86_64-2 2 --live

5.再次登陆到虚拟机,查看cpu个数
centos7是自动激活了cpu,如果不是的话需要echo 1 > [root@localhost ~]# cat /sys/devices/system/cpu/cpu0/online
1

注意热修改,只能加不能减,也不能超过设置的最大数
[root@localhost ~]# virsh setvcpus  CentOS-7.3-x86_64-2 1 --live
error: unsupported configuration: failed to find appropriate hotpluggable vcpus to reach the desired target vcpu count
内存,热球技术能加能减,不能超过设置的最大数
1.修改xml
[root@localhost ~]# virsh edit CentOS-7.3-x86_64-2
  <memory unit='KiB'>1048576</memory> 最大内存
  <currentMemory unit='KiB'>1048576</currentMemory> 现内存

2.重启生效
[root@localhost ~]# virsh shutdown  CentOS-7.3-x86_64-2
Domain CentOS-7.3-x86_64-2 is being shutdown

[root@localhost ~]# virsh list --all
 Id    Name                           State
----------------------------------------------------
 -     CentOS-7.3-x86_64-2              shut off
[root@localhost ~]# virsh start  CentOS-7.3-x86_64-2
Domain CentOS-7.3-x86_64-2 started


3.显示虚拟机当前内存
[root@localhost ~]# virsh qemu-monitor-command CentOS-7.3-x86_64-2 --hmp --cmd info balloon
balloon: actual=1024

4.修改虚拟机内存,减少
[root@localhost ~]# virsh qemu-monitor-command CentOS-7.3-x86_64-2 --hmp --cmd balloon 600

显示虚拟机当前内存
[root@localhost ~]# virsh qemu-monitor-command CentOS-7.3-x86_64-2 --hmp --cmd info balloon
balloon: actual=600

5.修改虚拟机内存,添加
[root@localhost ~]# virsh qemu-monitor-command CentOS-7.3-x86_64-2 --hmp --cmd balloon 1024

显示虚拟机当前内存
[root@localhost ~]# virsh qemu-monitor-command CentOS-7.3-x86_64-2 --hmp --cmd info balloon
balloon: actual=1024

6.登录到虚拟机查看
注意,内存也不能超过最大内存
磁盘
[root@localhost ~]# qemu-img --help
支持如下硬盘格式
Supported formats: vvfat vpc vmdk vhdx vdi ssh sheepdog rbd raw host_cdrom host_floppy host_device file qed qcow2 qcow parallels nbd iscsi gluster dmg tftp ftps ftp https http cloop bochs blkverify blkdebug

1.全镜像模式
raw,设置多大,就是多大。写入块,方便转换成其他格式,性能最优

2.稀疏模式
qcow2,功能全,压缩,快照,镜像,更小存储空间,设置多大,它也只是用多大
所有磁盘管理,可以使用qemu -img管理