最近有时间在我们的应用中集成了华为,小米,OPPO,vivo四大平台的推送,一切顺利。
这里做一个记录,
开撸:
一、华为推送
1、下载HMS Agent套件,解压如下:

找到GetHMSAgent_cn.bat 打开如下,按照提示输入包名,appid等信息,按enter键下一项,因为我这里只需要推送功能,所以除了最后的“是否需要推送服务”输入了1外,其他的我都是否。

完成后会在原来的目录下找到一个叫copysrc的文件夹,如下图:

然后打开copysrc-->java 把com整个文件复制到我们的项目工程中,位置:app->java文件中,如出现错误,请检查复制到的目录是否正确如下:

2、build文件配置,在app的build文件中找到allprojedts-->repositories添加:
maven { url 'http://developer.huawei.com/repo/' }
如下图:

同时,在build中dependencies添加依赖:implementation 'com.huawei.android.hms:push:xxxx'
xxxx替换为你下载到的套件的版本号,如我下载的是HMSAgent_2.6.3.306,则是:
implementation 'com.huawei.android.hms:push:2.6.3.306'3、配置AndroidManifest.xml文件,添加以下内容:
<!--华为推送相关权限-->
<!-- 接收PUSH TOKEN的广播以及PUSH消息需要定义该权限 xxx 要替换上您应用的包名 -->
<permission
    android:name="xxx .permission.PROCESS_PUSH_MSG"
    android:protectionLevel="signatureOrSystem" />
<!--接收PUSH TOKEN的广播以及PUSH消息需要定义该权限 xxx 要替换上您应用的包名 -->
<uses-permission android:name="xxx.permission.PROCESS_PUSH_MSG" />
在application的节点下添加以下内容,把以下的“你的appid”替换为你的appid,xxx替换为你的包名
<!--华为推送.......................................开始 ...................................................... -->
<meta-data
    android:name="com.huawei.hms.client.appid"
    android:value="appid=你的appid" />

<provider
    android:name="com.huawei.hms.update.provider.UpdateProvider"
    android:authorities="xxx.hms.update.provider"
    android:exported="false"
    android:grantUriPermissions="true" />

<provider
    android:name="com.huawei.updatesdk.fileprovider.UpdateSdkFileProvider"
    android:authorities="xxx.updateSdk.fileProvider"
    android:exported="false"
    android:grantUriPermissions="true" />

<activity
    android:name="com.huawei.android.hms.agent.common.HMSAgentActivity"
    android:configChanges="orientation|locale|screenSize|layoutDirection|fontScale"
    android:excludeFromRecents="true"
    android:exported="false"
    android:hardwareAccelerated="true"
    android:theme="@android:style/Theme.Translucent">
    <meta-data
        android:name="hwc-theme"
        android:value="androidhwext:style/Theme.Emui.Translucent" />
</activity>
<activity
    android:name="com.huawei.hms.activity.BridgeActivity"
    android:configChanges="orientation|locale|screenSize|layoutDirection|fontScale"
    android:excludeFromRecents="true"
    android:exported="false"
    android:hardwareAccelerated="true"
    android:theme="@android:style/Theme.Translucent">
    <meta-data
        android:name="hwc-theme"
        android:value="androidhwext:style/Theme.Emui.Translucent" />
</activity>

<activity
    android:name="com.huawei.updatesdk.service.otaupdate.AppUpdateActivity"
    android:configChanges="orientation|screenSize"
    android:exported="false"
    android:theme="@style/upsdkDlDialog">
    <meta-data
        android:name="hwc-theme"
        android:value="androidhwext:style/Theme.Emui.Translucent.NoTitleBar" />
</activity>

<activity
    android:name="com.huawei.updatesdk.support.pm.PackageInstallerActivity"
    android:configChanges="orientation|keyboardHidden|screenSize"
    android:exported="false"
    android:theme="@style/upsdkDlDialog">
    <meta-data
        android:name="hwc-theme"
        android:value="androidhwext:style/Theme.Emui.Translucent" />
</activity>

<receiver
    android:name=".server.HuaweiPushRevicer"
    android:permission="xxx.permission.PROCESS_PUSH_MSG">
    <intent-filter>
        <!-- 必须,用于接收token -->
        <action android:name="com.huawei.android.push.intent.REGISTRATION" />
        <!-- 必须, 用于接收透传消息 -->
        <action android:name="com.huawei.android.push.intent.RECEIVE" />
        <!-- 必须, 用于接收通知栏消息点击事件 此事件不需要开发者处理,只需注册就可以-->
        <action android:name="com.huawei.intent.action.PUSH_DELAY_NOTIFY" />
    </intent-filter>
</receiver>

<service
    android:name="com.huawei.hms.support.api.push.service.HmsMsgService"
    android:enabled="true"
    android:exported="true"
    android:process=":pushservice">
    <intent-filter>
        <action android:name="com.huawei.push.msg.NOTIFY_MSG" />
        <action android:name="com.huawei.push.msg.PASSBY_MSG" />
    </intent-filter>
</service>
<!--华为推送.......................................结束...................................................... -->
上面的HuaweiPushRevicer为自定义的一个广播接收器,如下:
public class HuaweiPushRevicer extends PushReceiver {

    public static final String TAG = "HuaweiPushRevicer";

    public static final String ACTION_UPDATEUI = "action.updateUI";
    public static final String ACTION_TOKEN = "action.updateToken";

    private static List<IPushCallback> pushCallbacks = new ArrayList<IPushCallback>();
    private static final Object CALLBACK_LOCK = new Object();

    public interface IPushCallback {
        void onReceive(Intent intent);
    }

    public static void registerPushCallback(IPushCallback callback) {
        synchronized (CALLBACK_LOCK) {
            pushCallbacks.add(callback);
        }
    }

    public static void unRegisterPushCallback(IPushCallback callback) {
        synchronized (CALLBACK_LOCK) {
            pushCallbacks.remove(callback);
        }
    }

    @Override
    public void onToken(Context context, String tokenIn, Bundle extras) {
        Log.e("onToken:", tokenIn);

        String belongId = extras.getString("belongId");
        Intent intent = new Intent();
        intent.setAction(ACTION_TOKEN);
        intent.putExtra(ACTION_TOKEN, tokenIn);
        callBack(intent);

        intent = new Intent();
        intent.setAction(ACTION_UPDATEUI);
        intent.putExtra("log", "belongId is:" + belongId + " Token is:" + tokenIn);
        callBack(intent);
    }

    @Override
    public boolean onPushMsg(Context context, byte[] msg, Bundle bundle) {

        Log.e("onPushMsg:", "接收消息");
        try {
            //CP可以自己解析消息内容,然后做相应的处理 | CP can parse message content on its own, and then do the appropriate processing
            String content = new String(msg, "UTF-8");
            Intent intent = new Intent();
            intent.setAction(ACTION_UPDATEUI);
            intent.putExtra("log", "Receive a push pass message with the message:" + content);
            callBack(intent);
        } catch (Exception e) {
            Intent intent = new Intent();
            intent.setAction(ACTION_UPDATEUI);
            intent.putExtra("log", "Receive push pass message, exception:" + e.getMessage());
            callBack(intent);
        }
        return false;
    }

    public void onEvent(Context context, Event event, Bundle extras) {
        Log.e("onEvent:", "事件");
        Intent intent = new Intent();
        intent.setAction(ACTION_UPDATEUI);

        int notifyId = 0;
        if (Event.NOTIFICATION_OPENED.equals(event) || Event.NOTIFICATION_CLICK_BTN.equals(event)) {
            notifyId = extras.getInt(BOUND_KEY.pushNotifyId, 0);
            if (0 != notifyId) {
                NotificationManager manager = (NotificationManager) context
                        .getSystemService(Context.NOTIFICATION_SERVICE);
                manager.cancel(notifyId);
            }
        }

        String message = extras.getString(BOUND_KEY.pushMsgKey);
        intent.putExtra("log", "Received event,notifyId:" + notifyId + " msg:" + message);
        callBack(intent);
        super.onEvent(context, event, extras);
    }

    @Override
    public void onPushState(Context context, boolean pushState) {
        Log.e("onPushState:", "接收状态");
        Intent intent = new Intent();
        intent.setAction(ACTION_UPDATEUI);
        intent.putExtra("log", "The Push connection status is:" + pushState);
        callBack(intent);
    }

    private static void callBack(Intent intent) {
        synchronized (CALLBACK_LOCK) {
            for (IPushCallback callback : pushCallbacks) {
                if (callback != null) {
                    callback.onReceive(intent);
                }
            }
        }
    }
4、在Application的onCreate()方法中初始化:
HMSAgent.init(this);
5、连接华为通道,获取唯一token
在主activity中实现HuaweiPushRevicer.IPushCallback 接口,
同时:在onCreate()方法中
HuaweiPushRevicer.registerPushCallback(this);
HMSAgent.connect(this, new ConnectHandler() {
    @Override
    public void onConnect(int rst) {
        Log.e("HuaWeiRegister:", "HMS connect end:" + rst);
    }
});
然后我们就可以在实现的onReceive方法中拿到token了...如下:
@Override
public void onReceive(Intent intent) {
    if (intent != null) {
        String action = intent.getAction();
        Bundle b = intent.getExtras();
        if (b != null && "action.updateToken".equals(action)) {
            String token = b.getString("action.updateToken");
            Log.d("HuaWeiRegister", "华为连接成功token:" + token);
        }
    }
}
华为推送结束。
二、小米推送
1、下载Android SDK,解压后把sdk文件下的jar包拷贝到项目的libs下。
2、在AndroidManifest文件添加以下内容:
权限:
<uses-permission android:name="android.permission.GET_TASKS" />//好像可以不加<!--xiaomi推送.....................................开始.......................................................-->
<service
android:name="com.xiaomi.push.service.XMPushService"
android:enabled="true"
android:process=":pushservice" />
<receiver
android:name=".server.XiaomiPushReceiver"
android:exported="true">
<intent-filter>
<action android:name="com.xiaomi.mipush.RECEIVE_MESSAGE" />
</intent-filter>
<intent-filter>
<action android:name="com.xiaomi.mipush.MESSAGE_ARRIVED" />
</intent-filter>
<intent-filter>
<action android:name="com.xiaomi.mipush.ERROR" />
</intent-filter>
</receiver>
<service
android:name="com.xiaomi.push.service.XMJobService"
android:enabled="true"
android:exported="false"
android:permission="android.permission.BIND_JOB_SERVICE"
android:process=":pushservice" /> <!--注:此service必须在3.0.1版本以后(包括3.0.1版本)加入-->
<service
android:name="com.xiaomi.mipush.sdk.PushMessageHandler"
android:enabled="true"
android:exported="true" />
<service
android:name="com.xiaomi.mipush.sdk.MessageHandleService"
android:enabled="true" /> <!--注:此service必须在2.2.5版本以后(包括2.2.5版本)加入-->
<receiver
android:name="com.xiaomi.push.service.receivers.NetworkStatusReceiver"
android:exported="true">
<intent-filter>
<action android:name="android.net.conn.CONNECTIVITY_CHANGE" />
<category android:name="android.intent.category.DEFAULT" />
</intent-filter>
</receiver>
<receiver
android:name="com.xiaomi.push.service.receivers.PingReceiver"
android:exported="false"
android:process=":pushservice">
<intent-filter>
<action android:name="com.xiaomi.push.PING_TIMER" />
</intent-filter>
</receiver>上面的XiaomiPushReceiver为自定义的广播接收器,当我们配置完成后就可以在onCommandResult()方法中拿到token
如下:
public class XiaomiPushReceiver extends PushMessageReceiver { @Override public void onReceivePassThroughMessage(Context context, MiPushMessage message) { } @Override public void onNotificationMessageClicked(Context context, MiPushMessage message) { } @Override public void onNotificationMessageArrived(Context context, MiPushMessage message) { } @Override public void onCommandResult(Context context, MiPushCommandMessage message) { String command = message.getCommand(); List<String> arguments = message.getCommandArguments(); if (MiPushClient.COMMAND_REGISTER.equals(command)) { if (message.getResultCode() == ErrorCode.SUCCESS) { String mRegID = arguments.get(0); Log.d("小米registerID", mRegID)} } } @Override public void onReceiveRegisterResult(Context context, MiPushCommandMessage message) { } @Override public void onRequirePermissions(Context context, String[] permissions) { super.onRequirePermissions(context, permissions); } @SuppressLint("SimpleDateFormat") private static String getSimpleDate() { return new SimpleDateFormat("MM-dd hh:mm:ss").format(new Date()); } public String arrayToString(String[] strings) { String result = " "; for (String str : strings) { result = result + str + " "; } return result; } }
3、在Application的onCreate()方法中初始化:
MiPushClient.registerPush(this, "你的AppID", "你的AppKey");
然后就可以在XiaomiPushReceiver中拿到registerID了
小米push结束。
三、OPPO推送
1、下载Android SDK,解压后把jar拷贝到我们项目的libs下。
2、在AndroidManifest文件添加以下内容:
<!--OPPO推送.......................................开始 ...................................................... -->
<service
    android:name="com.coloros.mcssdk.PushService"
    android:permission="com.coloros.mcs.permission.SEND_MCS_MESSAGE">
    <intent-filter>
        <action android:name="com.coloros.mcs.action.RECEIVE_MCS_MESSAGE" />
    </intent-filter>
</service>
<!--OPPO推送.......................................结束 ...................................................... -->
3、在Application的onCreate()方法中初始化,初始化成功后会拿到registerId:
PushManager.getInstance().register(this, "你的appkey", "你的appsecret", new PushCallback() {
    @Override
    public void onRegister(int code, String s) {
        if (code == 0) {
            Log.d("oppo注册成功", "registerId:" + s);
            setOPPOPushPassageway();
        } else {
            Log.d("oppo注册失败", "code=" + code + ",msg=" + s);
        }
    }

    @Override
    public void onUnRegister(int i) {

    }

    @Override
    public void onGetAliases(int i, List<SubscribeResult> list) {

    }

    @Override
    public void onSetAliases(int i, List<SubscribeResult> list) {

    }

    @Override
    public void onUnsetAliases(int i, List<SubscribeResult> list) {

    }

    @Override
    public void onSetUserAccounts(int i, List<SubscribeResult> list) {

    }

    @Override
    public void onUnsetUserAccounts(int i, List<SubscribeResult> list) {

    }

    @Override
    public void onGetUserAccounts(int i, List<SubscribeResult> list) {

    }

    @Override
    public void onSetTags(int i, List<SubscribeResult> list) {

    }

    @Override
    public void onUnsetTags(int i, List<SubscribeResult> list) {

    }

    @Override
    public void onGetTags(int i, List<SubscribeResult> list) {

    }

    @Override
    public void onGetPushStatus(int i, int i1) {

    }

    @Override
    public void onSetPushTime(int i, String s) {

    }

    @Override
    public void onGetNotificationStatus(int i, int i1) {

    }
});
OPPO在android 8.0版本后需要创建通道:
//oppo推送通道配置
private void setOPPOPushPassageway() {
    if (Build.VERSION.SDK_INT >= Build.VERSION_CODES.O && PushManager.isSupportPush(this)) {
        String channelId = "oppoPush";//记住此channelId ,可自定义
        String channelName = "通知消息";//记住此channelName ,可自定义
        int importance = NotificationManager.IMPORTANCE_HIGH;
        NotificationChannel channel = new NotificationChannel(channelId, channelName, importance);
        NotificationManager notificationManager = (NotificationManager) getSystemService(NOTIFICATION_SERVICE);
        notificationManager.createNotificationChannel(channel);
    }
}
在客户端创建好通道之后,服务端则需要根据此通道ID来推送消息。在手机上需要把通道的允许通知权限也打开才能收到消息。
四、vivo推送
1、下载sdk,下载Android SDK,解压后把libs下的jar包拷贝到我们项目的libs下。
2、在AndroidManifest文件添加以下内容,同时拿到你应用的apikey和appid对应替换:
<!--vivo推送.......................................开始.......................................................-->
<meta-data
    android:name="com.vivo.push.api_key"
    android:value="你的apiKey"/>
<meta-data
    android:name="com.vivo.push.app_id"
    android:value="你的AppID" />

<receiver android:name=".server.VivoPushMessageReceiver">
    <intent-filter>
        <!-- 接收push消息 -->
        <action android:name="com.vivo.pushclient.action.RECEIVE" />
    </intent-filter>
</receiver>
<service
    android:name="com.vivo.push.sdk.service.CommandClientService"
    android:exported="true" />
<activity
    android:name="com.vivo.push.sdk.LinkProxyClientActivity"
    android:exported="false"
    android:screenOrientation="portrait"
    android:theme="@android:style/Theme.Translucent.NoTitleBar" />
<!--vivo推送.......................................结束.......................................................-->
VivoPushMessageReceiver为自定义的广播接收器:
public class VivoPushMessageReceiver extends OpenClientPushMessageReceiver {
    @Override
    public void onNotificationMessageClicked(Context context, UPSNotificationMessage upsNotificationMessage) {
        long msgId;
        String customeContent = "";
        if (upsNotificationMessage != null) {
            msgId = upsNotificationMessage.getMsgId();
            customeContent = upsNotificationMessage.getSkipContent();
            Log.e("NPL", "获取通知内容如下:msgId = " + msgId + ";customeContent=" + customeContent);
        }
    }

    @Override
    public void onReceiveRegId(Context context, String s) {
        if (TextUtils.isEmpty(s)) {
            //获取regId失败
            Log.e("NPL", "获取RegId失败");
        } else {
            Log.e("NPL", "获取registerId成功,registerId= " + s);
        }
    }
3、在Application的onCreate()方法中初始化,初始化成功后就可以在VivoPushMessageReceiver中拿到registerId:
PushClient.getInstance(this).initialize();
PushClient.getInstance(this).turnOnPush(new IPushActionListener() {
@Override
public void onStateChanged(int i) {
if (i == 0) {
Log.e("NPL", "打开推送服务成功");
} else {
Log.e("NPL", "打开推送服务失败");
}
}
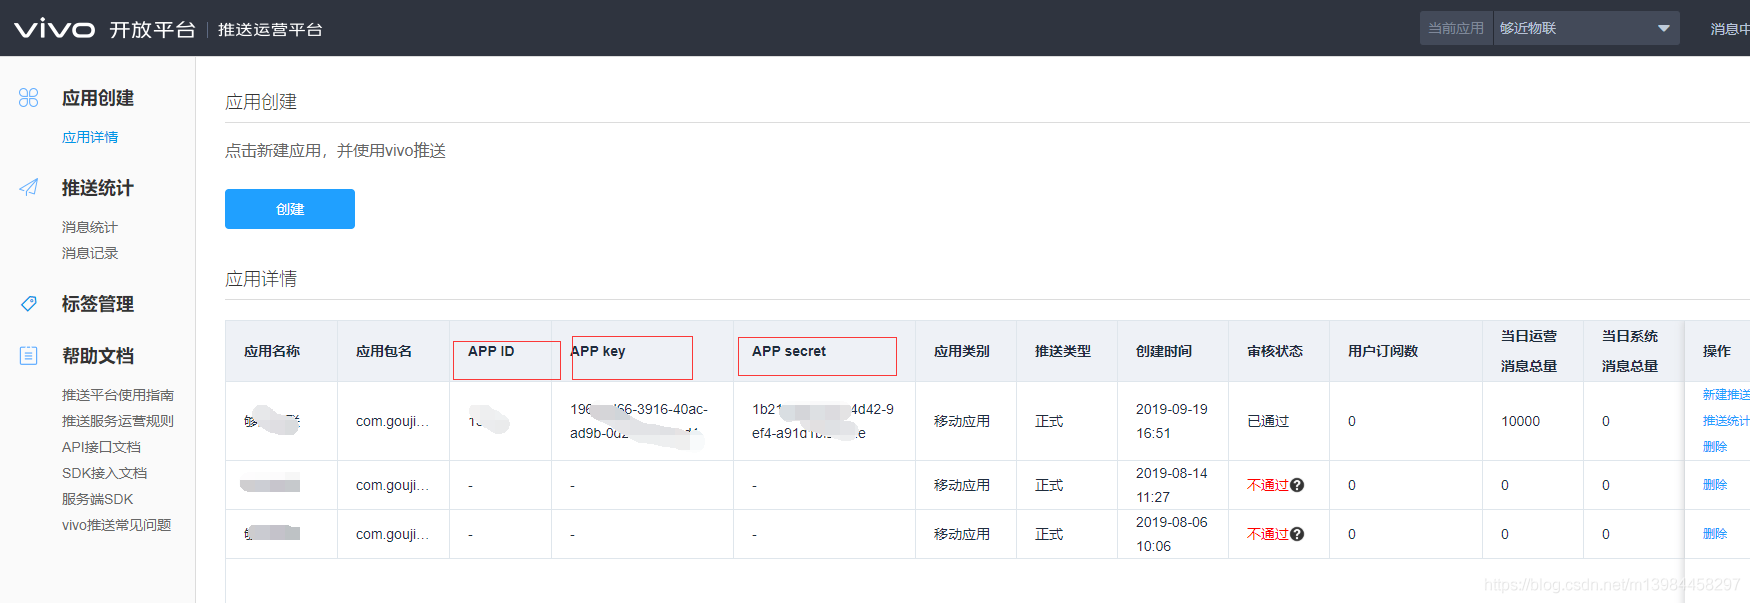
});vivo推送特别注意:
上面的appid不是下图的id:

而是下图的appid,appkey也是下图的:
完成。.
