Unity C++ 底层渲染 plugin
- 1. Android Unity Render
- 1.1 android handle all the process
- 1.2 unity handle all the process
- 1.3 android open camera,untiy render
- 2. Unity Low-level native plug-in interface
- 2.1 load and unload
- 2.2 IssuePluginEvent
- 2.3 DrawColoredTriangle
- 2.4 ModifyTexturePixels
- 2.5 ModifyVertexBuffer
- 2.6 RenderAPI
- 3. Build Android Library
- 4 Analysis
1. Android Unity Render
Unity 主要是用C#语言书写的,为了更好的泛用性,它支持各种其他语言的plugin(就是可以使用其他语言预先编译好的代码库,并使用其中的函数方法进行运算)。对我个人来说,用的最多的是C++和android java。最近在开发手机unity ar app的时候,遇到了渲染的问题:手机相机开启由谁开启,开启之后图片由谁渲染(android还是unity)。
最后,我们想出了几种解决方法。
Unity is primarily written in C#. For better versatility, it supports plugins in a variety of other languages (that is, you can use pre-compiled code libraries in other languages and use the function methods in them). For my cases, the most used are C++ and android java. Recently when I developed the mobile phone unity AR application, I encountered a rendering problem: who opened the phone camera, and who rendered the image (android or unity) after opening.
Finally, we came up with several solutions.
1.1 android handle all the process
图片相机全由android aar开启和渲染。同时其他物体(虚拟物体)由unity渲染,同时设定untiy的背景的透明度。为此,大致的步骤如下:
The image camera is fully opened and rendered by android aar. At the same time other objects (virtual objects) are rendered by unity, while setting the transparency of the background of the untiy. To do this, the general steps are as follows:
-
unity的“player setting”中勾选设置”Preserve framebuffer alpha“ 。
-
unity中的camera相机选择”clear flags“设置为”solid color“,并且对应的颜色”color“设置为全是0,并且注意alpha也要设置为0(即透明)。
-
在安卓项目的layout配置文件”.xml“中在对应的unity窗口配置中增加" android:windowsIsTranslucent = “true” ",并且注意unity的窗口要在android的窗口之后。
-
下面是我的layout的例子。
-
unity set ”Preserve framebuffer alpha“ in “player setting”
-
Select in unity"clear flags" set to “solid color” of the camera object, and the corresponding color “color” is set to all 0, and note that alpha is also set to 0 (ie, transparent).
-
In the layout file “.xml” of the Android project, add "android:windowsIsTranslucent=“true” in the corresponding unity window configuration, and note that the window of unity should be after the android window.
-
The following is my example layout.
<?xml version="1.0" encoding="utf-8"?>
<FrameLayout xmlns:android="http://schemas.android.com/apk/res/android"
    xmlns:app="http://schemas.android.com/apk/res-auto"
    android:layout_width="match_parent"
    android:layout_height="match_parent"
    android:orientation="horizontal">

  <org.opencv.android.JavaCameraView
      android:id="@+id/opencvView"
      android:layout_width="700dp"
      android:layout_height="350dp"
      android:fillViewport="true"
      app:camera_id="any"
      app:show_fps="true"/>

    <LinearLayout
        android:id="@+id/unity_view"
        android:windowIsTranslucent="true"
        android:layout_width="match_parent"
        android:layout_height="match_parent"
        android:orientation="horizontal"
        android:visibility="visible">
    </LinearLayout>

</FrameLayout>
1.2 unity handle all the process
这种方法从程序运行的角度来说是非常不效率的,但是开发的难度是最低的。所以,我为了快速开发,也尝试的这种方法。总的来说,
- 就是unity使用web camera类来开启相机。
- 然后获取到相机的texture转换为texture2d,再将它转换为byte数组的格式。
- 将这个byte数组传给C++方法调用,获取结果。
This method is very inefficient from the point of view of program operation, but the development is the least difficult. So, I tried this method for rapid development. In general,
- It is unity using the web camera class to turn on the camera.
- Then get the texture of the camera converted to texture2d, and then convert it to the format of a byte array.
- Pass this byte array to the C++ method call to get the result.
实现大致如下(非常的不效率):
The realize is followed:
        private Texture2D texture2D;
        private WebCamTexture camTexture;
        private byte[] GetCamImage()
        {
            if (!camTexture.isPlaying)
            {
                return null;
            }
            Color32[] color32s = camTexture.GetPixels32();
            texture2D = new Texture2D(camTexture.width, camTexture.height, TextureFormat.RGB24, false);
            texture2D.SetPixels32(color32s);
            texture2D.Apply();
            DoSomethingWithPluginFcn(texture2D.EncodeToJPG(jpgQuanlity));
        }
1.3 android open camera,untiy render
这种方式会是比较理想的。
- unity创建texture类,将texture的地址传递给android。
- android C++开启相机。
- android使用C++处理,按照正确的格式将视频流书写到texture的地址上。
- unity处理渲染texture。
为了实现这种方法,就引入了下一章的内容。我们需要使用unity的”Low-level native plug-in interface“。因为我们需要按正确的方式书写texture。这是我开始使用untiy底层渲染的出发点,但是之后的内容不限于此。
This way would be more ideal.
- unity creates a texture class and passes the address of the texture to android.
- android C++ turns on the camera.
- android uses C++ to process the video stream to the address of the texture in the correct format.
- unity handles rendering textures.
In order to implement this method, the content of the next chapter is introduced. We need to use the “Low-level native plug-in interface” of unity. Because we need to write the texture in the right way. This is the starting point for me to start using untiy underlying rendering, but the content after that is not limited to this.
2. Unity Low-level native plug-in interface
下面是unity的官方文件,和它提供的代码范例,也是我学习的材料。
Below is the official file of unity, and the code examples it provides, and the material I learned.
Unity offical page
Github offical project
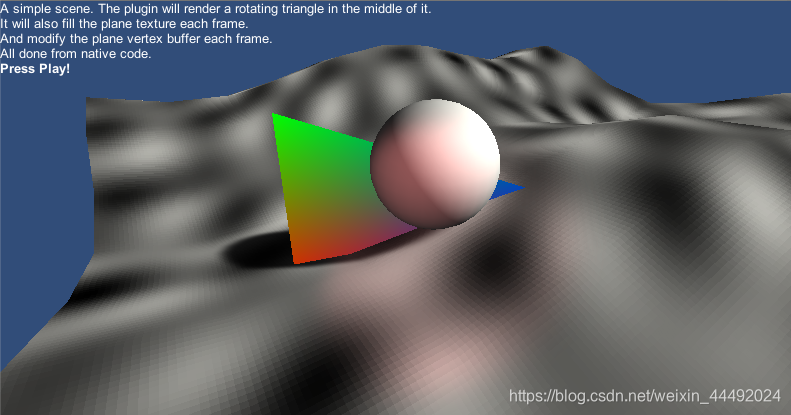
实现的效果如下图:
- 有一个旋转的三角
- 和一个”流动的“平面
The effect achieved is as follows:
- There is a rotating triangle
- and a “flowing” plane
我们先来看一下unity的代码:
Let’s see its code in Unity:
	IEnumerator Start()
	{
		CreateTextureAndPassToPlugin();
		SendMeshBuffersToPlugin();
		yield return StartCoroutine("CallPluginAtEndOfFrames");
	}
主要有三个部分:
- 创建一个texture并将它的指针传递给plugin。这个texture是为旋转的三角准备的。
- 将平面的meshbuffer传递给plugin。这个是为”流动的“平面准备的。
- 开始coroutine,在每一帧结束的时候调用plugin中改变texture和mesh的方法。
There are three main parts:
- Create a texture and pass its pointer to the plugin. This texture is prepared for the rotating triangle.
- Pass the flat meshbuffer to the plugin. This is prepared for the “flowing” plane.
- Start coroutine, call the method of changing texture and mesh in plugin at the end of each frame.
	private IEnumerator CallPluginAtEndOfFrames()
	{
		while (true) {
			// Wait until all frame rendering is done
			// 等待到这一的帧的渲染全部结束(这一帧的end)
			yield return new WaitForEndOfFrame();

			// Set time for the plugin
			// 将实践参数传递给C++,为了产生随时间变化的动画
			SetTimeFromUnity (Time.timeSinceLevelLoad);

			// Issue a plugin event with arbitrary integer identifier.
			// The plugin can distinguish between different
			// things it needs to do based on this ID.
			// For our simple plugin, it does not matter which ID we pass here.
			// 调用渲染,ID是用作区分不同进程的,在这里只有单一的进程,所以不重要
			GL.IssuePluginEvent(GetRenderEventFunc(), 1);
		}
	}
2.1 load and unload
首先需要include库,这些库在项目文件中都可以找到,或者可以参考项目中RenderingPlugin.cpp的引入处理方式。
First we need to include the library, these libraries can be found in the project file, or you can refer to the introduction of RenderingPlugin.cpp in the project.
#include "IUnityInterface.h"
#include "IUnityGraphics.h"
在导入库之后,首先需要定义的是UnityPluginLoad和UnityPluginUnload方法,这些是为了处理主要的unity事件,它的基本格式也是一直的,几乎不需要改动,按照官方文件或者范例中的方式即可。
- 先申明一些需要的变量,和一个callback函数。
After importing the library, the first need to define the UnityPluginLoad and UnityPluginUnload methods, these are to deal with the main unity event, its basic format is always, almost no changes, according to the official documents or examples.
- Declare some required variables first, and a callback function.
// 这是事件的callback函数,会在下面定义
static void UNITY_INTERFACE_API OnGraphicsDeviceEvent(UnityGfxDeviceEventType eventType);

// the unity interface unity的交互界面
static IUnityInterfaces* s_UnityInterfaces = NULL;
// the graphics device 图像渲染的设备
static IUnityGraphics* s_Graphics = NULL;
- 定义load方法
- define the load method
extern "C" void	UNITY_INTERFACE_EXPORT UNITY_INTERFACE_API UnityPluginLoad(IUnityInterfaces* unityInterfaces)
{
	s_UnityInterfaces = unityInterfaces;
	// to access generic graphics device functionality
	// 为了可以访问渲染工具的功能
	s_Graphics = s_UnityInterfaces->Get<IUnityGraphics>();
	// to receive notification about events on the graphics device
	// 为了获取图像设备的信息
	s_Graphics->RegisterDeviceEventCallback(OnGraphicsDeviceEvent);

// Vulkan is a low-overhead, cross-platform 3D graphics and computing API.
// Vulkan是一款图像渲染api,unity提供了它的支持,但是我暂时没有使用它的需求
#if SUPPORT_VULKAN
	if (s_Graphics->GetRenderer() == kUnityGfxRendererNull)
	{
		extern void RenderAPI_Vulkan_OnPluginLoad(IUnityInterfaces*);
		RenderAPI_Vulkan_OnPluginLoad(unityInterfaces);
	}
#endif // SUPPORT_VULKAN

	// Run OnGraphicsDeviceEvent(initialize) manually on plugin load
	// to not miss the event in case the graphics device is already initialized
	// 手工调用一次callback的初始化方法
	OnGraphicsDeviceEvent(kUnityGfxDeviceEventInitialize);
}
- unload则十分简单
- define the unload method
extern "C" void UNITY_INTERFACE_EXPORT UNITY_INTERFACE_API UnityPluginUnload()
{
	s_Graphics->UnregisterDeviceEventCallback(OnGraphicsDeviceEvent);
}
- 定义图像实践callback方法
- define the event callback method
static RenderAPI* s_CurrentAPI = NULL;
static UnityGfxRenderer s_DeviceType = kUnityGfxRendererNull;

static void UNITY_INTERFACE_API OnGraphicsDeviceEvent(UnityGfxDeviceEventType eventType)
{
	// Create graphics API implementation upon initialization
	if (eventType == kUnityGfxDeviceEventInitialize)
	{
		assert(s_CurrentAPI == NULL);
		s_DeviceType = s_Graphics->GetRenderer();
		s_CurrentAPI = CreateRenderAPI(s_DeviceType);
	}

	// Let the implementation process the device related events
	if (s_CurrentAPI)
	{
		s_CurrentAPI->ProcessDeviceEvent(eventType, s_UnityInterfaces);
	}

	// Cleanup graphics API implementation upon shutdown
	if (eventType == kUnityGfxDeviceEventShutdown)
	{
		delete s_CurrentAPI;
		s_CurrentAPI = NULL;
		s_DeviceType = kUnityGfxRendererNull;
	}
}
2.2 IssuePluginEvent
这里需要输入渲染的event,在unity的代码中调用到(参加上面unity代码)。在plugin中是通过下面代码实现的:
Here you need to enter the rendered event, which is called in the unity code (to participate in the unity code above). In the plugin is achieved by the following code:
static void UNITY_INTERFACE_API OnRenderEvent(int eventID)
{
	// Unknown / unsupported graphics device type? Do nothing
	if (s_CurrentAPI == NULL)
		return;

	DrawColoredTriangle();
	ModifyTexturePixels();
	ModifyVertexBuffer();
}

// --------------------------------------------------------------------------
// GetRenderEventFunc, an example function we export which is used to get a rendering event callback function.

extern "C" UnityRenderingEvent UNITY_INTERFACE_EXPORT UNITY_INTERFACE_API GetRenderEventFunc()
{
	return OnRenderEvent;
}
在这个event中,主要进行了三个函数:
- DrawColoredTriangle(); 绘制有颜色的三角形(并使这个三角形旋转)
- ModifyTexturePixels(); 修改像素点的位置
- ModifyVertexBuffer(); 修改平面mesh每个顶点的位置
In this event, three main functions are performed:
- DrawColoredTriangle(); Draws a colored triangle (and rotates this triangle)
- ModifyTexturePixels(); Modify the position of the pixel
- ModifyVertexBuffer(); Modify the position of each vertex of the plane mesh
2.3 DrawColoredTriangle
static void DrawColoredTriangle()
{
	// Draw a colored triangle. Note that colors will come out differently
	// in D3D and OpenGL, for example, since they expect color bytes
	// in different ordering.
	// 定义vertex结构体 包含了位置和颜色
	struct MyVertex
	{
		float x, y, z;
		unsigned int color;
	};
	// 三角形的三个顶点,和每个顶点的颜色(由于编码方式不一样,颜色在D3D和opengl中会不一样)
	MyVertex verts[3] =
	{
		{ -0.5f, -0.25f,  0, 0xFFff0000 },
		{ 0.5f, -0.25f,  0, 0xFF00ff00 },
		{ 0,     0.5f ,  0, 0xFF0000ff },
	};

	// Transformation matrix: rotate around Z axis based on time.
	// 计算三角形的旋转矩阵 并将它告知
	float phi = g_Time; // time set externally from Unity script
	float cosPhi = cosf(phi);
	float sinPhi = sinf(phi);
	float depth = 0.7f;
	float finalDepth = s_CurrentAPI->GetUsesReverseZ() ? 1.0f - depth : depth;
	float worldMatrix[16] = {
		cosPhi,-sinPhi,0,0,
		sinPhi,cosPhi,0,0,
		0,0,1,0,
		0,0,finalDepth,1,
	};

	s_CurrentAPI->DrawSimpleTriangles(worldMatrix, 1, verts);
}
2.4 ModifyTexturePixels
static void ModifyTexturePixels()
{
	void* textureHandle = g_TextureHandle;
	int width = g_TextureWidth;
	int height = g_TextureHeight;
	if (!textureHandle)
		return;

	int textureRowPitch;
	void* textureDataPtr = s_CurrentAPI->BeginModifyTexture(textureHandle, width, height, &textureRowPitch);
	if (!textureDataPtr)
		return;

	const float t = g_Time * 4.0f;

	unsigned char* dst = (unsigned char*)textureDataPtr;
	for (int y = 0; y < height; ++y)
	{
		unsigned char* ptr = dst;
		for (int x = 0; x < width; ++x)
		{
			// Simple "plasma effect": several combined sine waves
			int vv = int(
				(127.0f + (127.0f * sinf(x / 7.0f + t))) +
				(127.0f + (127.0f * sinf(y / 5.0f - t))) +
				(127.0f + (127.0f * sinf((x + y) / 6.0f - t))) +
				(127.0f + (127.0f * sinf(sqrtf(float(x*x + y*y)) / 4.0f - t)))
				) / 4;

			// Write the texture pixel
			ptr[0] = vv;
			ptr[1] = vv;
			ptr[2] = vv;
			ptr[3] = vv;

			// To next pixel (our pixels are 4 bpp)
			ptr += 4;
		}

		// To next image row
		dst += textureRowPitch;
	}

	s_CurrentAPI->EndModifyTexture(textureHandle, width, height, textureRowPitch, textureDataPtr);
}
2.5 ModifyVertexBuffer
static void ModifyVertexBuffer()
{
	void* bufferHandle = g_VertexBufferHandle;
	int vertexCount = g_VertexBufferVertexCount;
	if (!bufferHandle)
		return;

	size_t bufferSize;
	void* bufferDataPtr = s_CurrentAPI->BeginModifyVertexBuffer(bufferHandle, &bufferSize);
	if (!bufferDataPtr)
		return;
	int vertexStride = int(bufferSize / vertexCount);

	const float t = g_Time * 3.0f;

	char* bufferPtr = (char*)bufferDataPtr;
	// modify vertex Y position with several scrolling sine waves,
	// copy the rest of the source data unmodified
	for (int i = 0; i < vertexCount; ++i)
	{
		const MeshVertex& src = g_VertexSource[i];
		MeshVertex& dst = *(MeshVertex*)bufferPtr;
		dst.pos[0] = src.pos[0];
		dst.pos[1] = src.pos[1] + sinf(src.pos[0] * 1.1f + t) * 0.4f + sinf(src.pos[2] * 0.9f - t) * 0.3f;
		dst.pos[2] = src.pos[2];
		dst.normal[0] = src.normal[0];
		dst.normal[1] = src.normal[1];
		dst.normal[2] = src.normal[2];
		dst.uv[0] = src.uv[0];
		dst.uv[1] = src.uv[1];
		bufferPtr += vertexStride;
	}

	s_CurrentAPI->EndModifyVertexBuffer(bufferHandle);
}
2.6 RenderAPI
为了针对不同的设备,例子中还定了不同的API,分别针对D3D11,D3D12,Metal,OpenGL,和Vulkan。这里的具体内容,就不讨论了。
In order to target different devices, different APIs are also set in the examples for D3D11, D3D12, Metal, OpenGL, and Vulkan. The specific content here will not be discussed.
3. Build Android Library
-
新建android studio项目并且设定C++支持,并且正确设置SDK和NDT。(这些可以参考官网的教程)
-
导入项目的C++文件,并且设置cmakelist.txt。下面是我的设定,需要注意的是,按照github原项目的说明需要设定"Android.mk",但是我使用的版本看不见这个文件,只能设定cmakelist文件,所以需要在最后连接”GLESv2“库。而且考虑到手机的graphics api是opengl unified,所以我把opengl core ES的render api加入了项目,其他的则随意就好。
-
Create a new android studio project and set C++ support, and set the SDK and NDT correctly. (These can refer to [Official Website Tutorial] (https://developer.android.com/studio/projects/add-native-code))
-
Import the project’s C++ file and set cmakelist.txt. The following is my setting, it should be noted that according to the description of the original github project, you need to set “Android.mk”, but the version I use can’t see this file, only the cmakelist file can be set, so I need to connect at the end." GLESv2 "Library. And considering that the graphics api of the mobile phone is opengl unified, I added the open api’s render api to the project, and the rest are free.
cmake_minimum_required(VERSION 3.4.1)

add_library( # Sets the name of the library.
        RenderingPlugin

        # Sets the library as a shared library.
        SHARED

        src/main/cpp/NativeRenderingPlugin/log/log_util.cpp

        src/main/cpp/NativeRenderingPlugin/RenderAPI.cpp
        src/main/cpp/NativeRenderingPlugin/RenderAPI_D3D11.cpp
        src/main/cpp/NativeRenderingPlugin/RenderAPI_D3D12.cpp
        src/main/cpp/NativeRenderingPlugin/RenderAPI_OpenGLCoreES.cpp
        src/main/cpp/NativeRenderingPlugin/RenderingPlugin.cpp

        )

find_library( # Sets the name of the path variable.
        log-lib

        # Specifies the name of the NDK library that
        # you want CMake to locate.
        log)

target_link_libraries( # Specifies the target library.
        RenderingPlugin

        # library for opengl unified
        GLESv2
        # Links the target library to the log library
        # included in the NDK.
        ${log-lib})
-
然后编译项目,选择正确的android cpu架构的库,添加到unity中,并且设定正确的对应配置文件。然后直接打包目标平台android即可。
-
最后成功在android上运行,但是存在一个问题–glBufferData不能使用,导致平面mesh点难以获取,所以平面没有”流动性“,而保持为了平面。
-
glBufferData是GLES2.0的拓展库,在ios和大部分android中都有支持,但是它不是必须的。在我的编译过程中,不能正确的找到这个函数,我也不是opengl专精,无法解决这个问题。(错误参考)
-
Then compile the project, select the correct android cpu architecture library, add to unity, and set the correct corresponding configuration file. Then directly package the target platform android.
-
Finally succeeded in running on android, but there is a problem - glBufferData can not be used, which makes the plane mesh point difficult to obtain, so the plane does not have “liquidity”, but remains flat.
-
glBufferData is an extension of GLES 2.0, which is supported in iOS and most android, but it is not required. In my compilation process, this function cannot be found correctly. I am not an opengl specialization and cannot solve this problem. ([Error Reference] (https://stackoverflow.com/questions/30641095/glmapbuffer-is-missing-from-opengl-es-2))
4 Analysis
总的来说这个项目展示了两个例子:
- 转动的三角形。这个例子中,完全由android的graphics api负责创建并且渲染,untiy完全没有插手。
- 流动的平面。这个例子中,由unity创建了一个mesh和texture,再将他们的地址传递给底层,然后由底层C++负责修改texture和mesh的值。这个object是由unity和底层C++共同携手创建的。
对我而言实现AR相机,我也可以根据这个例子从两个方向出发:
- 完全由底层开启相机并且创建对图片的渲染,完全不让unity插手。(我猜测这可能就是高通vofria的实现方式)
- 或者也可以由我们现在unity创建图片显示的texture。然后传递它的地址交由底层C++写入数据。
In general, this project shows two examples:
- ** Rotating triangle**. In this example, it is completely created and rendered by the android graphics api, and untiy does not intervene at all.
- ** Flowing plane**. In this example, a mesh and texture are created by unity, and their addresses are passed to the underlying layer, and then the underlying C++ is responsible for modifying the values of the texture and mesh. This object was created by unity and the underlying C++.
For me to implement an AR camera, I can also proceed from two directions based on this example:
- The camera is turned on completely by the bottom layer and the rendering of the image is created, so that no unity is allowed. (I guess this may be the way Qualcomm vofria is implemented)
- Or you can create a texture for the image display by us now unity. Then pass its address to the underlying C++ to write the data.
