Ultimate Guide to Convert a Web App To a Decentralized App Dapp
In this guide you’ll learn all you need to take a web app that you already have and convert it into a dapp. I’ll walk you through all the steps from start to finish. At the end of it, you’ll know how to create your own decentralized application based on your web apps in any situation.

So be sure to read the entire article and clap it 42 times if you learned something valuable.
I’m writing this guide because I ran a survey of about 100 responses where one of the most demanded topics was how to convert a web app to a dapp. If you’re a web developer, you’ll love this guide even though you’ll have to research about Solidity programming for your own needs later on.
This tutorial is ideal for people who have some experience developing Smart Contracts but don’t know how to actually apply their knowledge to create something useful with a dapp. We’ll start from scratch so anybody can use this guide.
You must have a web app already created since I’ll show you a web app and we will convert it but we won’t create the web app from scratch.
Your goal with this guide is to read and understand the process behind the conversion of a web app to a dapp. Then it’s your choice to apply this information into your own projects.
In order to show you how it is done, I’ll create a simple web app project based on the popular social media site Linkedin with less features. Then, you’ll see how to make it decentralized.
Here’s the index of the contents in this guide:
- Preparation. Tools needed for the job
- Introduction. The web app that we are going to convert
- Smart Contracts. Creating the Smart Contracts required for the dapp
- Web3. Connecting the Smart Contracts to the web app
- Conclusion
1. Preparation. Tools needed for the job
Before showing you the project, you need to know the tools that we are going to use to convert such web app to a dapp.
A decentralized application is just a web app where the server-database logic is stored on the blockchain. For instance, if you want to write a short, decentralized tweet in a dapp, the text will be stored on the Ethereum blockchain via a Smart Contract in a string variable.
A Smart Contract is the code that help us communicate with the blockchain to store data and use it.
So to start you need to download metamask. In order to communicate with the blockchain via Smart Contracts, we need Metamask which is a chrome and firefox extension where you can connect to a free server that has the latest Ethereum blockchain downloaded. It’s a tool for connecting to Ethereum in “Developer mode”.
Go to metamask.io and download the chrome or firefox extension.
Then click the little icon at the top of your browser:

Accept the terms, create a new password:

And copy your 12-word private seed somewhere in a notepad:

Now you’ll see that you’re connected on the main network. Click on the mainnet icon:

And change it to ropsten:
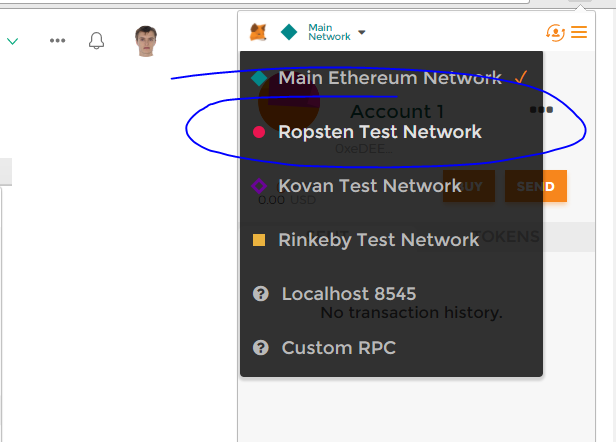
Ropsten is a test blockchain where Ether doesn’t have any real monetary value. It’s a free blockchain used for development. You needed it because you don’t want to spend real money when testing and designing your dapp.
Now that you have metamask set up and ready, let’s see the next tool that you’ll need to create the decentralized application: the Remix IDE code editor.
Remix is a very interesting dapp where you can develop Smart Contracts, deploy them to the blockchain of your choice and interact with those Smart Contracts right away.
Go to remix.ethereum.org.
It is essential for developing and getting started. The most important aspects of this code editor are the code section, where you’ll write your code:

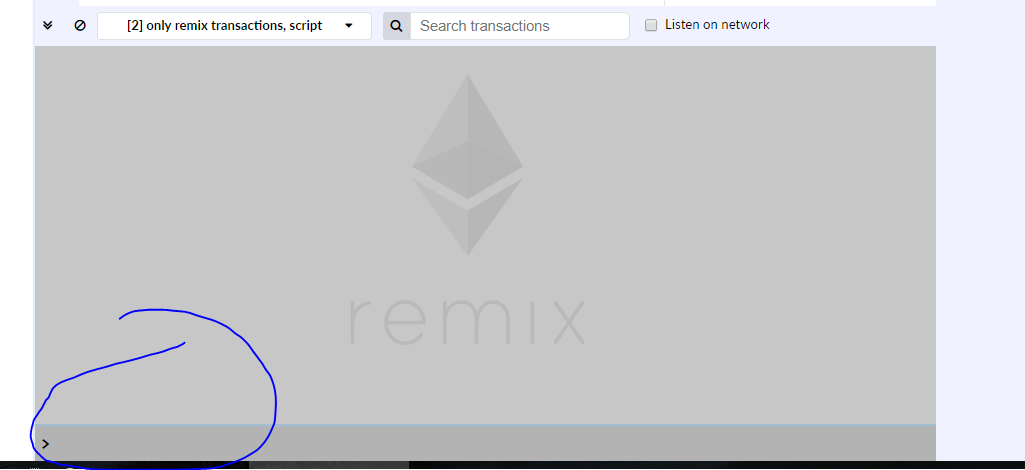
The console section where you’ll see the response from the blockchain when using your Smart Contracts:
And the Run section, which you’ll use to interact and deploy your contracts:

Now that you’re familiar with the interface that you’ll use for developing the Smart Contracts needed for converting your web app into a dapp, you can go ahead and continue with the next section.
2. Introduction. The web app that we are going to convert
First let’s see the web app that we are going to decentralize. This is a simple linkedin-like application where users can create accounts, follow other users and they can write small messages.
Here’s a gif of how the web application looks like:
You can see the web app in action here: https://decentralized-linked.github.io/
And the source code here: https://github.com/decentralized-linked/decentralized-linked.github.io
It’s a simple web app without a server for simplicity sake where you can follow people, write messages and configure your profile. Our goal is to make it decentralized so it works with Ethereum.
For now you need to write down the functionality that requires a server. For instance in this application:
- The accounts and messages are stored on a database each time an action is taken
- The server saves on the database who you’re following
The remaining functionality is made with plain javascript on the browser. So the information that we will store on the blockchain is:
- User accounts with names, occupations and bios
- The number of followers for each user
- The messages with the content, who wrote each message and when
After writing down what information you are storing on your centralized database, you can continue with the next section. You’ll need that information for creating the Smart Contracts.
Ready for the code? If you think this guide is worth your time you can clap it and share it. Otherwise just keep reading and apply what you learn. You can also help me create content that you like by filling this short survey in 1 min: https://goo.gl/forms/Vns2xlFY4dpgsEMA2
3. Smart Contracts. Creating the Smart Contracts required for the dapp
A Smart Contract is a programming file usually written in the language Solidity where you define all the logic required for communicating with the blockchain.
Smart Contracts store the information that you would have stored on a centralized database.
They also contain the logic for processing that information in the blockchain. It’s like your server side code but simpler.
The first step for creating the Smart Contracts required for decentralizing your web app, is to write the variables used. In the previous section you wrote down the information stored on the database. That’s the information that will be stored in the Smart Contract.
So open remix.ethereum.org and create the variables:
pragma solidity 0.4.21;
contract Linked {
    // User profile
    struct User {
        bytes32 name;
        bytes32 occupation;
        string bio;
    }

    // The structure of a message
    struct Message {
        string content;
        address writtenBy;
        uint256 timestamp;
    }

    // Each address is linked to a user with name, occupation and bio
    mapping(address => User) public userInfo;

    // Each address is linked to several follower addresses
    mapping(address => address[]) public userFollowers;

    // The messages that each address has written
    mapping(address => Message[]) public userMessages;

    // All the messages ever written
    Message[] public messages;
}
A struct is a type of variable that allows you to create a new type of variable with several internal properties. In this case I’ve created the structs User and Message:
- Each user will have a name, occupation and bio.
- The Message has the content of the message, the address of the user that wrote the message and the timestamp when it was written.
You can learn more about each type of variable in the official docs: http://solidity.readthedocs.io/en/v0.4.21/types.html
After creating your variables, you want to code functions that will use those variables. My web app has the following functions:
- Set the user profile by saving the data in a database
2. Write a message that will be stored in the database with the content of the message, who wrote it and the timestamp of the message
3. Follow and unfollow users. Each user is linked with several followers
Let’s create them one-by-one in your Smart Contract using unique functions.
1. Set the user profile by saving the data in a database:
Here’s how I’d do it in my Smart Contract:
// Sets the profile of a user
function setProfile(bytes32 _name, bytes32 _occupation, string _bio) public {
    User memory user = User(_name, _occupation, _bio);
    userInfo[msg.sender] = user;
}
This function is receiving the name, occupation and bio of the user and it’s updating the mapping of that user. The mapping links the address of the sender with his user information. We are overriding that information here.
In your web app you may would have stored that information by making an API call to a node.js server which would store that information inside a mondodb database. In decentralized apps, all that logic is inside the Smart Contract written in Solidity.
2. Write a message that will be stored in the database with the content of the message, who wrote it and the timestamp of the message
// Adds a new message
function writeMessage(string _content) public {
    Message memory message = Message(_content, msg.sender, now);
    userMessages[msg.sender].push(message);
    messages.push(message);
}
The function receives the content of the message. Then it creates a temporary message struct instance with the content, the address of the sender and the current timestamp. Finally it adds the message to the array of messages of that user and it also adds the message to the public array of all the messages.
The keyword now is the current time in a unix format of 10 numbers. I’m using it for the timestamp of each message.
3. Follow and unfollow users. Each user is linked with several followers
// Follows a new user
function followUser(address _user) public {
    userFollowers[msg.sender].push(_user);
}

// Unfollows a user
function unfollowUser(address _user) public {
    for(uint i = 0; i < userFollowers[msg.sender].length; i++) {
        if(userFollowers[msg.sender][i] == _user) {
            delete userFollowers[msg.sender][i];
        }
    }
}
The follow function adds that follow address to your mapping of follows.
The unfollow user function loops through all your follows and removes that user address for the array. Note that this will only work for a small amount of addresses, up to about 200 loops since the number of loops is limited by the gas sent in the transaction when executing the unfollow function.
You can see that the for loop is very similar to the one of similar languages lika java or c++.
Great, we now have the variables and functions using those variables.
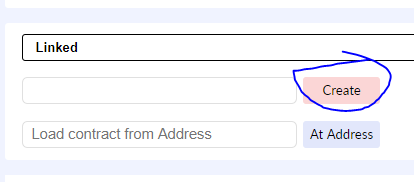
After your Smart Contract code is ready, deploy it on ropsten by going to the Run tab on the right or the Remix code editor:

Make sure you’re using the Injected Web3 from Metamask and that your metamask account is connected to Ropsten like you saw before:

You’ll need test ropsten Ether for deploying and using the contract. You can get test ether by going to https://faucet.metamask.io/ and clicking on request 1 Ether:

Then go back to Remix and deploy the Smart Contract by clicking on Create and confirming the transaction in Metamask:

The last thing is to use those functions on your web app. Learn how in the next section.
4. Web3. Connecting the Smart Contracts to the web app
To use that decentralized Smart Contract on your web app as a database, you will use a javascript library called web3.js.
Go to your web app project folder and create an empty file called web3.min.jsusing your favorite text editor. I like atom.io.
Then go to the official github repository of web3 and copy the web3 min code from here: https://github.com/ethereum/web3.js/blob/develop/dist/web3.min.js
Click on raw:

Select the code with CTRL + A and copy it with CTRL + C. Then paste it in your empty web3.min.js file and save it:

Next, import it in your main html file:

Alternatively, you can install web3 with nodejs:
npm i -S web3
And require it if you’re using webpack or any other tool to combine your javascript files:
const Web3 = require('web3')
// Or
import Web3 from 'web3'
Now that you have the library there, you have to initialize web3 like so:
// Remember that we are using ropsten for this application. Once completed we may deploy it to the mainnet for public use
window.web3 = new Web3(window.web3 ? window.web3.currentProvider : new Web3.providers.HttpProvider('https://ropsten.infura.io'))
What I’m doing there is setting the global variable web3 in lowecase to the new Web3 provider. If it’s already defined because metamask injected it, I just use that provider injected. Otherwise, I create a new provider with infura. You can learn more about infura here if you’re curious: https://infura.io/
Note that you will only be able to use this application if you have metamask, mist or similar for connecting to the blockchain and signing transactions.
After that, you have to initialize the Smart Contract that you’ll use for your web app. You can do it like so:
const contractABI = [Your-JSON-ABI]
const contractAddress = '0x70ae16608789f81604fd2f485fb81bc02cf0f8cb'
const contractInstance = web3.eth.contract(contractABI).at(contractAddress)
You need the contract ABI and the contract address. Then you can create the instance.
The ABI is a JSON document with the names of all the functions in your smart contract. Required for executing functions in web3.js.
To get the ABI, go back to Remix and in the Compile tab, click on Details:

Then click on the Copy button next to the ABI section:

Before using that JSON ABI code, you need to eliminate the spaces since it’s a json formated document. Go to https://www.cleancss.com/json-minify/, paste your ABI there and click on JSON Minify:

Then copy the output down below by right clicking on the selected text:

Go back to your code and paste that information into a variable:
const contractABI = [{"constant":true,"inputs":[{"name":"","type":"address"},{"name":"","type":"uint256"}],"name":"userMessages","outputs":[{"name":"content","type":"string"},{"name":"writtenBy","type":"address"},{"name":"timestamp","type":"uint256"}],"payable":false,"stateMutability":"view","type":"function"},{"constant":true,"inputs":[{"name":"","type":"address"}],"name":"userInfo","outputs":[{"name":"name","type":"bytes32"},{"name":"occupation","type":"bytes32"},{"name":"bio","type":"string"}],"payable":false,"stateMutability":"view","type":"function"},{"constant":true,"inputs":[{"name":"","type":"address"},{"name":"","type":"uint256"}],"name":"userFollowers","outputs":[{"name":"","type":"address"}],"payable":false,"stateMutability":"view","type":"function"},{"constant":true,"inputs":[{"name":"","type":"uint256"}],"name":"messages","outputs":[{"name":"content","type":"string"},{"name":"writtenBy","type":"address"},{"name":"timestamp","type":"uint256"}],"payable":false,"stateMutability":"view","type":"function"},{"constant":false,"inputs":[{"name":"_user","type":"address"}],"name":"followUser","outputs":[],"payable":false,"stateMutability":"nonpayable","type":"function"},{"constant":false,"inputs":[{"name":"_name","type":"bytes32"},{"name":"_occupation","type":"bytes32"},{"name":"_bio","type":"string"}],"name":"setProfile","outputs":[],"payable":false,"stateMutability":"nonpayable","type":"function"},{"constant":false,"inputs":[{"name":"_user","type":"address"}],"name":"unfollowUser","outputs":[],"payable":false,"stateMutability":"nonpayable","type":"function"},{"constant":false,"inputs":[{"name":"_content","type":"string"}],"name":"writeMessage","outputs":[],"payable":false,"stateMutability":"nonpayable","type":"function"}]
Now you need the address of the contract that you deployed earlier in remix. Go back to remix and copy the contract address which you’ll find in the Run tab down below:

If you don’t see the contract address, refresh the page and deploy it again on Ropsten. You’ll have to wait until the transaction is processed by the miners. Now set that address into a variable:
const contractAddress = '0x9d198b2a209481b08e570aa7a629a6661cd33f24'
And create your contract instance that you’ll use for executing the functions of the Smart Contract:
const contractInstance = web3.eth.contract(contractABI).at(contractAddress)
If you remember the web app that we are decentralizing:
You can see that there’s a function to see the profile information. So to make it work with the decentralized Smart Contract that you just created, you have to open the javascript file that contains that function and update it with the contract instance code:
function initMyProfile() {
    contractInstance.userInfo(web3.eth.accounts[0], (err, myProfile) => {
        if(err) return alert(err)

        let profileContent = ''
        myName = web3.toUtf8(myProfile[0])
        let myOccupation = web3.toUtf8(myProfile[1])
        let myBio = myProfile[2]
profileContent += `
            Name: <span id="my-name">${myName}</span> <br/>
            Occupation: <span id="my-occupation">${myOccupation}</span> <br/>
            Bio: <span id="my-bio">${myBio}</span> <br/>
            <button id="set-profile-button" class="align-center" onclick="setProfile()">Set Profile</button>`
        document.querySelector('#profile-content').innerHTML = profileContent
    })
}
Here’s what I did to decentralize the function to get the profile information about the user:
- The
userInfois a public variable, which allows us to execute it as a function with the right parameters to get its value. The first parameter is the current user address, which you can get withweb3.eth.accounts[0]remember that you need to be connected to metamask and that your code is served via a local server. You can do it by installingnpm i -g http-serverand executinghttp-serveron your project directory. - If the function is getting the data correctly from the Smart Contract, the variable
myProfilewill be an array with the name, occupation and bio of the user. Each of those values can be accesed in order like somyProfile[0] // This is the namemyProfile[2] // This is the bio - Now because we defined the variables name and occupation as
bytes32, the information is stored in a hexadecimal string of 32 values. You need to convert that information to a human readable text with the functionweb3.toUtf8(myProfile[1]). Note that this is for the version 0.20.0 of web3.js. If you’re using a newer version, the function will be different so make sure to check the official documentation of web3 for your version by searching on google.
That’s how you get the information from the blockchain via the Smart Contract instead of a server with its database. That Smart Contract information will be available 24/7.
Next I’m updating the saveProfile() function that will update the profile information of the current user like so:
function saveSetProfile(name, occupation, bio) {
    contractInstance.setProfile(name, occupation, bio, (err, result) => {
        console.log(err, result)
    })
}
You can see that I’m executing the function setProfile() of the Smart Contract with the name, occupation and bio. Then I’m logging the information about the error and the result.
When that function is executed in your front-end javascript, you’ll receive a metamask notification asking you to confirm the contractInstance.setProfile() function transaction.
Now you have to keep doing the same for all the functions of your web app. Your goal is to make them decentralized. This means that instead of getting the information from a centralized database with some server logic, you have to use Smart Contracts.
Here are the steps to help you convert the functions of your web app to dapp functions:
- Create the Smart Contract with variables that will store the information that you’re storing right now on a database. To do so, you’ll need to learn about Solidity types in the official docs or in my other guide
- Initialize the Smart Contract on your web app with web3.js using its ABI and address
- Convert all of your existing web app functions to their decentralized version with web3 and the contract instance that you just created
Conclusion
Your final dapp will be different from the original web application. Some information will be stored in a different type of variable and you’ll have to use tricks to get around the limitations of the blockchain. Whenever you get stuck, search for an anwser on google and try different things.
It’s important that you have a solid understanding about Smart Contract development so be sure to read the docs and keep expanding your knowledge. Most of the things are possible on the blockchain if you’re creative.
One of the best exercices that you can do for learning faster is to try to convert all of your existing web apps to dapps. Then you’ll learn the small things that make you a great Ethereum Developer.
Thanks for reading the article. Make sure to share it with your friends on twitter, reddit and linkedin. Let me know if you get stuck somewhere and I’ll try to help you. I’m usually very busy so it might take me a while to get back to you.
Join my private Ethereum Developers facebook group to get up to speed faster than you could ever go alone here: https://www.facebook.com/groups/ethereumdevelopers/
You’ll receive exclusive information that you won’t find anywhere else along with an awesome active community willing to help you whenever you need it.
You can follow me on linkedin, twitter and on medium. What content do you want me to write about? Fill this short-1-minute survey with your choices and I’ll write about the most requested topics https://goo.gl/forms/Vns2xlFY4dpgsEMA2
Do you thing this information is valuable? The clap it 1 or 50 times it really helps me help more people so its a win-win situation for all of us :)