为了模拟系统中的文件传输,需要建立两个虚拟机,并确保两个虚拟机之间可以ping通。
使用VMware Workstation建立两个虚拟机,根据电脑内存大小,为虚拟机选择合适的内存空间。
利用scp命令实现文件传输
scp的定义
scp copies files between hosts on a network. It uses ssh(1) for data transfer, and uses the same authentication and provides the same security as ssh(1). scp will ask for passwords or passphrases if they are needed for authentication.
scp命令用于在各主机之间安全地传输数据。
 -r      Recursively copy entire directories.  递归复制整个目录
 -q      Quiet mode 静默模式,不显示文件/目录的传输进度
本地文件->远程主机
scp 本地文件 用户@远程ip地址:文件地址
我的两台主机分别是:
ip地址:192.168.1.118 名称: rhtl7_clone
ip地址:192.168.1.119 名称: rhtl8_clone
- 首先用rhtl7_clone测试是否与rhtl8_clone正常ping通;
[root@rhtl7_clone ~]# ping 192.168.1.119 -c 3
PING 192.168.1.119 (192.168.1.119) 56(84) bytes of data.
64 bytes from 192.168.1.119: icmp_seq=1 ttl=64 time=0.838 ms
64 bytes from 192.168.1.119: icmp_seq=2 ttl=64 time=0.503 ms
64 bytes from 192.168.1.119: icmp_seq=3 ttl=64 time=0.493 ms

--- 192.168.1.119 ping statistics ---
3 packets transmitted, 3 received, 0% packet loss, time 2001ms
rtt min/avg/max/mdev = 0.493/0.611/0.838/0.161 ms
- 然后在主机rhtl7_clone远程登录主机rhtl8_clone的root用户
[root@rhtl7_clone ~]# ssh [email protected]
- 重新开启一个shell,在主机rhtl7_clone的mnt目录中新建一个file文件;
[root@rhtl7_clone ~]# touch /mnt/file
使用vim编辑该文件,文件内容为:hello world!
- 将文件传输至主机rhtl8_clone的mnt目录中;
[root@rhtl7_clone ~]# scp /mnt/file [email protected]:/mnt/file
[email protected]'s password:
file                                          100%   13     6.1KB/s   00:00   ##默认显示文件传输进度
- 查看主机rhtl8_clone的mnt目录中是否有file文件;
[root@RHTL8_clone ~]# ls /mnt/       ##查看mnt目录中的文件
file  hgfs
[root@RHTL8_clone ~]# cd /mnt/       ##进入mnt目录
[root@RHTL8_clone mnt]# cat file     ##查看file的内容,文件传输成功
hello world!
远程文件->本地主机
scp 用户@远程ip地址:远程文件 本地文件地址
- 在主机rhtl8_clone的mnt目录下建立文件file2,使用vim编辑器给file2中增加内容;
[root@RHTL8_clone mnt]# touch file2
- 将主机rhtl8_clone中的file2文件传输至主机rhtl8_clone中;
[root@rhtl7_clone ~]# scp [email protected]:/mnt/file2 /mnt/file2
- 将主机rhtl8_clone中的file2文件传输至主机rhtl7_clone中;
[root@rhtl7_clone ~]# scp [email protected]:/mnt/file2 /mnt/file2
[email protected]'s password:
file2                                         100%   17     0.6KB/s   00:00  ##默认显示文件传输进度
- 查看主机rhtl7_clone中是否存在file2文件;
[root@rhtl7_clone ~]# cat /mnt/file2
Wuhan Fighting!!          ##文件传输成功
本地目录->远程主机
scp 本地目录 -r 用户@远程ip地址:目录地址
传输目录:
[root@rhtl7_clone ~]# mkdir /mnt/dir       ##创建目录
[root@rhtl7_clone ~]# cd /mnt/
[root@rhtl7_clone mnt]# ls
dir  file  file2
[root@rhtl7_clone mnt]# cd dir             ##进入该目录
[root@rhtl7_clone dir]# touch file{1..5}   ##在该目录下创建文件
[root@rhtl7_clone dir]# ls
file1  file2  file3  file4  file5
[root@rhtl7_clone dir]# scp -r /mnt/dir [email protected]:/mnt/dir   ##传输目录,使用-r
[email protected]'s password:
file1                                         100%    0     0.0KB/s   00:00
file2                                         100%    0     0.0KB/s   00:00
file3                                         100%    0     0.0KB/s   00:00
file4                                         100%    0     0.0KB/s   00:00
file5                                         100%    0     0.0KB/s   00:00
查看远程主机中是否存在该目录:
[root@RHTL8_clone ~]# ls /mnt/dir/   ##文件传输成功
file1  file2  file3  file4  file5
远程目录->本地主机
scp 远程目录 -r 用户@远程ip地址:本地目录地址
在远程主机创建新目录
[root@RHTL8_clone ~]# cd /mnt/
[root@RHTL8_clone mnt]# mkdir china
[root@RHTL8_clone mnt]# cd china
[root@RHTL8_clone china]# touch HuBei ShanXi JiangSu ZheJiang HeNan
[root@RHTL8_clone china]# ls
HeNan  HuBei  JiangSu  ShanXi  ZheJiang
由本地主机进行传输
[root@rhtl7_clone dir]# scp -r -q [email protected]:/mnt/china /mnt/china  ##传输目录,使用-r属性,增加-q属性,不显示传输进度
[email protected]'s password:
[root@rhtl7_clone dir]# ls /mnt/china
HeNan  HuBei  JiangSu  ShanXi  ZheJiang
利用rsync命令实现文件传输
rsync命令也可以用来传输文件,它与scp命令之间地不同之处为:
scp是复制+黏贴,如果该文件已存在则将其覆盖,比较耗时间;可以加密传输;不会增大磁盘的IO负载。
rsync是增量复制,如果要求复制的文件中有已经存在的文件,会直接跳过,仅复制增加的部分;不可以加密传输;短时间内会增大磁盘的IO负载。
它的用法与scp类似:
rsync 本地文件 远程用户@远程主机ip地址:远程文件地址
rsync 远程用户@远程主机ip地址:远程文件地址 本地文件
常用参数:
| 参数 | 含义 |
|---|---|
| a | =rlptogD全部执行 |
| r | 复制目录 |
| l | 复制链接 |
| p | 复制权限 |
| t | 复制时间戳 |
| o | 复制拥有者 |
| g | 复制拥有组 |
| D | 复制设备文件 |
scp与rsync命令的对比
dd 表示截取
if = inputfile
of = outputfile
bs = blocksize
count 表示块数
[root@rhtl7_clone mnt]# dd if=/dev/zero of=/mnt/file1 bs=1M count=10
10+0 records in
10+0 records out
10485760 bytes (10 MB) copied, 0.171284 s, 61.2 MB/s
[root@rhtl7_clone mnt]# dd if=/dev/zero of=/mnt/file2 bs=1M count=20
20+0 records in
20+0 records out
20971520 bytes (21 MB) copied, 0.222208 s, 94.4 MB/s
[root@rhtl7_clone mnt]# dd if=/dev/zero of=/mnt/file3 bs=1M count=30
30+0 records in
30+0 records out
31457280 bytes (31 MB) copied, 0.18178 s, 173 MB/s
[root@rhtl7_clone mnt]# rm file2
rm: remove regular file ‘file2’? yes
[root@rhtl7_clone mnt]# time ls /mnt
china  dir  file  file1  file2  file3

real	0m0.003s
user	0m0.000s
sys	0m0.002s
- 免密登录远程主机;
[root@rhtl7_clone mnt]# ssh-keygen       ##使用该命令生成本地用户的RSA公私钥对
[root@rhtl7_clone mnt]# ssh-copy-id -i /root/.ssh/id_rsa.pub [email protected]
/usr/bin/ssh-copy-id: INFO: Source of key(s) to be installed: "/root/.ssh/id_rsa.pub"
/usr/bin/ssh-copy-id: INFO: attempting to log in with the new key(s), to filter out any that are already installed
/usr/bin/ssh-copy-id: INFO: 1 key(s) remain to be installed -- if you are prompted now it is to install the new keys
[email protected]'s password:

Number of key(s) added: 1

Now try logging into the machine, with:   "ssh '[email protected]'"
and check to make sure that only the key(s) you wanted were added.

[root@rhtl7_clone mnt]# ssh [email protected]   ##连接远程用户
Activate the web console with: systemctl enable --now cockpit.socket

Last login: Wed Feb 12 23:25:48 2020
- 编辑check_scp.sh文件,检测scp的传输时间:

同时复制本地主机mnt目录本身和其下的文件。 - 运行该程序
[root@rhtl7_clone ~]# sh check_scp.sh

real	0m26.641s
user	0m0.256s
sys		0m0.467s

real	0m26.322s
user	0m0.280s
sys		0m0.450s

real	0m26.275s
user	0m0.225s
sys		0m0.492s
- 编辑check_rsync.sh文件,检测rsync的传输时间:
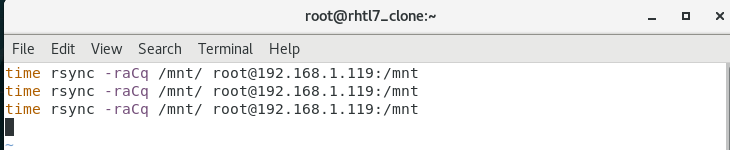
仅复制本地主机mnt目录中的文件。 - 运行该程序
root@rhtl7_clone ~]# sh check_rsync.sh

real	0m26.859s
user	0m0.452s
sys		0m0.747s

real	0m25.291s
user	0m0.010s
sys		0m0.013s

real	0m25.320s
user	0m0.011s
sys		0m0.017s
显然,rsync命令下,系统第二次和第三次的执行时间都比第一次要小很多;而scp命令下系统三次执行的时间基本一致。
rsync常用参数的用法
- 清除本地主机mnt目录下的文件,新建5个文件
[root@rhtl7_clone mnt]# rm -fr *
[root@rhtl7_clone mnt]# touch /mnt/file{1..5}
root@rhtl7_clone mnt]# chown zj:zj /mnt/*    ##修改5个文件的所有者
[root@rhtl7_clone mnt]# chmod 777 /mnt/*     ##修改5个文件的权限
[root@rhtl7_clone mnt]# ll
total 0
-rwxrwxrwx. 1 zj zj 0 Feb 13 02:35 file1
-rwxrwxrwx. 1 zj zj 0 Feb 13 02:35 file2
-rwxrwxrwx. 1 zj zj 0 Feb 13 02:35 file3
-rwxrwxrwx. 1 zj zj 0 Feb 13 02:35 file4
-rwxrwxrwx. 1 zj zj 0 Feb 13 02:40 file5
[root@rhtl7_clone mnt]# ln -s /mnt/file1 /mnt/file   ##建立file1文件的软链接
[root@rhtl7_clone mnt]# ll
total 0
lrwxrwxrwx. 1 root root 10 Feb 13 02:46 file -> /mnt/file1
-rwxrwxrwx. 1 zj   zj    0 Feb 13 02:35 file1
-rwxrwxrwx. 1 zj   zj    0 Feb 13 02:35 file2
-rwxrwxrwx. 1 zj   zj    0 Feb 13 02:35 file3
-rwxrwxrwx. 1 zj   zj    0 Feb 13 02:35 file4
-rwxrwxrwx. 1 zj   zj    0 Feb 13 02:40 file5
- 清除远程主机mnt目录下的文件并监视此mnt目录;
[root@RHTL8_clone mnt]# watch -n 1 ls -lR /mnt
- 将本地主机中的文件复制到远程主机中;
a. -l参数
[root@rhtl7_clone mnt]# rsync -rl /mnt/ [email protected]:/mnt ##-l参数使复制包含了软连接,否则,仅复制file1~file5

b. -p参数
[root@rhtl7_clone mnt]# rsync -rlp /mnt/ [email protected]:/mnt ##-p参数同步原文件的属性

c.-o和-g参数
[root@rhtl7_clone mnt]# rsync -rlpog /mnt/ [email protected]:/mnt ##-o同步原文件的所属用户,-g同步原文件的所属组

d. -t参数
[root@rhtl7_clone mnt]# rsync -rlpogt /mnt/ [email protected]:/mnt ##-t同步原文件的时间戳

e.-D参数
root@rhtl7_clone mnt]# ll /dev/pts    ##查看系统中的设备文件
total 0
crw--w----. 1 root tty  136, 0 Feb 13 03:35 0
crw--w----. 1 root tty  136, 1 Feb 13 03:35 1
crw--w----. 1 root tty  136, 2 Feb 13 02:35 2
c---------. 1 root root   5, 2 Feb 12 23:22 ptmx
[root@rhtl7_clone mnt]# rsync -r /dev/pts [email protected]:/mnt  ##复制失败
skipping non-regular file "pts/0"
skipping non-regular file "pts/1"
skipping non-regular file "pts/2"
skipping non-regular file "pts/ptmx"
[root@rhtl7_clone mnt]# rsync -rD /dev/pts [email protected]:/mnt  ##复制设备文件成功

文件归档
tar命令:归档文件
常用参数
| 参数 | 含义 |
|---|---|
| c | 创建 |
| f | 指定文件名称 |
| x | 解档 |
| t | 查看 |
| r | 向归档文件中添加文件 |
| –get | 解档指定文件 |
| –delete | 删除 |
| -C | 指定的位置 |
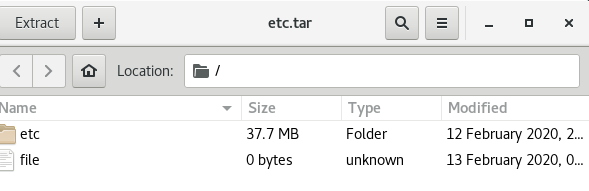
- 在桌面上创建归档文件etc.tar
[root@rhtl7_clone mnt]# cd /root/Desktop/
[root@rhtl7_clone Desktop]# du -sh /etc/          ##统计etc目录的大小
44M	/etc/
[root@rhtl7_clone Desktop]# tar cf etc.tar /etc   ##在桌面上打包etc目录,参数c表示创建,f表示文件
[root@rhtl7_clone Desktop]# du -sh etc.tar        ##统计etc.tar的大小
39M	etc.tar             ##变小的原因:原目录中有很多链接,打包后不统计这些链接的大小
- 查看归档文件中的内容(参数t)
[root@rhtl7_clone Desktop]# tar tf etc.tar /etc
- 给归档文件中添加文件
[root@rhtl7_clone Desktop]# touch file             ##在桌面新建文件
[root@rhtl7_clone Desktop]# tar rf etc.tar file    ##将file添加到归档文件中
3. 解档文件
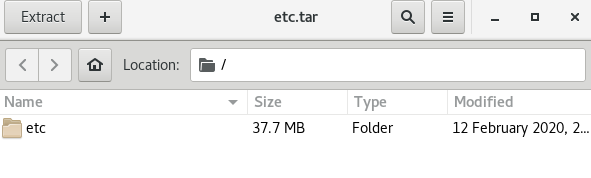
[root@rhtl7_clone Desktop]# rm -f file       ##删除桌面上的file文件
[root@rhtl7_clone Desktop]# tar xf etc.tar   ##在当前位置取出etc.tar中的file文件和etc目录

若只想解档某一个文件:
[root@rhtl7_clone Desktop]# rm -f file   ##删除桌面上的file文件
[root@rhtl7_clone Desktop]# rm -fr etc   ##删除桌面上的etc目录
[root@rhtl7_clone Desktop]# tar f etc.tar --get file   ##仅取出file文件,将它放到桌面上
若要求在指定位置解档文件:
[root@rhtl7_clone Desktop]# tar xf etc.tar -C /mnt
[root@rhtl7_clone Desktop]# ls /mnt/
etc  file  file1  file2  file3  file4  file5
- 删除归档文件中的某一个文件
[root@rhtl7_clone Desktop]# tar -f etc.tar --delete file
文件的压缩
压缩格式:rar(由于版权限制,Linux中无此类型,需下载插件),zip,gzip,bzip2,xz。
zip
压缩 zip -r 压缩文件 原文件
解压缩 unzip 压缩文件
[root@rhtl7_clone Desktop]# zip -r etc.tar.zip etc.tar ##压缩etc.tar
adding: etc.tar (deflated 70%)
[root@rhtl7_clone Desktop]# du -sh etc.tar.zip
16M etc.tar.zip
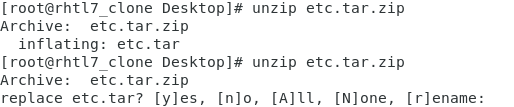
[root@rhtl7_clone Desktop]# rm -fr etc.tar
[root@rhtl7_clone Desktop]# unzip etc.tar.zip ##解压文件,若文件已存在会询问
Archive: etc.tar.zip
inflating: etc.tar
gzip
压缩 gzip 原文件
解压缩 gunzip 压缩文件
[root@rhtl7_clone Desktop]# gzip etc.tar        ##压缩后自动删除原文件
[root@rhtl7_clone Desktop]# du -sh etc.tar.gz
12M	etc.tar.gz
[root@rhtl7_clone Desktop]# gunzip etc.tar.gz   ##解压后自动删除压缩文件
bzip2
压缩 bzip2 原文件
解压缩 bunzip2 压缩文件
[root@rhtl7_clone Desktop]# bzip2 etc.tar         ##压缩后自动删除原文件
[root@rhtl7_clone Desktop]# du -sh etc.tar.bz2
10M	etc.tar.bz2
[root@rhtl7_clone Desktop]# bunzip2 etc.tar.bz2   ##解压后自动删除压缩文件
xz
压缩 xz 原文件
解压缩 unxz 压缩文件
[root@rhtl7_clone Desktop]# bunzip2 etc.tar.bz2   ##压缩后自动删除原文件
[root@rhtl7_clone Desktop]# xz etc.tar
[root@rhtl7_clone Desktop]# du -sh etc.tar.xz
8.0M	etc.tar.xz
[root@rhtl7_clone Desktop]# unxz etc.tar.xz       ##解压后自动删除压缩文件
tar+压缩
[root@rhtl7_clone Desktop]# tar zcf etc.tar.gz /etc       ##gzip打包压缩

[root@rhtl7_clone Desktop]# tar jcf etc.tar.bz2 /etc/     ##bzip2打包压缩

[root@rhtl7_clone Desktop]# tar Jcf etc.tar.xz /etc/      ##xz打包压缩

[root@rhtl7_clone Desktop]# tar zxf etc.tar.gz /etc       ##gzip解压缩

[root@rhtl7_clone Desktop]# tar jxf etc.tar.bz2 /etc/	  ##bzip2解压缩

[root@rhtl7_clone Desktop]# tar Jxf etc.tar.xz /etc/      ##xz解压缩
