上一篇 SpringCloud系列(二)——Eureka简介介绍了Eureka和搭建了一个简单的单点Eureka应用,但是一个注册中心远远无法满足实际的生产环境,需要多个注册中心进行集群,达到真正的高可用。今天我们实战来修改上一篇的代码,搭建一个Eureka集群。
Server端:
- 因为需要两个注册中心,所以同一台机器需要绑定下host,进入C:\Windows\System32\drivers\etc,修改hosts文件:
127.0.0.1 slave1
127.0.0.1 slave2 - 修改配置文件 application.yml,让两个Server相互注册:
server:
  port: 8761
spring:
  application:
    name: cloud-server
  profiles: slave1
eureka:
  client:
    serviceUrl:
      defaultZone: http://slave2:8762/eureka
---
server:
  port: 8762
spring:
  application:
    name: cloud-server
  profiles: slave2
eureka:
  client:
    serviceUrl:
defaultZone: http://slave1:8761/eureka- 修改ServerApp代码,通过输入服务器名称启动两个Eureka服务器,并让两个Server相互注册:
@SpringBootApplication
@EnableEurekaServer
public class ServerApp {
    public static void main(String[] args) {
        Scanner scan = new Scanner(System.in);
        String profiles = scan.nextLine();
        new SpringApplicationBuilder(ServerApp.class).profiles(profiles).run(args);
    }
}
Provider端:
- 修改配置文件 application.yml,让服务都注册到两个Eureka服务器:
eureka:
  client:
    serviceUrl:
defaultZone: http://localhost:8761/eureka/, http://localhost:8762/eureka/- 修改ProviderApp代码,通过输入端口号启动两个服务器:
@SpringBootApplication
@EnableEurekaClient
public class ProviderApp {

    public static void main(String[] args) {
        Scanner scan = new Scanner(System.in);
        // 读取控制台的端口输入
        String port = scan.nextLine();
        new SpringApplicationBuilder(ProviderApp.class).properties("server.port=" + port).run(args);
    }

}
Invoker端:
- 修改配置文件 application.yml,让消费方都注册到两个Eureka服务器,同Provider端。
- Invoker调用Provider服务:
@Controller
@Configuration
public class TestController {

    @Bean
    @LoadBalanced
    public RestTemplate getRestTemplate() {
        return new RestTemplate();
    }

    @GetMapping("/router")
    @ResponseBody
    public String router() {
        RestTemplate tpl = getRestTemplate();
        String json = tpl.getForObject("http://cloud-provider/call/1", String.class);
        return json;
    }

}
启动运行:
Server端:8761,8762;
Provider端:8080,8081;
Invoker端:9000;
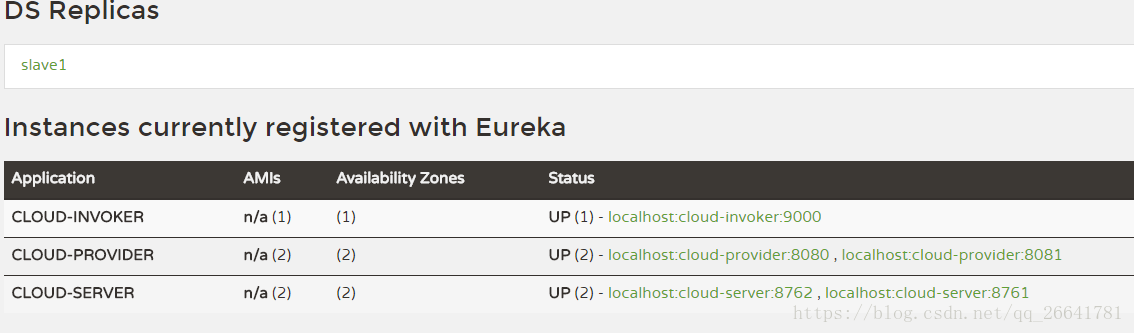
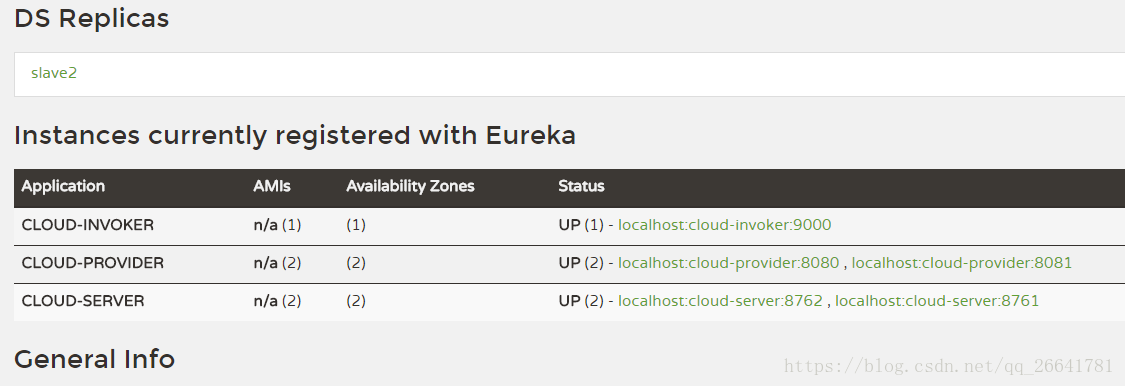
效果图:
slave1:
slave2:
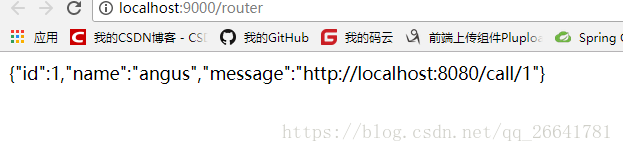
Invoker调用Provider服务,轮流调用两个服务,因为Ribbon(负载均衡)默认的策略是轮询(RoundRobinRule):
由上可以看出,两个Eureka服务器已经相互注册,两个服务和消费也注册到两个Eureka服务器。