在使用Java的SSH框架的时候,一直在感叹注解真是方便啊,关于注解的原理,大家可以参考我的另一片文章Java注解详解。最近有时间研究了Android注解的使用,今天与大家分享一下。
android中注解的使用用到了GitHub上的开源框架androidannotations,下载地址。这个开源框架应该是目前使用人数最多的android注解框架了,主要是由于它设计的注解标签非常多,能够满足我们日常开发中的大部分需求。androidannotations将许多可以抽取出来的方法都包装成了注解标签供我们使用,一会我会给大家具体演示。
好了,言归正传,我们一起来看看怎么使用这个东东。
第一步
下载androidannotations
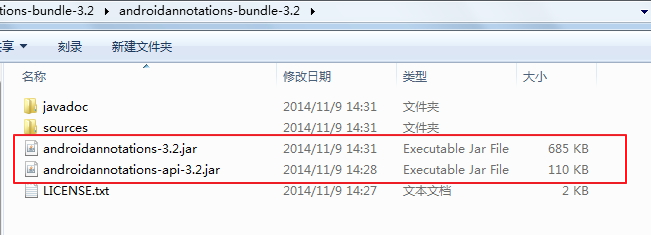
下载之后解压文件,我们会看到有两个jar包:
第二步
在eclipse上配置框架:
1.新建一个android项目,把androidannotations-api-3.2.jar拷贝到libs文件夹中,同时在项目中新建一个文件夹,叫做compile-lib,把androidannotations-3.2.jar文件拷贝进去。如图:

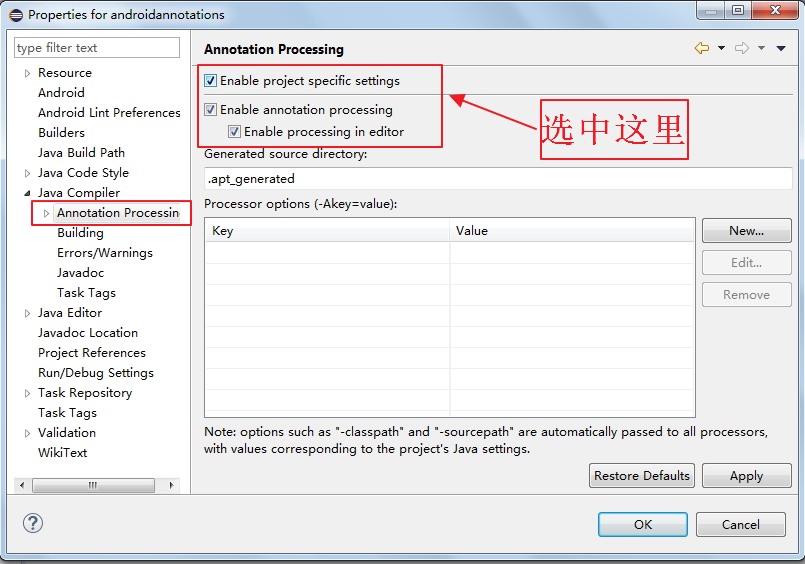
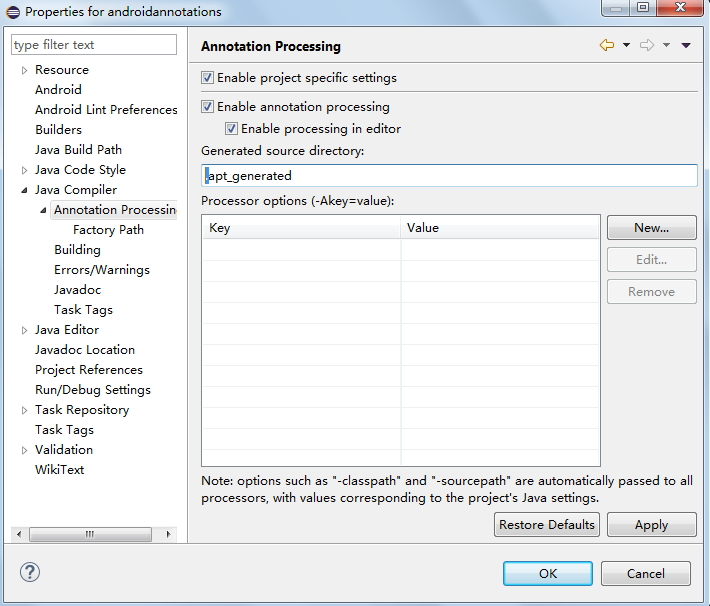
2.选中项目,右键单击,选择Properties,在新窗口左边可以看到Java Compiler,选中Java Compiler下的Annotation Processin,然后选中右边的Enable project specific Settings,允许给项目一些特殊设置。如图:
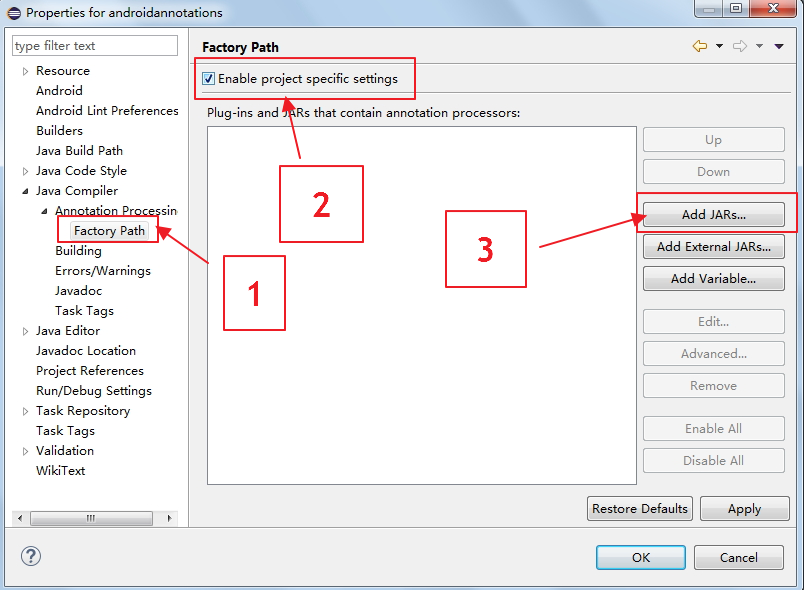
3.展开Annotation Processin,选中Factory Path,然后点击右边的Enable project specific Settings,最后点击Add JARs,添加jar包。如图:
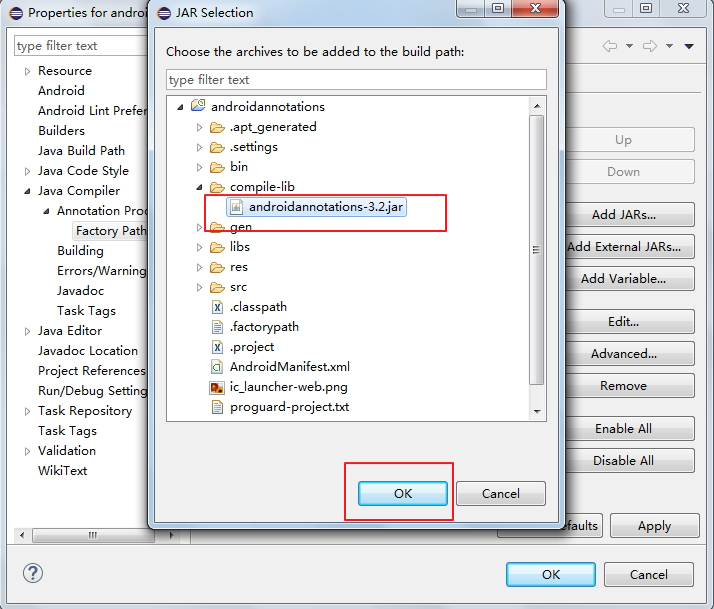
4.选中我们刚刚新建文件夹中的jar包,一路点击OK即可,如图
好了,至此我们的开发环境上的配置就完成了
第三步
测试配置是否成功
在一个Activity上输入@E,看看提示什么:
如果你看到了@EActivity,那么恭喜你,配置成功,如果没有看到,请检查以上步骤。
如图:

第四步
配置好了,接下来我们就要看看怎么使用androidannotations了。
1.Activity注解的使用
修改清单文件中的activity配置,我们要在MainActivity后面添加一个_:
        <activity
            android:name=".MainActivity_"
            android:label="@string/app_name" >
            <intent-filter>
                <action android:name="android.intent.action.MAIN" />

                <category android:name="android.intent.category.LAUNCHER" />
            </intent-filter>
        </activity>
- 1
- 2
- 3
- 4
- 5
- 6
- 7
- 8
- 9

- 1
- 2
- 3
- 4
- 5
- 6
- 7
- 8
- 9
至于为什么要把MainActivity改为MainActivity_,我在后面会给大家解释。然后在MainActivity上添加注解:
@EActivity(R.layout.activity_main)
public class MainActivity extends Activity {
- 1
- 2
- 1
- 2
删除掉onCreate()方法中的setContentView(R.layout.activity_main);,如图:
    @Override
    protected void onCreate(Bundle savedInstanceState) {
        super.onCreate(savedInstanceState);
    }
- 1
- 2
- 3
- 4
- 1
- 2
- 3
- 4
为了方便起见,我们先在主布局文件中添加一些控件:
<LinearLayout xmlns:android="http://schemas.android.com/apk/res/android"
    xmlns:tools="http://schemas.android.com/tools"
    android:layout_width="match_parent"
    android:layout_height="match_parent"
    android:paddingBottom="@dimen/activity_vertical_margin"
    android:paddingLeft="@dimen/activity_horizontal_margin"
    android:paddingRight="@dimen/activity_horizontal_margin"
    android:paddingTop="@dimen/activity_vertical_margin"
    android:orientation="vertical"
    tools:context="com.example.androidannotations.MainActivity" >

    <TextView
        android:id="@+id/textView1"
        android:layout_width="wrap_content"
        android:layout_height="wrap_content"
        android:text="@string/hello_world" />

    <Button
        android:id="@+id/button1"
        android:layout_width="wrap_content"
        android:layout_height="wrap_content"
        android:text="Button1" />

    <Button
        android:id="@+id/button2"
        android:layout_width="wrap_content"
        android:layout_height="wrap_content"
        android:text="Button2" />

    <Button
        android:id="@+id/button3"
        android:layout_width="wrap_content"
        android:layout_height="wrap_content"
        android:text="Button3" />

    <Button
        android:id="@+id/button4"
        android:layout_width="wrap_content"
        android:layout_height="wrap_content"
        android:text="Button4" />
    <Button
        android:id="@+id/button5"
        android:layout_width="wrap_content"
        android:layout_height="wrap_content"
        android:text="Go TO Next Activity" />
    <Button
        android:id="@+id/button6"
        android:layout_width="wrap_content"
        android:layout_height="wrap_content"
        android:text="多线程事件" />

    <TextView
        android:id="@+id/textView2"
        android:layout_width="wrap_content"
        android:layout_height="wrap_content"
        android:text="TextView" />

    <TextView
        android:id="@+id/textView3"
        android:layout_width="wrap_content"
        android:layout_height="wrap_content"
        android:text="TextView" />

    <TextView
        android:id="@+id/textView4"
        android:layout_width="wrap_content"
        android:layout_height="wrap_content"
        android:text="TextView" />

</LinearLayout>
- 1
- 2
- 3
- 4
- 5
- 6
- 7
- 8
- 9
- 10
- 11
- 12
- 13
- 14
- 15
- 16
- 17
- 18
- 19
- 20
- 21
- 22
- 23
- 24
- 25
- 26
- 27
- 28
- 29
- 30
- 31
- 32
- 33
- 34
- 35
- 36
- 37
- 38
- 39
- 40
- 41
- 42
- 43
- 44
- 45
- 46
- 47
- 48
- 49
- 50
- 51
- 52
- 53
- 54
- 55
- 56
- 57
- 58
- 59
- 60
- 61
- 62
- 63
- 64
- 65
- 66
- 67
- 68
- 69
- 70
这个时候我们运行看看,在没有给Activity设置布局的情况下系统有没有报错:
没有崩溃,所有内容正常显示,由此可见@EActivity(R.layout.activity_main)代替了setContentView(R.layout.activity_main);,这个使用起来更加方便。
再介绍一个和Activity有关的注解,我们在Activity使用过程中,经常需要重新自定义标题栏,从而需要隐藏系统默认的标题栏,那么这个该怎么实现呢:
@WindowFeature({ Window.FEATURE_NO_TITLE , Window.FEATURE_INDETERMINATE_PROGRESS})
@EActivity(R.layout.activity_main)
public class MainActivity extends Activity {
- 1
- 2
- 3
- 1
- 2
- 3
效果图:

标题栏成功隐藏,比我们其他的隐藏标题的方式都方便吧。
2.实例化控件注解
实例化控件注解是androidannotations中又一个非常好用的注解,也解决了我们开发过程中最枯燥的一项工作,正常情况下,我们实例化一个控件要使用findViewById,拿到控件后再强转为我们需要的类型,代码量大,而且枯燥,那么看看androidannotations带给我们什么惊喜呢?
我们的主布局文件上一共有四个TextView,我使用以下三种方式来进行实例化:
    @ViewById(R.id.textView1)
    TextView tv1;

    @ViewById
    TextView textView2;

    @ViewsById({R.id.textView3,R.id.textView4})
    List<TextView> list;
- 1
- 2
- 3
- 4
- 5
- 6
- 7
- 8
- 1
- 2
- 3
- 4
- 5
- 6
- 7
- 8
第一种:@ViewById(R.id.textView1)这是非常标准的写法。声明一个控件之后,然后使用@ViewById注解,在注解中说明这个控件的id,这样相当于代替了这样一行代码:
TextView tv1 = (TextView) this.findViewById(R.id.textView1);
- 1
- 1
第二种:我没有指明这个注解标签要用的id,那么它是怎么实例化的呢?在没有指明的情况下,androidannotations会使用控件名作为id,我的第二个控件名叫做textView2,与xml中的布局id是一样的,因此可以不用在注解中指定id.
第三种:如果要声明多个控件,可以把这些控件放入一个List集合中,然后在注解中指明多个id即可。
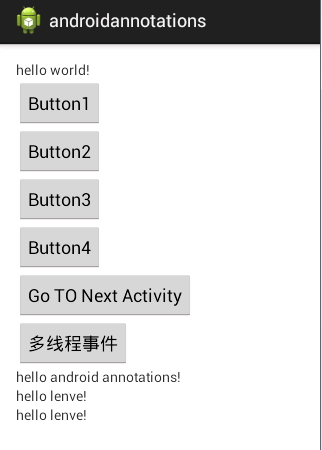
控件实例化之后,紧跟着就可以给控件赋值了:
    @AfterViews
    public void initTextView(){
        tv1.setText("hello world!");
        textView2.setText("hello android annotations!");
        for(TextView tv:list){
            tv.setText("hello lenve!");
        }
    }
- 1
- 2
- 3
- 4
- 5
- 6
- 7
- 8
- 1
- 2
- 3
- 4
- 5
- 6
- 7
- 8
这个方法会在实例完控件后执行。
3.事件注解
我们开发中用的较多的事件androidannotations几乎都给我们提供了注解:
    @TextChange
    @AfterTextChange
    @BeforeTextChange
    @EditorAction
    @FocusChange
    @CheckedChange
    @Touch
    @Click
    @LongClick
    @ItemClick
    @ItemLongClick
    @ItemSelect
    @OptionsItem
    @SeekBarProgressChange
    @SeekBarTouchStart
    @SeekBarTouchStop
- 1
- 2
- 3
- 4
- 5
- 6
- 7
- 8
- 9
- 10
- 11
- 12
- 13
- 14
- 15
- 16
- 17
- 18
- 1
- 2
- 3
- 4
- 5
- 6
- 7
- 8
- 9
- 10
- 11
- 12
- 13
- 14
- 15
- 16
- 17
- 18
我这里挑个简单的,也是最常用的说一下,算是抛砖引玉了:
    @Click({R.id.button1,R.id.button2,R.id.button3})
    public void btn_click(View v){
        switch (v.getId()) {
        case R.id.button1:
            Toast.makeText(this,"btn1", Toast.LENGTH_LONG).show();
            break;
        case R.id.button2:
            Toast.makeText(this,"btn2", Toast.LENGTH_LONG).show();
            break;
        case R.id.button3:
            Toast.makeText(this,"btn3", Toast.LENGTH_LONG).show();
            break;
        }
    }

    @Click(R.id.button4)
    public void btn4_click(){
        Toast.makeText(this,"btn4", Toast.LENGTH_LONG).show();
    }
- 1
- 2
- 3
- 4
- 5
- 6
- 7
- 8
- 9
- 10
- 11
- 12
- 13
- 14
- 15
- 16
- 17
- 18
- 19
- 1
- 2
- 3
- 4
- 5
- 6
- 7
- 8
- 9
- 10
- 11
- 12
- 13
- 14
- 15
- 16
- 17
- 18
- 19
在方法之上添加@Click注解,在注解中指明这是哪个控件的点击事件,如果是多个事件的点击事件,就注明多个id,在方法中使用v.getId()方法来进行区分。如果只给一个控件设置点击事件,那看button4的例子。
事件的注解其实是比较简单的,我就不多说了,大家有兴趣可以查看官方文档。
4.线程注解
这大概是最让我激动的一个注解了。这里主要给大家介绍两个注解:
@Background
@UiThread
- 1
- 2
- 1
- 2
毫无疑问,@Background是让方法在子线程中运行,而@UiThreaad则是让方法在UI线程中运行。
我们来实现一个简单的效果,点击一个按钮之后,让一个TextView自动更新值。
    @Background
    public void doInBackground(){
        try {
            for (int i = 0; i < 100; i++) {
                tvShowNumber(i);
                Thread.sleep(1000);
            }
        } catch (InterruptedException e) {
            e.printStackTrace();
        }
    }

    @UiThread
    public void tvShowNumber(int i) {
        list.get(1).setText(i+"");
    }
- 1
- 2
- 3
- 4
- 5
- 6
- 7
- 8
- 9
- 10
- 11
- 12
- 13
- 14
- 15
- 16
- 1
- 2
- 3
- 4
- 5
- 6
- 7
- 8
- 9
- 10
- 11
- 12
- 13
- 14
- 15
- 16
首先,在doInBackground方法中,每隔1秒执行一次tvShowNumber(i);方法,这个方法如果在主线程中运行会导致ANR异常,所以必须在子线程中运行,但是android中有不允许在子线程中更新UI线程,所以我们要在tvShowNumber方法上添加@UiThread标签,表明该方法是在UI线程中运行的。
看看效果图:
这里彻底抛弃了烦人的Message、Handler(此处该有掌声)。
5.Activity之间传值注解
Activity之间的跳转经常需要数据的传递,在新的Activity中需要通过Bundle来获得这些数据,还要判断是否为空,非常麻烦,看看androidannotations是怎么解决这个问题的:
新建一个SecondActivity,注意要修改清单文件,在文件后面加上_:
        <activity
            android:name=".SecondActivity_"
            android:label="@string/title_activity_second" >
        </activity>
- 1
- 2
- 3
- 4
- 1
- 2
- 3
- 4
SecondActivity接收MainActivity传来的两个参数,一个是name,一个是address,我们先来看看MainActivity中的代码:
    @Click(R.id.button5)
    public void go2NextActivity(){
        //这里要注意第二个Activity的写法
        Intent intent = new Intent(this,SecondActivity_.class);
        intent.putExtra("name", "张三");
        intent.putExtra("address", "xi'an");
        startActivity(intent);
    }
- 1
- 2
- 3
- 4
- 5
- 6
- 7
- 8
- 1
- 2
- 3
- 4
- 5
- 6
- 7
- 8
在SecondActivity中获得MainActivity中传来的值:
    @Extra("name")
    String username;
    @Extra
    String address;
- 1
- 2
- 3
- 4
- 1
- 2
- 3
- 4
和上文一样,如果参数名相同,则不用在注解中说明参数名称,否则要指明。这样就自动拿到MainActivity中传来的值了。如果MainActivity中传来的值为空,也不会报错,系统会自动处理异常情况。
6.资源文件注解
资源文件的使用我们也可以使用注解,比如,在strings.xml中添加一个字符串:
<string name="welcome">hello China,Hello xi\'an and guangzhou</string>
- 1
- 1
在程序中我们要引用这个值:
@StringRes(R.string.welcome)
    String welcome;
- 1
- 2
- 1
- 2
这样welcome就自动获得了这里的值。注意@StringRes导入的包是import org.androidannotations.annotations.res.StringRes;,不是android自带的包,别上当了。
效果图:
7关于加_的原因
最后再解决一个问题,就是什么要在清单文件中加_,要回答这个问题请大家先选中项目,右键单击,取消apt_generated前面的一个点。
取消之后,我们的项目里多了一个文件夹:
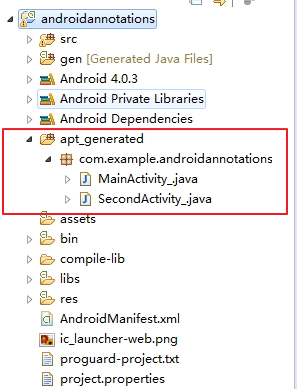
这里的文件夹中的Activity就是我们刚才新建的Activity,只不过都多了一个下划线,我们打开这些Activity看看:
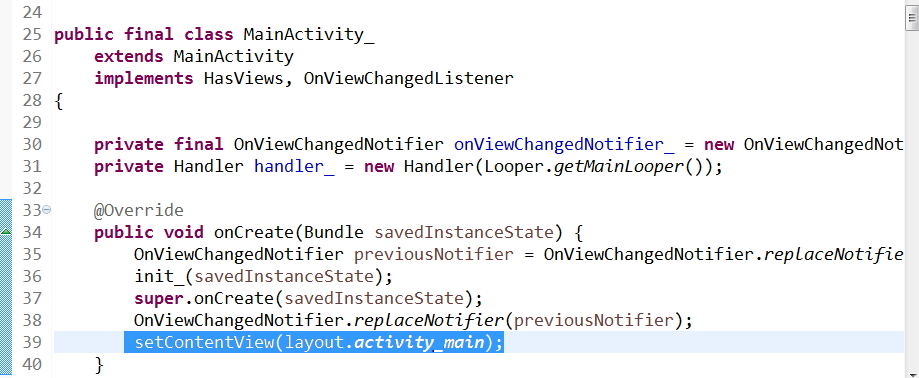
我们通过注解写的布局文件,它又在这里给我们生成了,所以说,我们最终编译时用的是这里的文件,这也是为什么清单文件中要加下划线了。
注意事项
最后强调一个注意事项,凡是使用注解的代码,一定不要用private修饰最多可以用protected修饰,因为androidannotations在使用注解生成真正的源码时,如果我们的东东被private修饰了,它就没法调用这些东西了,所以最多只能用protected修饰。
关于androidannotations的更多用法大家可以参考官方文档
好了,关于Androidannotations的使用就给大家介绍到这里,有什么问题请留言。本项目源码下载。
在使用Java的SSH框架的时候,一直在感叹注解真是方便啊,关于注解的原理,大家可以参考我的另一片文章Java注解详解。最近有时间研究了Android注解的使用,今天与大家分享一下。
android中注解的使用用到了GitHub上的开源框架androidannotations,下载地址。这个开源框架应该是目前使用人数最多的android注解框架了,主要是由于它设计的注解标签非常多,能够满足我们日常开发中的大部分需求。androidannotations将许多可以抽取出来的方法都包装成了注解标签供我们使用,一会我会给大家具体演示。
好了,言归正传,我们一起来看看怎么使用这个东东。
第一步
下载androidannotations
下载之后解压文件,我们会看到有两个jar包:
第二步
在eclipse上配置框架:
1.新建一个android项目,把androidannotations-api-3.2.jar拷贝到libs文件夹中,同时在项目中新建一个文件夹,叫做compile-lib,把androidannotations-3.2.jar文件拷贝进去。如图:
2.选中项目,右键单击,选择Properties,在新窗口左边可以看到Java Compiler,选中Java Compiler下的Annotation Processin,然后选中右边的Enable project specific Settings,允许给项目一些特殊设置。如图:
3.展开Annotation Processin,选中Factory Path,然后点击右边的Enable project specific Settings,最后点击Add JARs,添加jar包。如图:
4.选中我们刚刚新建文件夹中的jar包,一路点击OK即可,如图
好了,至此我们的开发环境上的配置就完成了
第三步
测试配置是否成功
在一个Activity上输入@E,看看提示什么:
如果你看到了@EActivity,那么恭喜你,配置成功,如果没有看到,请检查以上步骤。
如图:
第四步
配置好了,接下来我们就要看看怎么使用androidannotations了。
1.Activity注解的使用
修改清单文件中的activity配置,我们要在MainActivity后面添加一个_:
        <activity
            android:name=".MainActivity_"
            android:label="@string/app_name" >
            <intent-filter>
                <action android:name="android.intent.action.MAIN" />

                <category android:name="android.intent.category.LAUNCHER" />
            </intent-filter>
        </activity>
- 1
- 2
- 3
- 4
- 5
- 6
- 7
- 8
- 9
- 1
- 2
- 3
- 4
- 5
- 6
- 7
- 8
- 9
至于为什么要把MainActivity改为MainActivity_,我在后面会给大家解释。然后在MainActivity上添加注解:
@EActivity(R.layout.activity_main)
public class MainActivity extends Activity {
- 1
- 2
- 1
- 2
删除掉onCreate()方法中的setContentView(R.layout.activity_main);,如图:
    @Override
    protected void onCreate(Bundle savedInstanceState) {
        super.onCreate(savedInstanceState);
    }
- 1
- 2
- 3
- 4
- 1
- 2
- 3
- 4
为了方便起见,我们先在主布局文件中添加一些控件:
<LinearLayout xmlns:android="http://schemas.android.com/apk/res/android"
    xmlns:tools="http://schemas.android.com/tools"
    android:layout_width="match_parent"
    android:layout_height="match_parent"
    android:paddingBottom="@dimen/activity_vertical_margin"
    android:paddingLeft="@dimen/activity_horizontal_margin"
    android:paddingRight="@dimen/activity_horizontal_margin"
    android:paddingTop="@dimen/activity_vertical_margin"
    android:orientation="vertical"
    tools:context="com.example.androidannotations.MainActivity" >

    <TextView
        android:id="@+id/textView1"
        android:layout_width="wrap_content"
        android:layout_height="wrap_content"
        android:text="@string/hello_world" />

    <Button
        android:id="@+id/button1"
        android:layout_width="wrap_content"
        android:layout_height="wrap_content"
        android:text="Button1" />

    <Button
        android:id="@+id/button2"
        android:layout_width="wrap_content"
        android:layout_height="wrap_content"
        android:text="Button2" />

    <Button
        android:id="@+id/button3"
        android:layout_width="wrap_content"
        android:layout_height="wrap_content"
        android:text="Button3" />

    <Button
        android:id="@+id/button4"
        android:layout_width="wrap_content"
        android:layout_height="wrap_content"
        android:text="Button4" />
    <Button
        android:id="@+id/button5"
        android:layout_width="wrap_content"
        android:layout_height="wrap_content"
        android:text="Go TO Next Activity" />
    <Button
        android:id="@+id/button6"
        android:layout_width="wrap_content"
        android:layout_height="wrap_content"
        android:text="多线程事件" />

    <TextView
        android:id="@+id/textView2"
        android:layout_width="wrap_content"
        android:layout_height="wrap_content"
        android:text="TextView" />

    <TextView
        android:id="@+id/textView3"
        android:layout_width="wrap_content"
        android:layout_height="wrap_content"
        android:text="TextView" />

    <TextView
        android:id="@+id/textView4"
        android:layout_width="wrap_content"
        android:layout_height="wrap_content"
        android:text="TextView" />

</LinearLayout>
- 1
- 2
- 3
- 4
- 5
- 6
- 7
- 8
- 9
- 10
- 11
- 12
- 13
- 14
- 15
- 16
- 17
- 18
- 19
- 20
- 21
- 22
- 23
- 24
- 25
- 26
- 27
- 28
- 29
- 30
- 31
- 32
- 33
- 34
- 35
- 36
- 37
- 38
- 39
- 40
- 41
- 42
- 43
- 44
- 45
- 46
- 47
- 48
- 49
- 50
- 51
- 52
- 53
- 54
- 55
- 56
- 57
- 58
- 59
- 60
- 61
- 62
- 63
- 64
- 65
- 66
- 67
- 68
- 69
- 70
- 1
- 2
- 3
- 4
- 5
- 6
- 7
- 8
- 9
- 10
- 11
- 12
- 13
- 14
- 15
- 16
- 17
- 18
- 19
- 20
- 21
- 22
- 23
- 24
- 25
- 26
- 27
- 28
- 29
- 30
- 31
- 32
- 33
- 34
- 35
- 36
- 37
- 38
- 39
- 40
- 41
- 42
- 43
- 44
- 45
- 46
- 47
- 48
- 49
- 50
- 51
- 52
- 53
- 54
- 55
- 56
- 57
- 58
- 59
- 60
- 61
- 62
- 63
- 64
- 65
- 66
- 67
- 68
- 69
- 70
这个时候我们运行看看,在没有给Activity设置布局的情况下系统有没有报错:
没有崩溃,所有内容正常显示,由此可见@EActivity(R.layout.activity_main)代替了setContentView(R.layout.activity_main);,这个使用起来更加方便。
再介绍一个和Activity有关的注解,我们在Activity使用过程中,经常需要重新自定义标题栏,从而需要隐藏系统默认的标题栏,那么这个该怎么实现呢:
@WindowFeature({ Window.FEATURE_NO_TITLE , Window.FEATURE_INDETERMINATE_PROGRESS})
@EActivity(R.layout.activity_main)
public class MainActivity extends Activity {
- 1
- 2
- 3
- 1
- 2
- 3
效果图:
标题栏成功隐藏,比我们其他的隐藏标题的方式都方便吧。
2.实例化控件注解
实例化控件注解是androidannotations中又一个非常好用的注解,也解决了我们开发过程中最枯燥的一项工作,正常情况下,我们实例化一个控件要使用findViewById,拿到控件后再强转为我们需要的类型,代码量大,而且枯燥,那么看看androidannotations带给我们什么惊喜呢?
我们的主布局文件上一共有四个TextView,我使用以下三种方式来进行实例化:
    @ViewById(R.id.textView1)
    TextView tv1;

    @ViewById
    TextView textView2;

    @ViewsById({R.id.textView3,R.id.textView4})
    List<TextView> list;
- 1
- 2
- 3
- 4
- 5
- 6
- 7
- 8
- 1
- 2
- 3
- 4
- 5
- 6
- 7
- 8
第一种:@ViewById(R.id.textView1)这是非常标准的写法。声明一个控件之后,然后使用@ViewById注解,在注解中说明这个控件的id,这样相当于代替了这样一行代码:
TextView tv1 = (TextView) this.findViewById(R.id.textView1);
- 1
- 1
第二种:我没有指明这个注解标签要用的id,那么它是怎么实例化的呢?在没有指明的情况下,androidannotations会使用控件名作为id,我的第二个控件名叫做textView2,与xml中的布局id是一样的,因此可以不用在注解中指定id.
第三种:如果要声明多个控件,可以把这些控件放入一个List集合中,然后在注解中指明多个id即可。
控件实例化之后,紧跟着就可以给控件赋值了:
    @AfterViews
    public void initTextView(){
        tv1.setText("hello world!");
        textView2.setText("hello android annotations!");
        for(TextView tv:list){
            tv.setText("hello lenve!");
        }
    }
- 1
- 2
- 3
- 4
- 5
- 6
- 7
- 8
- 1
- 2
- 3
- 4
- 5
- 6
- 7
- 8
这个方法会在实例完控件后执行。
3.事件注解
我们开发中用的较多的事件androidannotations几乎都给我们提供了注解:
    @TextChange
    @AfterTextChange
    @BeforeTextChange
    @EditorAction
    @FocusChange
    @CheckedChange
    @Touch
    @Click
    @LongClick
    @ItemClick
    @ItemLongClick
    @ItemSelect
    @OptionsItem
    @SeekBarProgressChange
    @SeekBarTouchStart
    @SeekBarTouchStop
- 1
- 2
- 3
- 4
- 5
- 6
- 7
- 8
- 9
- 10
- 11
- 12
- 13
- 14
- 15
- 16
- 17
- 18
- 1
- 2
- 3
- 4
- 5
- 6
- 7
- 8
- 9
- 10
- 11
- 12
- 13
- 14
- 15
- 16
- 17
- 18
我这里挑个简单的,也是最常用的说一下,算是抛砖引玉了:
    @Click({R.id.button1,R.id.button2,R.id.button3})
    public void btn_click(View v){
        switch (v.getId()) {
        case R.id.button1:
            Toast.makeText(this,"btn1", Toast.LENGTH_LONG).show();
            break;
        case R.id.button2:
            Toast.makeText(this,"btn2", Toast.LENGTH_LONG).show();
            break;
        case R.id.button3:
            Toast.makeText(this,"btn3", Toast.LENGTH_LONG).show();
            break;
        }
    }

    @Click(R.id.button4)
    public void btn4_click(){
        Toast.makeText(this,"btn4", Toast.LENGTH_LONG).show();
    }
- 1
- 2
- 3
- 4
- 5
- 6
- 7
- 8
- 9
- 10
- 11
- 12
- 13
- 14
- 15
- 16
- 17
- 18
- 19
- 1
- 2
- 3
- 4
- 5
- 6
- 7
- 8
- 9
- 10
- 11
- 12
- 13
- 14
- 15
- 16
- 17
- 18
- 19
在方法之上添加@Click注解,在注解中指明这是哪个控件的点击事件,如果是多个事件的点击事件,就注明多个id,在方法中使用v.getId()方法来进行区分。如果只给一个控件设置点击事件,那看button4的例子。
事件的注解其实是比较简单的,我就不多说了,大家有兴趣可以查看官方文档。
4.线程注解
这大概是最让我激动的一个注解了。这里主要给大家介绍两个注解:
@Background
@UiThread
- 1
- 2
- 1
- 2
毫无疑问,@Background是让方法在子线程中运行,而@UiThreaad则是让方法在UI线程中运行。
我们来实现一个简单的效果,点击一个按钮之后,让一个TextView自动更新值。
    @Background
    public void doInBackground(){
        try {
            for (int i = 0; i < 100; i++) {
                tvShowNumber(i);
                Thread.sleep(1000);
            }
        } catch (InterruptedException e) {
            e.printStackTrace();
        }
    }

    @UiThread
    public void tvShowNumber(int i) {
        list.get(1).setText(i+"");
    }
- 1
- 2
- 3
- 4
- 5
- 6
- 7
- 8
- 9
- 10
- 11
- 12
- 13
- 14
- 15
- 16
- 1
- 2
- 3
- 4
- 5
- 6
- 7
- 8
- 9
- 10
- 11
- 12
- 13
- 14
- 15
- 16
首先,在doInBackground方法中,每隔1秒执行一次tvShowNumber(i);方法,这个方法如果在主线程中运行会导致ANR异常,所以必须在子线程中运行,但是android中有不允许在子线程中更新UI线程,所以我们要在tvShowNumber方法上添加@UiThread标签,表明该方法是在UI线程中运行的。
看看效果图:
这里彻底抛弃了烦人的Message、Handler(此处该有掌声)。
5.Activity之间传值注解
Activity之间的跳转经常需要数据的传递,在新的Activity中需要通过Bundle来获得这些数据,还要判断是否为空,非常麻烦,看看androidannotations是怎么解决这个问题的:
新建一个SecondActivity,注意要修改清单文件,在文件后面加上_:
        <activity
            android:name=".SecondActivity_"
            android:label="@string/title_activity_second" >
        </activity>
- 1
- 2
- 3
- 4
- 1
- 2
- 3
- 4
SecondActivity接收MainActivity传来的两个参数,一个是name,一个是address,我们先来看看MainActivity中的代码:
    @Click(R.id.button5)
    public void go2NextActivity(){
        //这里要注意第二个Activity的写法
        Intent intent = new Intent(this,SecondActivity_.class);
        intent.putExtra("name", "张三");
        intent.putExtra("address", "xi'an");
        startActivity(intent);
    }
- 1
- 2
- 3
- 4
- 5
- 6
- 7
- 8
- 1
- 2
- 3
- 4
- 5
- 6
- 7
- 8
在SecondActivity中获得MainActivity中传来的值:
    @Extra("name")
    String username;
    @Extra
    String address;
- 1
- 2
- 3
- 4
- 1
- 2
- 3
- 4
和上文一样,如果参数名相同,则不用在注解中说明参数名称,否则要指明。这样就自动拿到MainActivity中传来的值了。如果MainActivity中传来的值为空,也不会报错,系统会自动处理异常情况。
6.资源文件注解
资源文件的使用我们也可以使用注解,比如,在strings.xml中添加一个字符串:
<string name="welcome">hello China,Hello xi\'an and guangzhou</string>
- 1
- 1
在程序中我们要引用这个值:
@StringRes(R.string.welcome)
    String welcome;
- 1
- 2
- 1
- 2
这样welcome就自动获得了这里的值。注意@StringRes导入的包是import org.androidannotations.annotations.res.StringRes;,不是android自带的包,别上当了。
效果图:
7关于加_的原因
最后再解决一个问题,就是什么要在清单文件中加_,要回答这个问题请大家先选中项目,右键单击,取消apt_generated前面的一个点。
取消之后,我们的项目里多了一个文件夹:
这里的文件夹中的Activity就是我们刚才新建的Activity,只不过都多了一个下划线,我们打开这些Activity看看:
我们通过注解写的布局文件,它又在这里给我们生成了,所以说,我们最终编译时用的是这里的文件,这也是为什么清单文件中要加下划线了。
注意事项
最后强调一个注意事项,凡是使用注解的代码,一定不要用private修饰最多可以用protected修饰,因为androidannotations在使用注解生成真正的源码时,如果我们的东东被private修饰了,它就没法调用这些东西了,所以最多只能用protected修饰。
关于androidannotations的更多用法大家可以参考官方文档
好了,关于Androidannotations的使用就给大家介绍到这里,有什么问题请留言。本项目源码下载。