1.9 整合Oauth2.0
1.9.1 Oauth2.0介绍
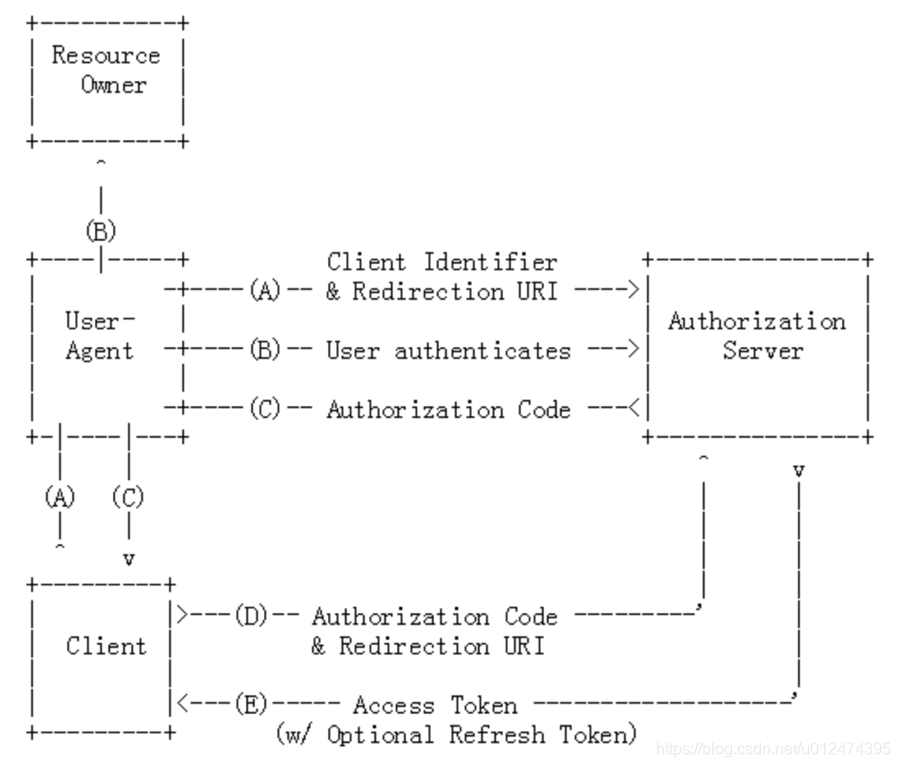
在实践之前我们先来了解下oauth2.0,OAuth是一个关于授权(authorization)的开放网络标准,在全世界得到广泛应用,目前的版本是2.0版。OAuth2.0服务提供者实际上分为:“授权服务 Authorization Service ”和“资源服务Resource Service”。Oauth2.0 的运行流程如下图所示:

*(A)用户打开客户端,客户端要求用户给予授权。
*(B)用户同意给予客户端授权。
*(C)客户端使用上一步获得的授权(一般是Code),向认证服务器申请令牌TOKEN。
*(D)认证服务器对客户端进行认证以后,确认无误,同意发放令牌。
*(E)客户端使用令牌,向资源服务器申请获取资源(用户信息等)。
*(F)资源服务器确认令牌无误,同意向客户端开放资源。
图中服务端的三个组件分别为:
- Resource Owner:即指需要授权访问的资源,比如用户昵称,头像
- Authorization Server:鉴权服务,核心鉴权逻辑
- Resource Server:资源服务
Oauth2.0 定义了五种授权方式: - 授权码模式(authorization code)
- 简化模式(implicit)
- 密码模式(resource owner password credentials)
- 客户端模式(client credentials)
- 扩展模式(Extension)
1.9.2 Oauth2.0授权模式
1.9.2.1 授权码模式(authorization_code)
授权码模式是功能最完整、流程最严密的授权模式。他的特点是通过客户端的后台服务器,与"服务提供商"的认证服务器进行互动。以微信公众平台公众号网页应用开发流程为例。
步骤如下:
- (A)用户访问客户端,客户端将用户导向认证服务器。
- (B)用户选择是否给予客户端授权。
- (C)若用户给予授权,认证服务器将用户导向客户端指定的"重定向URI"(redirection URI),同时附上授权码code。
- (D)客户端收到授权码code,附上早先的"重定向URI",向认证服务器申请token。这一步是在客户端的后台的服务器上完成的,对用户不可见。
- (E)认证服务器核对了授权码和重定向URI,确认无误后,向客户端发送访问令牌(access token)和更新令牌(refresh token)。
授权码模式的几个重要参数如下:
- response_type:表示授权类型,必选项,此处的值固定为"code"
- appid:表示客户端的ID,必选项
- redirect_uri:表示重定向URI,可选项
- scope:表示申请的权限范围,可选项
- state:表示客户端的当前状态,可以指定任意值,认证服务器会原封不动地返回这个值。用于防止恶意攻击
授权码模式的URL以及参数应用步骤如下:
- (1)引导用户跳转到授权页面:
http://localhost:8080/oauth/authorize?client_id=client&redirect_uri=REDIRECT_URI&response_type=code&scope=SCOPE&state=STATE#wechat_redirect
参数:- client_id 客户唯一标识
- redirect_uri 授权后重定向的回调链接地址, 请使用 urlEncode 对链接进行处理
- response_type 返回类型,请填写code
- scope 应用授权作用域,有snsapi_base 、snsapi_userinfo 两种
- state 重定向后会带上state参数,开发者可以填写a-zA-Z0-9的参数值,最多128字节
- (2)通过code获取Token
http://localhost:8080/oauth/token? client_id=client&secret=secret&code=CODE&grant_type=authorization_code
参数:- client_id 客户唯一标识
- secret 密钥
- code 填写获取的code参数(存在有效期,通常设为10分钟,客户端只能使用该码一次,否则会被授权服务器拒绝。该码与客户端ID和重定向URI,是一一对应关系)
- grant_type 填写为authorization_code
返回结果:
{
"access_token":"ACCESS_TOKEN", //网页授权接口调用凭证,注意:此access_token与基础支持的access_token不同
"expires_in":7200,  // access_token接口调用凭证超时时间,单位(秒)
"refresh_token":"REFRESH_TOKEN", //用户刷新access_token
"client_id":"client",  //用户唯一标识
"scope":"all"  //用户授权的作用域,使用逗号(,)分隔
 }
- access_token:表示访问令牌,必选项。
- token_type:表示令牌类型,该值大小写不敏感,必选项,可以是bearer类型或mac类型。
- expires_in:表示过期时间,单位为秒。如果省略该参数,必须其他方式设置过期时间。
- refresh_token:表示更新令牌,用来获取下一次的访问令牌,可选项。
- scope:表示权限范围,如果与客户端申请的范围一致,此项可省略。
1.9.2.2 简化模式(implicit)
简化模式是不通过第三方应用程序的服务器,直接在浏览器中向认证服务器申请令牌,跳过"授权码"步骤。所有步骤在浏览器中完成,令牌对访问者是可见的,且客户端不需要认证。
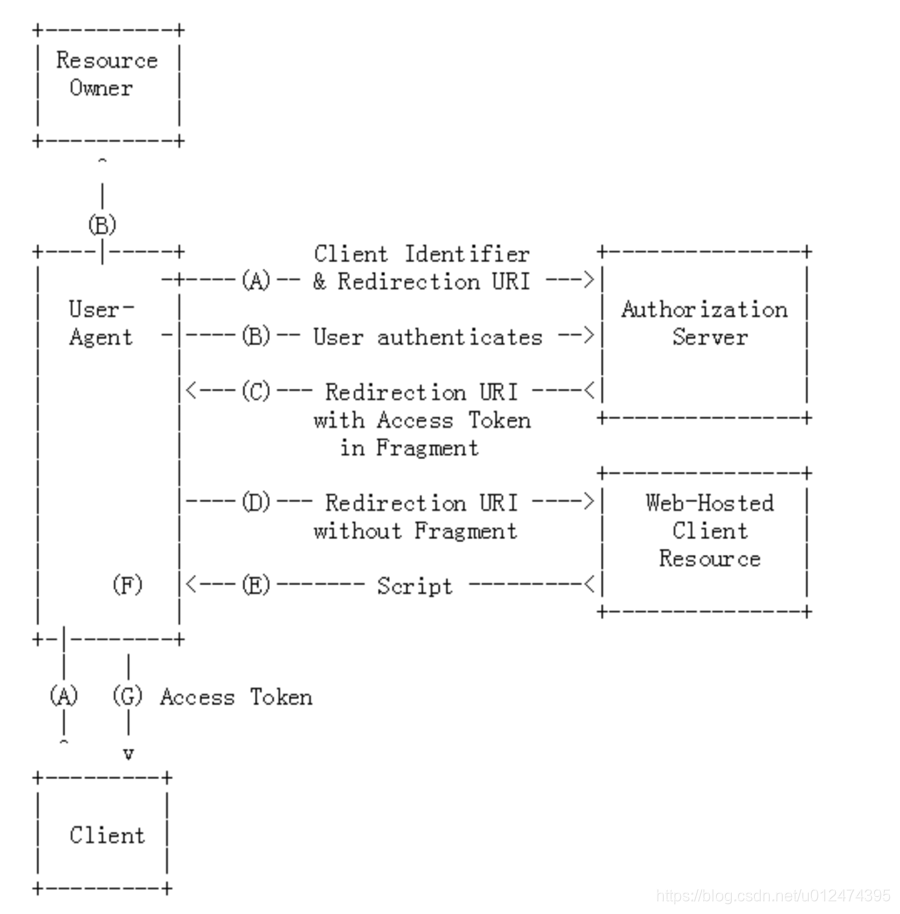
步骤如下:
- (A)客户端将用户导向认证服务器。
- (B)用户决定是否给于客户端授权。
- (C)若用户授权,认证服务器将用户导向客户端指定的"重定向URI",并在URI的Hash部分包含了访问令牌。
- (D)浏览器向资源服务器发出请求,其中不包括上一步收到的Hash值。
- (E)资源服务器返回一个网页,其中包含的代码可以获取Hash值中的令牌。
- (F)浏览器执行上一步获得的脚本,提取出令牌。
- (G)浏览器将令牌发给客户端。
下面是上面这些步骤所需要的参数。

A步骤中,客户端发出的HTTP请求,包含以下参数:
- response_type:表示授权类型,此处的值固定为"token",必选项。
- client_id:表示客户端的ID,必选项。
- redirect_uri:表示重定向的URI,可选项。
- scope:表示权限范围,可选项。
- state:表示客户端的当前状态,可以指定任意值,认证服务器会原封不动地返回这个值
例如:
GET /authorize?response_type=token&client_id=s6BhdRkqt3&state=xyz&redirect_uri=http://www.baidu.com
HTTP/1.1

Host: www.baidu.com
C步骤中,认证服务器回应客户端的URI,包含以下参数:
- access_token:表示访问令牌,必选项。
- token_type:表示令牌类型,该值大小写不敏感,必选项。
- expires_in:表示过期时间,单位为秒。如果省略该参数,必须其他方式设置过期时间。
- scope:表示权限范围,如果与客户端申请的范围一致,此项可省略。
- state:如果客户端的请求中包含这个参数,认证服务器的回应也必须一模一样包含这个参数。
例如:
HTTP/1.1 302 Found
Location: http://www.baidu.com#access_token=9e64da25-105c-4d20-a8b5-606c553c9b33&token_type=bearer&expires_in=829
认证服务器用HTTP头信息的Location栏,指定浏览器重定向的网址。注意,在这个网址的Hash部分包含了令牌。
根据上面的D步骤,下一步浏览器会访问Location指定的网址,但是Hash部分不会发送。接下来的E步骤,服务提供商的资源服务器发送过来的代码,会提取出Hash中的令牌。
1.9.2.3 密码模式(Password)
向客户端提供自己的用户名和密码,客户端使用这些信息,向"服务商提供商"索要授权。在这种模式中,用户必须把自己的密码给客户端,但是客户端不得储存密码。这通常用在用户对客户端高度信任的情况下,比如客户端是操作系统的一部分,或由一个著名公司出品。而认证服务器只有在其他授权模式无法执行的情况下,才能考虑使用这种模式。
步骤如下:
- (A)用户向客户端提供用户名和密码。
- (B)客户端将用户名和密码发给认证服务器,向后者请求令牌。
- (C)认证服务器确认无误后,向客户端提供访问令牌。
在B步骤中,客户端发出的HTTP请求,包含以下参数: - grant_type:表示授权类型,此处的值固定为"password",必选项。
- username:表示用户名,必选项。
- password:表示用户的密码,必选项。
- scope:表示权限范围,可选项。
例如:
     POST /oauth/token HTTP/1.1
     Host: localhost
     Authorization: Basic czZCaGRSa3F0MzpnWDFmQmF0M2JW
     Content-Type: application/x-www-form-urlencoded
     grant_type=password&username=admin&password=111111
C步骤中,认证服务器向客户端发送访问令牌,例子:
     HTTP/1.1 200 OK
     Content-Type: application/json;charset=UTF-8
     Cache-Control: no-store
     Pragma: no-cache
     {
       "access_token":"2YotnFZFEjr1zCsicMWpAA",
       "token_type":"example",
       "expires_in":3600,
       "refresh_token":"tGzv3JOkF0XG5Qx2TlKWIA",
       "example_parameter":"example_value"
     }
整个过程中,客户端不得保存用户的密码。
1.9.2.4 客户端模式(client_credentials)
客户端模式下,并不存在对个体用户授权的行为,被授权的主体为client。因此,该模式可用于对某类用户进行集体授权。
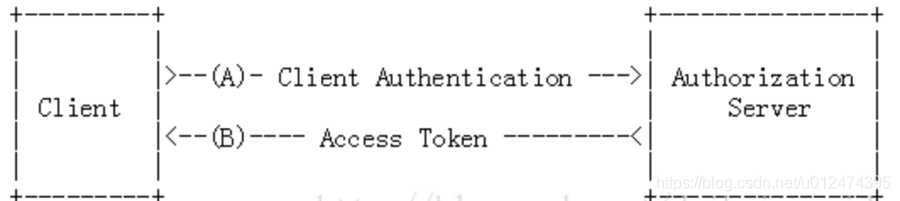
申请该模式时,需要在HTTP request entity-body中提交以下信息。
POST /oauth/token
content-type: application/x-www-form-urlencoded
user-agent: PostmanRuntime/7.1.1
accept: */*
host: localhost:8080
accept-encoding: gzip, deflate
content-length: 74
grant_type=client_credentialsscope=allclient_id=zgqclient_secret=secret
若申请成功,服务器将返回access token和token有效时间。
HTTP/1.1 200
status: 200
cache-control: no-store
pragma: no-cache
x-content-type-options: nosniff
x-xss-protection: 1; mode=block
x-frame-options: DENY
content-type: application/json;charset=UTF-8
transfer-encoding: chunked
date: Thu, 20 Jun 2019 09:01:58 GMT
{"access_token":"43f856cb-2976-4a73-85f3-75638c32f8d7","token_type":"bearer","expires_in":1199,"scope":"all"}
1.9.2.5 扩展模式
扩展模式也叫自定义模式。Oauth2.0的规范中要求 “grant type”参数必须为URI。对于其他申请数据,可以根据需求进行自定义。这里不对这个部分做深入讨论,如果需要可以进一步查看Oauth2.0 相关文档。
1.9.2.6 令牌更新
在用户访问的时候,客户端的"访问令牌"如果已经过期,则需要使用"更新令牌"申请一个新的访问令牌。客户端可以发出更新令牌的HTTP请求进行令牌更新。
令牌更新请求包含以下参数:
- grant_type:表示使用的授权模式,此处的值固定为"refresh_token",必选项。
- refresh_token:表示早前收到的更新令牌,必选项。
- scope:表示申请的授权范围,不可以超出上一次申请的范围,如果省略该参数,则表示与上一次一致。
- client_id: 客户唯一标识
- client_secret:密钥
例如:
请求内容:
POST /oauth/token
refresh_token=67ced428-1011-4da5-ae54-f3b98cb46b01&grant_type=refresh_token&scope=all&client_id=zgq&token_type=bearer&client_secret=secret
返回内容:
HTTP/1.1 200
{"access_token":"ab827d16-0a6b-4cdd-abaa-ad6535de9881","token_type":"bearer","refresh_token":"67ced428-1011-4da5-ae54-f3b98cb46b01","expires_in":11999,"scope":"all"}
1.9.3 SpringBoot整合Oauth2.0 和Spring Security
1.9.3.1 Step1:创建Oauth2.0所需要的三个表
Mysql脚本如下:
-- ----------------------------
-- Table structure for oauth_access_token
-- ----------------------------
DROP TABLE IF EXISTS `oauth_access_token`;
CREATE TABLE `oauth_access_token`  (
  `token_id` varchar(256) CHARACTER SET utf8 COLLATE utf8_general_ci NULL DEFAULT NULL,
  `token` blob NULL,
  `authentication_id` varchar(250) CHARACTER SET utf8 COLLATE utf8_general_ci NOT NULL,
  `user_name` varchar(256) CHARACTER SET utf8 COLLATE utf8_general_ci NULL DEFAULT NULL,
  `client_id` varchar(256) CHARACTER SET utf8 COLLATE utf8_general_ci NULL DEFAULT NULL,
  `authentication` blob NULL,
  `refresh_token` varchar(256) CHARACTER SET utf8 COLLATE utf8_general_ci NULL DEFAULT NULL,
  PRIMARY KEY (`authentication_id`) USING BTREE
) ENGINE = InnoDB CHARACTER SET = utf8 COLLATE = utf8_general_ci ROW_FORMAT = Dynamic;

-- ----------------------------
-- Table structure for oauth_client_details
-- ----------------------------
DROP TABLE IF EXISTS `oauth_client_details`;
CREATE TABLE `oauth_client_details`  (
  `client_id` varchar(250) CHARACTER SET utf8 COLLATE utf8_general_ci NOT NULL,
  `resource_ids` varchar(256) CHARACTER SET utf8 COLLATE utf8_general_ci NULL DEFAULT NULL,
  `client_secret` varchar(256) CHARACTER SET utf8 COLLATE utf8_general_ci NULL DEFAULT NULL,
  `scope` varchar(256) CHARACTER SET utf8 COLLATE utf8_general_ci NULL DEFAULT NULL,
  `authorized_grant_types` varchar(256) CHARACTER SET utf8 COLLATE utf8_general_ci NULL DEFAULT NULL,
  `web_server_redirect_uri` varchar(256) CHARACTER SET utf8 COLLATE utf8_general_ci NULL DEFAULT NULL,
  `authorities` varchar(256) CHARACTER SET utf8 COLLATE utf8_general_ci NULL DEFAULT NULL,
  `access_token_validity` int(11) NULL DEFAULT NULL,
  `refresh_token_validity` int(11) NULL DEFAULT NULL,
  `additional_information` varchar(4096) CHARACTER SET utf8 COLLATE utf8_general_ci NULL DEFAULT NULL,
  `autoapprove` varchar(256) CHARACTER SET utf8 COLLATE utf8_general_ci NULL DEFAULT NULL,
  PRIMARY KEY (`client_id`) USING BTREE
) ENGINE = InnoDB CHARACTER SET = utf8 COLLATE = utf8_general_ci ROW_FORMAT = Dynamic;

-- ----------------------------
-- Table structure for oauth_refresh_token
-- ----------------------------
DROP TABLE IF EXISTS `oauth_refresh_token`;
CREATE TABLE `oauth_refresh_token`  (
  `token_id` varchar(256) CHARACTER SET utf8 COLLATE utf8_general_ci NULL DEFAULT NULL,
  `token` blob NULL,
  `authentication` blob NULL
) ENGINE = InnoDB CHARACTER SET = utf8 COLLATE = utf8_general_ci ROW_FORMAT = Dynamic;
1.9.3.2 Step2:添加POM配置
<!--安全验证相关-->
<dependency>
    <groupId>org.springframework.cloud</groupId>
    <artifactId>spring-cloud-starter-security</artifactId>
</dependency>
<dependency>
    <groupId>org.springframework.security.oauth</groupId>
    <artifactId>spring-security-oauth2</artifactId>
    <version>2.0.14.RELEASE</version>
</dependency>

<dependency>
    <groupId>org.springframework.security.oauth.boot</groupId>
    <artifactId>spring-security-oauth2-autoconfigure</artifactId>
 </dependency>

<dependency>
    <groupId>org.springframework.security</groupId>
    <artifactId>spring-security-jwt</artifactId>
</dependency>
1.9.3.3 Step3:配置数据源
在采用数据库存储的Oauth认证信息时需要使用数据源访问数据库。需要在application-dev.properties 文件中增加以下配置。
#DataSource
spring.datasource.type=com.alibaba.druid.pool.DruidDataSource
spring.datasource.driver-class-name = com.mysql.cj.jdbc.Driver
spring.datasource.url = jdbc:mysql://localhost:3306/splus?serverTimezone=Asia/Shanghai&useSSL=false&useUnicode=true&characterEncoding=utf-8
spring.datasource.username = root
spring.datasource.password = root
初始化大小,最小,最大
spring.datasource.initialSize=5
spring.datasource.minIdle=5
spring.datasource.maxActive=20
# 配置获取连接等待超时的时间
spring.datasource.maxWait=60000
# 配置间隔多久才进行一次检测,检测需要关闭的空闲连接,单位是毫秒
spring.datasource.timeBetweenEvictionRunsMillis=60000
# 配置一个连接在池中最小生存的时间,单位是毫秒
spring.datasource.minEvictableIdleTimeMillis=300000
spring.datasource.validationQuery=SELECT 1 FROM DUAL
spring.datasource.testWhileIdle=true
spring.datasource.testOnBorrow=false
spring.datasource.testOnReturn=false
# 打开PSCache,并且指定每个连接上PSCache的大小
spring.datasource.poolPreparedStatements=true
spring.datasource.maxPoolPreparedStatementPerConnectionSize=20
同时还需要使用注解配置DataSource组件
import com.alibaba.druid.pool.DruidDataSource;
import org.springframework.boot.context.properties.ConfigurationProperties;
import org.springframework.context.annotation.Bean;
import org.springframework.context.annotation.Configuration;
import org.springframework.context.annotation.Primary;

import javax.sql.DataSource;
import java.sql.SQLException;

/**
 * DruidDataSourceConfig
 * Druid数据源管理配置类
 *
 * @author: zone7
 * @time: 2018.08.20
 */
@Configuration
@ConfigurationProperties(prefix = "spring.datasource")
public class DruidDataSourceConfig {
    private String url;
    private String username;
    private String password;
    private String driverClassName;
    private int initialSize;
    private int minIdle;
    private int maxActive;
    private int maxWait;
    private int timeBetweenEvictionRunsMillis;
    private int minEvictableIdleTimeMillis;
    private String validationQuery;
    private boolean testWhileIdle;
    private boolean testOnBorrow;
    private boolean testOnReturn;
    private boolean poolPreparedStatements;
    private int maxPoolPreparedStatementPerConnectionSize;
    private String filters;
    private String connectionProperties;

    // 解决 spring.datasource.filters=stat,wall,log4j 无法正常注册
    @Bean
    @Primary // 在同样的DataSource中,首先使用被标注的DataSource
    public DataSource dataSource() {
        DruidDataSource datasource = new DruidDataSource();
        datasource.setUrl(url);
        datasource.setUsername(username);
        datasource.setPassword(password);
        datasource.setDriverClassName(driverClassName);

        // configuration
        datasource.setInitialSize(initialSize);
        datasource.setMinIdle(minIdle);
        datasource.setMaxActive(maxActive);
        datasource.setMaxWait(maxWait);
        datasource.setTimeBetweenEvictionRunsMillis(timeBetweenEvictionRunsMillis);
        datasource.setMinEvictableIdleTimeMillis(minEvictableIdleTimeMillis);
        datasource.setValidationQuery(validationQuery);
        datasource.setTestWhileIdle(testWhileIdle);
        datasource.setTestOnBorrow(testOnBorrow);
        datasource.setTestOnReturn(testOnReturn);
        datasource.setPoolPreparedStatements(poolPreparedStatements);
        datasource.setMaxPoolPreparedStatementPerConnectionSize(maxPoolPreparedStatementPerConnectionSize);
        try {
            datasource.setFilters(filters);
        } catch (SQLException e) {
            System.err.println("druid configuration initialization filter: " + e);
        }
        datasource.setConnectionProperties(connectionProperties);
        return datasource;
    }

    public String getUrl() {
        return url;
    }

    public void setUrl(String url) {
        this.url = url;
    }

    public String getUsername() {
        return username;
    }

    public void setUsername(String username) {
        this.username = username;
    }

    public String getPassword() {
        return password;
    }

    public void setPassword(String password) {
        this.password = password;
    }

    public String getDriverClassName() {
        return driverClassName;
    }

    public void setDriverClassName(String driverClassName) {
        this.driverClassName = driverClassName;
    }

    public int getInitialSize() {
        return initialSize;
    }

    public void setInitialSize(int initialSize) {
        this.initialSize = initialSize;
    }

    public int getMinIdle() {
        return minIdle;
    }

    public void setMinIdle(int minIdle) {
        this.minIdle = minIdle;
    }

    public int getMaxActive() {
        return maxActive;
    }

    public void setMaxActive(int maxActive) {
        this.maxActive = maxActive;
    }

    public int getMaxWait() {
        return maxWait;
    }

    public void setMaxWait(int maxWait) {
        this.maxWait = maxWait;
    }

    public int getTimeBetweenEvictionRunsMillis() {
        return timeBetweenEvictionRunsMillis;
    }

    public void setTimeBetweenEvictionRunsMillis(int timeBetweenEvictionRunsMillis) {
        this.timeBetweenEvictionRunsMillis = timeBetweenEvictionRunsMillis;
    }

    public int getMinEvictableIdleTimeMillis() {
        return minEvictableIdleTimeMillis;
    }

    public void setMinEvictableIdleTimeMillis(int minEvictableIdleTimeMillis) {
        this.minEvictableIdleTimeMillis = minEvictableIdleTimeMillis;
    }

    public String getValidationQuery() {
        return validationQuery;
    }

    public void setValidationQuery(String validationQuery) {
        this.validationQuery = validationQuery;
    }

    public boolean isTestWhileIdle() {
        return testWhileIdle;
    }

    public void setTestWhileIdle(boolean testWhileIdle) {
        this.testWhileIdle = testWhileIdle;
    }

    public boolean isTestOnBorrow() {
        return testOnBorrow;
    }

    public void setTestOnBorrow(boolean testOnBorrow) {
        this.testOnBorrow = testOnBorrow;
    }

    public boolean isTestOnReturn() {
        return testOnReturn;
    }

    public void setTestOnReturn(boolean testOnReturn) {
        this.testOnReturn = testOnReturn;
    }

    public boolean isPoolPreparedStatements() {
        return poolPreparedStatements;
    }

    public void setPoolPreparedStatements(boolean poolPreparedStatements) {
        this.poolPreparedStatements = poolPreparedStatements;
    }

    public int getMaxPoolPreparedStatementPerConnectionSize() {
        return maxPoolPreparedStatementPerConnectionSize;
    }

    public void setMaxPoolPreparedStatementPerConnectionSize(int maxPoolPreparedStatementPerConnectionSize) {
        this.maxPoolPreparedStatementPerConnectionSize = maxPoolPreparedStatementPerConnectionSize;
    }

    public String getFilters() {
        return filters;
    }

    public void setFilters(String filters) {
        this.filters = filters;
    }

    public String getConnectionProperties() {
        return connectionProperties;
    }

    public void setConnectionProperties(String connectionProperties) {
        this.connectionProperties = connectionProperties;
    }
}
1.9.3.4 Step4:新建Spring安全用户明细
用户明细类必须继承org.springframework.security.core.userdetails.User
import com.zone7.admin.sys.pojo.SysUser;
import org.springframework.security.core.authority.SimpleGrantedAuthority;
import org.springframework.security.core.userdetails.User;

import java.util.Arrays;
import java.util.Collections;
import java.util.List;

public class MyUserDetails extends User{
    private static List grants = Arrays.asList(new SimpleGrantedAuthority("ROLE_ADMIN"));
    private UserDto user;

    public MyUserDetails(UserDto user) {

        super(user.getUsername(), user.getPassword(), true, true, true, true, grants);
        this.user = user;
    }

    public UserDto getUser() {
        return user;
    }

    public void setUser(UserDto user) {
        this.user = user;
    }
}
1.9.3.5 Step5:新建用户验证服务
用于加载用户信息,当Oauth2.0的 authorization_code或者password授权模式的时候需要使用这个类验证用户信息。
import com.zone7.admin.sys.dto.MyUserDetails;
import com.zone7.admin.sys.dto.UserDto;
import com.zone7.admin.sys.pojo.SysUser;
import com.zone7.admin.sys.service.SysUserService;
import org.springframework.beans.BeanUtils;
import org.springframework.beans.factory.annotation.Autowired;
import org.springframework.security.core.GrantedAuthority;
import org.springframework.security.core.authority.SimpleGrantedAuthority;
import org.springframework.security.core.userdetails.User;
import org.springframework.security.core.userdetails.UserDetails;
import org.springframework.security.core.userdetails.UserDetailsService;
import org.springframework.security.core.userdetails.UsernameNotFoundException;
import org.springframework.stereotype.Component;

import java.util.ArrayList;
import java.util.List;

/**
 * @ClassName: UserDetailsServiceImpl
 * @Description: TODO
 * @Author: zgq
 * @Date: 2019/6/19 21:16
 * @Version: 1.0
 */
@Component
public class UserDetailsServiceImpl implements UserDetailsService {

    @Autowired
    private SysUserService sysUserService;

    @Override
    public UserDetails loadUserByUsername(String username) throws UsernameNotFoundException {
        SysUser user = sysUserService.findByKeyword(username);
        if(user==null){
            throw new UsernameNotFoundException("用户不存在!");
        }else{
            return UserDetailConverter.convert(user);
        }
    }

    private static class UserDetailConverter {
        static UserDetails convert(SysUser user) {
            UserDto dto=new UserDto();
            BeanUtils.copyProperties(user,dto);
            return new MyUserDetails(dto);
        }
    }
}
1.9.3.6 Step6:新增密钥编码解码器
主要用于密码验证
import com.zone7.admin.utils.SHA256Util;
import org.springframework.security.crypto.password.PasswordEncoder;

/**
 * 密钥编码器
 * @Authod zone7
 */
public class Sha256PasswordEncoder implements PasswordEncoder {
    @Override
    public String encode(CharSequence charSequence) {
        return SHA256Util.getSHA256StrJava(charSequence.toString());
    }

    @Override
    public boolean matches(CharSequence charSequence, String s) {

        return s.equals(SHA256Util.getSHA256StrJava(charSequence.toString()));
    }
}
1.9.3.7 Step7:新增配置类
- (1) Oauth2.0授权配置类AuthorizationServerConfigurerAdapter
package com.zone7.admin.config.oauth2;

import com.zone7.admin.sys.service.impl.UserDetailsServiceImpl;
import org.springframework.beans.factory.annotation.Autowired;
import org.springframework.beans.factory.annotation.Qualifier;
import org.springframework.context.annotation.Bean;
import org.springframework.context.annotation.Configuration;
import org.springframework.context.annotation.Primary;
import org.springframework.core.annotation.Order;
import org.springframework.http.HttpMethod;
import org.springframework.security.authentication.AuthenticationManager;
import org.springframework.security.config.annotation.authentication.configurers.ldap.LdapAuthenticationProviderConfigurer;
import org.springframework.security.oauth2.config.annotation.configurers.ClientDetailsServiceConfigurer;
import org.springframework.security.oauth2.config.annotation.web.configuration.AuthorizationServerConfigurerAdapter;
import org.springframework.security.oauth2.config.annotation.web.configuration.EnableAuthorizationServer;
import org.springframework.security.oauth2.config.annotation.web.configurers.AuthorizationServerEndpointsConfigurer;
import org.springframework.security.oauth2.config.annotation.web.configurers.AuthorizationServerSecurityConfigurer;
import org.springframework.security.oauth2.provider.ClientDetailsService;
import org.springframework.security.oauth2.provider.client.JdbcClientDetailsService;
import org.springframework.security.oauth2.provider.token.DefaultTokenServices;
import org.springframework.security.oauth2.provider.token.TokenStore;
import org.springframework.security.oauth2.provider.token.store.JdbcTokenStore;
import javax.sql.DataSource;
import java.util.concurrent.TimeUnit;

/**
 * 授权服务配置
 */
@Configuration
@EnableAuthorizationServer
@Order(7)
public class OAuth2ServerConfig extends AuthorizationServerConfigurerAdapter {

   @Bean // 声明TokenStore实现
   public TokenStore tokenStore() {
      return new JdbcTokenStore(dataSource);
   }

   @Bean // 声明 ClientDetails实现
   public ClientDetailsService clientDetails() {
      return new JdbcClientDetailsService(dataSource);
   }
   /**
    * 注入authenticationManager
    * 来支持 password grant type
    */
   @Autowired
   private AuthenticationManager authenticationManager;
   @Autowired
   private DataSource dataSource;
   @Autowired
   private TokenStore tokenStore;
   @Autowired
   private ClientDetailsService clientDetails;
   @Autowired
   private UserDetailsServiceImpl userDetailsService;

   @Bean
   @Primary
   public DefaultTokenServices tokenServices() {
      DefaultTokenServices tokenServices = new DefaultTokenServices();
      tokenServices.setSupportRefreshToken(true);
      tokenServices.setTokenStore(tokenStore);
      return tokenServices;
   }


   @Override
   public void configure(AuthorizationServerSecurityConfigurer oauthServer) throws Exception {
      oauthServer
            .passwordEncoder(new MyPasswordEncoder())
            .tokenKeyAccess("permitAll()") //url:/oauth/token_key,exposes public key for token verification if using JWT tokens
            .checkTokenAccess("isAuthenticated()") //url:/oauth/check_token allow check token
            .allowFormAuthenticationForClients();
   }


   @Override
   public void configure(AuthorizationServerEndpointsConfigurer endpoints) throws Exception {
      endpoints.authenticationManager(authenticationManager);
      endpoints.tokenStore(tokenStore());
      endpoints.userDetailsService(userDetailsService);
      endpoints.setClientDetailsService(clientDetails);

      //配置TokenServices参数
      DefaultTokenServices tokenServices = new DefaultTokenServices();
      tokenServices.setTokenStore(endpoints.getTokenStore());
      tokenServices.setSupportRefreshToken(true);
      tokenServices.setClientDetailsService(endpoints.getClientDetailsService());

      tokenServices.setTokenEnhancer(endpoints.getTokenEnhancer());
      tokenServices.setAccessTokenValiditySeconds((int) TimeUnit.DAYS.toSeconds(1)); // 1天
      endpoints.tokenServices(tokenServices);
   }


   @Override
   public void configure(ClientDetailsServiceConfigurer clients) throws Exception {
      clients.jdbc(dataSource).passwordEncoder(new MyPasswordEncoder());


   }

}
- (2) 资源配置类ResourceServerConfigurerAdapter
import org.springframework.context.annotation.Configuration;
import org.springframework.security.config.annotation.web.builders.HttpSecurity;
import org.springframework.security.oauth2.config.annotation.web.configuration.EnableResourceServer;
import org.springframework.security.oauth2.config.annotation.web.configuration.ResourceServerConfigurerAdapter;
import org.springframework.security.oauth2.config.annotation.web.configurers.ResourceServerSecurityConfigurer;

/**
 * 资源服务配置
 */
@Configuration
@EnableResourceServer
public class ResourceServerConfig extends ResourceServerConfigurerAdapter {

   @Override
   public void configure(HttpSecurity http) throws Exception {
      http.requestMatchers().antMatchers("/api/**")
            .and()
            .authorizeRequests().antMatchers("/api/**").authenticated();
   }

   @Override
   public void configure(ResourceServerSecurityConfigurer resources) throws Exception {
      resources.resourceId("resourcesId").stateless(true);
   }

}
- (3) WEB安全配置类WebSecurityConfigurerAdapter
import com.zone7.admin.sys.service.impl.UserDetailsServiceImpl;
import org.springframework.beans.factory.annotation.Autowired;
import org.springframework.context.annotation.Bean;
import org.springframework.core.annotation.Order;
import org.springframework.security.authentication.AuthenticationManager;
import org.springframework.security.config.annotation.authentication.builders.AuthenticationManagerBuilder;
import org.springframework.security.config.annotation.method.configuration.EnableGlobalMethodSecurity;
import org.springframework.security.config.annotation.web.builders.HttpSecurity;
import org.springframework.security.config.annotation.web.builders.WebSecurity;
import org.springframework.security.config.annotation.web.configuration.EnableWebSecurity;
import org.springframework.security.config.annotation.web.configuration.WebSecurityConfigurerAdapter;

@EnableWebSecurity
@EnableGlobalMethodSecurity(prePostEnabled = true, proxyTargetClass = true)
@Order(100)
public class WebSecurityConfig extends WebSecurityConfigurerAdapter {

   @Override
   protected void configure(HttpSecurity http) throws Exception {
      http.csrf().disable();
      http.anonymous().disable();

      http.requestMatchers().antMatchers("/oauth/**","/login/**","/logout/**")
            .and()
            .authorizeRequests()
            .antMatchers("/oauth/**","/login/**","/logout/**").authenticated()
            .and()

            .formLogin().permitAll();


   }

   @Override
   public void configure(WebSecurity web) throws Exception {
      //设置静态资源不要拦截
      web.ignoring().antMatchers("/js/**","/cs/**","/images/**");
   }
   @Autowired
   private UserDetailsServiceImpl userDetailsService;

   @Override
   protected void configure(AuthenticationManagerBuilder auth) throws Exception {
      auth.userDetailsService(userDetailsService).passwordEncoder(new Sha256PasswordEncoder());

//    auth.inMemoryAuthentication().passwordEncoder(new Sha256PasswordEncoder())
//          .withUser("admin").password("123456").roles("ADMIN","USER").and()
//          .withUser("user").password("111").roles("USER");
   }

   /**
    * 需要配置这个支持password模式 support password grant type
    * @return
    * @throws Exception
    */
   @Override
   @Bean
   public AuthenticationManager authenticationManagerBean() throws Exception {
      return super.authenticationManagerBean();
   }

}
1.9.3.8 Step8:测试
启动数据和应用程序,使用Postman
首先添加一个http请求,请求地址为资源配置类中配置的路径,例如:

点击Get New Access Token 按钮。分别使用不同的授权模式测试授权服务器获取令牌的功能。
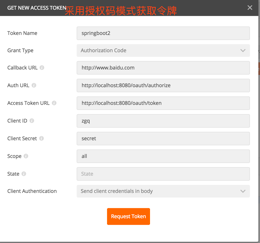
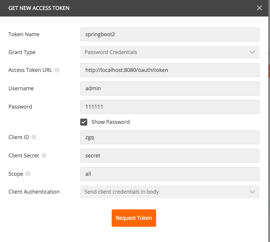
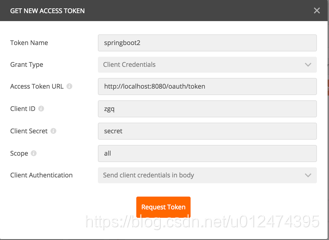
点击Request Token 得到Token
