SpringBoot 整合 Oauth2.0
Oauth2.0 简介
OAuth2.0是OAuth协议的延续版本,但不向前兼容OAuth 1.0(即完全废止了OAuth1.0)。 OAuth 2.0关注客户端开发者的简易性。要么通过组织在资源拥有者和HTTP服务商之间的被批准的交互动作代表用户,要么允许第三方应用代表用户获得访问的权限。同时为Web应用,桌面应用和手机,和起居室设备提供专门的认证流程。2012年10月,OAuth 2.0协议正式发布为RFC 6749
Oauth2.0 认证授权过程
在认证和授权的过程中涉及的三方包括:
1、服务提供方,用户使用服务提供方来存储受保护的资源,如照片,视频,联系人列表。
2、用户,存放在服务提供方的受保护的资源的拥有者。
3、客户端,要访问服务提供方资源的第三方应用,通常是网站,如提供照片打印服务的网站。在认证过程之前,客户端要向服务提供者申请客户端标识。
使用OAuth进行认证和授权的过程如下所示:
用户想操作存放在服务提供方的资源。
用户登录客户端向服务提供方请求一个临时令牌。
服务提供方验证客户端的身份后,授予一个临时令牌。
客户端获得临时令牌后,将用户引导至服务提供方的授权页面请求用户授权。在这个过程中将临时令牌和客户端的回调连接发送给服务提供方。
用户在服务提供方的网页上输入用户名和密码,然后授权该客户端访问所请求的资源。
授权成功后,服务提供方引导用户返回客户端的网页。
客户端根据临时令牌从服务提供方那里获取访问令牌。
服务提供方根据临时令牌和用户的授权情况授予客户端访问令牌。
客户端使用获取的访问令牌访问存放在服务提供方上的受保护的资源。
Oauth2.0 提供的四种授权方式
1、授权码模式(authorization code)用在客户端与服务端应用之间授权
2、简化模式(implicit)用在移动app或者web app(这些app是在用户的设备上的,如
在手机上调起微信来进行认证授权)
3、密码模式(resource owner password credentials)应用直接都是受信任的(都是由一家公司开发的)
4、客户端模式(client credentials)用在应用API访问
OAuth2环境搭建
Maven依赖
    <groupId>cn.peak</groupId>
    <artifactId>oauth2_server</artifactId>
    <version>1.0-SNAPSHOT</version>

    <parent>
        <groupId>org.springframework.boot</groupId>
        <artifactId>spring-boot-starter-parent</artifactId>
        <version>2.0.1.RELEASE</version>
    </parent>

    <!-- 管理依赖 -->
    <dependencyManagement>
        <dependencies>
            <dependency>
                <groupId>org.springframework.cloud</groupId>
                <artifactId>spring-cloud-dependencies</artifactId>
                <version>Finchley.M7</version>
                <type>pom</type>
                <scope>import</scope>
            </dependency>
        </dependencies>
    </dependencyManagement>

    <dependencies>
        <!-- SpringBoot整合Web组件 -->
        <dependency>
            <groupId>org.springframework.boot</groupId>
            <artifactId>spring-boot-starter-web</artifactId>
        </dependency>

        <!-- 整合lombok 插件 -->
        <dependency>
            <groupId>org.projectlombok</groupId>
            <artifactId>lombok</artifactId>
        </dependency>

        <!-- springboot整合freemarker -->
        <dependency>
            <groupId>org.springframework.boot</groupId>
            <artifactId>spring-boot-starter-freemarker</artifactId>
        </dependency>

        <!-->spring-boot 整合security -->
        <dependency>
            <groupId>org.springframework.boot</groupId>
            <artifactId>spring-boot-starter-security</artifactId>
        </dependency>

        <!-- spring-cloud-starter-oauth2 -->
        <dependency>
            <groupId>org.springframework.cloud</groupId>
            <artifactId>spring-cloud-starter-oauth2</artifactId>
        </dependency>
    </dependencies>

    <!-- 注意: 这里必须要添加, 否者各种依赖有问题 -->
    <repositories>
        <repository>
            <id>spring-milestones</id>
            <name>Spring Milestones</name>
            <url>https://repo.spring.io/libs-milestone</url>
            <snapshots>
                <enabled>false</enabled>
            </snapshots>
        </repository>
    </repositories>
认证授权中心配置
import org.springframework.context.annotation.Bean;
import org.springframework.context.annotation.Configuration;
import org.springframework.http.HttpMethod;
import org.springframework.security.authentication.AuthenticationManager;
import org.springframework.security.authentication.AuthenticationProvider;
import org.springframework.security.authentication.dao.DaoAuthenticationProvider;
import org.springframework.security.core.Authentication;
import org.springframework.security.core.userdetails.User;
import org.springframework.security.core.userdetails.UserDetailsService;
import org.springframework.security.crypto.bcrypt.BCryptPasswordEncoder;
import org.springframework.security.crypto.password.PasswordEncoder;
import org.springframework.security.oauth2.config.annotation.configurers.ClientDetailsServiceConfigurer;
import org.springframework.security.oauth2.config.annotation.web.configuration.AuthorizationServerConfigurerAdapter;
import org.springframework.security.oauth2.config.annotation.web.configuration.EnableAuthorizationServer;
import org.springframework.security.oauth2.config.annotation.web.configurers.AuthorizationServerEndpointsConfigurer;
import org.springframework.security.oauth2.config.annotation.web.configurers.AuthorizationServerSecurityConfigurer;
import org.springframework.security.provisioning.InMemoryUserDetailsManager;

/**
 * @author jql
 * @ClassName: AuthorizationServerConfig
 * @Description: 授权认证服务中心配置
 * @date 2019/12/13 15:05
 *
 * @EnableAuthorizationServer 注解作用: 开启授权认证服务中心
 */
@Configuration
@EnableAuthorizationServer
public class AuthorizationServerConfig extends AuthorizationServerConfigurerAdapter {

    /*
     * accessToken 有效期2小时
     * */
    private static final int ACCESSTOKENVALIDITYSECONDS = 7200;

    /*
     * 刷新令牌 2小时
     * */
    private static final int REFRESHTOKENVALIDITYSECONDS = 7200;

    /**
     * @Title: configure
     * @Description: 配置 appid,appkey,回调地址,token有效期
     * @param clients
     * @return void
     * @date 2019/12/13 15:13
     * @throws
     */
    @Override
    public void configure(ClientDetailsServiceConfigurer clients) throws Exception {
        super.configure(clients);
        clients.inMemory()
                .withClient("client_1")
                .secret(passwordEncoder().encode("123456"))
                .redirectUris("http://peakinfo.cn/")
                .authorizedGrantTypes("authorization_code")
                .scopes("all")
                .accessTokenValiditySeconds(ACCESSTOKENVALIDITYSECONDS)
                .refreshTokenValiditySeconds(REFRESHTOKENVALIDITYSECONDS);
    }

    /**
     * @Title: configure
     * @Description: 设置token类型
     * @param endpoints
     * @return void
     * @date 2019/12/13 15:28
     * @throws
     */
    @Override
    public void configure(AuthorizationServerEndpointsConfigurer endpoints) {
        endpoints.authenticationManager(authenticationManager()).allowedTokenEndpointRequestMethods(HttpMethod.GET,
                HttpMethod.POST);
    }

    @Override
    public void configure(AuthorizationServerSecurityConfigurer oauthServer) {
        // 允许表单认证
        oauthServer.allowFormAuthenticationForClients();
        // 允许check_token访问
        oauthServer.checkTokenAccess("permitAll()");
    }

    @Bean
    AuthenticationManager authenticationManager() {
        AuthenticationManager authenticationManager = new AuthenticationManager() {

            @Override
            public Authentication authenticate(Authentication authentication) {
                return daoAuhthenticationProvider().authenticate(authentication);
            }
        };
        return authenticationManager;
    }

    @Bean
    public AuthenticationProvider daoAuhthenticationProvider() {
        DaoAuthenticationProvider daoAuthenticationProvider = new DaoAuthenticationProvider();
        daoAuthenticationProvider.setUserDetailsService(userDetailsService());
        daoAuthenticationProvider.setHideUserNotFoundExceptions(false);
        daoAuthenticationProvider.setPasswordEncoder(passwordEncoder());
        return daoAuthenticationProvider;
    }

    /**
     * @Title: userDetailsService
     * @Description: 设置添加用户信息,正常应该从数据库中读取
     * @return org.springframework.security.core.userdetails.UserDetailsService
     * @date 2019/12/13 15:28
     * @throws
     */
    @Bean
    UserDetailsService userDetailsService() {
        InMemoryUserDetailsManager userDetailsService = new InMemoryUserDetailsManager();
        userDetailsService.createUser(User.withUsername("user_1").password(passwordEncoder().encode("123456"))
                .authorities("ROLE_USER").build());
        userDetailsService.createUser(User.withUsername("user_2").password(passwordEncoder().encode("1234567"))
                .authorities("ROLE_USER").build());
        return userDetailsService;
    }

    /**
     * @Title: passwordEncoder
     * @Description: 设置加密方式
     * @return org.springframework.security.crypto.password.PasswordEncoder
     * @date 2019/12/13 15:29
     * @throws
     */
    @Bean
    PasswordEncoder passwordEncoder() {
        // 加密方式
        PasswordEncoder passwordEncoder = new BCryptPasswordEncoder();
        return passwordEncoder;
    }
}
启动服务
@SpringBootApplication
public class App {
    public static void main(String[] args) {
        SpringApplication.run(App.class,args);
    }
}
启动后访问:
http://127.0.0.1:8080/oauth/authorize?response_type=code&client_id=client_1&redirect_uri=http://peakinfo.cn/
注意:自己的端口号,和redirect_uri参数,redirect_uri参数要和配置中心configure方法中的redirectUris配置保持一致。response_type参数为验证方式,支持四种方式,上文中有说明。
解决报错问题
报错信息:org.springframework.security.authentication.InsufficientAuthenticationException: User must be authenticated with Spring Security before authorization can be completed.
解决办法:
新增SecurityConfig配置
import org.springframework.context.annotation.Configuration;
import org.springframework.security.config.annotation.web.builders.HttpSecurity;
import org.springframework.security.config.annotation.web.configuration.WebSecurityConfigurerAdapter;

/**
 * @author jql
 * @ClassName: SecurityConfig
 * @Description: 授权中心管理器
 * @date 2019/12/13 16:47
 */
@Configuration
public class SecurityConfig extends WebSecurityConfigurerAdapter {

    /**
     * @Title: configure
     * @Description: 拦截所有请求,使用httpBasic方式登录
     * @param http
     * @return void
     * @date 2019/12/13 16:48
     * @throws
     */
    @Override
    protected void configure(HttpSecurity http) throws Exception {
        http.authorizeRequests().antMatchers("/**").fullyAuthenticated().and().httpBasic();
    }

}
重新启动即可
效果演示
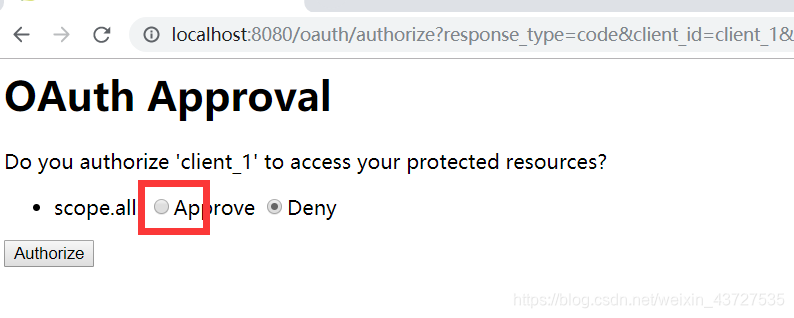
允许访问后,会跳转到回调地址中去,即:

跳转后,会返回code,我们拿到code后,可以换取令牌。
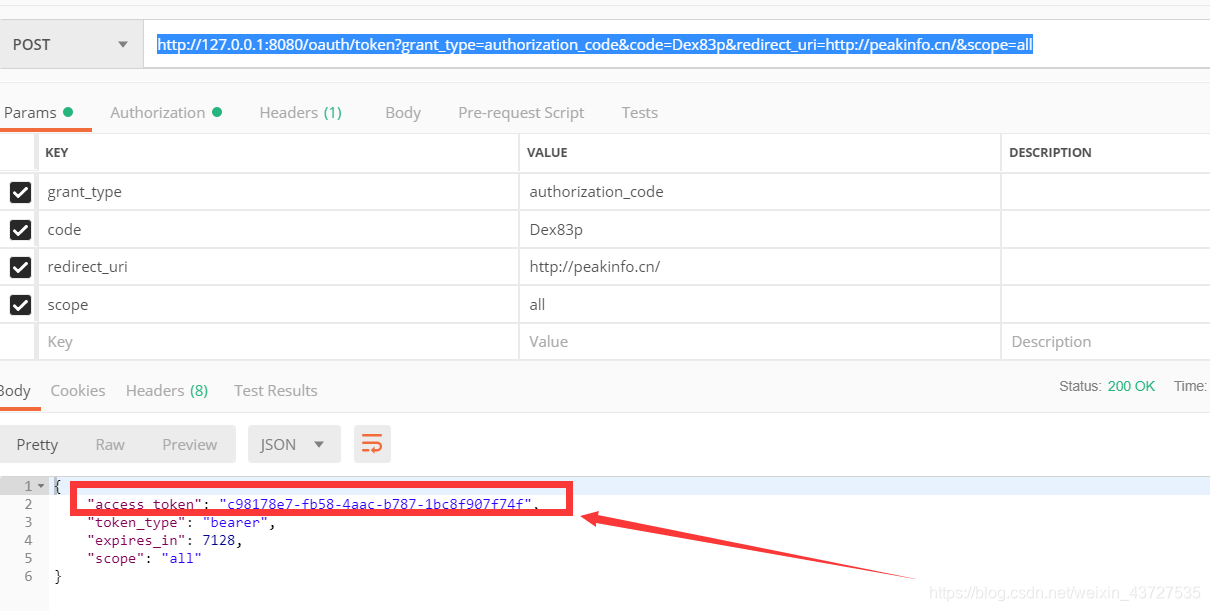
接下来我们使用code来换取token
使用code 来换取token
我们可以使用postman 来测试
接口地址:
http://127.0.0.1:8080/oauth/token?grant_type=authorization_code&code=Dex83p&redirect_uri=http://peakinfo.cn/&scope=all
参数说明:
grant_type 授权类型
code code(用户授权后生成)
redirect_uri 回调地址
scope 权限
如果你的postman 一直报401即如下图所示:
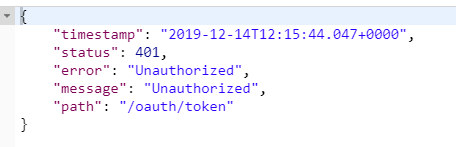
这需要对postman进行如下设置:

设置完后就可以啦!
密码模式
上面我们介绍了授权模式,下面我们看一下密码模式获取token
更改配置中心的配置:
@Override
    public void configure(ClientDetailsServiceConfigurer clients) throws Exception {
        super.configure(clients);
        clients.inMemory()
                .withClient("client_1")
                .secret(passwordEncoder().encode("123456"))
                .redirectUris("http://peakinfo.cn/")
                .authorizedGrantTypes("authorization_code","password")
                .scopes("all")
                .accessTokenValiditySeconds(ACCESSTOKENVALIDITYSECONDS)
                .refreshTokenValiditySeconds(REFRESHTOKENVALIDITYSECONDS);
    }
请求地址:
http://127.0.0.1:8080/oauth/token
参数说明:
grant_type 授权类型
username 用户名
password 密码
client_id appid
client_secret appkey
scope 权限

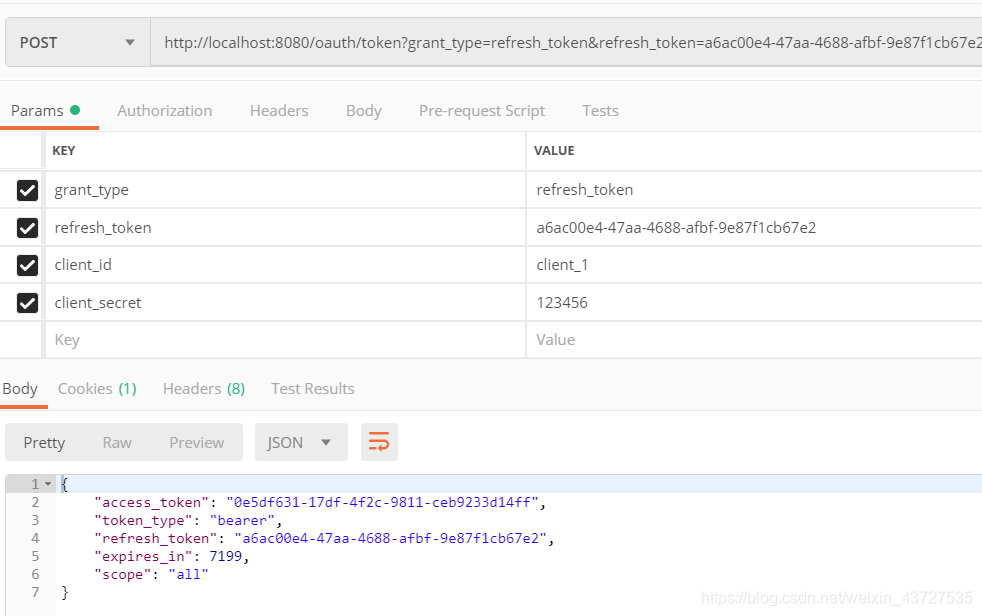
刷新令牌,验证令牌
刚刚我们已经获取到token(令牌了),但是这个令牌是有有效期的(2个小时),如果两个小时过了怎么办的?这个时候我们就要定时刷新令牌了。
更改配置中心的配置:
public void configure(ClientDetailsServiceConfigurer clients) throws Exception {


        super.configure(clients);
        clients.inMemory()
                .withClient("client_1")
                .secret(passwordEncoder().encode("123456"))
                .redirectUris("http://peakinfo.cn/")
                .authorizedGrantTypes("authorization_code","password","refresh_token")
                .scopes("all")
                .accessTokenValiditySeconds(ACCESSTOKENVALIDITYSECONDS)
                .refreshTokenValiditySeconds(REFRESHTOKENVALIDITYSECONDS);
    }
请求地址:
http://localhost:8080/oauth/token?grant_type=refresh_token&refresh_token=a6ac00e4-47aa-4688-afbf-9e87f1cb67e2&client_id=client_1&client_secret=123456
参数说明:
grant_type 授权类型
refresh_token 刷新token令牌
client_id appid
client_secret appkey
刷新token报错:
@Override
    public void configure(AuthorizationServerEndpointsConfigurer endpoints) {
        endpoints.authenticationManager(authenticationManager()).allowedTokenEndpointRequestMethods(HttpMethod.GET,
                HttpMethod.POST);
        endpoints.authenticationManager(authenticationManager());
		endpoints.userDetailsService(userDetailsService());
    }
这样,我们获得到新的token了,那么我们如何验证token是否有效呢?
请求地址:
http://localhost:8080/oauth/check_token?token=b212eaec-63a7-489d-b5a2-883ec248c417
参数说明:
token :要验证的token
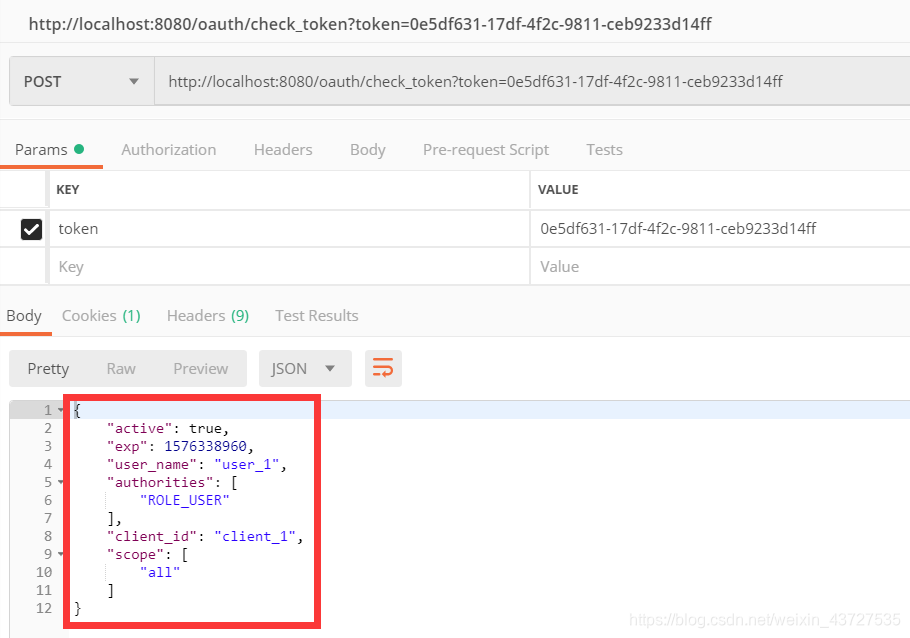
好了,我们的server已经搭建好了,获取到token后,我们就可以使用token来调用接口了!
下篇文章我们继续研究客户端如何调用服务端
更多学习资源移步到:http://www.mayikt.com/