这里是一个学习过程笔记的汇总:Spring Boot学习汇总
前面已经讲过了关于Spring Boot的缓存相关内容:Spring Boot与缓存,可以先了解下这篇,然后再进行今天的学习。
本篇的学习还是在上一篇的基础上进行的: Spring Boot整合Redis
1、Redis的缓存管理器
之前讲到的缓存都是Spring Boot默认的缓存机制,即默认SimpleCacheConfiguration配置类生效,默认创建的缓存管理器是:ConcurrentMapCacheManager,但当我们整合了Redis之后,项目默认生效的配置类就成了RedisCacheConfiguration,如下所示:


而生效的缓存管理器就是RedisCacheManager:

至于原因,那我们就得看一下源码了:
先看下SimpleCacheConfiguration类:

但是当我们引入了Redis,RedisCacheConfiguration就会生效,这个生效后就会给容器创建一个RedisCacheManager的缓存管理器,所以SimpleCacheConfiguration就不会生效了(容器中已经有了RedisCacheManager [间接实现了CacheManager接口])。
xxxCacheConfiguration的生效顺序是按如下来的,从上到下,前面的配置类生效,那么后面的配置类就不会生效:

2、测试
原理:
只要引入了Redis的starter模块,容器就会创建RedisCacheManager缓存管理器,而RedisCacheManager会帮我们创建RedisCache来作为缓存组件,RedisCache通过操作redis来缓存数据。
所以我们直接测试即可。
启动项目,连续两次访问:http://localhost:8080/user/1
控制台:
第二次访问,并没有打印sql查询,而是直接返回结果,说明缓存生效,那么我们来看一下Redis中的缓存。

可以看到,生成了一个名为user的缓存组件,key并不是我们之前所说的方法参数(即 1),而是user::1,这是为什么?
debug一下源码,可以看到:
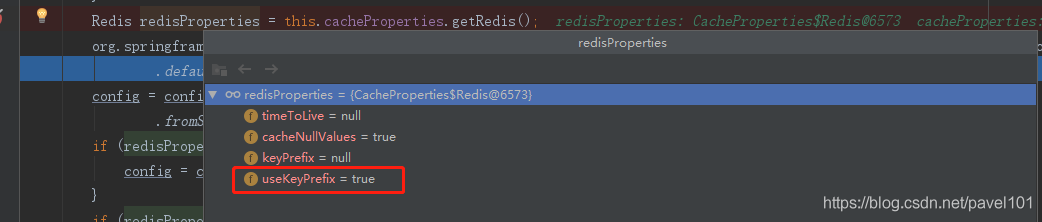
这里的配置是给key添加了一个前缀,而这个前缀就是我们设置的缓存组件的名称。
那value的值也是看不懂的一种编码格式,这是为什么呢?
原来默认保存数据k-v都是Object;利用序列化保存,而默认创建的RedisCacheManager操作redis时使用的是RedisTemplate<Object, Object> ,而RedisTemplate<Object, Object> 默认使用的是jdk的序列化机制。
 所以这里就像上一篇讲的那样,缓存中的key-value都是经过jdk序列化机制序列化之后的,然后value值我们就傻傻看不懂了,接下来我们就自定义CacheManager,这样缓存之后的value值是正常的j可以看懂的json数据
3、自定义CacheManager
在MyRedisConfig类中增加如下代码(从RedisCacheConfiguration中拷贝出源码再进行修改,主要就是修改序列化机制):
     @Bean
    public RedisCacheManager cacheManager(RedisConnectionFactory redisConnectionFactory) {
        RedisCacheManager.RedisCacheManagerBuilder builder = RedisCacheManager
                .builder(redisConnectionFactory)
                .cacheDefaults(determineConfiguration());
        return builder.build();
    }

    private org.springframework.data.redis.cache.RedisCacheConfiguration determineConfiguration() {
        org.springframework.data.redis.cache.RedisCacheConfiguration config = org.springframework.data.redis.cache.RedisCacheConfiguration
                .defaultCacheConfig();
        // 设置序列化器
        config = config.serializeValuesWith(RedisSerializationContext.SerializationPair
                .fromSerializer(new Jackson2JsonRedisSerializer(User.class)));
        return config;
}然后再启动,访问:http://localhost:8080/user/1
查看数据库缓存: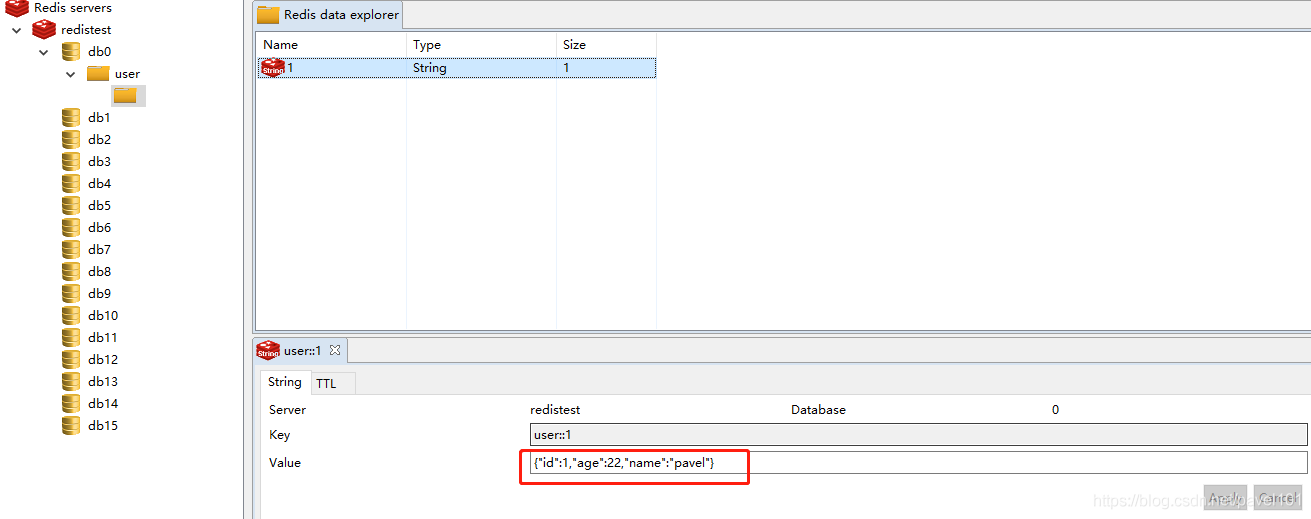
这样CacheManager就自定义成功。
4、以上做法存在的问题
我们在数据库中再创建一张表,city表:
CREATE TABLE `city` (
  `id` bigint(10) unsigned NOT NULL AUTO_INCREMENT,
  `name` varchar(10) NOT NULL COMMENT '城市名称',
  `description` varchar(25) DEFAULT NULL COMMENT '描述',
  PRIMARY KEY (`id`)
) ENGINE=InnoDB AUTO_INCREMENT=0 DEFAULT CHARSET=utf8
然后创建相应的实体类City:
package com.example.cache.domain;

import org.springframework.stereotype.Component;

import java.io.Serializable;

/**
 * @author pavel
 * @date 2018/11/28 0028
 */
@Component
public class City implements Serializable {

    private static final long serialVersionUID = -1274433079373420986L;

    private Long id;
    private String name;
    private String description;

    public City() {
    }

    public City(Long id, String name, String description) {
        this.id = id;
        this.name = name;
        this.description = description;
    }

    public Long getId() {
        return id;
    }

    public void setId(Long id) {
        this.id = id;
    }

    public String getName() {
        return name;
    }

    public void setName(String name) {
        this.name = name;
    }

    public String getDescription() {
        return description;
    }

    public void setDescription(String description) {
        this.description = description;
    }

    @Override
    public String toString() {
        return "City{" +
                "id=" + id +
                ", name='" + name + '\'' +
                ", description='" + description + '\'' +
                '}';
    }
}
创建CityMapper:
package com.example.cache.mapper;

import com.example.cache.domain.City;
import org.apache.ibatis.annotations.Mapper;
import org.apache.ibatis.annotations.Select;

/**
 * @author pavel
 * @date 2018/11/28 0028
 */
@Mapper
public interface CityMapper {

    @Select("select * from city where id = #{id}")
    City getCity(Long id);
}
创建CityService:
package com.example.cache.service;

import com.example.cache.domain.City;
import com.example.cache.mapper.CityMapper;
import org.springframework.beans.factory.annotation.Autowired;
import org.springframework.cache.annotation.Cacheable;
import org.springframework.stereotype.Service;

/**
 * @author pavel
 * @date 2018/11/28 0028
 */
@Service
public class CityService {

    @Autowired
    private CityMapper cityMapper;

    @Cacheable(cacheNames = "city")
    public City getCityById(Long id) {
        System.out.println("查询" + id + "号城市");
        return cityMapper.getCity(id);
    }
}
创建CityController:
package com.example.cache.controller;

import com.example.cache.domain.City;
import com.example.cache.service.CityService;
import org.springframework.beans.factory.annotation.Autowired;
import org.springframework.web.bind.annotation.GetMapping;
import org.springframework.web.bind.annotation.PathVariable;
import org.springframework.web.bind.annotation.RestController;

/**
 * @author pavel
 * @date 2018/11/28 0028
 */
@RestController
public class CityController {
    @Autowired
    private CityService cityService;

    @GetMapping("/city/{id}")
    public City getUser(@PathVariable("id") Long id) {
        City city = cityService.getCityById(id);
        System.out.println("查询结果: " + city);
        return city;
    }
}
启动项目,第一次访问:http://localhost:8080/city/1
控制台输出,

看redis数据,id为1的城市已加入缓存,key为1,value为id是1的City对象:

第二次访问:http://localhost:8080/city/1, 看控制台,可见我们的City对象并不能从缓存中反序列化回来

这是为什么呢?看错误信息,大概明白了,因为我们使用的是自定义的RedisCacheManager,这个自定义的缓存管理器是针对User对象的,我们存到缓存中的是City的json数据,所以用之前定义的缓存管理器就不行了,这种情况就得再配置一个。
如下,再MyRedisConfig中增加配置:
// City的缓存管理器
    @Bean
    public RedisCacheManager cityCacheManager(RedisConnectionFactory redisConnectionFactory) {
        RedisCacheManager.RedisCacheManagerBuilder builder = RedisCacheManager
                .builder(redisConnectionFactory)
                .cacheDefaults(cityDetermineConfiguration());
        return builder.build();
    }

    private org.springframework.data.redis.cache.RedisCacheConfiguration cityDetermineConfiguration() {
        org.springframework.data.redis.cache.RedisCacheConfiguration config = org.springframework.data.redis.cache.RedisCacheConfiguration
                .defaultCacheConfig();
        // 设置序列化器
        config = config.serializeValuesWith(RedisSerializationContext.SerializationPair
                .fromSerializer(new Jackson2JsonRedisSerializer(City.class)));
        return config;
}那么User和City有了专属的缓存管理器了,我们就可以在service上进行指定,这就是前面一篇:Spring Boot的缓存机制中讲到
@Cacheable注解的cacheManager属性,下面就来指定一下;
用@CacheConfig注解统一指定cacheManager,如下:

在方法上用@Cacheable注解指定cacheManager,如下:

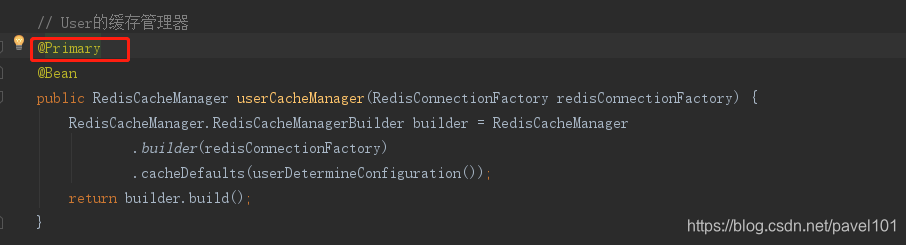
指定完之后,将redis中缓存的数据清除,启动项目,报错:

看错误信息,大概是因为现在项目中有了两个缓存管理器,但是redis必须要有一个默认的,所以就给其中任意一个设置为默认,加上@Primary注解即可。
这里就设置User的缓存管理器为默认:
再次启动项目,两次访问:http://localhost:8080/city/1,控制台:

没有报错,第二次访问是从缓存中取出数据并反序列化为City对象的,说明以上配置成功。
到此,Spring Boot缓存相关的内容学习告一段落。
