今天无意中看到了别人写的一个简单的车牌定位,仔细看了下,确实写的很简单,不足之处:
(1)鲁棒性差,阈值分割、轮廓提取过程中的参数选择都是定值,对于不同场景下的不同照片的适应性差。
(2) 定位不够精确。
(3)不具备车牌的校正能力,定位之后的车牌截图没有水平校正,因此大多是倾斜的。
代码如下:
# coding=utf-8
import cv2
import numpy as np
import imutils
def main(image_path):
img_org = cv2.imread(image_path)
# 按照彩色读取图像,获的三通道的数字矩阵
cv2.imshow('原图', img_org)
size = img_org.shape
# print(size ),输出如下:
# (375, 500, 3)
if size[0] <= 776:
img_org = imutils.resize(img_org, width=900)
# imutils.resize()可以实现按比例放大,即宽度方向放大900/500=1.8倍,则
# 高度方向同样方法1.8被倍,即375*1.8=675。
# print(img_org.shape),输出如下:
# (675, 900, 3)
img_org2 = img_org.copy()
img_gray = cv2.cvtColor(img_org, cv2.COLOR_BGR2GRAY)
# 将RGB格式的彩色图转化为灰度
# print(img_gray.shape),输出如下:
# (675, 900)
ret3, img_thr = cv2.threshold(img_gray, 125, 255, cv2.THRESH_BINARY)
# 做阈值分割,得到二值图
cv2.imwrite('thresh.jpg', img_thr)
img_edg = cv2.Canny(img_thr, 100, 200)
# 用canny算子作边缘检测
cv2.imwrite('cn_edge.jpg', img_edg)
# cv2.imshow(' img_edg',img_edg)
kernel = cv2.getStructuringElement(cv2.MORPH_DILATE, (7, 7))
# 构造7*7的十字形的结构元,用于形态学操作
# print(kernel),输出如下:
# [[0 0 0 1 0 0 0]
# [0 0 0 1 0 0 0]
# [0 0 0 1 0 0 0]
# [1 1 1 1 1 1 1]
# [0 0 0 1 0 0 0]
# [0 0 0 1 0 0 0]
# [0 0 0 1 0 0 0]]
img_dil = cv2.dilate(img_edg, kernel, iterations=1)
# 作开运算,去掉细小颗粒
cv2.imwrite('dilated_img.jpg', img_dil)
(somethig_else, contours, hierarchye) = cv2.findContours(img_dil.copy(), 1, 2)
cnts = sorted(contours, key=cv2.contourArea, reverse=True)[:10]
screenCnt = None
for c in cnts:
peri = cv2.arcLength(c, True)
approx = cv2.approxPolyDP(c, 0.02 * peri, True)
# 使用多边形逼近拟合函数 cv2.approxPolyDP()来拟合轮廓
# 返回N*1*2()形式的顶点坐标
# 如果多边形的顶点个数等于4,这个轮廓就是我们想要的
if approx.shape[0] == 4:
screenCnt = approx
break
mask = np.zeros(img_gray.shape, dtype=np.uint8)
# 创建一个和img_gray同大小的黑色画布
roi_corners = np.array(screenCnt, dtype=np.int32)
ignore_mask_color = (255,255,255)
cv2.fillPoly(mask, roi_corners, ignore_mask_color)
cv2.drawContours(img_org, [screenCnt],0, (255, 255, 0), 2,8)
cv2.imwrite('plate_detedted.jpg', img_org)
ys = [screenCnt[0, 0, 1], screenCnt[1, 0, 1], screenCnt[2, 0, 1], screenCnt[3, 0, 1]]
# print(ys),输出如下:
# [239, 324, 362, 261]
xs = [screenCnt[0, 0, 0], screenCnt[1, 0, 0], screenCnt[2, 0, 0], screenCnt[3, 0, 0]]
# print(xs ),输出如下:
# [203, 212, 630, 628]
ys_sorted_index = np.argsort(ys)
# print(ys_sorted_index),输出如下:
# [0 3 1 2]
xs_sorted_index = np.argsort(xs)
# print(xs_sorted_index ),输出如下:
# [0 1 3 2]
x1 = xs[xs_sorted_index[0]]
# print(x1 ),输出如下:
# 203
x2 = xs[xs_sorted_index[3]]
# print(x2 ),输出如下:
# 630
y1 = ys[ys_sorted_index[0]]
# print(y1)
# 239
y2 = ys[ys_sorted_index[3]]
# print(y2)
# 362
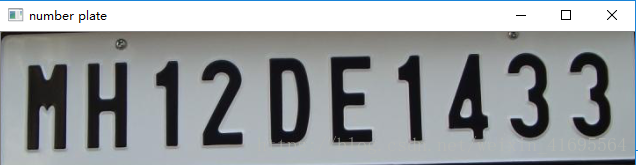
img_plate = img_org2[y1:y2, x1:x2]
cv2.imshow('number plate', img_plate)
cv2.imwrite('number_plate.jpg', img_plate)
cv2.waitKey(0)
if __name__ == "__main__":
image_path = "car1.jpg"
main(image_path)
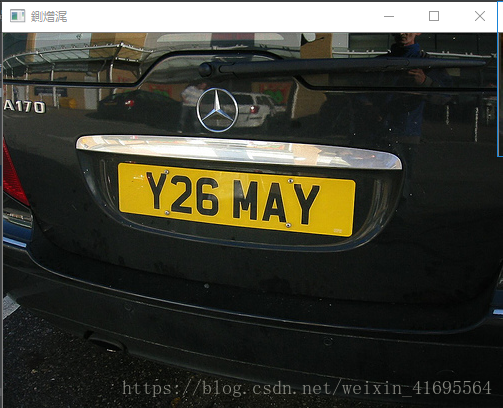
运行程序:

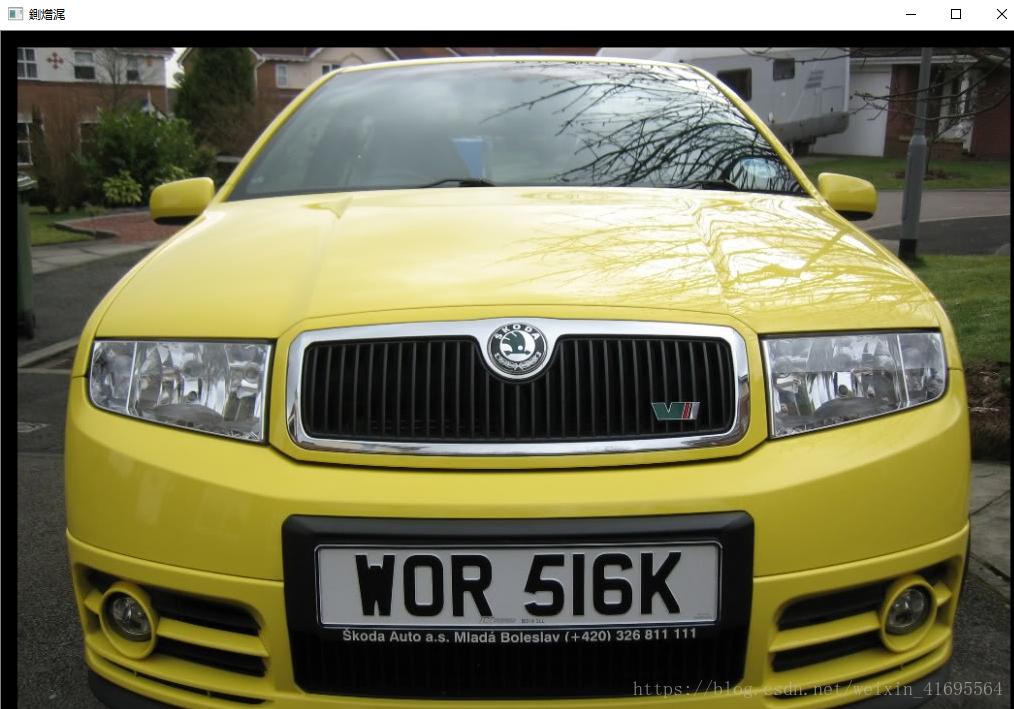
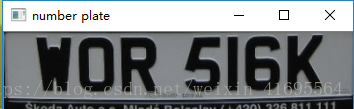
换张原图,如下:

再换张原图:
改进:采用基于特征提取的算法来定位车牌,效果应该会好很多。