用户登录成功后,信息保存再服务器的session中,并返回给用户一个sessionid,sessionid是一个会话的key,浏览器第一次访问服务器会在服务器端生成一个session,当用户再次请求时,将携带该sessionId,如果在服务器中能够找到该sessionid,则表示用户登录成功。这节将会学习如何管理session。这节将会在Spring Security -- 添加图形验证码(转载)的基础上继续扩展。
一、session超时设置
1、配置session
session超时时间也就是用户登录的有效时间。要设置session超时时间很简单,只需要在配置文件application.yml中添加:
#session设置超时
server:
  servlet:
    session:
      timeout: 3600
单位为秒,通过上面的配置,session的有效期为一个小时。值得注意的是,session的最小有效期为60秒,也就是说即使你设置为小于60秒的值,其有效期还是为60秒。
session失效后,刷新页面后将跳转到认证页面,我们可以再添加一些配置,自定义session失效后的一些行为。在Spring Security中配置session管理器,并配置session失效后要跳转的URL:
 @Override
    protected void configure(HttpSecurity http) throws Exception {
        http.addFilterBefore(validateCodeFilter, UsernamePasswordAuthenticationFilter.class) // 添加图片验证码校验过滤器
                .addFilterBefore(smsCodeFilter, UsernamePasswordAuthenticationFilter.class)  // 添加手机短信验证码校验过滤器
                .authorizeRequests()    // 授权配置
                .antMatchers("/code/image","/code/sms","/session/invalid")
                .permitAll()       // 无需认证的请求路径
                .anyRequest()       // 任何请求
                .authenticated()    //都需要身份认证
                .and()
                .formLogin()         // 或者httpBasic()
                .loginPage("/login")  // 指定登录页的路径
                //我们的form表单action是将请求提交到/login/mobile页面,而在Spring Security中配置的 .loginProcessingUrl("/login") 值为/login,这两者为什么不一样呢?这样做的目的是通过指定Spring Security中的UsernamePasswordAuthenticationFilter的拦截目标为post请求/login,从而使得该过滤器不会拦截/login/mobile请求;那么针对/login/mobile请求我们会仿照UsernamePasswordAuthenticationFilter定义自己的过滤器,然后对其进行认证;
                .loginProcessingUrl("/login")  // 指定自定义form表单提交请求的路径
                .successHandler(authenticationSucessHandler)    // 处理登录成功
                .failureHandler(authenticationFailureHandler) // 处理登录失败
                // 必须允许所有用户访问我们的登录页(例如未验证的用户,否则验证流程就会进入死循环)
                // 这个formLogin().permitAll()方法允许所有用户基于表单登录访问/login这个page。
                .permitAll()
//                .and()
//                .rememberMe()
//                .tokenRepository(persistentTokenRepository)  // 配置 token 持久化仓库
//                .tokenValiditySeconds(3600)      // remember 过期时间,单为秒
//                .userDetailsService(userDetailsService)   // 处理自动登录逻辑
//                .and()
//                .logout()
//                .permitAll()
                .and()
                .sessionManagement()    //添加session管理器
                .invalidSessionUrl("/session/invalid")   //Session失效后跳转到这个链接
                .and()
                //默认都会产生一个hiden标签 里面有安全相关的验证 防止请求伪造 这边我们暂时不需要 可禁用掉
                .csrf().disable()
                .apply(smsAuthenticationConfig); // 将短信验证码认证配置加到 Spring Security 中  添加一个安全配置其到http的configurers集合
    }
2、SessionController
上面配置了session失效后跳转到/session/invalid,并且将这个URL添加到了免认证路径中。
在包com.goldwind.conmtroller下创建类SessionController,添加一个方法,映射该请求:
package com.goldwind.controller;

import org.springframework.http.HttpStatus;
import org.springframework.web.bind.annotation.GetMapping;
import org.springframework.web.bind.annotation.ResponseStatus;

/**
 * @Author: zy
 * @Description: session路由
 * @Date: 2020/2/16
 */
public class SessionController {
    @GetMapping("/session/invalid")
    @ResponseStatus(HttpStatus.UNAUTHORIZED)
    public String sessionInvalid(){
        return "session已失效,请重新认证";
    }
}
3、测试
为了演示,我们将session的超时时间设置为最小值60秒,重启项目,访问http://127.0.0.1:8080/index,并成功认证后输出:

等待60秒并刷新页面:

可看到请求跳转到了我们自定义的/session/invalidURL上。
4、session并发控制
session并发控制可以控制一个账号同一时刻最多能登录多少个。我们在Spring Security配置中继续添加session相关配置:
 @Override
    protected void configure(HttpSecurity http) throws Exception {
        http.addFilterBefore(validateCodeFilter, UsernamePasswordAuthenticationFilter.class) // 添加图片验证码校验过滤器
                .addFilterBefore(smsCodeFilter, UsernamePasswordAuthenticationFilter.class)  // 添加手机短信验证码校验过滤器
                .authorizeRequests()    // 授权配置
                .antMatchers("/code/image","/code/sms","/session/invalid")
                .permitAll()       // 无需认证的请求路径
                .anyRequest()       // 任何请求
                .authenticated()    //都需要身份认证
                .and()
                .formLogin()         // 或者httpBasic()
                .loginPage("/login")  // 指定登录页的路径
                //我们的form表单action是将请求提交到/login/mobile页面,而在Spring Security中配置的 .loginProcessingUrl("/login") 值为/login,这两者为什么不一样呢?这样做的目的是通过指定Spring Security中的UsernamePasswordAuthenticationFilter的拦截目标为post请求/login,从而使得该过滤器不会拦截/login/mobile请求;那么针对/login/mobile请求我们会仿照UsernamePasswordAuthenticationFilter定义自己的过滤器,然后对其进行认证;
                .loginProcessingUrl("/login")  // 指定自定义form表单提交请求的路径
                .successHandler(authenticationSucessHandler)    // 处理登录成功
                .failureHandler(authenticationFailureHandler) // 处理登录失败
                // 必须允许所有用户访问我们的登录页(例如未验证的用户,否则验证流程就会进入死循环)
                // 这个formLogin().permitAll()方法允许所有用户基于表单登录访问/login这个page。
                .permitAll()
//                .and()
//                .rememberMe()
//                .tokenRepository(persistentTokenRepository)  // 配置 token 持久化仓库
//                .tokenValiditySeconds(3600)      // remember 过期时间,单为秒
//                .userDetailsService(userDetailsService)   // 处理自动登录逻辑
//                .and()
//                .logout()
//                .permitAll()
                .and()
                //默认都会产生一个hiden标签 里面有安全相关的验证 防止请求伪造 这边我们暂时不需要 可禁用掉
                .csrf().disable()
                .apply(smsAuthenticationConfig) // 将短信验证码认证配置加到 Spring Security 中  添加一个安全配置其到http的configurers集合
                .and()
                .sessionManagement()    //添加session管理器
                .invalidSessionUrl("/session/invalid")   //Session失效后跳转到这个链接
                .maximumSessions(1)
                .expiredSessionStrategy(sessionInformationExpiredStrategy);
    }
maximumSessions配置了最大session并发数量为1个,如果admin这个账户登录后,在另一个客户端也使用admin账户登录,那么第一个使用admin登录的账户将会失效,类似于一个先入先出队列。sessionInformationExpiredStrategy配置了session在并发下失效后的处理策略,这里为我们在com.goldwind.config包下自定义策略CustomSessionInformationExpiredStrategy :
package com.goldwind.config;

import org.springframework.http.HttpStatus;
import org.springframework.security.web.session.SessionInformationExpiredEvent;
import org.springframework.security.web.session.SessionInformationExpiredStrategy;
import org.springframework.stereotype.Component;

import javax.servlet.ServletException;
import javax.servlet.http.HttpServletResponse;
import java.io.IOException;

/**
 * @Author: zy
 * @Description: 配置了Session在并发下失效后的处理策略
 * @Date: 2020/2/16
 */
@Component
public class CustomSessionInformationExpiredStrategy implements SessionInformationExpiredStrategy {

    @Override
    public void onExpiredSessionDetected(SessionInformationExpiredEvent event) throws IOException, ServletException {
        HttpServletResponse response = event.getResponse();
        response.setStatus(HttpStatus.UNAUTHORIZED.value());
        response.setContentType("application/json;charset=utf-8");
        response.getWriter().write("您的账号已经在别的地方登录,当前登录已失效。如果密码遭到泄露,请立即修改密码!");
    }
}
为了演示这个效果,我们先将session超时时间设置久一点,比如3600秒,然后重启项目,在Chrome里使用admin账户登录。
登录成功后,在IE上也是用admin账户登录,登录成功后回到Chrome,刷新页面,效果如下所示:

除了后者将前者踢出的策略,我们也可以控制当session达到最大有效数的时候,不再允许相同的账户登录。
要实现这个功能只需要在上面的配置中添加:
......
.and()
    .sessionManagement() // 添加 Session管理器
    .invalidSessionUrl("/session/invalid") // Session失效后跳转到这个链接
    .maximumSessions(1)
    .maxSessionsPreventsLogin(true)
    .expiredSessionStrategy(sessionInformationExpiredStrategy)
    .and()
......
重启系统,在Chrome上登录admin账户后,在IE上尝试使用admin账户登录:

可以看到登录受限。在实际开发中,发现session并发控制只对Spring Security默认的登录方式——账号密码登录有效,而像短信验证码登录,社交账号登录并不生效,解决方案可以开源项目https://github.com/wuyouzhuguli/FEBS-Security。
5、session集群处理
session集群听着高大上,其实实现起来很简单。当我们登录成功后,用户认证的信息存储在session中,而这些session默认是存储在运行运用的服务器上的,比如Tomcat,netty等。当应用集群部署的时候,用户在A应用上登录认证了,后续通过负载均衡可能会把请求发送到B应用,而B应用服务器上并没有与该请求匹配的认证session信息,所以用户就需要重新进行认证。要解决这个问题,我们可以把session信息存储在第三方容器里(如Redis集群),而不是各自的服务器,这样应用集群就可以通过第三方容器来共享session了。
我们引入Redis和Spring Session依赖:
<dependency>
    <groupId>org.springframework.session</groupId>
    <artifactId>spring-session</artifactId>
</dependency>
<dependency>
    <groupId>org.springframework.boot</groupId>
    <artifactId>spring-boot-starter-data-redis</artifactId>
</dependency>
然后在yml中配置Session存储方式为Redis:
spring:
  session:
    store-type: redis
为了方便,Redis配置采用默认配置即可。开启Redis,并且启动两个应用实例,一个端口为8080,另一个端口为9090。
我们现在8080端口应用上登录:

然后访问9090端口应用的主页:
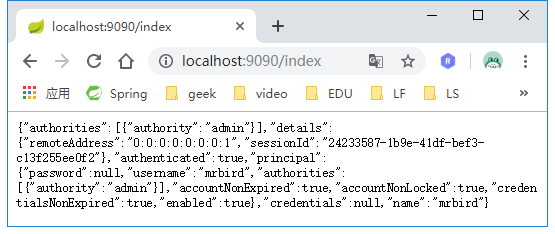
可以看到登录也是生效的。这就实现了集群化session管理。
6、其它操作
SessionRegistry包含了一些使用的操作Session的方法,比如:
踢出用户(让Session失效):
String currentSessionId = request.getRequestedSessionId();
sessionRegistry.getSessionInformation(sessionId).expireNow();
获取所有Session信息:
List<Object> principals = sessionRegistry.getAllPrincipals();
参考文章:
[1] Spring Security Session管理(转载)