什么是spring security?
spring security是基于spring的安全框架.它提供全面的安全性解决方案,同时在Web请求级别和调用级别确认和授权.在Spring Framework基础上,spring security充分利用了依赖注入(DI)和面向切面编程(AOP)功能,为应用系统提供声明式的安全访问控制功能,建晒了为企业安全控制编写大量重复代码的工作,是一个轻量级的安全框架,并且很好集成Spring MVC
spring security的核心功能有哪些?
1 认证 :认证用户
2 验证: 验证用户是否有哪些权限,可以做哪些事情
spring security基于哪些技术实现?
Filter,Servlet,AOP实现
框架技术准备:
IDEA 2017.3 ,MAVEN 3+ ,springboot 2.2.6 spring security 5.2.2, JDK 8+
spring security初步集成使用
创建一个基于Maven的spring boot项目,引入必需依赖
父级依赖
 <parent>
      <groupId>org.springframework.boot</groupId>
      <artifactId>spring-boot-parent</artifactId>
      <version>2.2.6.RELEASE</version>
  </parent>
springboot项目集成spring security的起步依赖
springboot web项目的起步依赖
 <dependency>
      <groupId>org.springframework.boot</groupId>
      <artifactId>spring-boot-starter-security</artifactId>
    </dependency>

    <dependency>
      <groupId>org.springframework.boot</groupId>
      <artifactId>spring-boot-starter-web</artifactId>
    </dependency>
我们启动springboot项目的主类
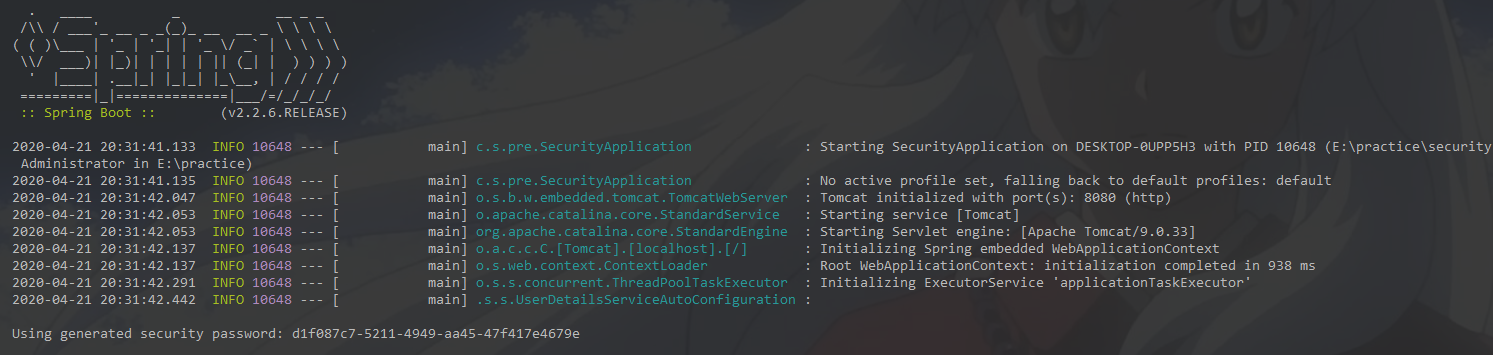
大家可以看到,此刻我们已经实现了spring security最简单的功能,上面截图的最下方就是spring sceurity给我们随机生成的密码
我们此刻可以创建一个最简单的controller层来测试访问安全控制
@RestController
public class HelloController {

    @RequestMapping("/sayHello") public String sayHello() { System.out.println("Hello,spring security"); return "hello,spring security"; } }
接下来我们通过调用这个sayHello接口,我们会得到一个登录界面
此刻我们输入默认的用户名user ,密码就是控制台随机生成的一串字符 2dddf218-48c7-454c-875d-f7283e8457c1
我们就可以以成功访问: hello,spring security
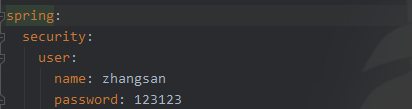
当然,我们也可以在spring的配置文件中去配置自定义的用户名和密码,这样也可以实现同样的效果,配置如下图所示.

如果我们不想使用spring security的访问控制功能,我们可以在Springboot的启动类注解上排除spring security的自动配置
@SpringBootApplication(exclude ={SecurityAutoConfiguration.class})
这样我们再次访问接口,就不会要求我们登陆就可以直接访问了.
Spring Security 基于内存配置:
去除上述所有配置,我们重新配置一个配置类去继承WebSecurityConfigurerAdapter,这个适配器类有很多方法,我们需要重写configure(AuthenticationManagerBuilder auth)方法
@Configuration //配置类
@EnableWebSecurity //启用spring security安全框架功能
public class MyWebSecurityConfig extends WebSecurityConfigurerAdapter {

    @Override
    protected void configure(AuthenticationManagerBuilder auth) throws Exception {
        PasswordEncoder passwordEncoder = passwordEncoder();
        auth.inMemoryAuthentication().withUser("admin").password(passwordEncoder.encode("123456"))
                .roles();
    }

    /**
     * spring security自带的加密算法PasswordEncoder,我们使用其中一种算法来对密码加密 BCryptPasswordEncoder方法采用SHA-256
     * +随机盐+密钥对密码进行加密,过程不可逆 不加密高版本会报错
     */
    @Bean
    public PasswordEncoder passwordEncoder() {
        return new BCryptPasswordEncoder();
    }
}
这样我们就在内存配置了用户admin,密码采用加密算法去实现内存中的用户登录认证.
在实际的场景中一个用户可能有多个角色,接下来看一下基于内存角色的用户认证
首先我们在配置类上需要添加注解启用方法级别的用户角色认证@EnableGlobalMethodSecurity(prePostEnabled = true)
@Configuration //配置类
@EnableWebSecurity //启用spring security安全框架功能
@EnableGlobalMethodSecurity(prePostEnabled = true)
//启用方法级别的认证 prePostEnabled boolean默认false,true表示可以使用 @PreAuthorize注解 和 @PostAuthorize注解
public class MyWebSecurityConfig extends WebSecurityConfigurerAdapter {

    @Override
    protected void configure(AuthenticationManagerBuilder auth) throws Exception {
        PasswordEncoder passwordEncoder = passwordEncoder();
        auth.inMemoryAuthentication().withUser("admin").password(passwordEncoder.encode("123456"))
                .roles("super", "normal");
        auth.inMemoryAuthentication().withUser("normal").password(passwordEncoder.encode("123456"))
                .roles("normal");
    }

    /**
     * spring security自带的加密算法PasswordEncoder,我们使用其中一种算法来对密码加密 BCryptPasswordEncoder方法采用SHA-256
     * +随机盐+密钥对密码进行加密,过程不可逆 不加密高版本会报错
     */
    @Bean
    public PasswordEncoder passwordEncoder() {
        return new BCryptPasswordEncoder();
    }
}
此刻我们在内存中创建了两个用户,一个normal用户,只有normal权限,一个admin用户,拥有super权限和normal权限.
我们创建三个访问路径,分别对应super,normal和 super,normal都可以访问
    @RequestMapping("/super")
    @PreAuthorize(value = "hasRole('super')")
    public String saySuper() {
        System.out.println("Hello,super!");
        return "Hello,super";
    }

    @RequestMapping("/normal")
    @PreAuthorize(value = "hasRole('normal')")
    public String sayNormal() {
        System.out.println("Hello,normal!");
        return "hello,normal";
    }

    @RequestMapping("/all")
    @PreAuthorize(value = "hasAnyRole('normal','super')")
    public String sayAll() {
        System.out.println("Hello,super,normal!");
        return "Hello,super,normal";
    }
我们会发现,normal用户可以访问2,3 admin可以访问 1,2,3,由此可以看出,此刻权限控制是OK的
这样简单地基于内存的用户权限认证就完成了,但是内存中的用户信息是不稳定不可靠的,我们需要从数据库读取,那么spring security又是如何帮我们去完成的呢?
spring security基于数据库用户信息的安全访问控制
当我们把用户信息加入到数据库,需要实现框架提供的UserDetailsService接口,去通过调用数据库去获取我们需要的用户和角色信息
@Configuration //配置类
@EnableWebSecurity //启用spring security安全框架功能
@EnableGlobalMethodSecurity(prePostEnabled = true)
//启用方法级别的认证 prePostEnabled boolean默认false,true表示可以使用 @PreAuthorize注解 和 @PostAuthorize注解
public class MyWebSecurityConfig extends WebSecurityConfigurerAdapter {
    @Autowired
    private MyUserDetailService userDetailService;
    @Override
    protected void configure(AuthenticationManagerBuilder auth) throws Exception {
        PasswordEncoder passwordEncoder = passwordEncoder();
        //        auth.inMemoryAuthentication().withUser("admin").password(passwordEncoder.encode("123456"))
        //                .roles("super", "normal");
        auth.userDetailsService(userDetailService).passwordEncoder(new BCryptPasswordEncoder());
    }
    /**
     * spring security自带的加密算法PasswordEncoder,我们使用其中一种算法来对密码加密 BCryptPasswordEncoder方法采用SHA-256
     * +随机盐+密钥对密码进行加密,过程不可逆 不加密高版本会报错
     */
    @Bean
    public PasswordEncoder passwordEncoder() {
        return new BCryptPasswordEncoder();
    }
}
自定义实现的接口,去通过数据库查询用户信息,此处需要注意两个地方,
1:我们数据库的密码是通过new BCryptPasswordEncoder().encode("123456")生成的,明文密码是不可以的,因为我们已经指定了密码加密规则BCryptPasswordEncoder,
2:我们若有多个角色怎么办?循环遍历放入list中,注意:角色必须以ROLE_开头
@Component
public class MyUserDetailService implements UserDetailsService {

    @Resource
    private UserMapper userMapper;

    @Override
    public UserDetails loadUserByUsername(String userName) throws UsernameNotFoundException {
        org.springframework.security.core.userdetails.User user = null;
        User userInfo = null;
        if (!StringUtils.isEmpty(userName)) {
            userInfo = userMapper.getUserInfoByName(userName);
            if (userInfo != null) {
                List<GrantedAuthority> list = new ArrayList<>();
                String role = userInfo.getRole();
                GrantedAuthority authority = new SimpleGrantedAuthority(
                        "ROLE_" + userInfo.getRole());
                list.add(authority);
                //创建User对象返回
                user = new org.springframework.security.core.userdetails.User(userInfo.getName(),
                        userInfo.getPassword(), list);
            }
        }
        return user;
    }
}
这里的接口给予了用户极大的扩展空间,我们最终创建User对象返回,User对象有两个构造方法,根据需要选取,参数含义参考源码对照就行

这样我们就通过查询数据库获取用户的登录用户名和密码以及角色信息是否匹配和具有访问权限.
基于角色的权限
认证和授权:
认证(authentication):认证访问者是谁?是否是当前系统的有限用户
授权(authorization):当前用户可以做什么?
我们就以RBAC(Role-Based Access controll),这样我们就需要设计出最少五张表去完成权限控制
user 表(存储用户信息)
user_role(用户角色信息关系表)
role表(角色信息)
role_permission(角色权限信息关系表)
permission(授权信息,可以存储访问url路径等)
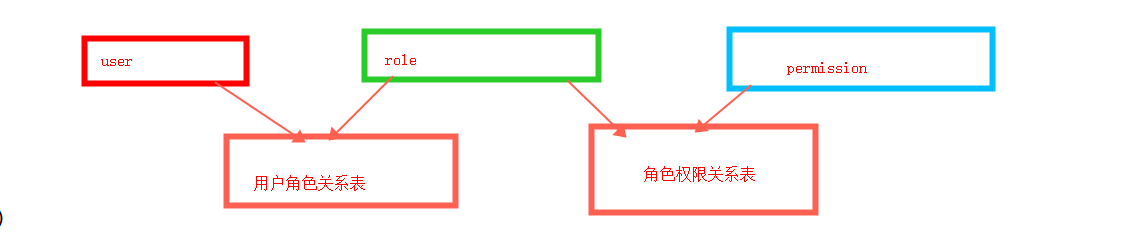
这样的权限设计模型,权限授予角色,角色授予用户,管理起来清晰明了
接下来我们需要再次重写MyWebSecurityConfig中的两个configure方法
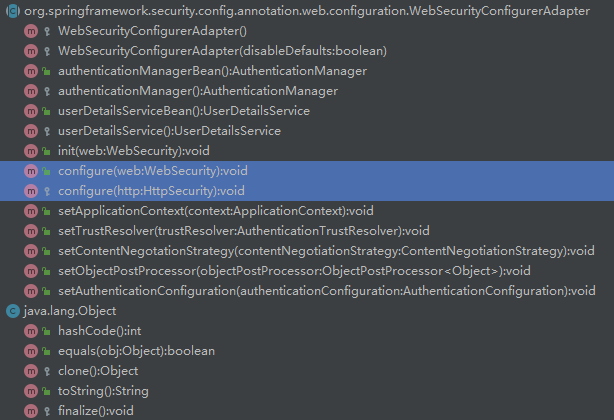
我们如果想忽略控制某些资源,不加访问拦截,我们就可以在WebSecurity方法配置忽略请求的url,一般会设置登录路径,获取图形验证码路径,静态资源等
 @Override
    public void configure(WebSecurity web) throws Exception {
        //设置忽略拦截的路径匹配,这些请求无需拦截,直接放行
        web.ignoring().antMatchers("/index.html", "/static/**", "/login_p", "/getPicture");
    }
接下来我们就重点讲一下重新的下一个方法HttpSecurity,这个方法里面配置了我们对于权限的处理
 @Override
    protected void configure(HttpSecurity http) throws Exception {
        http.authorizeRequests() //authorizeRequests() 允许基于使用HttpServletRequest限制访问
                .withObjectPostProcessor(postProcessor())  //请求都会经过此方法配置的过滤器*****重点******,出了WebSecurity配置的忽略请求
                .and()  //返回HttpSecurity对象-----------------------------------
                .formLogin()  //指定基于表单的身份验证没指定,则将生成默认登录页面
                .loginPage("/login_p") //指定跳转登录页
                .loginProcessingUrl("/login") //登录路径
                .usernameParameter("username") //用户名参数名
                .passwordParameter("password")//密码参数名
                .failureHandler(customAuthenticationFailureHandler()) //自定义失败处理
                .successHandler(customAuthenticationSuccessHandler()) //自定义成功处理
                .permitAll().and() //返回HttpSecurity对象----------------------------------------
                .logout()//
                .logoutUrl("/logout").logoutSuccessHandler(customLogoutSuccessHandler())
                .permitAll()//
                .and()  //返回HttpSecurity对象----------------------------------------
                .csrf().disable() //默认会开启CSRF处理,判断请求是否携带了token,如果没有就拒绝访问  我们此处设置禁用
                .exceptionHandling()//
                .authenticationEntryPoint(customAuthenticationEntryPoint()) //认证入口
                .accessDeniedHandler(customAccessDeniedHandler()); //访问拒绝处理
    }
 public ObjectPostProcessor<FilterSecurityInterceptor> postProcessor() {
        ObjectPostProcessor<FilterSecurityInterceptor> obj = new ObjectPostProcessor<FilterSecurityInterceptor>() { //此方法
            @Override
            public <O extends FilterSecurityInterceptor> O postProcess(O object) {
                object.setSecurityMetadataSource(metadataSource); //通过请求地址获取改地址需要的用户角色
                object.setAccessDecisionManager(
                        accessDecisionManager); //判断是否登录,是否当前用户是否具有访问当前url的角色
                return object;
            }
        };
        return obj;
    }
在这里我们需要实现两个接口FilterInvocationSecurityMetadataSource ,AccessDecisionManager
首先是FilterInvocationSecurityMetadataSource,我们在这个接口实现类里面getAttributes()方法主要做的就是获取请求路径url,然后去数据库查询哪些角色具有此路径的访问权限,然后把角色信息返回List<ConfigAttribute>,很巧,SecurityConfig已经提供了一个方法createList,我们直接调用此方法返回就可以
@Component
public class CustomMetadataSource implements FilterInvocationSecurityMetadataSource {

    @Override
    public Collection<ConfigAttribute> getAttributes(Object o) throws IllegalArgumentException {
    String requestUrl = ((FilterInvocation)o).getRequestUrl();
        List<String> list = new ArrayList();
        if (list.size() > 0) {
    //伪代码 匹配到具有该url的角色放入集合
            String[] values = new String[list.size()];
            return SecurityConfig.createList(values);
        }
        //没有匹配上的资源,都是登录访问
        return SecurityConfig.createList("ROLE_LOGIN");
    }

    @Override
    public Collection<ConfigAttribute> getAllConfigAttributes() {
        return null;
    }

    @Override
    public boolean supports(Class<?> aClass) {
        return FilterInvocation.class.isAssignableFrom(aClass);
    }
}
下面我们需要通过用户所拥有的角色和url所需角色作比对,匹配可以访问,不匹配抛出异常AccessDeniedException,这里更巧的一点是
我们可以通过Authentication获取用户所拥有的的角色,我们在上面实现类放入的角色集合也通过参数形式再次传了进来,我们可以循环比对当前用户是否有足够权限
@Component
public class UrlAccessDecisionManager implements AccessDecisionManager {
    @Override
    public void decide(Authentication auth, Object o, Collection<ConfigAttribute> cas){
        Iterator<ConfigAttribute> iterator = cas.iterator();
        while (iterator.hasNext()) {
            ConfigAttribute ca = iterator.next();
            //当前请求需要的权限
            String needRole = ca.getAttribute();
            if ("ROLE_LOGIN".equals(needRole)) {
                if (auth instanceof AnonymousAuthenticationToken) {
                    throw new BadCredentialsException("未登录");
                } else
                    return;
            }
            //当前用户所具有的权限
            Collection<? extends GrantedAuthority> authorities = auth.getAuthorities();
            for (GrantedAuthority authority : authorities) {
                if (authority.getAuthority().equals(needRole)) {
                    return;
                }
            }
        }
        throw new AccessDeniedException("权限不足!");
    }
    @Override
    public boolean supports(ConfigAttribute configAttribute) {
        return true;
    }
    @Override
    public boolean supports(Class<?> aClass) {
        return true;
    }
}
当我们把这两个接口自定义实现了方法之后,后面每一步的自定义处理信息,我们都可以根据业务需要去处理,比如
自定义身份验证处理器: 根据异常去响应会不同信息或者跳转url,其他自定义处理器同理
下面给大家一个处理器demo,下面自定义处理器custom**的都可以参考做不同情况处理返回值等来完成处理,前后端分离可以响应数据,不分离的可以跳转页面
  public AuthenticationFailureHandler customAuthenticationFailureHandler() {
        AuthenticationFailureHandler failureHandler = new AuthenticationFailureHandler() {
            @Override
            public void onAuthenticationFailure(HttpServletRequest httpServletRequest,
                    HttpServletResponse resp, AuthenticationException e)
                    throws IOException, ServletException {
                resp.setContentType("application/json;charset=utf-8");
                RespBean respBean = null;
                if (e instanceof BadCredentialsException
                        || e instanceof UsernameNotFoundException) {
                    respBean = RespBean.error("账户名或者密码输入错误!");
                } else if (e instanceof LockedException) {
                    respBean = RespBean.error("账户被锁定,请联系管理员!");
                } else if (e instanceof CredentialsExpiredException) {
                    respBean = RespBean.error("密码过期,请联系管理员!");
                } else if (e instanceof AccountExpiredException) {
                    respBean = RespBean.error("账户过期,请联系管理员!");
                } else if (e instanceof DisabledException) {
                    respBean = RespBean.error("账户被禁用,请联系管理员!");
                } else {
                    respBean = RespBean.error("登录失败!");
                }
                resp.setStatus(401);
                ObjectMapper om = new ObjectMapper();
                PrintWriter out = resp.getWriter();
                out.write(om.writeValueAsString(respBean));
                out.flush();
                out.close();
            }
        };
        return failureHandler;
    }
当我们把表建立好,实现上面的不同接口处理器,完成上述配置,我们就可以实现安全访问控制,至于spring security更深层级的用法,欢迎大家一起探讨!有时间我会分享一下另一个主流的安全访问控制框架 Apache shiro.其实我们会发现,所有的安全框架都是基于RBAC模型来实现的,根据框架的接口去做自定义实现来完成权限控制.