Spring Security是一款基于Spring的安全框架,主要包含认证和授权两大安全模块,和另外一款流行的安全框架Apache Shiro相比,它拥有更为强大的功能。Spring Security也可以轻松的自定义扩展以满足各种需求,并且对常见的Web安全攻击提供了防护支持。如果你的Web框架选择的是Spring,那么在安全方面Spring Security会是一个不错的选择。
一、开启Spring Security
1、导入依赖
创建一个Spring Boot项目springboot-springsecurity,然后引入spring-boot-starter-security:
        <!--   Spring Security的maven依赖    -->
        <dependency>
            <groupId>org.springframework.boot</groupId>
            <artifactId>spring-boot-starter-security</artifactId>
        </dependency>
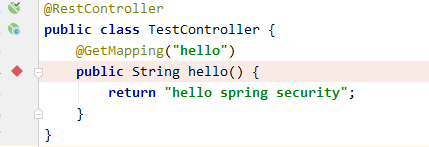
2、创建Controller
新建包com.goldwind.controller,接下来我们创建一个TestController,对外提供一个/hello服务:
package com.goldwind.controller;

import org.springframework.web.bind.annotation.GetMapping;
import org.springframework.web.bind.annotation.RestController;

/**
 * @Author: zy
 * @Description: 测试
 * @Date: 2020-2-9
 */
@RestController
public class TestController {
    @GetMapping("hello")
    public String hello() {
        return "hello spring security";
    }
}
3、新建App入口
新建入口程序App.java:
package com.goldwind;

import org.springframework.boot.SpringApplication;
import org.springframework.boot.autoconfigure.SpringBootApplication;

/**
 * @Author: zy
 * @Description: 启动程序
 * @Date: 2020-2-9
 */
@SpringBootApplication
public class App {
    public static void main(String[] args){
        SpringApplication.run(App.class,args);
    }
}
这时候我们直接启动项目,访问http://localhost:8080/hello,可看到页面弹出了个formLogin认证框:
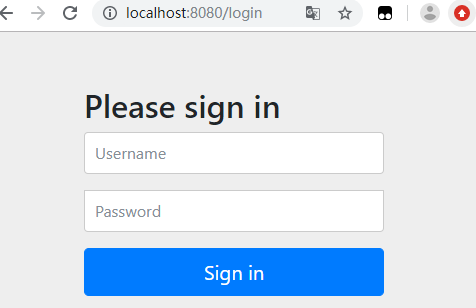
这个配置开启了一个form Login类型的认证,所有服务的访问都必须先过这个认证,默认的用户名为user,密码由Sping Security自动生成,回到IDE的控制台,可以找到密码信息:
Using generated security password: a77c9456-901e-4848-a221-3822347e52ea
输入用户名user,密码a77c9456-901e-4848-a221-3822347e52ea后,我们便可以成功访问/hello接口。
二、基于HTTP basic类型的认证
我们可以通过一些配置将表单认证修改为基于HTTP Basic的认证方式。
1、配置Spring Security
创建包com.goldwind.config,创建一个配置类BrowserSecurityConfig继承org.springframework.security.config.annotation.web.configuration.WebSecurityConfigurerAdapter这个抽象类并重写configure(HttpSecurity http)方法。WebSecurityConfigurerAdapter是由Spring Security提供的Web应用安全配置的适配器:
package com.goldwind.config;

import org.springframework.context.annotation.Configuration;
import org.springframework.security.config.annotation.web.builders.HttpSecurity;
import org.springframework.security.config.annotation.web.configuration.WebSecurityConfigurerAdapter;

/**
 * @Author: zy
 * @Description: spring security配置类
 * @Date: 2020-2-9
 */
@Configuration
public class BrowserSecurityConfig extends WebSecurityConfigurerAdapter {
    /**
     * 配置拦截请求资源
     * @param http:HTTP请求安全处理
     * @throws Exception
     */
    @Override
    protected void configure(HttpSecurity http) throws Exception {
        http.httpBasic()  //HTTP Basic认证方式
            .and()
            .authorizeRequests()  // 授权配置
            .anyRequest()  // 所有请求
            .authenticated(); // 都需要认证
    }
}
Spring Security提供了这种链式的方法调用。上面配置指定了认证方式为HTTP Basic登录,并且所有请求都需要进行认证。这时候我们重启项目,再次访问http://localhost:8080/hello,可以看到认证方式已经是HTTP Basic的方式了:
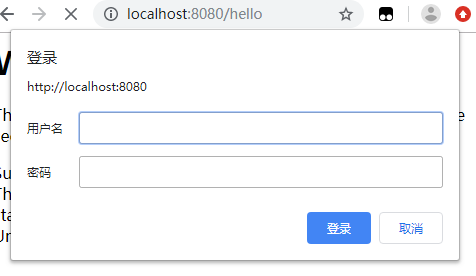
用户名依旧是user,密码由Spring Security自动生成,如果需要换回表单的认证方式,我们只需要简单修改configure方法中的配置:
@Override
protected void configure(HttpSecurity http) throws Exception {
    // http.formLogin() // 表单方式
    http.httpBasic() // HTTP Basic方式
            .and()
            .authorizeRequests() // 授权配置
            .anyRequest()  // 所有请求
            .authenticated(); // 都需要认证
}
三、Spring Security基本原理
1、基本原理
上面我们开启了一个最简单的Spring Security安全配置,下面我们来了解下Spring Security的基本原理。通过上面的的配置,代码的执行过程可以简化为下图表示:
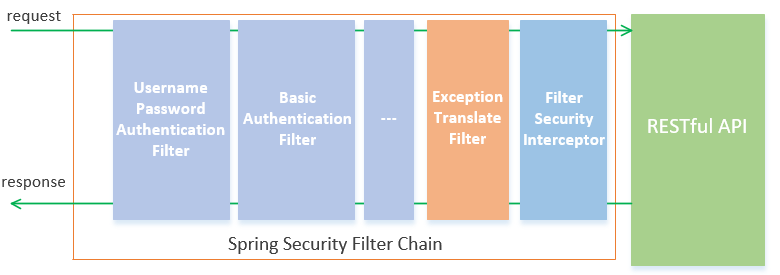
如上图所示,Spring Security包含了众多的过滤器,这些过滤器形成了一条链,所有请求都必须通过这些过滤器后才能成功访问到资源:
UsernamePasswordAuthenticationFilter过滤器用于处理基于表单方式的登录认证;BasicAuthenticationFilter用于处理基于HTTP Basic方式的登录验证;FilterSecurityInterceptor的拦截器,用于判断当前请求身份认证是否成功,是否有相应的权限,当身份认证失败或者权限不足的时候便会抛出相应的异常;ExceptionTranslateFilter捕获并处理,所以我们在ExceptionTranslateFilter过滤器用于处理了FilterSecurityInterceptor抛出的异常并进行处理,比如需要身份认证时将请求重定向到相应的认证页面,当认证失败或者权限不足时返回相应的提示信息;
2、断点调试
首先下载Spring Security源码,在调试代码时导入。下面我们通过debug来验证这个过程(登录方式改回表单的方式)。
我们在/hello服务上打个断点:
在FilterSecurityInterceptor的invoke方法的super.beforeInvocation上打个断点:
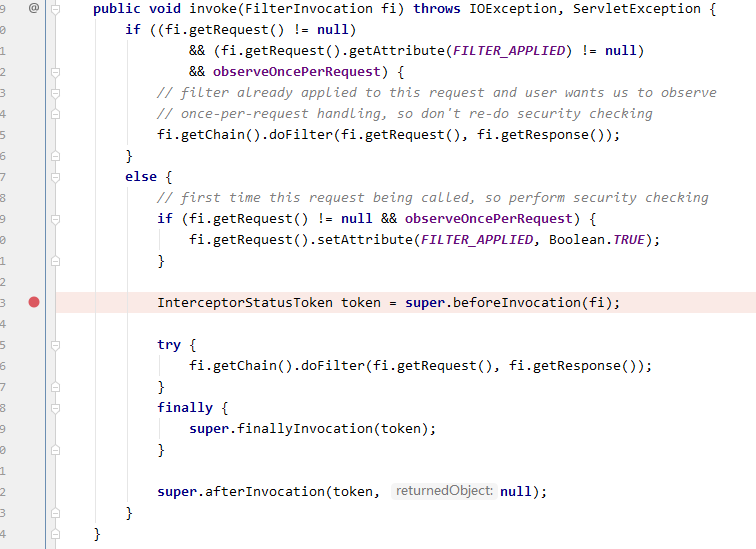
当这行代码执行通过后,便可以调用下一行的doFilter方法来真正调用/hello服务,否则将抛出相应的异常。
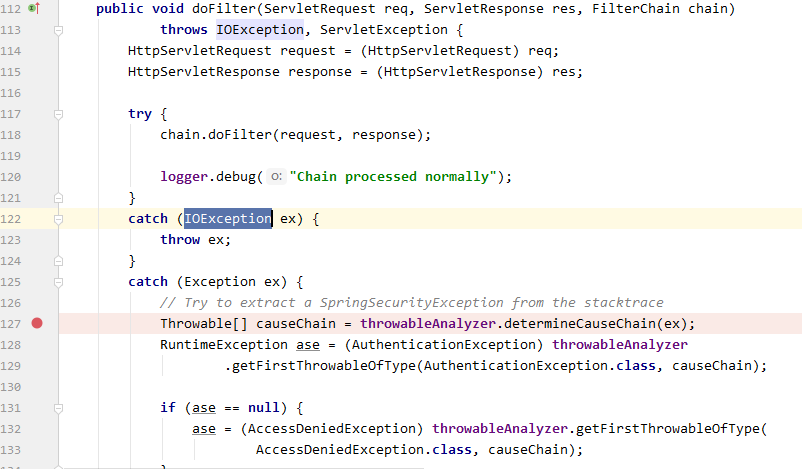
当FilterSecurityInterceptor抛出异常时,异常将由ExceptionTranslateFilter捕获并处理,所以我们在ExceptionTranslateFilter的doFilter方法catch代码块第一行打个断点:
我们待会模拟的是用户未登录直接访问/hello,所以应该是抛出用户未认证的异常,所以接下来应该跳转到UsernamePasswordAuthenticationFilter处理表单方式的用户认证。在UsernamePasswordAuthenticationFilter的attemptAuthentication方法上打个断点:

准备完毕后,我们启动项目,然后访问http://localhost:8080/hello:
- 代码直接跳转到
FilterSecurityInteceptor的断点上; - 往下执行,因为当前请求没有经过身份认证,所以将抛出异常并被
ExceptionTranslateFilter捕获; - 捕获异常后重定向到登录表单登录页面,当我们在表单登录页面输入信息点login后,代码跳转到
UsernamePasswordAuthenticationFilter过滤器的attemptAuthentication方法上; - 当认证通过时,
FilterSecurityInterceptor代码往下执行doFilter,然后代码最终跳转到/hello上: - 浏览器页面将显示
hello spring security信息;
参考文章:
[1] Spring Boot中开启Spring Security(转载)