前两天没什么事重新搭建了一下ssm,报错报了好几个小时也是醉了,还好最终钻出死胡同出来了,一个小地方弄错了,所以现在看来最简单的原理一定要理解的最透,不然死都不知道怎么死的,然后配置了一下ehcache,又因为一个错误查了好久,前两天我一定是没吃饱饭。。。
对于ssm框架一定要理解其原理,spring,springmvc,mybatis分别的作用以及集体的运行原理,一半天也要总结一下,先来搭一下

先配置web.xml

<?xml version="1.0" encoding="UTF-8"?>
<web-app xmlns:xsi="http://www.w3.org/2001/XMLSchema-instance" xmlns="http://xmlns.jcp.org/xml/ns/javaee" xsi:schemaLocation="http://xmlns.jcp.org/xml/ns/javaee http://xmlns.jcp.org/xml/ns/javaee/web-app_3_1.xsd" id="WebApp_ID" version="3.1">
  <display-name>ssm基本数据库查询</display-name>
  <welcome-file-list>
    <welcome-file>index.html</welcome-file>
    <welcome-file>index.htm</welcome-file>
    <welcome-file>index.jsp</welcome-file>
    <welcome-file>default.html</welcome-file>
    <welcome-file>default.htm</welcome-file>
    <welcome-file>default.jsp</welcome-file>
  </welcome-file-list>
  <servlet>
    <servlet-name>springMVC</servlet-name>
    <servlet-class>org.springframework.web.servlet.DispatcherServlet</servlet-class>
    <init-param>
      <param-name>contextConfigLocation</param-name>
      <param-value>classpath:*-servlet.xml</param-value>
    </init-param>
  </servlet>
  <servlet-mapping>
    <servlet-name>springMVC</servlet-name>
    <url-pattern>*.do</url-pattern>
  </servlet-mapping>
<!-- 监听器 -->
  <listener>
    <listener-class>org.springframework.web.context.ContextLoaderListener</listener-class>
  </listener>
  <context-param>
    <param-name>contextConfigLocation</param-name>
    <param-value>classpath:applicationContext.xml</param-value>
  </context-param>
</web-app>
用户向服务器发送请求,请求被Spring前端控制器ServletDispatcherServlet捕获,对其进行解析,得到请求资源标识符(URI),然后调用映射处理器HandlerMapping获得所有相关的对象,包括拦截器等<param-value>classpath:*-servlet.xml</param-value>,最后以HandlerExecutionChain对象的形式返回
DispatcherServlet根据获得的Handler,选择一个合适的处理器适配器HandlerAdapter。执行相应的Controller,执行完向DispatcherServlet返回一个ModelAndView对象;根据返回的ModelAndView,选择一个适合的视图解析器 ViewResolver,ViewResolver结合Model和View,来渲染视图将渲染结果返回给客户端
这是springMVC-servlet.xml
<?xml version="1.0" encoding="UTF-8"?>
<beans xmlns="http://www.springframework.org/schema/beans"
        xmlns:xsi="http://www.w3.org/2001/XMLSchema-instance" xmlns:mvc="http://www.springframework.org/schema/mvc"
        xmlns:context="http://www.springframework.org/schema/context"
        xsi:schemaLocation="http://www.springframework.org/schema/beans
                                                http://www.springframework.org/schema/beans/spring-beans-3.2.xsd
                                                http://www.springframework.org/schema/mvc
                                                http://www.springframework.org/schema/mvc/spring-mvc-3.2.xsd
                                                http://www.springframework.org/schema/context
                                                http://www.springframework.org/schema/context/spring-context-3.2.xsd
                                                ">
        <!--注解扫描-->
        <context:component-scan base-package="com.game" />

        <!-- 视图解析器 -->
        <bean id="jspViewResolver"
                class="org.springframework.web.servlet.view.InternalResourceViewResolver">
                <property name="prefix" value="/jsp/" />
                <property name="suffix" value=".jsp" />
        </bean>
</beans>
package com.game.mj.controller;

import org.springframework.beans.factory.annotation.Autowired;
import org.springframework.stereotype.Controller;
import org.springframework.web.bind.annotation.RequestMapping;

import com.game.mj.service.AdminService;

@Controller
@RequestMapping("/admin")
public class AdminController {

        @RequestMapping("/login.do")
        public String login(){

                return "index";
        }
}
请求入口login.jsp,跳到index.jsp
<a href="../admin/login.do">login</a>
下面整合spring和mybatis,web.xml请求到classpath:applicationContext.xml ,见下面
<?xml version="1.0" encoding="UTF-8"?>
<beans xmlns="http://www.springframework.org/schema/beans"
        xmlns:tx="http://www.springframework.org/schema/tx" xmlns:xsi="http://www.w3.org/2001/XMLSchema-instance"
        xmlns:context="http://www.springframework.org/schema/context"
        xmlns:aop="http://www.springframework.org/schema/aop" xmlns:p="http://www.springframework.org/schema/p"
        xsi:schemaLocation="http://www.springframework.org/schema/beans
       http://www.springframework.org/schema/beans/spring-beans-3.2.xsd
       http://www.springframework.org/schema/tx
       http://www.springframework.org/schema/tx/spring-tx-3.2.xsd
       http://www.springframework.org/schema/context
       http://www.springframework.org/schema/context/spring-context-3.2.xsd
       http://www.springframework.org/schema/aop
       http://www.springframework.org/schema/aop/spring-aop-3.2.xsd">


        <!-- 数据源 -->
        <bean id="dataSource" class="org.apache.commons.dbcp.BasicDataSource">
                <property name="driverClassName" value="com.microsoft.sqlserver.jdbc.SQLServerDriver" />
                <property name="url" value="jdbc:sqlserver://127.0.0.1:1433;DatabaseName=" />
                <property name="username" value="" />
                <property name="password" value="" />
                <!-- 初始化连接大小 -->
                <property name="initialSize" value="0"></property>
                <!-- 连接池最大数量 -->
                <property name="maxActive" value="20"></property>
                <!-- 连接池最大空闲 -->
                <property name="maxIdle" value="20"></property>
                <!-- 连接池最小空闲 -->
                <property name="minIdle" value="1"></property>
                <!-- 获取连接最大等待时间 -->
                <property name="maxWait" value="60000"></property>
        </bean>

        <!-- sessionFactory 将spring和mybatis整合 -->
        <bean id="sqlSessionFactory" class="org.mybatis.spring.SqlSessionFactoryBean">
                <property name="dataSource" ref="dataSource" />
                <property name="configLocation" value="classpath:mybatis-config.xml" />
                <property name="mapperLocations" value="classpath:mapper/*.xml" />    <!-- 加载mapper文件 -->
        </bean>

        <!-- dao mapping接口扫描 -->
        <bean class="org.mybatis.spring.mapper.MapperScannerConfigurer">
                <property name="basePackage" value="com.game.*.dao" />
                <property name="sqlSessionFactoryBeanName" value="sqlSessionFactory" />
        </bean>
        <!-- 事务 -->
        <bean id="txManager"
                class="org.springframework.jdbc.datasource.DataSourceTransactionManager">
                <property name="dataSource" ref="dataSource" />
        </bean>
        <tx:advice id="txAdvice" transaction-manager="txManager">
                <tx:attributes>
                        <tx:method name="insert*" propagation="REQUIRED" />
                        <tx:method name="update*" propagation="REQUIRED" />
                        <tx:method name="delete*" propagation="REQUIRED" />
                        <tx:method name="create*" propagation="REQUIRED" />
                        <tx:method name="find*" propagation="REQUIRED" read-only="true" />
                        <tx:method name="get*" propagation="REQUIRED" read-only="true" />
                </tx:attributes>
        </tx:advice>
        <aop:config>
                <aop:pointcut expression="execution(* com.game.*.service.*.*(..))"
                        id="pointCut" />
                <aop:advisor advice-ref="txAdvice" pointcut-ref="pointCut" />
        </aop:config>
</beans>
通过sqlsessionfactory链接数据库,扫描接口,加载mybatis-config.xml和mapper/*.xml,
这是mybatis-config.xml
<?xml version="1.0" encoding="UTF-8"?>
<!DOCTYPE configuration
  PUBLIC "-//mybatis.org//DTD Config 3.0//EN"
  "http://mybatis.org/dtd/mybatis-3-config.dtd">
<configuration>
<!-- mybatis配置 cacheEnabled若不配置ehcache则为false,这里为true-->
        <settings>
                <setting name="cacheEnabled" value="true" />
                <setting name="lazyLoadingEnabled" value="false" />
                <setting name="multipleResultSetsEnabled" value="true" />
                <setting name="useColumnLabel" value="true" />
                <setting name="useGeneratedKeys" value="true" />
                <setting name="defaultExecutorType" value="SIMPLE" />
        </settings>
        <!-- 配置别名 可用别名代替配置文件中parameterType resultType -->
        <typeAliases>
                <typeAlias type="com.game.mj.vo.Users" alias="Users"/>
        </typeAliases>

</configuration>
下面给出SpringMVC请求数据库,
public interface AdminService {
        String messageSelect(int userID);
}
@Service
public class AdminServiceImp implements AdminService{
        @Autowired private AdminMapper adminDao;

        @Override

        public String messageSelect(int userID) {
                System.out.println("service");
                return adminDao.messageSelect(userID);
        }

}
@SuppressWarnings("serial")
public class Users implements Serializable {
private String username;
private int userID;
public String getUsername() {
return username;
}
public void setUsername(String username) {
this.username = username;
}
public int getUserID() {
return userID;
}
public void setUserID(int userID) {
this.userID = userID;
}
}
mapper
<?xml version="1.0" encoding="UTF-8"?>
<!DOCTYPE mapper PUBLIC "-//mybatis.org//DTD Mapper 3.0//EN" "http://mybatis.org/dtd/mybatis-3-mapper.dtd" >
<mapper namespace="com.game.mj.dao.AdminMapper">

        <select id="messageSelect" resultType="java.lang.String" parameterType="java.lang.Integer">
                select Username from Base_Users where UserID=#{userID};
        </select>
</mapper>
上面呢,是纯正的ssm连接数据库,话说楼上装修吵的我脑袋疼。。。下面再说配置ehcache
首先配置ehcache.xml
<?xml version="1.0" encoding="UTF-8"?>
<ehcache xmlns:xsi="http://www.w3.org/2001/XMLSchema-instance"
        xsi:noNamespaceSchemaLocation="ehcache.xsd">
        <diskStore path="D:/cache" />
        <defaultCache maxElementsInMemory="10000"
                maxElementsOnDisk="1000" eternal="false" overflowToDisk="true"
                timeToIdleSeconds="300" timeToLiveSeconds="600" maxEntriesLocalHeap="10000"
                maxEntriesLocalDisk="10000000" />

        <!-- <cache name="tplCache" maxElementsInMemory="100" eternal="true"
                overflowToDisk="false" diskSpoolBufferSizeMB="30" maxElementsOnDisk="10000000"
                diskPersistent="false" diskExpiryThreadIntervalSeconds="120"
                memoryStoreEvictionPolicy="LRU" statistics="false" />
        <cache name="dataConfigCache" maxElementsInMemory="10000"
                timeToIdleSeconds="300" eternal="false" overflowToDisk="false"
                diskSpoolBufferSizeMB="30" maxElementsOnDisk="10000000"
                diskPersistent="false" diskExpiryThreadIntervalSeconds="120"
                memoryStoreEvictionPolicy="LRU" statistics="false" />
        缓存3小时
        <cache name="threeHourCache" maxElementsInMemory="100"
                timeToLiveSeconds="10800" eternal="false" overflowToDisk="false"
                diskSpoolBufferSizeMB="30" maxElementsOnDisk="10000000"
                diskPersistent="false" diskExpiryThreadIntervalSeconds="120"
                memoryStoreEvictionPolicy="LRU" statistics="false" clearOnFlush="true" />
        缓存1小时
        <cache name="oneHourCache" maxElementsInMemory="100"
                timeToLiveSeconds="3600" eternal="false" overflowToDisk="false"
                diskSpoolBufferSizeMB="30" maxElementsOnDisk="10000000"
                diskPersistent="false" diskExpiryThreadIntervalSeconds="120"
                memoryStoreEvictionPolicy="LRU" statistics="false" clearOnFlush="true" />
        缓存5分钟 -->
        <cache name="fiveMinsCache" maxElementsInMemory="10000"
                timeToLiveSeconds="300" eternal="false" overflowToDisk="false"
                diskSpoolBufferSizeMB="30" maxElementsOnDisk="10000000"
                diskPersistent="false" diskExpiryThreadIntervalSeconds="120"
                memoryStoreEvictionPolicy="LRU" statistics="false" clearOnFlush="true" />

        <!--
    <diskStore>==========当内存缓存中对象数量超过maxElementsInMemory时,将缓存对象写到磁盘缓存中(需对象实现序列化接口)

    <diskStore path="">==用来配置磁盘缓存使用的物理路径,Ehcache磁盘缓存使用的文件后缀名是*.data和*.index name=================缓存名称,cache的唯一标识(ehcache会把这个cache放到HashMap里)

    maxElementsOnDisk====磁盘缓存中最多可以存放的元素数量,0表示无穷大 maxElementsInMemory==内存缓存中最多可以存放的元素数量,若放入Cache中的元素超过这个数值,则有以下两种情况 :
        1)若overflowToDisk=true,则会将Cache中多出的元素放入磁盘文件中
        2)若overflowToDisk=false,则根据memoryStoreEvictionPolicy策略替换Cache中原有的元素

    eternal==============缓存中对象是否永久有效,即是否永驻内存,true时将忽略timeToIdleSeconds和timeToLiveSeconds

    timeToIdleSeconds====缓存数据在失效前的允许闲置时间(单位:秒),仅当eternal=false时使用,默认值是0表示可闲置时间无穷大,此为可选属性
        即访问这个cache中元素的最大间隔时间,若超过这个时间没有访问此Cache中的某个元素,那么此元素将被从Cache中清除

    timeToLiveSeconds====缓存数据在失效前的允许存活时间(单位:秒),仅当eternal=false时使用,默认值是0表示可存活时间无穷大
        即Cache中的某元素从创建到清楚的生存时间,也就是说从创建开始计时,当超过这个时间时,此元素将从Cache中清除

    overflowToDisk=======内存不足时,是否启用磁盘缓存(即内存中对象数量达到maxElementsInMemory时,Ehcache会将对象写到磁盘中)
        会根据标签中path值查找对应的属性值,写入磁盘的文件会放在path文件夹下,文件的名称是cache的名称,后缀名是data

    diskPersistent=======是否持久化磁盘缓存,当这个属性的值为true时,系统在初始化时会在磁盘中查找文件名为cache名称,后缀名为index的文件
                     这个文件中存放了已经持久化在磁盘中的cache的index,找到后会把cache加载到内存
                     要想把cache真正持久化到磁盘,写程序时注意执行net.sf.ehcache.Cache.put(Element element)后要调用flush()方法

    diskExpiryThreadIntervalSeconds==磁盘缓存的清理线程运行间隔,默认是120秒

    diskSpoolBufferSizeMB============设置DiskStore(磁盘缓存)的缓存区大小,默认是30MB

    memoryStoreEvictionPolicy========内存存储与释放策略,即达到maxElementsInMemory限制时,Ehcache会根据指定策略清理内存
                     共有三种策略,分别为LRU(最近最少使用)、LFU(最常用的)、FIFO(先进先出)
-->
</ehcache>
这是applicationContext-ehcache.xml
<?xml version="1.0" encoding="UTF-8"?>
<beans xmlns="http://www.springframework.org/schema/beans"
    xmlns:xsi="http://www.w3.org/2001/XMLSchema-instance"
    xmlns:cache="http://www.springframework.org/schema/cache"
    xmlns:context="http://www.springframework.org/schema/context"
    xmlns:aop="http://www.springframework.org/schema/aop"
    xsi:schemaLocation="
           http://www.springframework.org/schema/beans
           http://www.springframework.org/schema/beans/spring-beans-3.0.xsd
           http://www.springframework.org/schema/aop
           http://www.springframework.org/schema/aop/spring-aop-3.0.xsd
           http://www.springframework.org/schema/context
           http://www.springframework.org/schema/context/spring-context-3.0.xsd
           http://www.springframework.org/schema/cache
           http://www.springframework.org/schema/cache/spring-cache-3.1.xsd">

<bean id="ehCacheManager" class="org.springframework.cache.ehcache.EhCacheManagerFactoryBean">
    <property name="configLocation" value="classpath:ehcache.xml" />
    <property name="shared" value="true"/>
</bean>

<!-- 开启spring缓存 -->
    <cache:annotation-driven cache-manager="cacheManager" />
    <bean id="cacheManager" class="org.springframework.cache.ehcache.EhCacheCacheManager">
        <property name="cacheManager" ref="ehCacheManager"></property>
    </bean>
</beans>
**mybatis-config.xml中的配置<setting name="cacheEnabled" value="true" />
**然后把applicationContext-ehcache.xml注入到springMVC中<import resource="classpath:applicationContext-ehcache.xml"/>
**然后再AdminMapper.xml中加入<cache type="org.mybatis.caches.ehcache.LoggingEhcache" /> 可以输入日志,
或者<cache type="org.mybatis.caches.ehcache.EhcacheCache" />都可以
**最后注解一下,在AdminServiceImp中方法上面加入@Cacheable(value = { "fiveMinsCache" }),value中的值是ehcache.xml中的name名
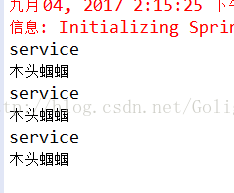
这样就配置完了,我已经在AdminServiceImp中加入log看运行结果如下:

第一次运行时service和木头蝈蝈,第二次从注解中知道有缓存直接取出没有执行service说明成功了
此外还有@CacheEvict和@CachePut
@CacheEvict注解定义了相关方法负责从给定的缓存存储器中移除某些缓存值。虽然大多数的缓存框架都提供了缓存数据的有效时间,但是使用这个注解可以立即显式地从缓存存储器中删除过时的数据。这个注解通常用于在执行删除操作时使用
通俗来讲,@CachePut有两个功能:
如果缓存存储器中已经有某个key的缓存了,那么在执行完标注了@CachePut注解的方法后,将会更新缓存存储器中这个key的缓存
如果缓存存储器中没有某个key的缓存,那么在执行完标注了@CachePut注解的方法后,将会在缓存存储器中使用这个方法的返回值来添加上这个key的缓存
在配置期间我有一个疑问:就是本来传过去的是userID,java.lang.Integer,这样是好使的,但是如果我用实体类Users传userID,那么二级缓存本地显示的sql语句的userID是?,这样是无法从缓存中正确读取的你看下面,有哪位朋友知道这是哪的问题留言告知谢谢了
这是我的demo下载地址:ssm-ehcache-demo