第3章 HDFS客户端操作(开发重点)
3.1 HDFS客户端环境准备
- 根据自己电脑的操作系统拷贝对应的编译后的hadoop jar包到非中文路径(例如:D:\Develop\hadoop-2.7.2),如图3-4所示。

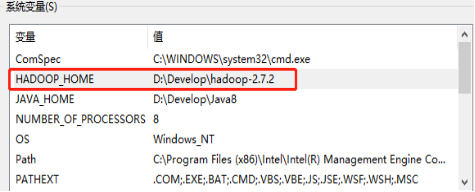
- 配置HADOOP_HOME环境变量,如图3-5所示。
- 配置Path环境变量,如图3-6所示。

- 创建一个Maven工程HdfsClientDemo
<dependencies>
		<dependency>
			<groupId>junit</groupId>
			<artifactId>junit</artifactId>
			<version>RELEASE</version>
		</dependency>
		<dependency>
			<groupId>org.apache.logging.log4j</groupId>
			<artifactId>log4j-core</artifactId>
			<version>2.8.2</version>
		</dependency>
		<dependency>
			<groupId>org.apache.hadoop</groupId>
			<artifactId>hadoop-common</artifactId>
			<version>2.7.2</version>
		</dependency>
		<dependency>
			<groupId>org.apache.hadoop</groupId>
			<artifactId>hadoop-client</artifactId>
			<version>2.7.2</version>
		</dependency>
		<dependency>
			<groupId>org.apache.hadoop</groupId>
			<artifactId>hadoop-hdfs</artifactId>
			<version>2.7.2</version>
		</dependency>
		<dependency>
			<groupId>jdk.tools</groupId>
			<artifactId>jdk.tools</artifactId>
			<version>1.8</version>
			<scope>system</scope>
			<systemPath>${JAVA_HOME}/lib/tools.jar</systemPath>
		</dependency>
</dependencies>
- 导入相应的依赖坐标+日志添加
注意:如果Eclipse/Idea打印不出日志,在控制台上只显示
1.log4j:WARN No appenders could be found for logger (org.apache.hadoop.util.Shell).
2.log4j:WARN Please initialize the log4j system properly.
3.log4j:WARN See http://logging.apache.org/log4j/1.2/faq.html#noconfig for more info.
需要在项目的src/main/resources目录下,新建一个文件,命名为“log4j.properties”,在文件中填入
log4j.rootLogger=INFO, stdout
log4j.appender.stdout=org.apache.log4j.ConsoleAppender
log4j.appender.stdout.layout=org.apache.log4j.PatternLayout
log4j.appender.stdout.layout.ConversionPattern=%d %p [%c] - %m%n
log4j.appender.logfile=org.apache.log4j.FileAppender
log4j.appender.logfile.File=target/spring.log
log4j.appender.logfile.layout=org.apache.log4j.PatternLayout
log4j.appender.logfile.layout.ConversionPattern=%d %p [%c] - %m%n
- 创建包名:com.atguigu.hdfs
- 创建HdfsClient类
public class HdfsClient{
@Test
public void testMkdirs() throws IOException, InterruptedException, URISyntaxException{

		// 1 获取文件系统
		Configuration configuration = new Configuration();
		// 配置在集群上运行
		// configuration.set("fs.defaultFS", "hdfs://hadoop102:9000");
		// FileSystem fs = FileSystem.get(configuration);

		FileSystem fs = FileSystem.get(new URI("hdfs://hadoop102:9000"), configuration, "atguigu");

		// 2 创建目录
		fs.mkdirs(new Path("/1108/daxian/banzhang"));

		// 3 关闭资源
		fs.close();
	}
}
- 执行程序
运行时需要配置用户名称,如图3-7所示

客户端去操作HDFS时,是有一个用户身份的。默认情况下,HDFS客户端API会从JVM中获取一个参数来作为自己的用户身份:-DHADOOP_USER_NAME=atguigu,atguigu为用户名称。
3.2 HDFS的API操作
3.2.1 HDFS文件上传(测试参数优先级)
- 编写源代码
@Test
public void testCopyFromLocalFile() throws IOException, InterruptedException, URISyntaxException {

		// 1 获取文件系统
		Configuration configuration = new Configuration();
		configuration.set("dfs.replication", "2");
		FileSystem fs = FileSystem.get(new URI("hdfs://hadoop102:9000"), configuration, "atguigu");

		// 2 上传文件
		fs.copyFromLocalFile(new Path("e:/banzhang.txt"), new Path("/banzhang.txt"));

		// 3 关闭资源
		fs.close();

		System.out.println("over");
}
- 将hdfs-site.xml拷贝到项目的根目录下
<?xml version="1.0" encoding="UTF-8"?>
<?xml-stylesheet type="text/xsl" href="configuration.xsl"?>

<configuration>
	<property>
		<name>dfs.replication</name>
        <value>1</value>
	</property>
</configuration>
- 参数优先级
参数优先级排序:
(1)客户端代码中设置的值 >(2)ClassPath下的用户自定义配置文件 >(3)然后是服务器的默认配置
3.2.2 HDFS文件下载
@Test
public void testCopyToLocalFile() throws IOException, InterruptedException, URISyntaxException{

		// 1 获取文件系统
		Configuration configuration = new Configuration();
		FileSystem fs = FileSystem.get(new URI("hdfs://hadoop102:9000"), configuration, "atguigu");

		// 2 执行下载操作
		// boolean delSrc 指是否将原文件删除
		// Path src 指要下载的文件路径
		// Path dst 指将文件下载到的路径
		// boolean useRawLocalFileSystem 是否开启文件校验
		fs.copyToLocalFile(false, new Path("/banzhang.txt"), new Path("e:/banhua.txt"), true);

		// 3 关闭资源
		fs.close();
}
3.2.3 HDFS文件夹删除
@Test
public void testDelete() throws IOException, InterruptedException, URISyntaxException{

	// 1 获取文件系统
	Configuration configuration = new Configuration();
	FileSystem fs = FileSystem.get(new URI("hdfs://hadoop102:9000"), configuration, "atguigu");

	// 2 执行删除
	fs.delete(new Path("/0508/"), true);

	// 3 关闭资源
	fs.close();
}
3.2.4 HDFS文件名更改
@Test
public void testRename() throws IOException, InterruptedException, URISyntaxException{

	// 1 获取文件系统
	Configuration configuration = new Configuration();
	FileSystem fs = FileSystem.get(new URI("hdfs://hadoop102:9000"), configuration, "atguigu");

	// 2 修改文件名称
	fs.rename(new Path("/banzhang.txt"), new Path("/banhua.txt"));

	// 3 关闭资源
	fs.close();
}
3.2.5 HDFS文件详情查看
查看文件名称、权限、长度、块信息
@Test
public void testListFiles() throws IOException, InterruptedException, URISyntaxException{

	// 1获取文件系统
	Configuration configuration = new Configuration();
	FileSystem fs = FileSystem.get(new URI("hdfs://hadoop102:9000"), configuration, "atguigu");

	// 2 获取文件详情
	RemoteIterator<LocatedFileStatus> listFiles = fs.listFiles(new Path("/"), true);

	while(listFiles.hasNext()){
		LocatedFileStatus status = listFiles.next();

		// 输出详情
		// 文件名称
		System.out.println(status.getPath().getName());
		// 长度
		System.out.println(status.getLen());
		// 权限
		System.out.println(status.getPermission());
		// 分组
		System.out.println(status.getGroup());

		// 获取存储的块信息
		BlockLocation[] blockLocations = status.getBlockLocations();

		for (BlockLocation blockLocation : blockLocations) {

			// 获取块存储的主机节点
			String[] hosts = blockLocation.getHosts();

			for (String host : hosts) {
				System.out.println(host);
			}
		}

		System.out.println("-----------班长的分割线----------");
	}

// 3 关闭资源
fs.close();
}
3.2.6 HDFS文件和文件夹判断
@Test
public void testListStatus() throws IOException, InterruptedException, URISyntaxException{

	// 1 获取文件配置信息
	Configuration configuration = new Configuration();
	FileSystem fs = FileSystem.get(new URI("hdfs://hadoop102:9000"), configuration, "atguigu");

	// 2 判断是文件还是文件夹
	FileStatus[] listStatus = fs.listStatus(new Path("/"));

	for (FileStatus fileStatus : listStatus) {

		// 如果是文件
		if (fileStatus.isFile()) {
				System.out.println("f:"+fileStatus.getPath().getName());
			}else {
				System.out.println("d:"+fileStatus.getPath().getName());
			}
		}

	// 3 关闭资源
	fs.close();
}
3.3 HDFS的I/O流操作
上面我们学的API操作HDFS系统都是框架封装好的。那么如果我们想自己实现上述API的操作该怎么实现呢?
我们可以采用IO流的方式实现数据的上传和下载。
3.3.1 HDFS文件上传
- 需求:把本地e盘上的banhua.txt文件上传到HDFS根目录
- 编写代码
@Test
public void putFileToHDFS() throws IOException, InterruptedException, URISyntaxException {

	// 1 获取文件系统
	Configuration configuration = new Configuration();
	FileSystem fs = FileSystem.get(new URI("hdfs://hadoop102:9000"), configuration, "atguigu");

	// 2 创建输入流
	FileInputStream fis = new FileInputStream(new File("e:/banhua.txt"));

	// 3 获取输出流
	FSDataOutputStream fos = fs.create(new Path("/banhua.txt"));

	// 4 流对拷
	IOUtils.copyBytes(fis, fos, configuration);

	// 5 关闭资源
	IOUtils.closeStream(fos);
	IOUtils.closeStream(fis);
    fs.close();
}
3.3.2 HDFS文件下载
- 需求:从HDFS上下载banhua.txt文件到本地e盘上
- 编写代码
// 文件下载
@Test
public void getFileFromHDFS() throws IOException, InterruptedException, URISyntaxException{

	// 1 获取文件系统
	Configuration configuration = new Configuration();
	FileSystem fs = FileSystem.get(new URI("hdfs://hadoop102:9000"), configuration, "atguigu");

	// 2 获取输入流
	FSDataInputStream fis = fs.open(new Path("/banhua.txt"));

	// 3 获取输出流
	FileOutputStream fos = new FileOutputStream(new File("e:/banhua.txt"));

	// 4 流的对拷
	IOUtils.copyBytes(fis, fos, configuration);

	// 5 关闭资源
	IOUtils.closeStream(fos);
	IOUtils.closeStream(fis);
	fs.close();
}
3.3.3 定位文件读取
- 需求:分块读取HDFS上的大文件,比如根目录下的/hadoop-2.7.2.tar.gz
- 编写代码
(1)下载第一块
@Test
public void readFileSeek1() throws IOException, InterruptedException, URISyntaxException{

	// 1 获取文件系统
	Configuration configuration = new Configuration();
	FileSystem fs = FileSystem.get(new URI("hdfs://hadoop102:9000"), configuration, "atguigu");

	// 2 获取输入流
	FSDataInputStream fis = fs.open(new Path("/hadoop-2.7.2.tar.gz"));

	// 3 创建输出流
	FileOutputStream fos = new FileOutputStream(new File("e:/hadoop-2.7.2.tar.gz.part1"));

	// 4 流的拷贝
	byte[] buf = new byte[1024];

	for(int i =0 ; i < 1024 * 128; i++){
		fis.read(buf);
		fos.write(buf);
	}

	// 5关闭资源
	IOUtils.closeStream(fis);
	IOUtils.closeStream(fos);
	fs.close();
}
(2)下载第二块
@Test
public void readFileSeek2() throws IOException, InterruptedException, URISyntaxException{

	// 1 获取文件系统
	Configuration configuration = new Configuration();
	FileSystem fs = FileSystem.get(new URI("hdfs://hadoop102:9000"), configuration, "atguigu");

	// 2 打开输入流
	FSDataInputStream fis = fs.open(new Path("/hadoop-2.7.2.tar.gz"));

	// 3 定位输入数据位置
	fis.seek(1024*1024*128);

	// 4 创建输出流
	FileOutputStream fos = new FileOutputStream(new File("e:/hadoop-2.7.2.tar.gz.part2"));

	// 5 流的对拷
	IOUtils.copyBytes(fis, fos, configuration);

	// 6 关闭资源
	IOUtils.closeStream(fis);
	IOUtils.closeStream(fos);
}
(3)合并文件
在Window命令窗口中进入到目录E:\,然后执行如下命令,对数据进行合并
type hadoop-2.7.2.tar.gz.part2 >> hadoop-2.7.2.tar.gz.part1
合并完成后,将hadoop-2.7.2.tar.gz.part1重新命名为hadoop-2.7.2.tar.gz。解压发现该tar包非常完整。
