用YOLO3进行人民币编码的定位与切割
背景介绍
来自于TinyMind的一个计算机视觉的比赛,已经过去有一段时间了,不过官方开放了练习模式,用来学习还算是一个不错的选择,比赛地址https://www.tinymind.cn/competitions/47?rron=banner
主要的目的就是这个:

一共给了不到四万张图片,一共九种面值,基本上长这样:

本片文章的目的就是把人民币的编码给切割下来,至于为啥切割下来,个人认为是为了减少干扰,毕竟到时候要识别数字或者字母,人民币上还是有很多其他数字作为干扰的,而且大佬们都这么做了,跟着做总没啥错。本篇文章主要分三部分,数据的预处理,定位和切割。
yolo3没有用过的可以看我写的这篇文章https://blog.csdn.net/qq_39226755/article/details/100073309
数据的预处理
具体的处理方法还是上边那个链接,这里只写主要部分
我将九种面值的编码都归为一个类别,一共标注了1800张图片,每个200张(一共1000张其实就够用),当然是标的越多效果越好
标完之后就用脚本转化成txt的格式,这个工具官方文件里都有,自己看着稍微改一改,下边是我改的代码:
import xml.etree.ElementTree as ET

xml_dir = 'H:\data\RMB\class_train_data\\xml_data'


def convert_annotation(xml_dir, image_id, list_file): #对每个XML文件的信息进行提取
    in_file = open('{0}/{1}'.format(xml_dir, image_id))
    tree=ET.parse(in_file)
    root = tree.getroot()
    path = root.find('path').text
    list_file.write(path)
    error_bool = False
    for obj in root.iter('object'):
        xmlbox = obj.find('bndbox')
        b = (int(xmlbox.find('xmin').text), int(xmlbox.find('ymin').text), int(xmlbox.find('xmax').text), int(xmlbox.find('ymax').text))
        if len(b)!=4:
            error_bool = True
        list_file.write(" " + ",".join([str(a) for a in b]) + ',' + str(0))
    return error_bool

import os
lists = os.listdir(xml_dir)
list_file = open('RMB_train.txt', 'w')
for xml in lists:
    error_bool = convert_annotation(xml_dir,xml,list_file)
    list_file.write('\n')
list_file.close()

if error_bool == False:#检查数据是否由五个数构成 xmin,ymin,xmax,ymax,class
    print('转换成功!')
else:
    print('出错啦!')
最后类别的部分我根本就没有提取,直接就设置成了0,加了一些检查结果正不正常的代码,因为刚开始用的时候出错了,经常格式不对,奇怪的是我加完这个代码后一次也没出过错
之后我们在文件里就生成了一个训练集,就可以开始用了

这个训练集每一行代表一个图片,分为两部分,用空格隔开,第一部分是图片地址,第二部分是x_min,y_min,x_max,y_max这四个坐标和一个类别序号,这里是0
训练模型
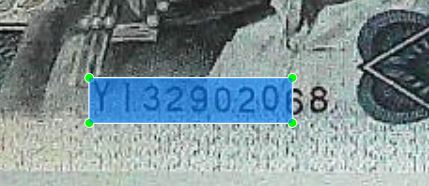
直接用train.py训练就好了,我这里选择的是直接用darknet的文件进行的迁移学习,冻结前185层,锚的话没有改,选择的九个,我没有训练到损失最低,因为我的小电脑也承受不住这么大的压力,毕竟是为了学习,训练的模型能用就行,我分两次进行了训练,当时觉得没啥问题,现在想一想有点不对,因为训练两次就分了两次训练集和验证集,每次分的不一样就容易出现过拟合,应该一次训练两种学习率,好在结果显示没啥问题,效果如下:


训练到这种样子我觉得就差不多了,接下来才是重点。
编码识别,坐标点的处理和保存
我们接着拿这个模型去识别我们的RMB,结果发现并不是很理想,有时会识别一半,有时会出现两个框,每个框识别一半,真正能识别的比较完美的也就占一半,出现这样的结果肯定是不行的,所以我对输出的坐标进行了一些处理。
形容一下:
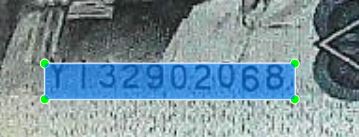
基本上就是这三种情况,只需要解决这三种就没的问题了,
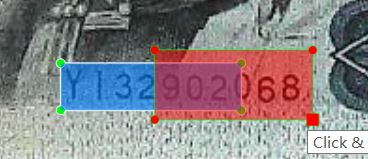
前两种情况可以归为一类,就是目标没有括全,这样到时候是很麻烦的,我看了看样本,发现样本与样本之间的尺寸还是差很多的,所以我先设定了一个参数llr,就是指图片长度和方框长度之间的比,这样的话图片变大,方框也会变大,然后我又设了一个lwr,是图片的长宽比,通俗的理解就是第一个参数决定方框大小,第二个参数决定方框尺寸。也就是让这个方框按照一定的规则扩大,这样就不用担心没法覆盖编码了。
第二类就是多个框,这个好解决,我把两个框融合成一个框,选取最靠外的坐标值,比如这个top就选红色的top,left就选蓝色的left。
处理后的图片如下:


方法应该是有很多,这只是我能想到的最简单的。
代码用的qqwwee的yolo3 地址https://github.com/qqwweee/keras-yolo3
下边这段代码的原版在yolo.py中,自己改的部分我都写了注释
top_left,bottom_right = (1000,1000),(0,0)#先初始化两个值
        for i, c in reversed(list(enumerate(out_classes))):
            predicted_class = self.class_names[c]
            box = out_boxes[i]
            score = out_scores[i]
            label = '{} {:.2f}'.format(predicted_class, score)

            top, left, bottom, right = box
            top = max(0, np.floor(top + 0.5).astype('int32'))
            left = max(0, np.floor(left + 0.5).astype('int32'))
            bottom = min(image.size[1], np.floor(bottom + 0.5).astype('int32'))
            right = min(image.size[0], np.floor(right + 0.5).astype('int32'))
            print(label, (left, top), (right, bottom))
            ##新添代码,for循环到这一行之前都没有改
            if top < top_left[1]:			#top和left都要选择最小的
                top_left = (top_left[0], top)
            if left < top_left[0]:
                top_left = (left,top_left[1])
            if bottom > bottom_right[1]:		#bottom和right都要选择最大的
                bottom_right = (bottom_right[0],bottom)
            if right > bottom_right[0]:
                bottom_right = (right,bottom_right[1])


        top,left = top_left[1],top_left[0]
        right,bottom = bottom_right[0],bottom_right[1]
        #得到top,left,right,bottom四个数

        long = bottom_right[0] - top_left[0] 		#获得预测框的长和宽
        wide = bottom_right[1] - top_left[1]

        llr = 3.5 # 图片长与预测框长之间的比值
        if image.size[0]/long > llr: 	#如果大于这个值,说明预测框太小了,对预选框进行扩大
            right += (image.size[0]/llr - long)/2
            left -= (image.size[0]/llr - long)/2

        long = right - left
        lw = long/wide
        lwr2 = 3.8 #预选框长宽比
        if lw >= lwr2:  #调整预选框的尺寸
             top -= (long/lwr2 - wide)/2
             bottom += (long/lwr2 - wide)/2
        else:
            left -= (wide*lwr2 - long)/2
            right += (wide*lwr2 - long)/2

        draw = ImageDraw.Draw(image) 			#把处理后的框画出来
        # My kingdom for a good redistributable image drawing library.
        for i in range(thickness):
            draw.rectangle(
                [left + i, top + i, right - i, bottom - i],
                outline=(255,0,0))
        del draw

        end = timer()
        print(end - start)
        #返回四个坐标和一个处理后的图片,方便测试
        return image,(int('{:.0f}'.format(left)),int('{:.0f}'.format(top))),(int(('{:.0f}'.format(right))),int('{:.0f}'.format(bottom)))
同时我把多余的代码都删除了,放着也可以,反正返回的值就是这些,只不过图片会比较乱
同时yolo_video.py也需要改一下,原来的代码就真的只是测试用的,在这个脚本里我创建了两个文件,一个用来储存处理好的图片和坐标,另一个存放出错的图片目录(包括打开出错和找不到编码)
添加了一个方法,修改了主程序(作者并没有写主函数),具体看注释
FLAGS = parser.parse_args()
###这行之前的代码没有改
log_dir = 'F:\DeepLearn\RMB_code/last_logs/log1/'		#日志(结果)保存目录
image_dir = 'H:\data\RMB/train_data/train_data/'		#图片根目录
if os.path.exists(log_dir) == False: #创建根目录,不然文件创建不出来
    os.makedirs(log_dir)
with open('{}correct_logs.txt'.format(log_dir),'w') as correct_logs:
    with open('{}error_logs.txt'.format(log_dir),'w') as error_logs :		#这里创建两个文件,一个用来存放处理好的图片,一个存放处理失败的图片
        image_lists = os.listdir(image_dir) 	#收集图片地址
        if FLAGS.image:		#这里表示图片模式,属于原代码
            """
            Image detection mode, disregard any remaining command line arguments
            """
            print("Image detection mode")
            if "input" in FLAGS:
                print(" Ignoring remaining command line arguments: " + FLAGS.input + "," + FLAGS.output)
            detect_img2(YOLO(**vars(FLAGS)),image_lists,correct_logs,error_logs)  #后三个参数分别是图片地址集和两个用来存信息的文件
            #detect_img(YOLO(**vars(FLAGS)))
            #YOLO,图片,结果
        elif "input" in FLAGS:
            detect_video(YOLO(**vars(FLAGS)), FLAGS.input, FLAGS.output)
        else:
            print("Must specify at least video_input_path.  See usage with --help.")

 #新添方法,用来一次性处理多个图片
 def detect_img2(yolo,image_list,correct_logs,error_logs):
    all_num = len(image_list)
    error_num = 0
    for i in range(len(image_list)):  #对每个图片进行识别
        img = image_list[i]
        print('img:{0},进度:{1:.2f}%'.format(img,(i/all_num)*100)) #进度
        try:#打开图片
            image = Image.open(image_dir+img)
        except: #打开失败,就写到error_logs文件里
            print('Open Error! Try again!')
            error_logs.write("{}\n".format(image_dir + img))
            error_num += 1
            continue
        else:
            r_image,top_left,bottom_right = yolo.detect_image(image)
            if r_image == False:  #如果False说明返回的是0,没有识别到编码,写入error_logs中
                error_logs.write("{}\n".format(image_dir + img))
                error_num += 1
                continue
            # long = bottom_right[0]-top_left[0] 		#用来测试用,展示各种参数
            # wide = bottom_right[1]-top_left[1]
            # print('点1:{0},点2:{1},长:{2},宽:{3},长宽比:{4}'.format(top_left,bottom_right,long,wide,long/wide))
            # print('图片长{0},宽{1},画框与圆框尺寸比例{2}'.format(image.size[0],image.size[1],image.size[0]/long))
            #处理好信息的存入correct_logs中
            correct_logs.write('{0},{1},{2},{3},{4}\n'.format(image_dir+img,top_left[0],top_left[1],bottom_right[0],bottom_right[1]))
            #图片地址,left,top,right,bottom
            #r_image.show()
    print('错误率:{}%,错误个数:{}'.format(error_num*100/all_num,error_num)) #打印错误的个数,和比例,让自己心里有个B数
    yolo.close_session()
处理完这些我们就可以开心的运行了,这个时候可以干点其他事,但是不能玩大型游戏,因为GPU被占满了,两个小时候再回来就会发现弄完了。

这次效果还不错,错误的比例非常低,基本上可以忽略的那种,63个图片可以实现手动切割或者识别,两个文件的内容如下:


接下来我们就可以准备切割了
编码切割
切割时一个非常简单的事情,只需要对像素进行复制,然后保存下来就行了。
import cv2

target_dir ='./cut_images/' #要保存的目录
text_dir = 'F:\DeepLearn\RMB_code\last_logs\log1\correct_logs.txt' #我们储存的correct_logs.txt文件

with open(text_dir,'r') as text_file:
    texts = text_file.readlines() #读取信息
    all_num = len(texts)
    for i in range(len(texts)):
        lists = texts[i].split(',')
        img = cv2.imread(lists[0])
        #对像素点进行操作 [Ymin:Ymax,Xmin:Xmax]
        image = img[int(lists[2]):int(lists[4]),int(lists[1]):int(lists[3])]#y1:y2,x1:x2
        #保存图片
        cv2.imwrite('{0}{1}'.format(target_dir,lists[0][-12:]),image)
        # cv2.imshow('sss',image)   #测试
        # cv2.waitKey()
        #B数
        print('存入{0},进度:{1:.2f}%'.format(lists[0][-12:],float(i*100/all_num)))
这样结果就出来了:

然后就可以用这个数据集进行文字识别了,离最终目标就差一步了,是不是很开心!!
