1 新建系统用户: useradd -M zhangsan 这样子用-M添加用户不会生成/home/zahngsan家目录;
给用户设置密码: passwd zhangsan 根据提示输入两次要设置的密码
2 新增用户组 groupadd svn
3 添加用户到用户组: usermod -G svn zhangsan
4 查看是否按照有 SVN: svnserve --version 如果没有先按照SVN:yum -y install subversion
5 创建 svn 版本库,初始化相关配置文件
mkdir -p /opt/svnrepos/code
svnadmin create /opt/svnrepos/code

查看版本库相关配置文件
cd /opt/svnrepos/code
ll
drwxr-xr-x. 2 root root 54 3月 2 22:49 conf
drwxr-sr-x. 6 root root 253 3月 2 22:51 db
-r--r--r--. 1 root root 2 3月 2 22:47 format
drwxr-xr-x. 2 root root 231 3月 2 22:47 hooks
drwxr-xr-x. 2 root root 41 3月 2 22:47 locks
-rw-r--r--. 1 root root 229 3月 2 22:47 README.txt
如果删除版本库:
# sudo rm -rf /opt/svnrepos/code
进入code 目录下的conf文件夹。将其中的authz与passwd文件复制到svnrepos目录
cd /opt/svnrepos/code/conf
cp authz /opt/svnrepos/
cp passwd /opt/svnrepos/
修改code/conf下的svnserve.conf文件,将其中的passwd文件制定与authz文件制定进行修改,其他配置按正常单svn配置。
[general]
#禁止匿名用户访问
anon-access = no
#授权用户拥有读写权限
auth-access = write
# 使用公共的passwd
password-db = /opt/svnrepos/passwd
# 使用公共的authz
authz-db = /opt/svnrepos/authz
#指定版本库的认证域, code仓库路径/opt/svnrepos/code/, custom仓库路径为/opt/svnrepos/code/
anon-access = none:表示禁止匿名用户访问。
auth-access = write:表示授权用户拥有读写权限。
password-db = passswd:指定用户名口令文件,即 passwd 文件。
authz-db = authz:指定权限配置文件,即 authz 文件。
realm = /opt/svnrepos/code/:指定认证域,即 /opt/svnrepos 目录
6 编辑svn用户配置文件
vi /opt/svnrepos/passwd
[users]
# harry = harryssecret
# sally = sallyssecret
# 用户名,密码
admin = admin
quest = 123456
lisi= 123456
zhangsan = 123456
wangwu=123456
ligang=123456
编辑svn权限控制配置文件 vi /opt/svnrepos/authz
[aliases]

[groups]
#用户组名=用户名
admin=admin
quest=quest
users_code=lisi,zhangsan
users_custom=wangwu,ligang

#表示根目录(/opt/svnrepos/),对全部版本库设置权限
[/]
#表示admin组对根目录有读写权限,r为读,w为写
@admin=rw

#表示code仓库根目录(/opt/svnrepos/code/)
[code:/]
#表示users_code组对根目录有读写权限,r为读,w为写
@users_code=rw

#表示code仓库下的test目录
[code:/test]
#表示quest组对根目录有读写权限,r为读
@quest=r

#表示custom仓库根目录(/opt/svnrepos/custom/)
[custom:/]
#表示users_code组对根目录有读写权限,r为读,w为写
@users_custom=rw

#表示custom仓库下的test目录
[custom:/test]
#表示quest组对根目录有读写权限,r为读
@quest=r
7 在 /etc/init.d 目录下,创建脚本 svnd
cd /etc/init.d
touch svnd
chmod u+x svnd
编辑后的 svnd 脚本如下所示
#!/bin/sh
# chkconfig: 2345 10 90
# description: svn server
SVN_HOME=/opt/svnrepos
if [ ! -f "/usr/bin/svnserve" ]
then
echo "svnserver startup: cannot start"
exit
fi
case "$1" in
start)
echo "Starting svnserve…"
/usr/bin/svnserve -d --listen-port 3690 -r $SVN_HOME
echo "Finished!"
;;
stop)
echo "Stoping svnserve…"
killall svnserve
echo "Finished!"
;;
restart)
$0 stop
$0 start

;;
*)
echo "Usage: svn { start | stop | restart } "
exit 1
esac
8 启动 svn 服务
[root@CentOS init.d]# service svnd start
Starting svnserve…
Finished!
[root@CentOS init.d]# ps -ef | grep 'svnserve'
root       4225      1  0 23:33 ?        00:00:00 /usr/bin/svnserve -d --listen-port 3690 -r /opt/svnrepos
root       4230   3505  0 23:33 pts/0    00:00:00 grep --color=auto svnserve
[root@CentOS init.d]#
安装好 svn 服务后,默认是没有随系统启动自动启动的, CentOS 7 的 /etc/rc.d/rc.local 是没有执行权限的, 系统建议创建 systemd service 启动服务
查看svnserve.service位置:systemctl enable svnserve.service 
于是查看 systemd 里 svn 的配置文件 /lib/systemd/system/svnserve.service
[Unit]
Description=Subversion protocol daemon
After=syslog.target network.target

[Service]
Type=forking
EnvironmentFile=/etc/sysconfig/svnserve
ExecStart=/usr/bin/svnserve --daemon --pid-file=/run/svnserve/svnserve.pid $OPTIONS

[Install]
WantedBy=multi-user.target
找到 svn 的 service 配置文件 /etc/sysconfig/svnserve 编辑配置文件
vi /etc/sysconfig/svnserve
将 OPTIONS="-r /var/svn" 改为 svn 版本库存放的目录,:wq 保存退出
在提示符下输入 systemctl enable svnserve.service
shutdow -r now
输入 ps -aux | grep 'svn'

开放 3690 端口 (svn服务默认端口)
[root@CentOS init.d]# firewall-cmd --zone=public --add-port=3690/tcp --permanent
success
[root@CentOS init.d]# firewall-cmd --reload
success
[root@CentOS init.d]#
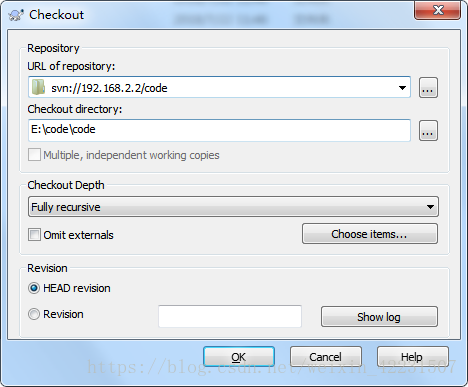
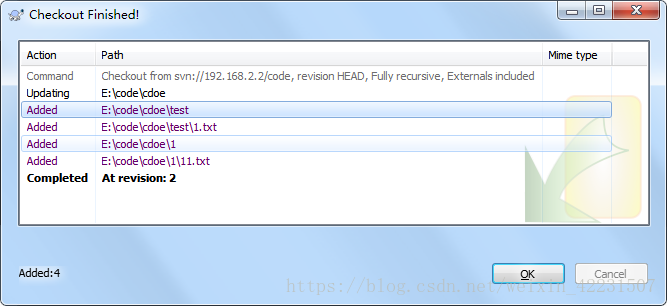
在 windows 下使用TortoiseSVN进行测试
如code仓库svn地址
svn://192.168.2.2/code

将 svn 添加为系统服务,并设置为开机启动
[root@CentOS init.d]# chkconfig --add svnd
[root@CentOS init.d]# chkconfig svnd on
=============================
配置httpd访问方式
安装httpd服务:yum install httpd
检查httpd是否安装成功:
httpd -version
Server version: Apache/2.4.6 (CentOS)
Server built:   Jul 18 2016 15:30:14
安装mod_dav_svn,mod_dav_svn是apache服务器访问svn的一个模块。通过yum安装:
yum install mod_dav_svn
安装成功后,会有mod_dav_svn.so和mod_authz_svn.so两个文件。
$ sudo find / -name mod_dav_svn.so
/usr/lib64/httpd/modules/mod_dav_svn.so

$ sudo find / -name mod_authz_svn.so
/usr/lib64/httpd/modules/mod_authz_svn.so
修改svn仓库的用户组为apache
chown -R apache:apache /opt/svnrepos
创建用户文件passwd_httpd(httpd方式密码为md5加密,需重新配置用户名密码),示例如下:
 touch /opt/svnrepos/passwd_http  #创建用户文件
 htpasswd /opt/svnrepos/passwd_httpd admin  #创建用户admin
 htpasswd /opt/svnrepos/passwd_http guest  #创建用户gues
配置httpd
 touch /etc/httpd/conf.d/subversion.conf

 cat /etc/httpd/conf.d/subversion.conf
<Location /svn>
    DAV svn
    #SVNPath定义到具体仓库位置
    #SVNPath /opt/svnrepos/code

    #SVNParentPath 定义多个仓库
    SVNParentPath /opt/svnrepos
    AuthType Basic
    AuthName "Subversion repos"
    #用户名密码(密码为md5加密)
    #AuthUserFile /opt/svnrepos/passwd_httpd
    AuthzSVNAccessFile /opt/svnrepos/authz
    Require valid-user
</Location>
启动httpd服务
service httpd start
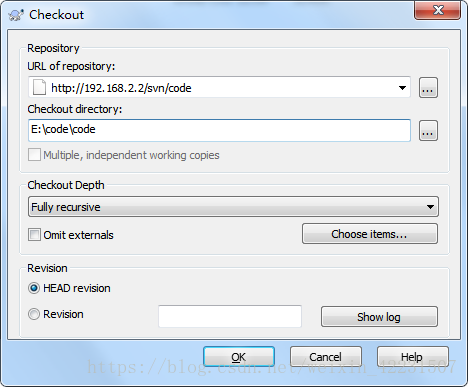
客户端使用http://192.168.2.2/svn/code就可以访问刚才建立的svn仓库了。 如果返回403错误,可能是防火墙问题。增加防火墙规则
//永久的添加该端口
firewall-cmd --permanent --zone=public --add-port=80/tcp
//加载配置,使得修改有效
 firewall-cmd --reload
//查看开启的端口
firewall-cmd --permanent --zone=public --list-ports
https://blog.csdn.net/weixin_42231507/article/details/81149568