设备驱动注册到源码
总线、设备、驱动注册流程图

说明
以上这个图片是相当重要的一个图片吗,它完整诠释了设备和驱动的注册流程。
首先关于平台platform总线
总线是Linux中很重要的一个概念,有许多条总线,比如media总线、SPI总线、mmc存储设备总线、平台总线(platform)等等,对于我们驱动开发工程师来说,最重要的,要深刻理解的就是平台platform总线了,相对于USB、PCI、I2C、SPI等物理总线来说,platform总线是一种虚拟、抽象出来的总线,实际中并不存在这样的总线。那为什么需要platform总线呢?其实是Linux设备驱动模型为了保持设备驱动的统一性而虚拟出来的总线。因为对于usb设备、i2c设备、pci设备、spi设备等等,他们与cpu的通信都是直接挂在相应的总线下面与我们的cpu进行数据交互的,但是在我们的嵌入式系统当中,并不是所有的设备都能够归属于这些常见的总线,在嵌入式系统里面,SoC系统中集成的独立的外设控制器、挂接在SoC内存空间的外设却不依附与此类总线。所以Linux驱动模型为了保持完整性,将这些设备挂在一条虚拟的总线上(platform总线),而不至于使得有些设备挂在总线上,另一些设备没有挂在总线上。
platform总线相关代码:driver\base\platform.c 文件
相关结构体定义:include\linux\platform_device.h 文件中
关于设备
设备代表真实存在的物理器件,每个器件有自己不同的通信时序,I2C、USB这些都代表不同的时序,这就与总线挂钩了
在最低层, Linux 系统中的每个设备由一个 struct platform_device 代表
 	struct platform_device {
			const char	* name;	//设备名称
			int		id;			//对同类设备的区分标识
			struct device	dev;//结构体中内嵌device结构体
			u32		num_resources;//设备使用资源的数量
			struct resource	* resource;//设备使用的资源数组

			const struct platform_device_id	*id_entry;

			/* MFD cell pointer */
			struct mfd_cell *mfd_cell;

			/* arch specific additions */
			struct pdev_archdata	archdata;
		};
Linux的所有设备由一个设备链表来维护,依次从Device0到DeviceN
我们可以通过device_register()来注册设备
关于驱动
驱动代表操作设备的方式和流程,以应用来说,在程序open设备时,接着read这个这个设备,驱动就是实现应用访问的具体过程。驱动就是一个通信官和翻译官,一是通过对soc的控制寄存器编程,按总线要求输出相应时序的命令,与设备交互,一是对得到数据进行处理,给上层提供特定格式数据。
- 不同总线的设备驱动过程不同
- 同一总线的不同类型设备驱动不同,光感和加速度
- 同一总线的同类设备驱动不同,多点触控和单点触控
驱动由一个 struct platform_driver 代表
struct platform_driver {
	int (*probe)(struct platform_device *);
	int (*remove)(struct platform_device *);
	void (*shutdown)(struct platform_device *);
	int (*suspend)(struct platform_device *, pm_message_t state);
	int (*resume)(struct platform_device *);
	struct device_driver driver;
	const struct platform_device_id *id_table;
};
驱动两个重要的操作就是注册register和卸载unregister,函数原型如下
extern int platform_driver_register(struct platform_driver *);//注册驱动函数
extern void platform_driver_unregister(struct platform_driver *);//卸载驱动函数
这两个函数的参数都是只有 platform_driver
驱动重点关注操作的流程和方法,如果在驱动中直接针对具体的引脚来编程,其驱动的平台可移植性就比较差,为了提高驱动的可移植性,Linux把驱动要用到的GPIO和中断等资源剥离给设备去管理。即在设备里面包含其自己的设备属性,还包括了其连接到SOC所用到的资源。
注册设备
以我我现在的水平肯定是不会去撸源码的,我现在追求的就是先掌握设备、驱动的注册流程,先能用起来,当然这部分的源码是很重要的,以后还是会去仔细分析的
注册设备的流程
- 1、注册设备,将设备结构体放到平台文件中,会自动注册设备,不用去调用注册设备的函数
vim arch/arm/mach-exynos/mach-itop4412.c
两个修改点
#ifdef CONFIG_HELLO_CTL
struct platform_device s3c_device_hello_ctl={
	.name = "hello_ctl",
	.id             = -1,
};
#endif
#ifdef CONFIG_HELLO_CTL
	&s3c_device_hello_ctl,
#endif
- 2、在Kconfig文件中添加编译HELLO设备的宏定义
config HELLO_CTL
tristate "Enable HELLO config"
default y
help
Enable HELLO config
- 3、配置menuconfig中的HELLO宏定义,生成新的.config文件

- 4、生成新的zImage,烧录
执行make zImage
然后到arch/arm/boot中寻找zImage
查看设备是否注册成功
通过以上的步骤就完成了设备的注册,这时进入系统我们可以查看一下开发板的设备,应该能找到我们的hello_ctl
ls /sys/devices/platform/
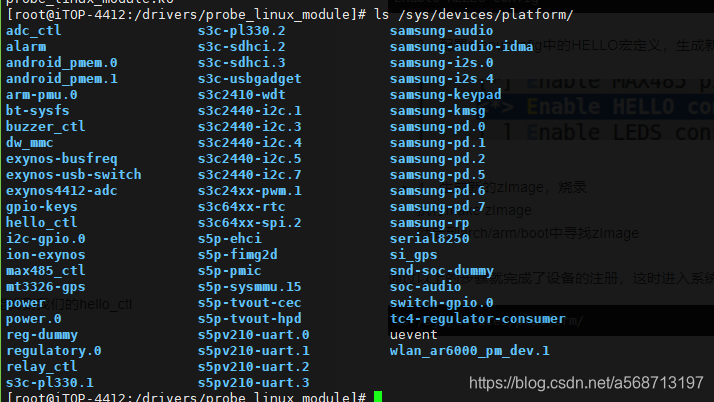
说明我们设备注册成功
注册驱动(很重要)
一些说明
驱动常见的几种状态:初始化、移除、断电、休眠、恢复
- probe函数
platform_match函数匹配之后,驱动调用的初始化函数 - remove函数
移除驱动函数 - shutdown函数
断电后执行的函数 - suspend函数
悬挂(休眠)驱动函数 - resume函数
休眠后恢复驱动
在platform_driver结构体中还有一个device_driver结构体类型的变量,所以我们也关注一些device_driver结构体
struct device_driver {
	const char		*name;//和注册的设备name要一致
	struct bus_type		*bus;

	struct module		*owner;//一般赋值THIS_MODULE
	const char		*mod_name;	/* used for built-in modules */

	bool suppress_bind_attrs;	/* disables bind/unbind via sysfs */

	const struct of_device_id	*of_match_table;

	int (*probe) (struct device *dev);
	int (*remove) (struct device *dev);
	void (*shutdown) (struct device *dev);
	int (*suspend) (struct device *dev, pm_message_t state);
	int (*resume) (struct device *dev);
	const struct attribute_group **groups;

	const struct dev_pm_ops *pm;

	struct driver_private *p;
};
编写驱动程序
#include <linux/init.h>
#include <linux/module.h>
/*关于驱动注册的头文件,包含一些函数和重要的结构体*/
#include <linux/platform_device.h>

#define DRIVER_NAME "hello_ctl"		//驱动名,注意要与设别名相同
/*开源协议声名和作者*/
MODULE_LICENSE("Dual BSD/GPL");
MODULE_AUTHOR("GYY");

/*驱动初始化函数*/
static int hello_probe (struct platform_device *pdv){
	printk(KERN_EMERG "\tinitialized\n");//打印initialized
	return 0;
}
/*移除驱动函数*/
static int hello_remove (struct platform_device *pdv){
	printk(KERN_EMERG "\tremove\n");//打印remove
	return 0;
}
/*断电后驱动执行的函数*/
static void hello_shutdown (struct platform_device *pdv){


}
/*驱动休眠函数*/
static int hello_suspend (struct platform_device *pdv){

	return 0;
}
/*驱动恢复函数*/
static int hello_resume (struct platform_device *pdv){

	return 0;
}

/*重要的platform_driver结构体*/
struct platform_driver hello_driver = {
	/*一些函数的注册,通过函数指针的形式传入*/
	.probe = hello_probe,
	.remove = hello_remove,
	.shutdown = hello_shutdown,
	.suspend = hello_suspend,
	.resume = hello_resume,
	/*device_driver结构体*/
	.driver = {
		.name = DRIVER_NAME,//驱动名,注意要与设备名相同
		.owner = THIS_MODULE,//THIS——MODULE
	}
};

/*驱动入口函数*/
static int hello_init(void)
{
	int DriverState;
	printk(KERN_EMERG "HELLO WORLD enter!\n");
	DriverState=platform_driver_register(&hello_driver);//注册驱动

	printk(KERN_EMERG "\t%d\n",DriverState);//打印驱动状态,注册成功的话为0
	return 0;
}
/*驱动的出口函数*/
static void hello_exit(void)
{
	printk(KERN_EMERG "HELLO WORLD exit!\n");
	platform_driver_unregister(&hello_driver);//卸载驱动
}

module_init(hello_init);
module_exit(hello_exit);
代码分析
- 入口函数
我们在驱动的入口函数执行了platform_driver_register(),所以我们看一下platform_driver_register的源码
int platform_driver_register(struct platform_driver *drv)
{
	drv->driver.bus = &platform_bus_type;
	if (drv->probe)
		drv->driver.probe = platform_drv_probe;
	if (drv->remove)
		drv->driver.remove = platform_drv_remove;
	if (drv->shutdown)
		drv->driver.shutdown = platform_drv_shutdown;

	return driver_register(&drv->driver);
}
这个函数首先初始化了总线类型,接着注册了probe、remove、shutdown函数,最后执行了driver_register()函数
到这里就不再深究了,但是我们知道在注册驱动的时候是会调用probe函数的,所以说当我们安装驱动(insmod)时我们应该先打印出“HELLO WORLD enter!”,接着打印initialized,最后注册完后打印驱动的状态
- 出口函数
我们在驱动的出口函数执行了platform_driver_unregister(),platform_driver_unregister()的源码很简单
void platform_driver_unregister(struct platform_driver *drv)
{
	driver_unregister(&drv->driver);
}
它就是调用了driver_unregister()这个函数
在我们卸载驱动的时候会执行驱动程序的remove函数,所以说当我们卸载驱动(rmmod)时会先打印出”HELLO WORLD exit!“,接着调用remove函数打印出remove
实验测试
安装驱动

符合我们的预期
查看驱动

卸载驱动

符合我们的预期
几句总结
要学习驱动开发,设备、驱动的注册是相当的重要的,但是Linux的源码也是相当复杂的,仅platform.c这个文件就有1200多行的代码量,一开始就一头扎进源码里显然是不太现实的,所以说还是先学会怎么用,以后慢慢的深入,相信自己会在不久的将来可以理清原理,手撕源码,写一些详尽的分析笔记。
