1.如何派生内置不可变类型并修改其实例化行为
我们想自定义一种新类型的元组,对于传入的可迭代对象,我们只保留其中int类型且值大于0的元素,例如:
IntTuple([2,-2,‘jr’,[‘x’,‘y’],4]) => (2,4)
如何继承内置tuple 实现 IntTuple
1.1 元组是python内置的不可变类型对象,我们通过重写元祖的 new 方法来实现上述功能
#通过继承元祖重写 __new__ 方法
class IntTuple(tuple):
    def __new__(cls, iterable):
        l = []
        for i in iterable:
            if isinstance(i, int) and i > 0:
                l.append(i)
        return super().__new__(cls, l)

if __name__ == '__main__':
    int_t = IntTuple([2,-2,'jr',['x','y'],4])
    print(int_t)
上面的例子可以简化为列表推导式:
class IntTuple(tuple):
    def __new__(cls, iterable):
        l = [i for i in iterable if isinstance(i, int) and i > 0]  #列表推导式
        return super().__new__(cls, l)

if __name__ == '__main__':
    int_t = IntTuple([2,-2,'jr',['x','y'],4])
    print(int_t)
上面代码返回值:

1.2 self 对象到底是由谁创建的?
通过这个例子说明1.1中为什么 return super().new(cls, l) 要返回 cls,因为这个cls就是 init 中的 self
class A(object):
def __new__(cls, *args, **kwargs):
print("A.__new__:", cls, args)
return object.__new__(cls)
# return super().__new__(cls)
def __init__(self, *args):
print('A.__init__', self, *args)
if __name__ == '__main__':
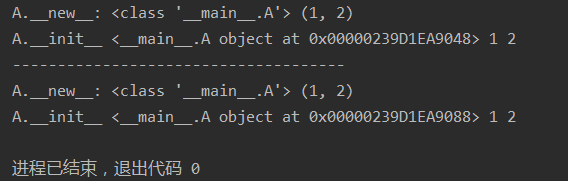
a = A(1, 2)
print('-------------------------------------')
a = A.__new__(A, 1, 2)
A.__init__(a, 1, 2)
说明:由返回值可知,a = A(1,2) 的实例化过程,相当于调用了
“a = A.new(A, 1, 2) 和
A.init(a, 1, 2)”
两条语句。
上面代码返回值:
1.3 列表推导式简介
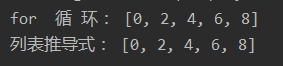
下面通过一个列子简单介绍下列表推导式
l = []
for i in range(10):
    if i % 2 == 0:
        l.append(i)
print(l)
#下面列表推导式,实现上面同样的功能
l = [i for i in range(10) if i % 2 == 0]
print(l)
上面程序运行结果相同:
2.如何为创建大量实例节省内存
在游戏中,定义了玩家类player,每有一个在线玩家,在服务器内则有一个player的实例,当在线人数很多时,将产生大量实例(百万级)
解决方案:
定义类的__slots__属性,声明实例有哪些属性(关闭动态绑定)
例子:定义两个用户类,分析内存使用情况,p2比p1多定义了 slots
import sys
import tracemalloc
class Player1(object):
    def __init__(self, uid, uname, status = 0, level = 1):
        self.uid = uid
        self.uname = uname
        self.status = status
        self.level = level


class Player2(object):
    # 通过 __slots__可以禁用动态绑定
    __slots__ = ('uid', 'uname', 'status', 'level')

    def __init__(self, uid, uname, status=0, level=1):
        self.uid = uid
        self.uname = uname
        self.status = status
        self.level = level


p1 = Player1('0001', 'juran')
p2 = Player2('0002', 'campo')
2.1实例化上面两个类,比较两个类对象的dir()属性
通过dir()属性查看类对象属性
print(dir(p1))
print(dir(p2))
p1 比 p2 多两个属性
print(set(dir(p1))-set(dir(p2)))
通过比较得知,p1比p2多了两个属性:
__weakref__弱引用,__dict__动态绑定
2.2 p1,p2动态绑定变量
p1对象动态绑定变量示例
p1.x = 'marry'
p1.__dict__['y'] = 7
print(p1.__dict__)
上面代码返回值:
{‘uid’: ‘0001’, ‘uname’: ‘juran’, ‘status’: 0, ‘level’: 1, ‘x’: ‘marry’, ‘y’: 7}
因为p2的魔态方法 slots ,禁用动态绑定,所以 p2.x = 7 系统报错:
AttributeError: ‘player2’ object has no attribute ‘dict’
2.3 查看p1各个属性的资源使用情况
查看p1内存资源使用情况
print('__dict__使用内存:',sys.getsizeof(p1.__dict__))
print('   uname使用内存:',sys.getsizeof(p1.uname))
print('     uid使用内存:',sys.getsizeof(p1.uid))
print('  status使用内存:',sys.getsizeof(p1.status))
print('   level使用内存:',sys.getsizeof(p1.level))
返回值:
__dict__使用内存:152
   uname使用内存: 54
     uid使用内存: 53
  status使用内存: 24
   level使用内存: 28
通过观察内存占用量可以看出,动态绑定占用了相对多的内存,dict 动态绑定属性占用内存最高 152
创建大量实例时,禁用动态绑定,可以很好的提高性能。
2.4 也可以这样看内存使用情况
导入 tracemalloc 查看内存使用情况
import tracemalloc
tracemalloc.start()
# p1 = [player1(1, 'juran', 3) for _ in range(100000)]
p2 = [player2(1, 2, 3) for _ in range(100000)]
end = tracemalloc.take_snapshot()
top = end.statistics('filename')
# top = end.statistics('lineno')

for stat in top[:100]:
    print(stat)
p1内存使用情况:
py:0: size=16.8 MiB, count=299994, average=59 B
p2内存使用情况:
py:0: size=7837 KiB, count=100002, average=80 B
结论:
Player2 通过设置 slots = (‘uid’, ‘uname’, ‘status’, ‘level’) 禁用动态绑定 dict,大大降低了内存的使用情况,
3.Python中的with语句
3.1 打开一个文件的完整处理流程
先来看一下try … except … finally 如何处理文件的
try:
    f = open('test.txt','r')
    raise IndexError
except KeyError as e:
    print('keyError')
    f.close()
except IndexError as e:
    print('IndexError')
    f.close()
except Exception as e:
    print(e)
    f.close()
finally:
    #有无异常,总是执行
    print('end')
    f.close()
上面的过程可以用with来实现,
with open('test.txt','r',encoding='utf-8') as f:
    content = f.read()
    print(content)
3.2 with 和上下文管理器
3.2.1 通过 enter 和 exit 简化文件处理流程
class Sample(object):
    #获取资源
    def __enter__(self):
        print('start')
        return self

    def demo(self):
        print('this is demo')

    #释放资源
    def __exit__(self, exc_type, exc_val, exc_tb):
        print('end')


with Sample() as sample:
    sample.demo()
用 with 实例化对象返回值:这里调用语句:sample.demo() 正常调用
start
this is demo
end
3.2.2打印 exc_type, exc_val, exc_tb 信息
#上下文管理器
class Sample(object):
    #获取资源
    def __enter__(self):
        print('start')
        return self

    def demo(self):
        print('this is demo')

    #释放资源
    def __exit__(self, exc_type, exc_val, exc_tb):
        print('end')
        #<class 'AttributeError'> - 异常类
        print(exc_type,'-')
        #'Sample' object has no attribute 'demos' - 异常值
        print(exc_val,'-')
        #<traceback object at 0x0000028A602FA9C8> - 异常信息追踪
        print(exc_tb,'-')

with Sample() as sample:
    sample.demo()
如果 sample.demos(),调用了一个不存在的方法sample.demos(),则程序会报三条异常信息:
<class ‘AttributeError’> - 异常类
‘Sample’ object has no attribute ‘demos’ - 异常值
<traceback object at 0x0000028A602FA9C8> - 异常信息追踪
3.2.3 contextlib简化上下文管理器
class Test:
    def print_test(self):
        print("第二次输出.....")
@contextlib.contextmanager
def file_open(filename):
    #yield上面相当于 __enter__ 函数
    print('file open')
    yield Test()
    #yield下面相当于 __exit__ 函数
    print('file close')

with file_open('test.txt') as f:
    f.print_test()
    print('file opretoin')
返回值:
file open
第二次输出…
file opretoin
file close
3.2.4 进一步理解 yeild
class Test:
    def print_test(self):
        print("第二次输出.....")
@contextlib.contextmanager
def test():
    print("第一次输出.....")
    yield Test()
    print("最后一次输出....")

##直接调用test()方法,t=yield返回的生成器结果
with test() as t:
    t.print_test()
上面程序返回值:
第一次输出…
第二次输出…
最后一次输出…
4.如何创建可管理的对象属性
在面向对象编程中,我们把方法看做对象的接口。直接访问对象的属性可能是不安全的,或设计上不够灵活,但是使用调用方法在形式上不如访问属性简洁。
通过装饰器,将方法视作属性进行操作
形式上 属性访问
实际上 调用方法
@property
@方法名.setter
class A():
    def __init__(self, age):
        self.age = age

    def get_age(self):
        return self.age

    def set_age(self, age):
        #判断age必须是int类型,否则抛出类型错误
        if not isinstance(age, int):
            raise TypeError('TypeError')
        self.age = age
    #def __init__(self, fget=None, fset=None, fdel=None, doc=None):
    R = property(get_age,set_age)
a = A(18)
a.R = 22
print(a.R)
上面代码返回值:22
将上面代码用 @property 和 @Age.setter 装饰
class A():
    def __init__(self, age):
        self.age = age

    @property    #相当于get方法
    def Age(self):
        return self.age

    @Age.setter   #相当于set方法
    def Age(self, age):
        if not isinstance(age, int):
            raise TypeError('TypeError')
        self.age = age
a = A(18)
a.Age = 20
print(a.Age)
上面程序返回值:20
访问Age函数就像访问类的变量一样方便
5.如何让类支持比较操作
有时,我们希望自定义类的实例间可以使用,<,<=,>,>=,==,!=符号进行比较,我们自定义比较的函数,例如,有一个矩形的类,比较两个矩形的实例时,比较的是他们的面积
5.1 导入functools.total_ordering方法,只需要实现 < 和 == 就能实现所有比较方法
5.1.1 字符串的比较实用ascII码进行比较的:
s1 = ‘abc’
s2 = ‘abd’
s1 > s2
返回:False
因为:ord(‘c’) < ord(‘d’)
5.1.2 集合比较
{1, 2, 3} > {4}
返回:False
{1, 2, 3} < {4}
返回:False
{1, 2, 3} == {4}
返回:False
集合比较的是 “是否包含”
{1, 2, 3} > {1}
返回:True
{1, 2, 3} > {1, 2}
返回:True
{1, 2, 3} > {1, 4}
返回:False
5.1.3 @total_ordering 装饰器
from functools import total_ordering
@total_ordering
#装饰器 @total_ordering
class Rect():
    def __init__(self, w, h):
        self.w = w
        self.h = h

    def area(self):
        return self.w * self.h

    def __str__(self):
        return '我是Rect对象宽%d,高%d'%(self.w, self.h)

    def __lt__(self, other):
        return self.area() < other.area()

    def __eq__(self, other):
        return self.area() == other.area()
下面实例化 rect1 与 rect2进行比较
if __name__ == '__main__':
    rect1 = Rect(2,3)
    print(rect1.area())
    返回值:6
    rect2 = Rect(4, 5)
    print(rect1 >= rect2)
    返回值:False
5.2 用抽象基类实现不同形状的比较
1、抽象出计算面积的共同方法 area() , lt, eq ,
2、@total_ordering 装饰器扩充比较类型,使得类只需实现 lt 和 eq 即可实现所有的比较类型
3、@abc.abstractmethod 抽象基类装饰器装饰area()方法,所以area方法在子类中必须重写,否则报错
from functools import total_ordering
#abc.abstractmethod定义抽象基类,在继承时必须实现
import abc
import math
#total_ordering 装饰器扩充比较类型
@total_ordering
class Shape(metaclass=abc.ABCMeta):
    @abc.abstractmethod
    def area(self):
        pass

    def __lt__(self, other):
        return self.area() < other.area()

    def __eq__(self, other):
        return self.area() == other.area()

class Rect(Shape):
    def __init__(self, w, h):
        self.w = w
        self.h = h

    def area(self):
        return self.w * self.h

class Circle(Shape):
    def __init__(self, r):
        self.r = r

    def area(self):
        return round(math.pi * self.r ** 2,4)
if __name__ == '__main__':
    c = Circle(2)
    print(c.area())
    #圆的面积返回值:12.5664
    r = Rect(2, 3)
    #矩形面积返回值:6
    print(r.area())
    print(c <= r )
    #Circle类 与 Rect类 比较的返回值:False
6.如何在环状数据结构中管理内存
6.1 del 方法只有当引用计数为零时才会执行,下面程序证明
class A():
    def __del__(self):
        print('__del__执行了')

a = A()
a2 = a
a = 1   #a释放了A类的引用
a2 = None   #a2释放了A类的引用
此时程序输出:
__del__执行了
6.2 弱引用 weakref
b2 = weakref.ref(b) 是弱引用,弱引用不占用引用计数,所以当b 和 b3 销毁,程序执行 del 方法
import  weakref
class B:
    def __del__(self):
        print('B类__del__执行了')


b = B()
b2 = weakref.ref(b)
b3 = b
del b, b3
程序打印:

6.3 双向循环链表
如何在环状数据结构中管理内存,add_right方法中引入弱引用,当head = None时可以释放资源
import weakref
class Node:
    def __init__(self, data):
        self.data = data
        self.left = None
        self.right = None

    def add_right(self, node):
        self.right = node
        #node.left = self
        node.left = weakref.ref(self)

    def __str__(self):
        return 'Node:<%s>' % self.data

    def __del__(self):
        print('in __del__: delete %s' % self)

def create_linklist(n):
    head = current = Node(1)
    for i in range(2, n + 1):
        node = Node(i)
        current.add_right(node)
        current = node
    return head

head = create_linklist(1000)
head = None

import time
for _ in range(1000):
    time.sleep(1)
    print('run...')
input('wait...')
7、通过实例方法名字的字符串调用方法
7.1 getattr()
 s = '123abc'
 getattr(s, 'find')('abc')
上面程序返回值:3
说明:‘abc’在s的索引位置是‘3’
7.2 map 映射函数
def demo(x):
     return x ** 2

list(map(demo, [1, 2, 3]))
返回值: [1, 4, 9]
7.3 getattr() 和 map() 函数应用
我们有三个图形类
Circle,Triangle,Rectangle
他们都有一个获取图形面积的方法,但是方法名字不同,我们可以实现一个统一的获取面积的函数,使用每种方法名进行尝试,调用相应类的接口
lib_shape.py 包含下面三个类Triangle、Rectangle、 Circle
class Triangle:
    def __init__(self,a,b,c):
        self.a,self.b,self.c = a,b,c

    def get_area(self):
        a,b,c = self.a,self.b,self.c
        p = (a+b+c)/2
        return (p * (p-a)*(p-b)*(p-c)) ** 0.5

class Rectangle:
    def __init__(self,a,b):
        self.a,self.b = a,b

    def getArea(self):
        return self.a * self.b

class Circle:
    def __init__(self,r):
        self.r = r

    def area(self):
        return self.r ** 2 * 3.14159
if __name__ == '__main__':
    t = Tranigle(3, 4, 5)
    print(t.get_area())
    返回值:6
    r = Rectangle(4, 6)
    print(r.getarea())
    返回值:20
    c = Circle(2)
    print(c.area())
    返回值:12.5664
下面使用一个类的将上面类包装
这里主要讲两个小知识点:1、getattr() 2、map() 函数
import lib_shape

shape1 = lib_shape.Traingle(3, 4, 5)
shape2 = lib_shape.Rectangle(4, 6)
shape3 = lib_shape.Circle(2)

#此处计算面积,两个小知识点:1、getattr()    2、map()   函数
def  get_area(shape):
    method_name = ['get_area','getarea','area']
    for name in method_name:
        f = getattr(shape,name,None)
        if f:
            return f()

if __name__ == '__main__':
    shape_list = [shape1, shape2, shape3]
    area_list = list(map(get_area, shape_list))
    print(area_list)
上面程序返回值:
[6.0, 24, 13]
