Nova
文章目录
1、Nova体系结构
Nova组件在Openstack中负责虚拟机的管理。
Nova主要由API、Compute、Conductor、Scheduler四个核心服务所组成,它们之间通过AMPQ消息队列进行通信。
1.1 API
Nova API是进入Nova的HTTP接口,是访问并使用Nova所提供的各种服务的唯一途径,作为客户端和Nova之间的中间层,它把客户端的请求传达给Nova,待Nova处理完请求后再将处理结果返回给客户端。
Nova API的执行过程主要包括三个阶段:
Nova client将用户命令转换
1.2 Conductor
Conductor服务最初于Grizzly版本中发布,目的是为数据库的访问提供一层安全保障。在此之前,nova-compute都是直接访问数据库,一旦其被攻击,则数据库会面临直接暴露的危险。引入Conductor的另一个好处是使nova-compute与数据库解耦。
目前,nova-compute所有访问数据库的动作都要交给nova-conductor完成。出于安全性考虑,应该避免nova-conductor与nova-compute部署在同一服务器上。
随着nova-conductor服务的不断完善,它还需要承担部分原本由nova-compute负责的TaskAPI任务,TaskAPI主要包含耗时较长的任务,如创建虚拟机,迁移虚拟机等。
在I版本中,引入Object Model,在此之前,对每一个表的操作都放在同一个文件里,如flavor.py,使用时直接调用这个文件中的函数去修改数据库。在Object Model引入后,新建了Flavor对象与flavor表相对应,将对flavor表的操作都封装在Flavor对象里,需要通过Flavor对象的函数去进行数据库操作。

ObjectModel主要功能:
nova-compute和数据库的在线升级:数据库变动无需修改nova-compute;
对象属性的类型声明:减少python中没有数据类型定义而引起的Bug;
减少写入数据库的数据量:通过对象的_change_field属性可以对数据库增量写入。
1.3 Schedule
nova-scheduler来裁决虚拟机的生存空间与资源分配,即是否有一个主机能够容纳新的虚拟机,它会通过各种规则,考虑包括内存使用率、CPU负载等多种因素为虚拟机选择一个合适的主机。今后nova-scheduler将被剥离为Gantt。
下面分别介绍调度器、过滤器以及权重。
目前Nova实现3种调度器:
ChanceScheduler(随机调度器):从所有nova-compute服务正常运行的节点中随机选择。 FilterScheduler(过滤调度器):根据指定的过滤条件以及权重挑选最佳节点。
CachingScheduler:FilterScheduler的一种,在FilterScheduler的基础上将主机资源信息缓存在本地内存中,然后通过后台的定时任务定时从数据库中获取最新的主机资源信息。
Filtering就是使用配置文件指定的各种Filters去过滤掉不符合条件的主机。在调用各Filters之前,首先会过滤掉那些不符合创建虚拟机的节点(例如:没有足够的内存)。
Juno中Nova支持的Filter共有28个,下面是常用的一些:
AllHostFilter:不进行任何过滤。
RamFilter:依据内存的可用情况过滤,挑选出拥有足够内存的主机。
ComputeFilter:挑选出所有出于活跃状态(Active)的主机。
TrustedFilter:挑选出所有可信的主机。
PciPassthroughFilter:挑选出提供PCI SR-IOV支持的主机。
Weighting是指对所有符合条件的主机计算权重(Weight)并排序从而得出最佳的一个。经过各种过滤器过滤之后,会得到一个Host列表,保存了所有通过指定过滤器的Host,其中可能存在多个Host,所以还需要在它们中选择最优的一个。类似于Filterig,这个过程需要调用指定的各种Weigher模块,得出每个主机总的权重值。
1.4 Compute
Nova本身并不提供虚拟化技术,只是借助于各种主流的虚拟化,比如Xen、KVM等,实现虚拟机的创建与管理,因此作为Nova的核心,nova-compute需要和不同的Hypervisor进行交互,各种Hypervisor的支持通过Virt Driver的方式实现,比如Libvirt Driver。
目前Nova中共实现了Hyperv、Libvirt、VMware以及XenAPI四种Virt Driver。目前Openstack支持最好的是Libvirt+KVM。
nova-compute需要在数据库中存储主机的资源使用情况,包括内存、CPU、磁盘等,以便nova-scheduler获取作为选择主机的依据,这就要求每创建、迁移、删除一个虚拟机,都要更新数据库中的相关内容。Nova使用ComputeNode对象保存计算节点的配置信息以及资源使用状态。nova-compute为每一个计算节点的主机创建一个ResourceTracker对象,任务就是更新ComputeNode对象在数据库中对应的表compute_nodes。
有两种更新数据库中资源数据的方式:一是使用Resource Tracker的Claim机制,二是使用周期性任务(PeriodicTask)。当一台主机被多个nova-scheduler同时选中并发送创建虚拟机的请求时,这台主机并不一定有足够的资源来满足这些虚拟机的创建要求。Claim机制即是在创建之前预先测试一下主机的可用资源是否能够满足新建虚拟机的需要,如果满足,则更新数据库,将虚拟机申请的资源从主机可用的资源中减掉,如果后来创建失败或者是将虚拟机删除时,会再通过Claim加上之前减掉的部分。于此同时,通过定时运行周期性任务来更新数据库信息。
1.5 kilo中nova各组件的安装
根据kilo版的官方安装文档(Ubuntu 14.04),nova的各个服务被安装在控制节点以及计算节点上。
在控制节点上安装的组件有nova-api、nova-cert、nova-conductor、nova-consoleauth、nova-novncproxy、nova-scheduler、python-novaclient。计算节点上单独安装nova-compute组件。这里除了4个核心服务,其它服务的功能如下:
-
nova-cert:管理X509证书。
-
nova-novncproxy:nova提供了novncproxy代理支持用户通过vnc访问虚拟机。提供完整的vnc访问功能,涉及几个nova服务。Nova-consoleauth提供认证授权,nova-novncproxy用于支持基于浏览器的vnc客户端。
-
python-novaclient:Nova api客户端,包括novaclient模块和命令行脚本(nova)。
2、vlibirt以及虚拟机的相关文件
nova最终是通过Hypervisor来创建虚拟机的,通常使用的Hypervisor是Libvirt。
在使用Libvirt创建虚拟机之前,需要确认CPU是否支持虚拟化:
egrep -c '(vmx|svm)' /proc/cpuinfo

//返回0表示不支持,返回1或更大的值表示支持。
//另外,对虚拟化的支持通常在BIOS中是禁掉的,必须开启才可以。
对于Libvirt,在启动虚拟机之前,首先需要一个XML文件来define虚拟机,可以通过下面的命令查看虚拟机的XML文件:
首先查寻虚拟机名:

# virsh list

     Id    Name                           State

----------------------------------------------------

     2     instance-00000001              running

查看XML文件:

# virsh dumpxml instance-00000001

…
Openstack虚拟机文件位置在/var/lib/nova/instances目录下,该目录内容
root@compute1:/var/lib/nova/instances# ll

total 24

drwxr-xr-x 5 nova nova 4096 Jun 16 14:03./

drwxr-xr-x 9 nova nova 4096 Jun 11 15:42../

drwxr-xr-x 2 nova nova 4096 Jun 12 09:46a7c1017b-a7ed-436f-b742-f50bc09954ed/

drwxr-xr-x 2 nova nova 4096 Jun 12 09:46 _base/

-rw-r--r-- 1 nova nova   30 Jun 16 16:26 compute_nodes

drwxr-xr-x 2 nova nova 4096 Jun 12 09:45locks/

_base目录下存放了image文件,可以查看相关信息:

root@compute1:/var/lib/nova/instances# cd_base

root@compute1:/var/lib/nova/instances/_base#ll

total 17756

drwxr-xr-x 2 nova nova     4096 Jun 12 09:46 ./

drwxr-xr-x 5 nova nova     4096 Jun 16 14:03 ../

-rw-r--r-- 1 nova kvm  41126400 Jun 16 16:266c7bc599bec82348db354513894d528dbf5fc592

root@compute1:/var/lib/nova/instances/_base#qemu-img info 6c7bc599bec82348db354513894d528dbf5fc592

image:6c7bc599bec82348db354513894d528dbf5fc592

file format: raw

virtual size: 39M (41126400 bytes)

disk size: 17M

a7c1017b-a7ed-436f-b742-f50bc09954ed目录名是虚拟机的uuid,下面存放了该虚拟机的相关文件:

root@compute1:/var/lib/nova/instances/a7c1017b-a7ed-436f-b742-f50bc09954ed#ls

console.log  disk disk.info  libvirt.xml

root@compute1:/var/lib/nova/instances/a7c1017b-a7ed-436f-b742-f50bc09954ed#qemu-img info disk

image: disk

file format: qcow2

virtual size: 1.0G (1073741824 bytes)

disk size: 1.7M

cluster_size: 65536

backing file:/var/lib/nova/instances/_base/6c7bc599bec82348db354513894d528dbf5fc592

Format specific information:

compat: 1.1

lazy refcounts: false
注意这里虽然磁盘分配了1G,但是只使用了1.7M,后端文件为image文件,如果在虚拟机中创建文件,那么将在这1G的磁盘内划分空间,而backingfile不会改变。
3、nova创建虚拟机
root@controller:~#nova flavor-list

+----+-----------+-----------+------+-----------+------+-------+-------------+-----------+

| ID | Name      | Memory_MB | Disk | Ephemeral | Swap |VCPUs | RXTX_Factor | Is_Public |

+----+-----------+-----------+------+-----------+------+-------+-------------+-----------+

| 1  | m1.tiny  | 512       | 1    | 0        |      | 1     | 1.0         | True      |

| 2  | m1.small | 2048      | 20   | 0        |      | 1     | 1.0         | True      |

| 3  | m1.medium | 4096      | 40  | 0         |      | 2    | 1.0         | True      |

| 4  | m1.large | 8192      | 80   | 0        |      | 4     | 1.0         | True      |

| 5  | m1.xlarge | 16384     | 160 | 0         |      | 8    | 1.0         | True      |

+----+-----------+-----------+------+-----------+------+-------+-------------+-----------+

将要使用m1.tiny创建虚拟机。

root@controller:~#nova image-list

+--------------------------------------+---------------------+--------+--------+

| ID                                   | Name                | Status | Server |

+--------------------------------------+---------------------+--------+--------+

|deeb9a1a-3af8-4b91-97ad-017c9902c0e1 | cirros-0.3.3-x86_64 | ACTIVE |        |

+--------------------------------------+---------------------+--------+--------+

root@controller:~#neutron net-list

+--------------------------------------+----------+-----------------------------------------------------+

| id                                   | name     | subnets                                             |

+--------------------------------------+----------+-----------------------------------------------------+

|6c8a7550-4c2f-4ba1-babe-c3d0baa1f5a3 | ext-net | c83eb2e8-cbbe-4602-90e6-df72f87de12c 172.17.99.0/24 |

| a3484c98-329d-4f12-850e-52a9ded90052| demo-net | bf40f7b8-fd2d-461f-937d-387c7ff36f8b 192.168.1.0/24 |

+--------------------------------------+----------+-----------------------------------------------------+

root@controller:~#nova secgroup-list

+--------------------------------------+---------+-------------+

| Id                                   | Name    | Description |

+--------------------------------------+---------+-------------+

|5c35a08d-77d1-431f-8dbe-8efc827cb428 | default | default     |

+--------------------------------------+---------+-------------+


创建虚拟机的命令如下:

nova --debug boot--flavor m1.tiny --image cirros-0.3.3-x86_64 --nic net-id=

a3484c98-329d-4f12-850e-52a9ded90052\

--security-groupdefault demo-instance1

创建虚拟机后,可以看到虚拟机的状态:

root@controller:~#nova list

+--------------------------------------+----------------+--------+------------+-------------+----------------------+

| ID                                   | Name           | Status | Task State | Power State| Networks             |

+--------------------------------------+----------------+--------+------------+-------------+----------------------+

|640f4b87-8be3-482d-8b85-4ed150ccf4ba | demo-instance1 | ACTIVE | -          | Running     | demo-net=192.168.1.5 |

+--------------------------------------+----------------+--------+------------+-------------+----------------------+
4、创建虚拟机的过程
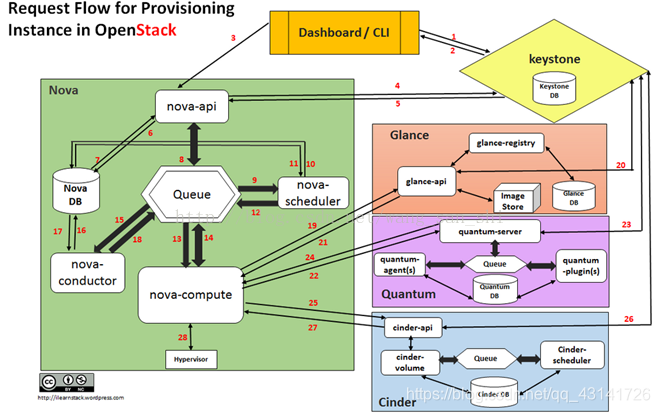
-
Dashboard or CLI gets the user credential and does the REST call to Keystone for authentication.
-
Keystone authenticatethe credentials and generate & send back auth-token which will be used forsending request to other Components through REST-call.
-
Dashboard or CLI convert the new instance request specified in ‘launchinstance’ or ‘nova-boot’ form to REST API request and send it to nova-api.
-
nova-api receivethe request and sends the request for validation auth-token and accesspermission tokeystone.
-
Keystone validatesthe token and sends updated auth headers with roles and permissions.
-
nova-api interactswith nova-database.
-
Createsinitial db entry for new instance.
-
nova-api sendsthe rpc.call request to nova-scheduler excepting to get updated instance entry with host IDspecified.
-
nova-scheduler picksthe request from the queue.
-
nova-scheduler interactswith nova-database to find an appropriate host via filtering and weighing.
-
Returnsthe updated instance entry with appropriate host ID after filtering andweighing.
-
nova-scheduler sendsthe rpc.cast request to nova-compute for ‘launching instance’ on appropriate host .
-
nova-compute picksthe request from the queue.
-
nova-compute sendthe rpc.call requestto nova-conductor to fetch the instance information such as host ID and flavor( Ram , CPU ,Disk).
-
nova-conductor picksthe request from the queue.
-
nova-conductor interactswith nova-database.
-
Returnthe instance information.
-
nova-compute picksthe instance information from the queue.
-
nova-compute doesthe REST call by passing auth-token to glance-api to get the Image URI by Image ID from glance and uploadimage from image storage.
-
glance-api validatesthe auth-token with keystone.
-
nova-compute getthe image metadata.
-
nova-compute doesthe REST-call by passing auth-token to Network API to allocate and configure the network such that instance getsthe IP address.
-
quantum-server validatesthe auth-tokenwith keystone.
-
nova-compute getthe network info.
-
nova-compute doesthe REST call by passing auth-token to Volume API to attach volumes to instance.
-
cinder-api validatesthe auth-token with keystone.
-
nova-compute getsthe block storage info.
-
nova-compute generatesdata for hypervisor driver and executes request on Hypervisor( via libvirt or api).
The table represents the Instance stateat various steps during the provisionin
| Status | Task | Power state | Steps |
|---|---|---|---|
| Build | scheduling | None | 3-12 |
| Build | networking | None | 22-24 |
| Build | block_device_mapping | None | 25-27 |
| Build | spawing | None | 28 |
| Active | none | Running |
