一.介绍
本文的案例主要有四个工程组成:一个sleuth-zipkin-serve-eureka ,它的主要作用使用ZipkinServer 的功能,收集调用数据,并展示出来;一个use-sleuth-zipkin-oneclient-eureka, 一个use-sleuth-zipkin-twoclient-eureka,一个eureka-client 这三个service可以相互调用;
并且只有调用了,sleuth-zipkin-serve-eureka****才会收集数据的,这就是为什么叫服务追踪了。
二.sleuth-zipkin-serve-eureka 端
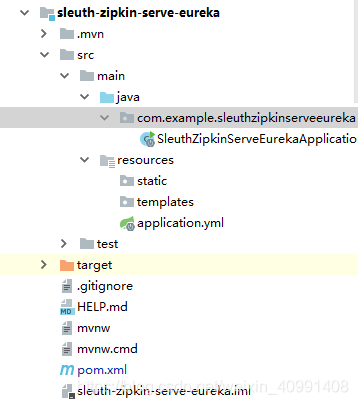
2.1 在主Maven工程中创建一个新的 Module 工程,命名为sleuth-zipkin-serve-eureka。采用Spring Initializr 的方式的方式创建。
2.2 sleuth-zipkin-serve-eureka 的 pom.xml 的内容如下:
<?xml version="1.0" encoding="UTF-8"?>
<project xmlns="http://maven.apache.org/POM/4.0.0" xmlns:xsi="http://www.w3.org/2001/XMLSchema-instance"
         xsi:schemaLocation="http://maven.apache.org/POM/4.0.0 https://maven.apache.org/xsd/maven-4.0.0.xsd">
    <modelVersion>4.0.0</modelVersion>
    <parent>
        <groupId>com.springcloud</groupId>
        <artifactId>springcloud-hx</artifactId>
        <version>1.0-SNAPSHOT</version>
        <relativePath/> <!-- lookup parent from repository -->
    </parent>
    <groupId>com.example</groupId>
    <artifactId>sleuth-zipkin-serve-eureka</artifactId>
    <version>0.0.1-SNAPSHOT</version>
    <name>sleuth-zipkin-serve-eureka</name>
    <description>Demo project for Spring Boot</description>

    <properties>
        <java.version>1.8</java.version>
    </properties>

    <dependencies>
       <!--zipkin-server 和 zipkin-autoconfigure-ui 的版本尽量一样,被这个版本坑了-->
        <dependency>
            <groupId>io.zipkin.java</groupId>
            <artifactId>zipkin-server</artifactId>
            <version>2.12.3</version>
            <!--springboot 默认的日志是log4j 和 sleuth 的日志有冲突,要排除掉-->
            <exclusions>
                <exclusion>
                    <artifactId>log4j-slf4j-impl</artifactId>
                    <groupId>org.apache.logging.log4j</groupId>
                </exclusion>
                <exclusion>
                    <groupId>ch.qos.logback</groupId>
                    <artifactId>logback-classic</artifactId>
                </exclusion>
            </exclusions>
        </dependency>

        <dependency>
             <groupId>io.zipkin.java</groupId>
             <artifactId>zipkin-autoconfigure-ui</artifactId>
            <version>2.12.3</version>
         </dependency>

        <dependency>
            <groupId>org.springframework.cloud</groupId>
            <artifactId>spring-cloud-starter-netflix-eureka-client</artifactId>
        </dependency>

        <dependency>
            <groupId>org.springframework.boot</groupId>
            <artifactId>spring-boot-starter-web</artifactId>
        </dependency>

        <dependency>
            <groupId>org.springframework.boot</groupId>
            <artifactId>spring-boot-starter-test</artifactId>
            <scope>test</scope>
        </dependency>
    </dependencies>

    <build>
        <plugins>
            <plugin>
                <groupId>org.springframework.boot</groupId>
                <artifactId>spring-boot-maven-plugin</artifactId>
            </plugin>
        </plugins>
    </build>

</project>
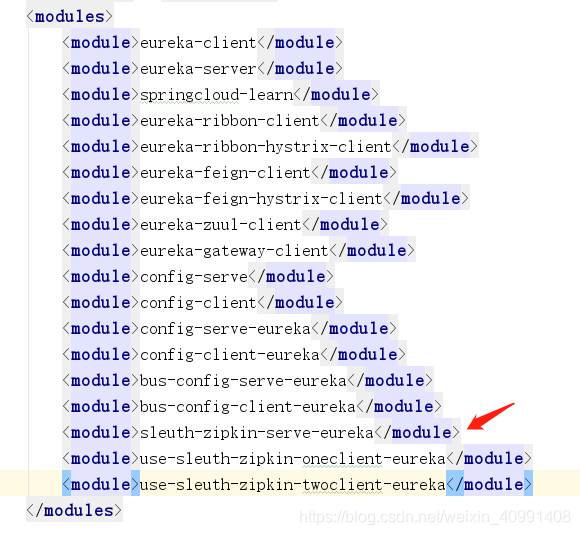
2.3 主Module 的 的 pom.xml 加上:
2.4 在启动类上加上 @EnableZipkinServer 注解启用Zipkin服务,加上@EnableDiscoveryClient 注解开启服务注册于发现代码如下:
package com.example.sleuthzipkinserveeureka;

import org.springframework.boot.SpringApplication;
import org.springframework.boot.autoconfigure.SpringBootApplication;
import org.springframework.cloud.client.discovery.EnableDiscoveryClient;
import zipkin2.server.internal.EnableZipkinServer;

//访问 http://localhost:8778/zipkin/   可以看到Zipkin后台页面
//开启服务注册于发现
@EnableDiscoveryClient
//启用Zipkin服务
@EnableZipkinServer
@SpringBootApplication
public class SleuthZipkinServeEurekaApplication {

    public static void main(String[] args) {
        SpringApplication.run(SleuthZipkinServeEurekaApplication.class, args);
    }

}
2.5 sleuth-zipkin-serve-eureka的配置文件 application.yml 内容如下:
server:
  port: 8778

#zipkin启动报错无法访问的解决方法
management:
  metrics:
    web:
      server:
        auto-time-requests: false

spring:
  #配置程序名为sleuth-zipkin-serve-eureka
  application:
    name: sleuth-zipkin-serve-eureka
  #当出现相同名字的类进行注册时,准许覆盖注册
  main:
    allow-bean-definition-overriding: true

eureka:
  client:
    #服务注册地址
    serviceUrl:
      #注意: Eureka Server 的注册地址
      #将服务提供者注册到三个Eureka Server中去
      #defaultZone: http://peer1:8001/eureka/,http://peer2:8002/eureka/,http://peer3:8003/eureka/
      #defaultZone: http://peer1:8001/eureka/
      defaultZone: http://localhost:8761/eureka/
2.6 测试
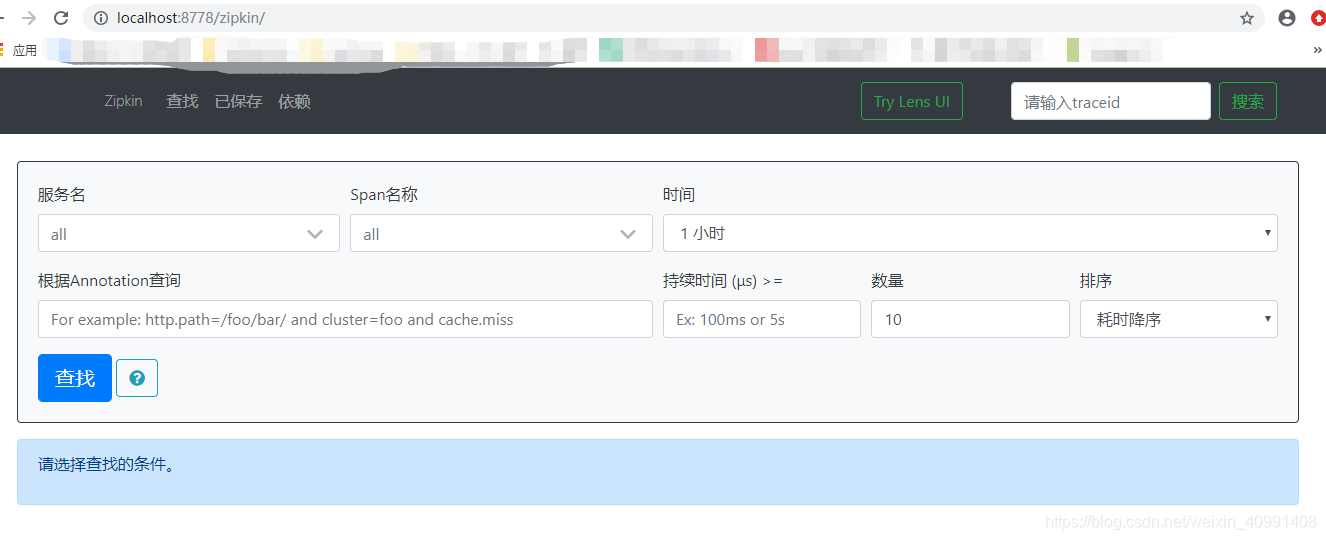
配置完成后依次启动示例项目:eureka-serve、sleuth-zipkin-serve-eureka项目。在浏览器访问地址:http://localhost:8778/zipkin/ 可以看到Zipkin后台页面:
三.use-sleuth-zipkin-oneclient-eureka端
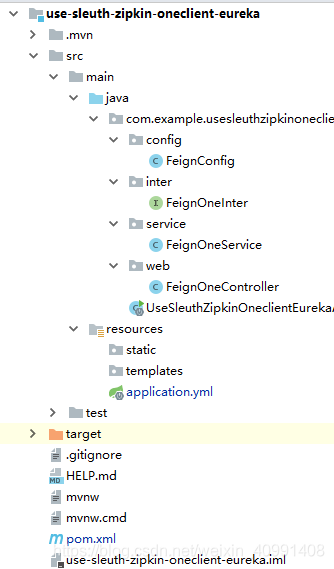
3.1 在主Maven工程中创建一个新的 Module 工程,命名为use-sleuth-zipkin-oneclient-eureka。采用Spring Initializr 的方式的方式创建。
3.2 use-sleuth-zipkin-oneclient-eureka 的 pom.xml 的内容如下:
<?xml version="1.0" encoding="UTF-8"?>
<project xmlns="http://maven.apache.org/POM/4.0.0" xmlns:xsi="http://www.w3.org/2001/XMLSchema-instance"
         xsi:schemaLocation="http://maven.apache.org/POM/4.0.0 https://maven.apache.org/xsd/maven-4.0.0.xsd">
    <modelVersion>4.0.0</modelVersion>
    <parent>
        <groupId>com.springcloud</groupId>
        <artifactId>springcloud-hx</artifactId>
        <version>1.0-SNAPSHOT</version>
        <relativePath/> <!-- lookup parent from repository -->
    </parent>
    <groupId>com.example</groupId>
    <artifactId>use-sleuth-zipkin-oneclient-eureka</artifactId>
    <version>0.0.1-SNAPSHOT</version>
    <name>use-sleuth-zipkin-oneclient-eureka</name>
    <description>Demo project for Spring Boot</description>

    <properties>
        <java.version>1.8</java.version>
    </properties>

    <dependencies>
        <!--添加zipkin的支持-->
        <dependency>
            <groupId>org.springframework.cloud</groupId>
            <artifactId>spring-cloud-starter-zipkin</artifactId>
        </dependency>

        <dependency>
            <groupId>org.springframework.cloud</groupId>
            <artifactId>spring-cloud-starter-netflix-eureka-client</artifactId>
        </dependency>

        <dependency>
            <groupId>org.springframework.cloud</groupId>
            <artifactId>spring-cloud-starter-openfeign</artifactId>
        </dependency>

        <dependency>
            <groupId>org.springframework.boot</groupId>
            <artifactId>spring-boot-starter-web</artifactId>
        </dependency>

        <dependency>
            <groupId>org.springframework.boot</groupId>
            <artifactId>spring-boot-starter-test</artifactId>
            <scope>test</scope>
        </dependency>
    </dependencies>

    <build>
        <plugins>
            <plugin>
                <groupId>org.springframework.boot</groupId>
                <artifactId>spring-boot-maven-plugin</artifactId>
            </plugin>
        </plugins>
    </build>

</project>
3.3 主Module 的 的 pom.xml 加上:
3.4 use-sleuth-zipkin-oneclient-eureka 的 配置文件 application.yml 的内容如下:
server:
  port: 8779

spring:
  #配置程序名为use-sleuth-zipkin-oneclient-eureka
  application:
    name: use-sleuth-zipkin-oneclient-eureka

  # spring.zipkin.base-url指定了Zipkin服务器的地址
  zipkin:
    base-url: http://localhost:8778
  # spring.sleuth.sampler.percentage将采样比例设置为1.0,也就是全部都需要
  sleuth:
    sampler:
      percentage: 1.0

eureka:
  client:
    #服务注册地址
    serviceUrl:
      #注意: Eureka Server 的注册地址
      #将服务提供者注册到三个Eureka Server中去
      #defaultZone: http://peer1:8001/eureka/,http://peer2:8002/eureka/,http://peer3:8003/eureka/
      #defaultZone: http://peer1:8001/eureka/
      defaultZone: http://localhost:8761/eureka/
spring.zipkin.base-url指定了Zipkin服务器的地址,spring.sleuth.sampler.percentage将采样比例设置为1.0,也就是全部都需要。
3.5 在启动类上加上 加上@EnableDiscoveryClient 注解开启服务注册发现功能,@EnableFeignClients注解开启 Feign Client 功能代码如下:
package com.example.usesleuthzipkinoneclienteureka;

import org.springframework.boot.SpringApplication;
import org.springframework.boot.autoconfigure.SpringBootApplication;
import org.springframework.cloud.client.discovery.EnableDiscoveryClient;
import org.springframework.cloud.openfeign.EnableFeignClients;

@SpringBootApplication
//开启服务注册于发现
@EnableDiscoveryClient
//开启 Feign Client 功能
@EnableFeignClients
public class UseSleuthZipkinOneclientEurekaApplication {

    public static void main(String[] args) {
        SpringApplication.run(UseSleuthZipkinOneclientEurekaApplication.class, args);
    }

}
3.6 新建 FeignConfig 类,FeignOneInter 接口 , FeignOneService 类 , FeignOneController 类,代码分别如下:
FeignConfig 类:
package com.example.usesleuthzipkinoneclienteureka.config;


import feign.Retryer;
import org.springframework.context.annotation.Configuration;

import static java.util.concurrent.TimeUnit.SECONDS;

//注入Retryer类的实例,这样在远程调用失败后,feign会进行重试
@Configuration
public class FeignConfig {


    public Retryer feignRetryer(){
        //Feign 默认的配置在请求失败后,重试次数为0,即不重试。
        //重试间隔 为100毫秒,最大重试时间为1秒,重试次数为5次
        //return new Retryer.Default();
        return new Retryer.Default(100,SECONDS.toMillis(1),5);
    }

}
FeignOneInter 接口:
package com.example.usesleuthzipkinoneclienteureka.inter;


import com.example.usesleuthzipkinoneclienteureka.config.FeignConfig;
import org.springframework.cloud.openfeign.FeignClient;
import org.springframework.web.bind.annotation.GetMapping;
import org.springframework.web.bind.annotation.PathVariable;


//在接口上加 @FeignClient 注解来声明 一个Feign Client,其中 value 为 远程调用其他服务的服务名
//FeignConfig.class 为 Feign Client 的配置类,注入Retryer类的实例,这样在远程调用失败后,feign会进行重试
//使用 Spring MVC 的注解来绑定具体该服务提供的 REST 接口
@FeignClient(value = "use-sleuth-zipkin-twoclient-eureka",configuration = FeignConfig.class)
public interface FeignOneInter {

    //使用 Spring MVC 的注解来绑定具体该服务提供的 REST 接口
    @GetMapping(value = "/FeignTwoController/hi/{name}")
    String sayHiFromEurekaClient(@PathVariable(value = "name") String name);
}
FeignOneService 类:
package com.example.usesleuthzipkinoneclienteureka.service;

import com.example.usesleuthzipkinoneclienteureka.inter.FeignOneInter;
import org.springframework.beans.factory.annotation.Autowired;
import org.springframework.stereotype.Service;

@Service
public class FeignOneService {

    @Autowired
    private FeignOneInter feignOneInter;

    public String helloFeign(String name) {
        return feignOneInter.sayHiFromEurekaClient(name);
    }
}
FeignOneController :
package com.example.usesleuthzipkinoneclienteureka.web;

import com.example.usesleuthzipkinoneclienteureka.service.FeignOneService;
import org.springframework.beans.factory.annotation.Autowired;
import org.springframework.web.bind.annotation.GetMapping;
import org.springframework.web.bind.annotation.PathVariable;
import org.springframework.web.bind.annotation.RequestMapping;
import org.springframework.web.bind.annotation.RestController;

@RestController
@RequestMapping("/FeignOneController")
public class FeignOneController {

   @Autowired
    private FeignOneService feignOneService;

    @GetMapping("/hi/{name}")
    public String helloFeign(@PathVariable("name") String name) {
        StringBuffer sb  = new StringBuffer();
        sb.append(feignOneService.helloFeign(name));
        return sb.toString();
    }

}
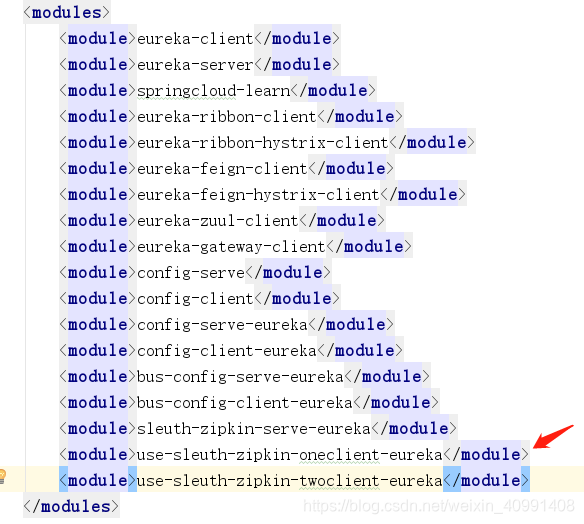
四.use-sleuth-zipkin-twoclient-eureka端
4.1 在主Maven工程中创建一个新的 Module 工程,命名为use-sleuth-zipkin-twoclient-eureka。采用Spring Initializr 的方式的方式创建。
4.2 use-sleuth-zipkin-twoclient-eureka 的 pom.xml 的内容如下:
<?xml version="1.0" encoding="UTF-8"?>
<project xmlns="http://maven.apache.org/POM/4.0.0" xmlns:xsi="http://www.w3.org/2001/XMLSchema-instance"
         xsi:schemaLocation="http://maven.apache.org/POM/4.0.0 https://maven.apache.org/xsd/maven-4.0.0.xsd">
    <modelVersion>4.0.0</modelVersion>
    <parent>
        <groupId>com.springcloud</groupId>
        <artifactId>springcloud-hx</artifactId>
        <version>1.0-SNAPSHOT</version>
        <relativePath/> <!-- lookup parent from repository -->
    </parent>
    <groupId>com.example</groupId>
    <artifactId>use-sleuth-zipkin-twoclient-eureka</artifactId>
    <version>0.0.1-SNAPSHOT</version>
    <name>use-sleuth-zipkin-twoclient-eureka</name>
    <description>Demo project for Spring Boot</description>

    <properties>
        <java.version>1.8</java.version>
    </properties>

    <dependencies>
        <!--添加zipkin的支持-->
        <dependency>
            <groupId>org.springframework.cloud</groupId>
            <artifactId>spring-cloud-starter-zipkin</artifactId>
        </dependency>

        <dependency>
            <groupId>org.springframework.cloud</groupId>
            <artifactId>spring-cloud-starter-netflix-eureka-client</artifactId>
        </dependency>

        <dependency>
            <groupId>org.springframework.cloud</groupId>
            <artifactId>spring-cloud-starter-openfeign</artifactId>
        </dependency>

        <dependency>
            <groupId>org.springframework.boot</groupId>
            <artifactId>spring-boot-starter-web</artifactId>
        </dependency>

        <dependency>
            <groupId>org.springframework.boot</groupId>
            <artifactId>spring-boot-starter-test</artifactId>
            <scope>test</scope>
        </dependency>
    </dependencies>

    <build>
        <plugins>
            <plugin>
                <groupId>org.springframework.boot</groupId>
                <artifactId>spring-boot-maven-plugin</artifactId>
            </plugin>
        </plugins>
    </build>

</project>
4.3 主Module 的 的 pom.xml 加上:
4.4 use-sleuth-zipkin-twoclient-eureka 的 配置文件 application.yml 的内容如下:
server:
  port: 8780

spring:
  #配置程序名为use-sleuth-zipkin-twoclient-eureka
  application:
    name: use-sleuth-zipkin-twoclient-eureka

  # spring.zipkin.base-url指定了Zipkin服务器的地址
  zipkin:
    base-url: http://localhost:8778
  # spring.sleuth.sampler.percentage将采样比例设置为1.0,也就是全部都需要
  sleuth:
    sampler:
      percentage: 1.0

eureka:
  client:
    #服务注册地址
    serviceUrl:
      #注意: Eureka Server 的注册地址
      #将服务提供者注册到三个Eureka Server中去
      #defaultZone: http://peer1:8001/eureka/,http://peer2:8002/eureka/,http://peer3:8003/eureka/
      #defaultZone: http://peer1:8001/eureka/
      defaultZone: http://localhost:8761/eureka/
4.5 在启动类上加上 加上@EnableDiscoveryClient 注解开启服务注册发现功能,@EnableFeignClients注解开启 Feign Client 功能代码如下:
package com.example.usesleuthzipkintwoclienteureka;

import org.springframework.boot.SpringApplication;
import org.springframework.boot.autoconfigure.SpringBootApplication;
import org.springframework.cloud.client.discovery.EnableDiscoveryClient;
import org.springframework.cloud.openfeign.EnableFeignClients;

@SpringBootApplication
//开启服务注册于发现
@EnableDiscoveryClient
//开启 Feign Client 功能
@EnableFeignClients
public class UseSleuthZipkinTwoclientEurekaApplication {

    public static void main(String[] args) {
        SpringApplication.run(UseSleuthZipkinTwoclientEurekaApplication.class, args);
    }

}
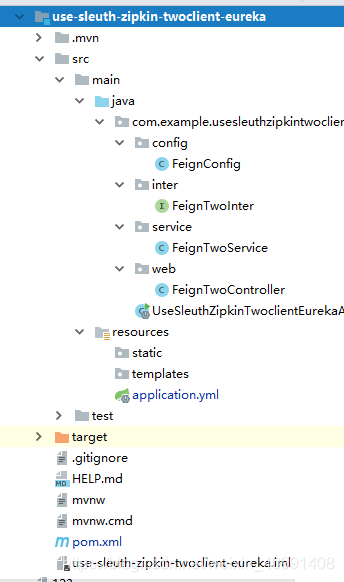
4.6 新建 FeignConfig 类,FeignTwoInter 接口 , FeignTwoService 类 , FeignTwoController 类,代码分别如下:
FeignConfig 类:
package com.example.usesleuthzipkinoneclienteureka.config;


import feign.Retryer;
import org.springframework.context.annotation.Configuration;

import static java.util.concurrent.TimeUnit.SECONDS;

//注入Retryer类的实例,这样在远程调用失败后,feign会进行重试
@Configuration
public class FeignConfig {


    public Retryer feignRetryer(){
        //Feign 默认的配置在请求失败后,重试次数为0,即不重试。
        //重试间隔 为100毫秒,最大重试时间为1秒,重试次数为5次
        //return new Retryer.Default();
        return new Retryer.Default(100,SECONDS.toMillis(1),5);
    }

}
FeignTwoInter 接口:
package com.example.usesleuthzipkintwoclienteureka.inter;


import com.example.usesleuthzipkintwoclienteureka.config.FeignConfig;
import org.springframework.cloud.openfeign.FeignClient;
import org.springframework.web.bind.annotation.GetMapping;
import org.springframework.web.bind.annotation.PathVariable;


//在接口上加 @FeignClient 注解来声明 一个Feign Client,其中 value 为 远程调用其他服务的服务名
//FeignConfig.class 为 Feign Client 的配置类,注入Retryer类的实例,这样在远程调用失败后,feign会进行重试
//使用 Spring MVC 的注解来绑定具体该服务提供的 REST 接口
@FeignClient(value = "eureka-client",configuration = FeignConfig.class)
public interface FeignTwoInter {

    //使用 Spring MVC 的注解来绑定具体该服务提供的 REST 接口
    @GetMapping(value = "/HiController/hi/{name}")
    String sayHiFromEurekaClient(@PathVariable(value = "name") String name);
}
FeignTwoService 类:
package com.example.usesleuthzipkintwoclienteureka.service;

import com.example.usesleuthzipkintwoclienteureka.inter.FeignTwoInter;
import org.springframework.beans.factory.annotation.Autowired;
import org.springframework.stereotype.Service;

@Service
public class FeignTwoService {

    @Autowired
    private FeignTwoInter feignTwoInter;

    public String helloFeign(String name) {
        return feignTwoInter.sayHiFromEurekaClient(name);
    }
}
FeignTwoController :
package com.example.usesleuthzipkintwoclienteureka.web;

import com.example.usesleuthzipkintwoclienteureka.service.FeignTwoService;
import org.springframework.beans.factory.annotation.Autowired;
import org.springframework.web.bind.annotation.GetMapping;
import org.springframework.web.bind.annotation.PathVariable;
import org.springframework.web.bind.annotation.RequestMapping;
import org.springframework.web.bind.annotation.RestController;

@RestController
@RequestMapping("/FeignTwoController")
public class FeignTwoController {

   @Autowired
    private FeignTwoService feignTwoService;

    @GetMapping("/hi/{name}")
    public String helloFeign(@PathVariable("name") String name) {
        StringBuffer sb  = new StringBuffer();
        sb.append(feignTwoService.helloFeign(name));
        return sb.toString();
    }

}
五.eureka-client 端
5.1 在eureka-client 的 pom.xml 上加 zipkin 的依赖,内容如下:
<!--添加zipkin的支持-->
        <dependency>
            <groupId>org.springframework.cloud</groupId>
            <artifactId>spring-cloud-starter-zipkin</artifactId>
        </dependency>
5.2 eureka-client 的 配置文件 application.yml 上添加 zipkin 的配置,内容如下:
# spring.zipkin.base-url指定了Zipkin服务器的地址
spring:
  zipkin:
    base-url: http://localhost:8778
  # spring.sleuth.sampler.percentage将采样比例设置为1.0,也就是全部都需要
  sleuth:
    sampler:
      percentage: 1.0
六.测试
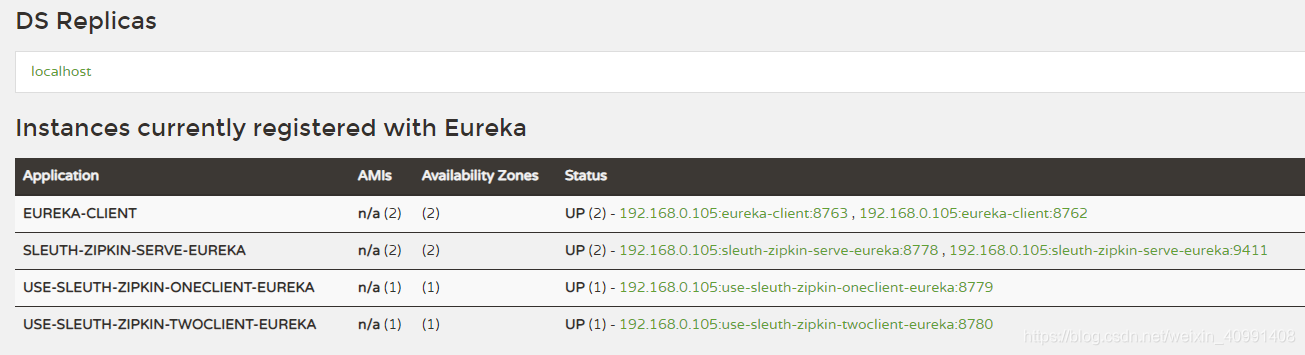
启动 eureka-serve、eureka-client(8762、8763两个端口)、sleuth-zipkin-serve-eureka 、use-sleuth-zipkin-oneclient-eureka 、use-sleuth-zipkin-twoclient-eureka 服务。
在浏览器上访问:http://localhost:8761/
在浏览器上 访问http://localhost:8779/FeignOneController/hi/java ,返回:
hi!java,im from port:8763
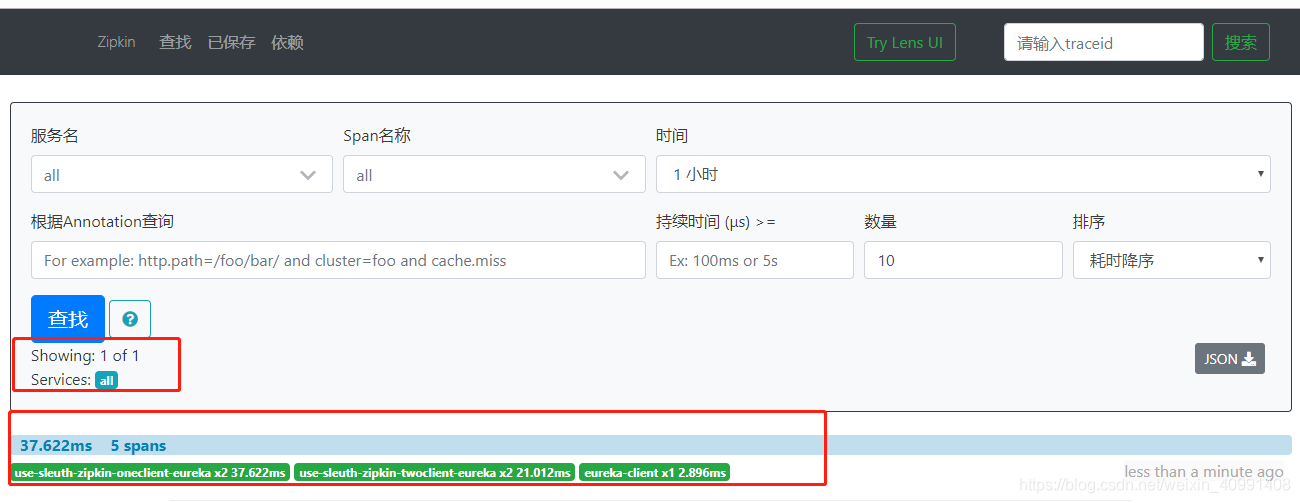
这时再打开地址:http://localhost:8778/zipkin/,点击对应按钮进行查看,可以看到有一条记录:
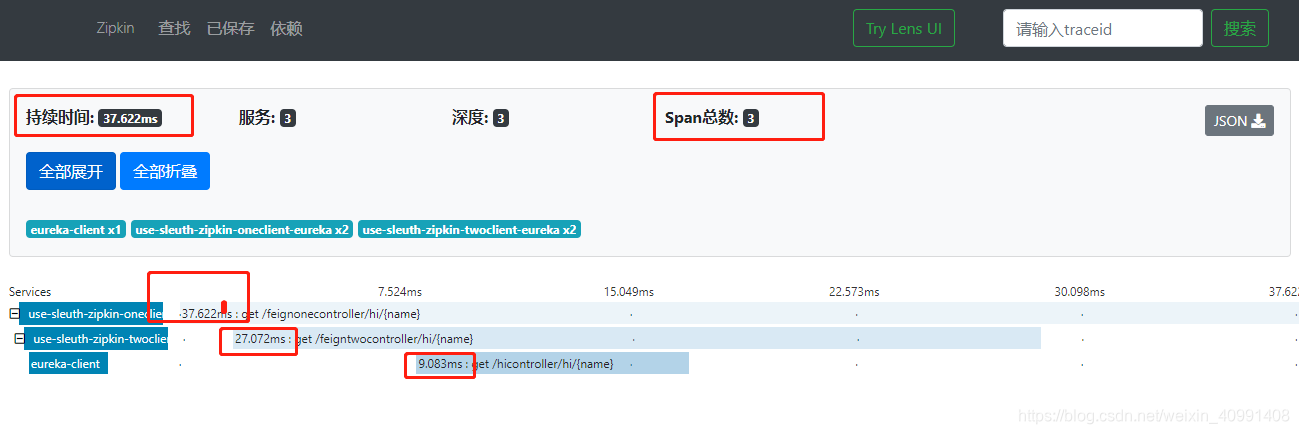
点击记录进去页面,可以看到每一个服务所耗费的时间和顺序
点击依赖分析,可以看到项目之间的调用关系

参考资料
http://www.ityouknow.com/springcloud/2018/02/02/spring-cloud-sleuth-zipkin.html
https://blog.csdn.net/forezp/article/details/81041078
学习过程中发现的问题及解决方法:
https://blog.csdn.net/weixin_42403773/article/details/101106720
https://www.cnblogs.com/xc-chejj/p/11344621.html
https://blog.csdn.net/lc1010078424/article/details/86540312
