
YoloV3
YoloV3作为最经典的一步法的模型之一,在精度中等的情况下并保证了很快的速度。

YoloV3框架
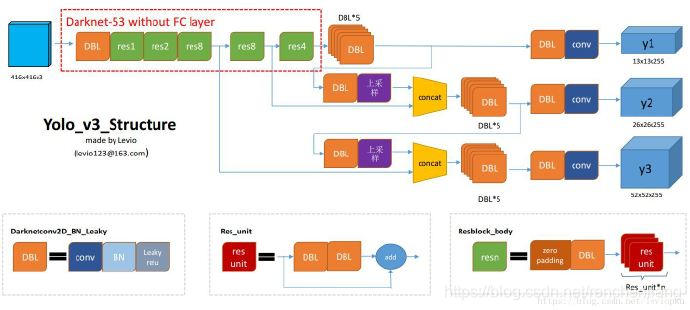
与大部分网络一样,首先是特征提取层。YoloV3采用了DarkNet53。YoloV3在其基础上得到了13×13的特征图m,再将其上采样并与DarkNet53中间得到的特征图合并得到26×26,同理再将26×26上采样得到52*52的特征图。 至于通道数为什么是255,d这不是随意取的,而是((4+1+80)×3),这将在下面解释。
Yolo系列的核心思想就是特征图中的每一个网格都会去预测一个物体。也就是最后得到的13×13,共169个网格,这169个网格都会分别去预测它对应网格的物体属于哪一个。而预测物体会得到boundingBox4个坐标,1个边框置信度以及coco数据集80个类别的概率(4+1+80)。至于为什么要×3呢,这归咎与anchor的存在(这将在后面说明)。 至此,一张图片经过DarkNet网络,得到了13×13×255,26×26×255,52×52×255金字塔特征图。后面所有的位置,种类预测也都是基于这3个不同大小的特征图。
anchor
如果没有anchor的话,直接这13×13中的1个特征像素对应原图32个像素(因为下采样了32倍),这样的话,32个像素肯定不能包含整个物体,而是某物体的一部分,最后再将所有同一类d别的的像素进行合并。这种方法,我个人觉得1是精度不高,2是训练困难。cce
anchor相当于把这32个像素的位置放大了。为了尽可能让anchor尽可能的准确包含物体,yoloV3为每个网格提供了3种先验框。这样总共3层特征图,聚类出3×3种尺寸的先验框(不同的数据集会稍有不同)。在COCO数据集这9个先验框是:
[(10x13),(16x30),(33x23)]—对应52×52网格;
[(30x61),(62x45),(59x119)]—对应26×26网格;
[(116x90),(156x198),(373x326)]—对应13×13网格。
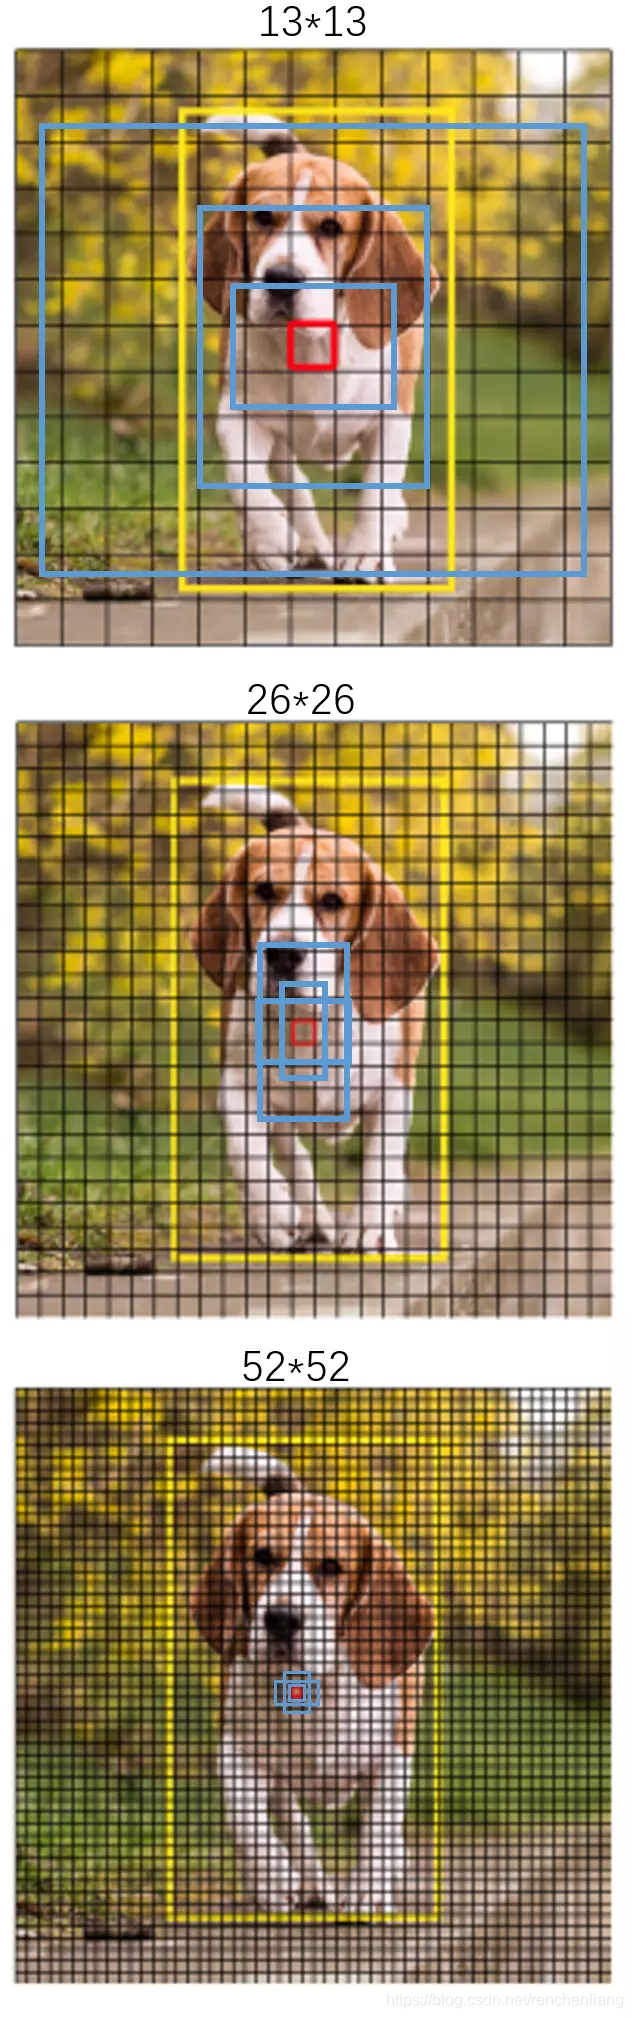
红色框是1313中的每一个网格。例如坐标为(10,5),那么它对应原图位置为(1032,532)像素点的位置。这样我们再以这个点为中心,找出附近[(116x90),(156x198),(373x326)]3个框的位置。例如第一个anchor对应的框为(1032-116/2,5*32-90/2,116,90)…遇到边界置0就好了。这样每一个网格就负责原图这3个位置的物体位置,类别预测,而这里最终预测的物体位置也是相对于anchor的位置(最后可还原至原图)。
同理,另外26×26,52×52的特征图也是这样预测物体位置的。
损失函数。
网络输出需要经过decode解码得到bbox的pred预测输出
        return tensor of shape [batch_size, output_size, output_size, anchor_per_scale, 5 + num_classes]
               contains (x, y, w, h, score, probability)
        """# 获得输入数据的形状conv_shape =tf.shape(conv_output)batch_size =conv_shape[0]output_size =conv_shape[1]# 每个gred预测3个box(只有包含box中心的grep才进行预测)anchor_per_scale =len(anchors)conv_output =tf.reshape(conv_output,(batch_size,output_size,output_size,anchor_per_scale,5+self.num_class))# 获得每个gred预测的box中心坐标的偏移值,conv_raw_dxdy =conv_output[:,:,:,:,0:2]# 表示高宽的缩放比conv_raw_dwdh =conv_output[:,:,:,:,2:4]# 会的box预测每个类别的置信度conv_raw_conf =conv_output[:,:,:,:,4:5]# 每种类别的概率conv_raw_prob =conv_output[:,:,:,:,5:]# 对没一列进进行标号,假设output_size = 5得到如下# [0 0 0 0 0]# [1 1 1 1 1]# [2 2 2 2 2]# [3 3 3 3 3]# [4 4 4 4 4]]y =tf.tile(tf.range(output_size,dtype=tf.int32)[:,tf.newaxis],[1,output_size])# 对没一列进进行标号,假设output_size = 5得到如下# [[0 1 2 3 4]#  [0 1 2 3 4]#  [0 1 2 3 4]#  [0 1 2 3 4]#  [0 1 2 3 4]]x =tf.tile(tf.range(output_size,dtype=tf.int32)[tf.newaxis,:],[output_size,1])# 获得每个gred的坐标,如:# [(0,0),(0,1),(0,2),(0,3),(0,4)]# ......# ......# [(4,0),(4,1),(4,2),(4,3),(4,4)]xy_grid =tf.concat([x[:,:,tf.newaxis],y[:,:,tf.newaxis]],axis=-1)# 再增加一个batch_size与anchor_per_scale的维度,最终形成的xy_grid包含每个batch_size,每个张图片gred的坐标,及3个预测的anchor_per_scalexy_grid =tf.tile(xy_grid[tf.newaxis,:,:,tf.newaxis,:],[batch_size,1,1,anchor_per_scale,1])xy_grid =tf.cast(xy_grid,tf.float32)# conv_raw_dxdy相对于中心点偏移值,* stride复原到原图像中pred_xy =(tf.sigmoid(conv_raw_dxdy)+xy_grid)*stride # conv_raw_dwdh,表示高宽的缩放比pred_wh =(tf.exp(conv_raw_dwdh)*anchors)*stride # 进行合并pred_xywh =tf.concat([pred_xy,pred_wh],axis=-1)# 置信度pred_conf =tf.sigmoid(conv_raw_conf)# 类别概率pred_prob =tf.sigmoid(conv_raw_prob)returntf.concat([pred_xywh,pred_conf,pred_prob],axis=-1)```
损失函数是由boundingBox,类别,置信度组成。
def loss_layer(self, conv, pred, label, bboxes, anchors, stride):
print(conv.shape)
print(pred.shape)
print(label.shape)
print(bboxes.shape)
conv_shape = tf.shape(conv)
batch_size = conv_shape[0]
output_size = conv_shape[1]
input_size = stride * output_size
conv = tf.reshape(conv, (batch_size, output_size, output_size,
self.anchor_per_scale, 5 + self.num_class))
conv_raw_conf = conv[:, :, :, :, 4:5] #没有通过anchors计算的置信度,即没有经过decode的原始网络的输出
conv_raw_prob = conv[:, :, :, :, 5:] #没有通过anchors计算的类别概率
pred_xywh = pred[:, :, :, :, 0:4] #通过anchors decode计算得到的中心坐标以及长宽
pred_conf = pred[:, :, :, :, 4:5] #通过anchors计算的类别的置信度
label_xywh = label[:, :, :, :, 0:4] # 每个cell真实3个box对应的中心坐标以及长框
respond_bbox = label[:, :, :, :, 4:5] # 每个cell真实3个box的置信度
label_prob = label[:, :, :, :, 5:] # 每个cell真实3个box种类的概率
giou = tf.expand_dims(self.bbox_giou(pred_xywh, label_xywh), axis=-1)
print('giou', giou.shape)
input_size = tf.cast(input_size, tf.float32)
bbox_loss_scale = 2.0 - 1.0 * label_xywh[:, :, :, :, 2:3] * label_xywh[:, :, :, :, 3:4] / (input_size ** 2)
giou_loss = respond_bbox * bbox_loss_scale * (1- giou)
iou = self.bbox_iou(pred_xywh[:, :, :, :, np.newaxis, :], bboxes[:, np.newaxis, np.newaxis, np.newaxis, :, :])
max_iou = tf.expand_dims(tf.reduce_max(iou, axis=-1), axis=-1)
respond_bgd = (1.0 - respond_bbox) * tf.cast( max_iou < self.iou_loss_thresh, tf.float32 )
conf_focal = self.focal(respond_bbox, pred_conf)
conf_loss = conf_focal * (
respond_bbox * tf.nn.sigmoid_cross_entropy_with_logits(labels=respond_bbox, logits=conv_raw_conf)
+
respond_bgd * tf.nn.sigmoid_cross_entropy_with_logits(labels=respond_bbox, logits=conv_raw_conf)
)
prob_loss = respond_bbox * tf.nn.sigmoid_cross_entropy_with_logits(labels=label_prob, logits=conv_raw_prob)
giou_loss = tf.reduce_mean(tf.reduce_sum(giou_loss, axis=[1,2,3,4]))
conf_loss = tf.reduce_mean(tf.reduce_sum(conf_loss, axis=[1,2,3,4]))
prob_loss = tf.reduce_mean(tf.reduce_sum(prob_loss, axis=[1,2,3,4]))
return giou_loss, conf_loss, prob_loss
<div class="hljs-button signin" data-title="登录后复制"></div></code><ul class="pre-numbering" style=""><li style="color: rgb(153, 153, 153);">1</li><li style="color: rgb(153, 153, 153);">2</li><li style="color: rgb(153, 153, 153);">3</li><li style="color: rgb(153, 153, 153);">4</li><li style="color: rgb(153, 153, 153);">5</li><li style="color: rgb(153, 153, 153);">6</li><li style="color: rgb(153, 153, 153);">7</li><li style="color: rgb(153, 153, 153);">8</li><li style="color: rgb(153, 153, 153);">9</li><li style="color: rgb(153, 153, 153);">10</li><li style="color: rgb(153, 153, 153);">11</li><li style="color: rgb(153, 153, 153);">12</li><li style="color: rgb(153, 153, 153);">13</li><li style="color: rgb(153, 153, 153);">14</li><li style="color: rgb(153, 153, 153);">15</li><li style="color: rgb(153, 153, 153);">16</li><li style="color: rgb(153, 153, 153);">17</li><li style="color: rgb(153, 153, 153);">18</li><li style="color: rgb(153, 153, 153);">19</li><li style="color: rgb(153, 153, 153);">20</li><li style="color: rgb(153, 153, 153);">21</li><li style="color: rgb(153, 153, 153);">22</li><li style="color: rgb(153, 153, 153);">23</li><li style="color: rgb(153, 153, 153);">24</li><li style="color: rgb(153, 153, 153);">25</li><li style="color: rgb(153, 153, 153);">26</li><li style="color: rgb(153, 153, 153);">27</li><li style="color: rgb(153, 153, 153);">28</li><li style="color: rgb(153, 153, 153);">29</li><li style="color: rgb(153, 153, 153);">30</li><li style="color: rgb(153, 153, 153);">31</li><li style="color: rgb(153, 153, 153);">32</li><li style="color: rgb(153, 153, 153);">33</li><li style="color: rgb(153, 153, 153);">34</li><li style="color: rgb(153, 153, 153);">35</li><li style="color: rgb(153, 153, 153);">36</li><li style="color: rgb(153, 153, 153);">37</li><li style="color: rgb(153, 153, 153);">38</li><li style="color: rgb(153, 153, 153);">39</li><li style="color: rgb(153, 153, 153);">40</li><li style="color: rgb(153, 153, 153);">41</li><li style="color: rgb(153, 153, 153);">42</li><li style="color: rgb(153, 153, 153);">43</li><li style="color: rgb(153, 153, 153);">44</li><li style="color: rgb(153, 153, 153);">45</li><li style="color: rgb(153, 153, 153);">46</li><li style="color: rgb(153, 153, 153);">47</li><li style="color: rgb(153, 153, 153);">48</li><li style="color: rgb(153, 153, 153);">49</li><li style="color: rgb(153, 153, 153);">50</li><li style="color: rgb(153, 153, 153);">51</li><li style="color: rgb(153, 153, 153);">52</li><li style="color: rgb(153, 153, 153);">53</li><li style="color: rgb(153, 153, 153);">54</li><li style="color: rgb(153, 153, 153);">55</li><li style="color: rgb(153, 153, 153);">56</li></ul></pre>
<h3><a name="t4"></a><a name="t4"></a><a id="_79"></a>中心坐标损失</h3>
<p><img alt="在这里插入图片描述" src="https://img-blog.csdnimg.cn/20190927202727775.png"><br>
x,y为label框的中心坐标,上面带符号的为预测中心坐标的位置。I为该位置是否是背景,是为0,否则为1。S×S为特征图网格的大小,分别为13,26,52。B为anchor的数量,为3。</p>
<h3><a name="t5"></a><a name="t5"></a><a id="_82"></a>宽高坐标损失</h3>
<p><img alt="在这里插入图片描述" src="https://img-blog.csdnimg.cn/20190927203120813.png"></p>
<h3><a name="t6"></a><a name="t6"></a><a id="_84"></a>置信度损失</h3>
<p><img alt="在这里插入图片描述" src="https://img-blog.csdnimg.cn/20190927203136518.png"></p>
<h3><a name="t7"></a><a name="t7"></a><a id="_86"></a>分类损失</h3>
<p><img alt="在这里插入图片描述" src="https://img-blog.csdnimg.cn/2019092720393520.png"></p>
<p>这里的j,没有进行求和。因此3个anchor只取IOU>阈值且最大的那个anchor求损失,另外2个不需要。 z</p>
<h3><a name="t8"></a><a name="t8"></a><a id="yoloV3_94"></a>yoloV3损失函数</h3>
<p><img alt="在这里插入图片描述" src="https://img-blog.csdnimg.cn/20190927205526439.png?x-oss-process=image/watermark,type_ZmFuZ3poZW5naGVpdGk,shadow_10,text_aHR0cHM6Ly9ibG9nLmNzZG4ubmV0L3JlbmNoZW5saWFuZw==,size_16,color_FFFFFF,t_70"></p>
</div>
<link href="https://csdnimg.cn/release/phoenix/mdeditor/markdown_views-b6c3c6d139.css" rel="stylesheet">
<div class="more-toolbox">
<div class="left-toolbox">
<ul class="toolbox-list">
<li class="tool-item tool-active is-like "><a href="javascript:;"><svg class="icon" aria-hidden="true">
<use xmlns:xlink="http://www.w3.org/1999/xlink" xlink:href="#csdnc-thumbsup"></use>
</svg><span class="name">点赞</span>
<span class="count"></span>
</a></li>
<li class="tool-item tool-active is-collection "><a href="javascript:;" data-report-click="{"mod":"popu_824"}"><svg class="icon" aria-hidden="true">
<use xmlns:xlink="http://www.w3.org/1999/xlink" xlink:href="#icon-csdnc-Collection-G"></use>
</svg><span class="name">收藏</span></a></li>
<li class="tool-item tool-active is-share"><a href="javascript:;"><svg class="icon" aria-hidden="true">
<use xmlns:xlink="http://www.w3.org/1999/xlink" xlink:href="#icon-csdnc-fenxiang"></use>
</svg>分享</a></li>
<!--打赏开始-->
<!--打赏结束-->
<li class="tool-item tool-more">
<a>
<svg t="1575545411852" class="icon" viewBox="0 0 1024 1024" version="1.1" xmlns="http://www.w3.org/2000/svg" p-id="5717" xmlns:xlink="http://www.w3.org/1999/xlink" width="200" height="200"><defs><style type="text/css"></style></defs><path d="M179.176 499.222m-113.245 0a113.245 113.245 0 1 0 226.49 0 113.245 113.245 0 1 0-226.49 0Z" p-id="5718"></path><path d="M509.684 499.222m-113.245 0a113.245 113.245 0 1 0 226.49 0 113.245 113.245 0 1 0-226.49 0Z" p-id="5719"></path><path d="M846.175 499.222m-113.245 0a113.245 113.245 0 1 0 226.49 0 113.245 113.245 0 1 0-226.49 0Z" p-id="5720"></path></svg>
</a>
<ul class="more-box">
<li class="item"><a class="article-report">文章举报</a></li>
</ul>
</li>
</ul>
</div>
</div>
<div class="person-messagebox">
<div class="left-message"><a href="https://blog.csdn.net/renchenliang">
<img src="https://profile.csdnimg.cn/4/6/2/3_renchenliang" class="avatar_pic" username="renchenliang">
<img src="https://g.csdnimg.cn/static/user-reg-year/1x/3.png" class="user-years">
</a></div>
<div class="middle-message">
<div class="title"><span class="tit"><a href="https://blog.csdn.net/renchenliang" data-report-click="{"mod":"popu_379"}" target="_blank">renchenliang</a></span>
</div>
<div class="text"><span>发布了4 篇原创文章</span> · <span>获赞 0</span> · <span>访问量 106</span></div>
</div>
<div class="right-message">
<a href="https://im.csdn.net/im/main.html?userName=renchenliang" target="_blank" class="btn btn-sm btn-red-hollow bt-button personal-letter">私信
</a>
<a class="btn btn-sm bt-button personal-watch" data-report-click="{"mod":"popu_379"}">关注</a>
</div>
</div>
</div>

YoloV3
YoloV3作为最经典的一步法的模型之一,在精度中等的情况下并保证了很快的速度。
YoloV3框架
与大部分网络一样,首先是特征提取层。YoloV3采用了DarkNet53。YoloV3在其基础上得到了13×13的特征图m,再将其上采样并与DarkNet53中间得到的特征图合并得到26×26,同理再将26×26上采样得到52*52的特征图。 至于通道数为什么是255,d这不是随意取的,而是((4+1+80)×3),这将在下面解释。
Yolo系列的核心思想就是特征图中的每一个网格都会去预测一个物体。也就是最后得到的13×13,共169个网格,这169个网格都会分别去预测它对应网格的物体属于哪一个。而预测物体会得到boundingBox4个坐标,1个边框置信度以及coco数据集80个类别的概率(4+1+80)。至于为什么要×3呢,这归咎与anchor的存在(这将在后面说明)。 至此,一张图片经过DarkNet网络,得到了13×13×255,26×26×255,52×52×255金字塔特征图。后面所有的位置,种类预测也都是基于这3个不同大小的特征图。
anchor
如果没有anchor的话,直接这13×13中的1个特征像素对应原图32个像素(因为下采样了32倍),这样的话,32个像素肯定不能包含整个物体,而是某物体的一部分,最后再将所有同一类d别的的像素进行合并。这种方法,我个人觉得1是精度不高,2是训练困难。cce
anchor相当于把这32个像素的位置放大了。为了尽可能让anchor尽可能的准确包含物体,yoloV3为每个网格提供了3种先验框。这样总共3层特征图,聚类出3×3种尺寸的先验框(不同的数据集会稍有不同)。在COCO数据集这9个先验框是:
[(10x13),(16x30),(33x23)]—对应52×52网格;
[(30x61),(62x45),(59x119)]—对应26×26网格;
[(116x90),(156x198),(373x326)]—对应13×13网格。
红色框是1313中的每一个网格。例如坐标为(10,5),那么它对应原图位置为(1032,532)像素点的位置。这样我们再以这个点为中心,找出附近[(116x90),(156x198),(373x326)]3个框的位置。例如第一个anchor对应的框为(1032-116/2,5*32-90/2,116,90)…遇到边界置0就好了。这样每一个网格就负责原图这3个位置的物体位置,类别预测,而这里最终预测的物体位置也是相对于anchor的位置(最后可还原至原图)。
同理,另外26×26,52×52的特征图也是这样预测物体位置的。
损失函数。
网络输出需要经过decode解码得到bbox的pred预测输出
        return tensor of shape [batch_size, output_size, output_size, anchor_per_scale, 5 + num_classes]
               contains (x, y, w, h, score, probability)
        """# 获得输入数据的形状conv_shape =tf.shape(conv_output)batch_size =conv_shape[0]output_size =conv_shape[1]# 每个gred预测3个box(只有包含box中心的grep才进行预测)anchor_per_scale =len(anchors)conv_output =tf.reshape(conv_output,(batch_size,output_size,output_size,anchor_per_scale,5+self.num_class))# 获得每个gred预测的box中心坐标的偏移值,conv_raw_dxdy =conv_output[:,:,:,:,0:2]# 表示高宽的缩放比conv_raw_dwdh =conv_output[:,:,:,:,2:4]# 会的box预测每个类别的置信度conv_raw_conf =conv_output[:,:,:,:,4:5]# 每种类别的概率conv_raw_prob =conv_output[:,:,:,:,5:]# 对没一列进进行标号,假设output_size = 5得到如下# [0 0 0 0 0]# [1 1 1 1 1]# [2 2 2 2 2]# [3 3 3 3 3]# [4 4 4 4 4]]y =tf.tile(tf.range(output_size,dtype=tf.int32)[:,tf.newaxis],[1,output_size])# 对没一列进进行标号,假设output_size = 5得到如下# [[0 1 2 3 4]#  [0 1 2 3 4]#  [0 1 2 3 4]#  [0 1 2 3 4]#  [0 1 2 3 4]]x =tf.tile(tf.range(output_size,dtype=tf.int32)[tf.newaxis,:],[output_size,1])# 获得每个gred的坐标,如:# [(0,0),(0,1),(0,2),(0,3),(0,4)]# ......# ......# [(4,0),(4,1),(4,2),(4,3),(4,4)]xy_grid =tf.concat([x[:,:,tf.newaxis],y[:,:,tf.newaxis]],axis=-1)# 再增加一个batch_size与anchor_per_scale的维度,最终形成的xy_grid包含每个batch_size,每个张图片gred的坐标,及3个预测的anchor_per_scalexy_grid =tf.tile(xy_grid[tf.newaxis,:,:,tf.newaxis,:],[batch_size,1,1,anchor_per_scale,1])xy_grid =tf.cast(xy_grid,tf.float32)# conv_raw_dxdy相对于中心点偏移值,* stride复原到原图像中pred_xy =(tf.sigmoid(conv_raw_dxdy)+xy_grid)*stride # conv_raw_dwdh,表示高宽的缩放比pred_wh =(tf.exp(conv_raw_dwdh)*anchors)*stride # 进行合并pred_xywh =tf.concat([pred_xy,pred_wh],axis=-1)# 置信度pred_conf =tf.sigmoid(conv_raw_conf)# 类别概率pred_prob =tf.sigmoid(conv_raw_prob)returntf.concat([pred_xywh,pred_conf,pred_prob],axis=-1)```
损失函数是由boundingBox,类别,置信度组成。