ARKit的简单使用
ARKit
插件下载
该链接为我所使用的ARKit版本插件;最新版本的可到官网下载,需要Apple开发者账号。
介绍
本文是介绍在Unity引擎环境下,使用Apple ARKit来为iPhone或iPad设备制作一款AR应用,其中所需的最基础操作;及ARKit的简单的基本使用。由于项目比较急,我暂时还没有做更深入的解析,仅在插件最基本的应用阶段。
准备工作
想为iOS系统开发应用,需要具备一台搭载Mac OS系统的电脑,以及下载资源所需的Apple开发者账号。其它硬件与软件需求如下:
Unity引擎(需要使用Unity 2018.3或更新版本,该版本以前不支持ARKit2.0);
Unity ARKit插件;
Xcode 9测试版;
macOS High Sierra 10.13测试版;
搭载iOS 11测试版与A9或A10处理器的Apple设备。
场景
场景中最主要的需要的三个类:UnityARVideo,UnityARCameraNearFar,UnityARCameraManager。
- UnityARVideo:用于Camera
是通过CommandBuffer将iOS设备的摄像头图像绘制到Unity的Camera中的类。通过AddComponent添加到相机下并使用它。此外,如果SkyBox等出现在相机上,相机的图像将被隐藏,因此您需要将相机的清除标志设置为仅适用于深度(Depth only)。- UnityARCameraNearFar:用于Camera
在Unity镜头剪切面的近/远类适当设置。将它添加到主相机并使用它。- UnityARCameraManager:
除了使摄像机的运动与终端的运动同步以外,还可以设置多个项目的类别。通过AddComponent添加到任意的GameObject中,使用相机的引用并使用它。
如图,以插件本身的UnityARImageAnchor场景中的为例:


在这种状态下,如果在执行过程中检查MainCamera的位置和Debug.Log等位置,可以看到MainCamera的位置与摄像机的运动同步移动。
创建ARReference和ARReferenceSet
在UnityARCameraManager的组件脚本中,我们可以看到有两个字段需要我们添加。

这两个分别表示我们需要扫描的物体类型:Image Tracking和Object Tracking,前者为图片,后者为物体。将相应的对象放入其中,程序便可识别运行。
下面是创建对应对象的步骤:

如图,我们可以创建我们想要的几个对象,再进行设置。
ARReference
图片和对象的设置属性基本相同,这里我们用图片举例:
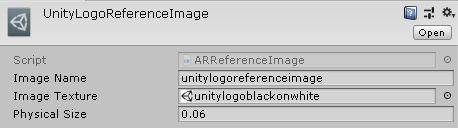
三个属性,分别为名字,图片和大小。名字自己起,只要确保不要用中文和重复便可;再将需要扫描的图片直接拖入框中即可。

还有一个注意的是,创建Object对象时,其中第一个属性是名字;第二个属性是一种后缀为arobject的文件,其创建方式可在官网中找到具体方式,由于我的项目中用不到,所以我暂时没有仔细研究,这里附上该处的官网链接。
ARReferenceSet
之后便是ARReferenceSet的创建,这里图片和对象的设置属性都是一样的。都是名字和ARReference对象的链表
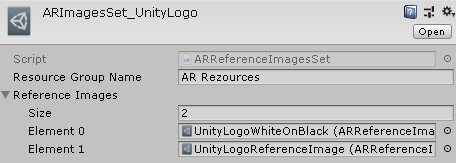
再将创建完成的ARReferenceSet对象放入UnityARCameraManager组件脚本对应的位置即可。
代码
示例
以下为示例UnityARImageAnchor中的代码:
using UnityEngine;
using UnityEngine.XR.iOS;

public class GenerateImageAnchor : MonoBehaviour
{
    [SerializeField]
    private ARReferenceImage referenceImage;
    [SerializeField]
    private GameObject prefabToGenerate;
    private GameObject imageAnchorGO;

    void Start()
    {
        UnityARSessionNativeInterface.ARImageAnchorAddedEvent += AddImageAnchor;
        UnityARSessionNativeInterface.ARImageAnchorUpdatedEvent += UpdateImageAnchor;
        UnityARSessionNativeInterface.ARImageAnchorRemovedEvent += RemoveImageAnchor;
    }

    void AddImageAnchor(ARImageAnchor arImageAnchor)
    {
        Debug.Log("image anchor added");
        if (arImageAnchor.referenceImageName == referenceImage.imageName)
        {
            Vector3 position = UnityARMatrixOps.GetPosition(arImageAnchor.transform);
            Quaternion rotation = UnityARMatrixOps.GetRotation(arImageAnchor.transform);
            imageAnchorGO = Instantiate<GameObject>(prefabToGenerate, position, rotation);
        }
    }

    void UpdateImageAnchor(ARImageAnchor arImageAnchor)
    {
        Debug.Log("image anchor updated");
        if (arImageAnchor.referenceImageName == referenceImage.imageName)
        {
            imageAnchorGO.transform.position = UnityARMatrixOps.GetPosition(arImageAnchor.transform);
            imageAnchorGO.transform.rotation = UnityARMatrixOps.GetRotation(arImageAnchor.transform);
        }
    }

    void RemoveImageAnchor(ARImageAnchor arImageAnchor)
    {
        Debug.Log("image anchor removed");
        if (imageAnchorGO)
        {
            GameObject.Destroy(imageAnchorGO);
        }
    }

    void OnDestroy()
    {
        UnityARSessionNativeInterface.ARImageAnchorAddedEvent -= AddImageAnchor;
        UnityARSessionNativeInterface.ARImageAnchorUpdatedEvent -= UpdateImageAnchor;
        UnityARSessionNativeInterface.ARImageAnchorRemovedEvent -= RemoveImageAnchor;
    }
}
其中最主要的便是UnityEngine.XR.iOS命名空间下的UnityARSessionNativeInterface类。顾名思义,它有一个与本地ARKit桥接的作用,可以接收后面描述的检测结果的获取作为这个类的代表。
我的项目中用到的便是图像识别,用的就是上面的代码,只是我不是实例化(Instantiate)对象,而是使用GameObject.SetAction函数对对象进行显示隐藏操作。
private void AddImageAnchor(ARImageAnchor arImageAnchor)
{
    Debug.Log("image anchor showed");
    if (arImageAnchor.referenceImageName == referenceImage.imageName)
    {
        Vector3 position = UnityARMatrixOps.GetPosition(arImageAnchor.transform);
        Quaternion rotation = UnityARMatrixOps.GetRotation(arImageAnchor.transform);
        imageAnchorGO.transform.position = position;
        imageAnchorGO.transform.rotation = rotation;
        imageAnchorGO.SetActive(true);
    }
}
引用
下面是我在网上找到的网文对UnityARSessionNativeInterface类的一些静态属性的介绍,这里介绍记录一下。
先上链接:https://www.jianshu.com/p/251b0893fa86
接收ARKit检测到的特征点:
可以使用名为UnityARSessionNativeInterface.ARFrameUpdatedEvent的委托方法接收ARKit检测到的特征点的更新。
public void Start()
{
	UnityARSessionNativeInterface.ARFrameUpdatedEvent + = ARFrameUpdated;
}
public void ARFrameUpdated(UnityAR Camera camera)
{
	Vector3 [] pointCloud = camera.pointCloudData;
}
UnityARCamera具有pointCloudData属性,特征点的位置以Vector3的数组存储。
在Unity ARKit插件的示例中,相应的处理在名为PointCloudParticleExample的类中实现。
接收ARKit检测到的平面信息
ARKit的检测平面信息是UnityARSessionNativeInterface.ARAnchorAddedEvent,UnityARSessionNativeInterface.ARAnchorUpdatedEvent,UnityARSessionNativeInterface.ARAnchorRemovedEvent可以接收三个委托方法。
public void Start()
{
	UnityARSessionNativeInterface.ARAnchorAddedEvent + = AddAnchor;
	UnityARSessionNativeInterface.ARAnchorUpdatedEvent + = UpdateAnchor;
	UnityARSessionNativeInterface.ARAnchorRemovedEvent + = RemoveAnchor;
}
public void AddAnchor(ARPlaneAnchor arPlaneAnchor)
{
	Debug.Log();
}
public  RemoveAnchor(ARPlaneAnchor arPlaneAnchor)
{
	Debug.Log();
}
public void UpdateAnchor(ARPlaneAnchor arPlaneAnchor)
{
	Debug.Log();
}
平面信息存储在ARPlaneAnchor结构中。
为了实现计划信息游戏物体,在存储必要的信息,ARPlaneAnchorGameObject使用,受到游戏物体和如下ARPlaneAnchor它有一套。
targetGameObject.name = arPlaneAnchor.identifier;
ARPlaneAnchorGameObject arpag = new ARPlaneAnchorGameObject();
arpag.planeAnchor = arPlaneAnchor;
arpag.gameObject = UpdatePlaneWithAnchorTransform(targetGameObject,arPlaneAnchor);
另外,由于ARPlaneAnchor与 PointCloud 不同,它的连续性。
如下更新。
UpdatePlaneWithAnchorTransform(arpag.gameobject,arPlaneAnchor);
在Unity ARKit插件的示例中,相应的处理在名为UnityARAnchorManager的类中实现。
UnityARAnchorManager在,UnityARUtility已成为实施有地板到一个预制,如果是在一个单一的预制没问题,是顺利的利用。
根据现实显示影子
为了显示阴影,需要以下三个步骤。
- 将UnityARCameraManager的EnableLightEstimation设置为true。
- 在统一DirectionalLight的创建,UnityARAmbient到AddComponent的。
- 由于shadowPlaneMaterial是作为仅显示阴影的素材准备的,请将其设置为floor等。
打包
该项目打包,可使用Xcode将项目打包成IPA,发布到IOS的一般过程即可。
