ActiveMQ的P2P示例(点对点通信)
(1)下载安装activemq,启动activeMQ。
详细步骤参考博客:http://www.cnblogs.com/DFX339/p/9050878.html
(2)新建maven项目(java项目或者web项目都可以)
目录结构如下,需要编写的文件: Consumer.java Provider.java pom.xml

生产者的创建: Provider.java
package cn.dfx.activeMQ_demo.queue;

import javax.jms.Connection;
import javax.jms.ConnectionFactory;
import javax.jms.Destination;
import javax.jms.JMSException;
import javax.jms.MessageProducer;
import javax.jms.Session;
import javax.jms.TextMessage;

import org.apache.activemq.ActiveMQConnection;
import org.apache.activemq.ActiveMQConnectionFactory;
/**
 * activemq的消息
 * @author Administrator
 *
 */
public class Provider {

      public static void main(String[] args) {
          System.out.println("进入生产者--");
            //连接信息设置
            String username = "system";
            String password = "manager";
            String brokerURL = "failover://tcp://localhost:61616";
            //默认的URL的值:ActiveMQConnection.DEFAULT_BROKER_URL;
            System.out.println("默认的URL:"+brokerURL);
            //连接工厂
            ConnectionFactory connectionFactory = null;
            //连接
            Connection connection = null;
            //会话 接受或者发送消息的线程
            Session session = null;
            //消息的目的地
            Destination destination = null;
            //消息生产者
            MessageProducer messageProducer = null;
            //实例化连接工厂
            connectionFactory = new ActiveMQConnectionFactory(username, password, brokerURL);

            try {
                //通过连接工厂获取连接
                connection = connectionFactory.createConnection();
                //启动连接
                connection.start();
                //创建session
                session = connection.createSession(true, Session.AUTO_ACKNOWLEDGE);
                //创建一个名称为QueueTest的消息队列
                destination = session.createQueue("QueueTest");
                //创建消息生产者
                messageProducer = session.createProducer(destination);
                //发送消息
                TextMessage message = null;
                TextMessage message1 =  session.createTextMessage();
                message1.setText("这是字符串呀");
                for (int i=200; i<220; i++) {
                    //创建要发送的文本信息
                    message = session.createTextMessage("Queue消息测试" +(i+1));
                    //通过消息生产者发出消息
                    messageProducer.send(message);
                    messageProducer.send(message1);
                    System.out.println("发送成功:" + message.getText());
                }
                session.commit();
            } catch (Exception e) {
                e.printStackTrace();
            }finally{
                if(null != connection){
                    try {
                        connection.close();
                    } catch (JMSException e) {
                        e.printStackTrace();
                    }
                }
            }

        }
}
消费者的创建: Consumer.java
package cn.dfx.activeMQ_demo.queue;

import javax.jms.Session;
import javax.jms.Connection;
import javax.jms.ConnectionFactory;
import javax.jms.Destination;
import javax.jms.JMSException;
import javax.jms.MessageConsumer;
import javax.jms.MessageProducer;
import javax.jms.TextMessage;

import org.apache.activemq.ActiveMQConnection;
import org.apache.activemq.ActiveMQConnectionFactory;
public class Consumer {

    public static void main(String[] args) {
        System.out.println("进入消费者--");
        //连接信息设置
        String username = "system";
        String password = "manager";
        String brokerURL = ActiveMQConnection.DEFAULT_BROKER_URL;
        //连接工厂
        ConnectionFactory connectionFactory = null;
        //连接
        Connection connection = null;
        //会话 接受或者发送消息的线程
        Session session = null;
        //消息的目的地
        Destination destination = null;
        //消息消费者
        MessageConsumer messageConsumer = null;
        //实例化连接工厂
        connectionFactory = new ActiveMQConnectionFactory(username, password, brokerURL);

        try {
              System.out.println("消费者开始建立连接-----");
            //通过连接工厂获取连接
            connection = connectionFactory.createConnection();
            //启动连接
            connection.start();
            System.out.println("消费者开始启动连接-----");
            //创建session
            session = connection.createSession(false, Session.AUTO_ACKNOWLEDGE);
            //创建一个连接QueueTest的消息队列
            destination = session.createQueue("QueueTest");
            //创建消息消费者
            messageConsumer = session.createConsumer(destination);
            System.out.println("消费者创建后-----");
            while (true) {
                System.out.println("消费者准备接收消息-----");
                TextMessage textMessage = (TextMessage) messageConsumer.receive(100000);
                System.out.println("消费者成功接收消息-----");
                if(textMessage != null){
                    System.out.println("成功接收消息:" + textMessage.getText());
                }else {
                    break;
                }
            }
        } catch (JMSException e) {
            e.printStackTrace();
        }
    }
}
项目依赖包的配置文件: pom.xml
<project xmlns="http://maven.apache.org/POM/4.0.0" xmlns:xsi="http://www.w3.org/2001/XMLSchema-instance"
    xsi:schemaLocation="http://maven.apache.org/POM/4.0.0 http://maven.apache.org/maven-v4_0_0.xsd">
    <modelVersion>4.0.0</modelVersion>
    <groupId>cn.dfx</groupId>
    <artifactId>activeMQ_demo</artifactId>
    <packaging>war</packaging>
    <version>0.0.1-SNAPSHOT</version>
    <name>activeMQ_demo Maven Webapp</name>
    <url>http://maven.apache.org</url>
    <build>
        <finalName>activeMQ_demo</finalName>
        <plugins>
            <plugin>
                <inherited>true</inherited>
                <groupId>org.apache.maven.plugins</groupId>
                <artifactId>maven-compiler-plugin</artifactId>
                <version>3.5.1</version>
                <configuration>
                    <source>${compiler.source}</source>
                    <target>${compiler.target}</target>
                    <encoding>${project.build.sourceEncoding}</encoding>
                    <compilerArguments>
                        <extdirs>${project.basedir}/src/main/webapp/WEB-INF/lib</extdirs>
                    </compilerArguments>
                </configuration>
            </plugin>

        </plugins>
    </build>
    <properties>
        <project.build.sourceEncoding>UTF-8</project.build.sourceEncoding>
        <compiler.source>1.7</compiler.source>
        <compiler.target>1.7</compiler.target>

        <!-- servlet/jsp/EL (2.4/2.0/?)(2.5/2.1/2.1),(3.0/2.2/2.2),(3.1/2.3/3.0) -->
        <servlet.version>3.1.0</servlet.version>
        <jsp.version>2.3.1</jsp.version>
        <jstl.version>1.2</jstl.version>
        <junit.version>4.12</junit.version>
    </properties>
    <dependencies>
        <dependency>
            <groupId>junit</groupId>
            <artifactId>junit</artifactId>
            <version>${junit.version}</version>
            <scope>test</scope>
        </dependency>
        <dependency>
            <groupId>javax.servlet</groupId>
            <artifactId>javax.servlet-api</artifactId>
            <version>${servlet.version}</version>
            <scope>provided</scope>
        </dependency>
        <dependency>
            <groupId>javax.servlet.jsp</groupId>
            <artifactId>javax.servlet.jsp-api</artifactId>
            <version>${jsp.version}</version>
            <scope>provided</scope>
        </dependency>

        <!-- activemq的依赖 -->
        <dependency>
            <groupId>javax.jms</groupId>
             <artifactId>jms</artifactId>
            <version>1.1</version>
        </dependency>
        <dependency>
            <groupId>org.apache.activemq</groupId>
            <artifactId>activemq-pool</artifactId>
            <version>5.7.0</version>
        </dependency>
        <dependency>
            <groupId>org.apache.activemq</groupId>
            <artifactId>activemq-core</artifactId>
            <version>5.5.0</version>
        </dependency>

    <!-- 引入spring的相关依赖 -->
        <dependency>
            <groupId>org.springframework</groupId>
            <artifactId>spring-core</artifactId>
            <version>3.0.3.RELEASE</version>
        </dependency>
         <dependency>
            <groupId>org.springframework</groupId>
            <artifactId>spring-beans</artifactId>
            <version>3.0.3.RELEASE</version>
        </dependency>
        <dependency>
            <groupId>org.springframework</groupId>
            <artifactId>spring-aop</artifactId>
            <version>3.0.3.RELEASE</version>
        </dependency>
        <dependency>
            <groupId>org.springframework</groupId>
            <artifactId>spring-context</artifactId>
            <version>3.0.3.RELEASE</version>
        </dependency>
        <dependency>
            <groupId>org.slf4j</groupId>
            <artifactId>slf4j-simple</artifactId>
            <version>1.7.25</version>
        </dependency>
    </dependencies>
</project>
在这之前先启动 activemq
在这之前先启动 activemq
在这之前先启动 activemq
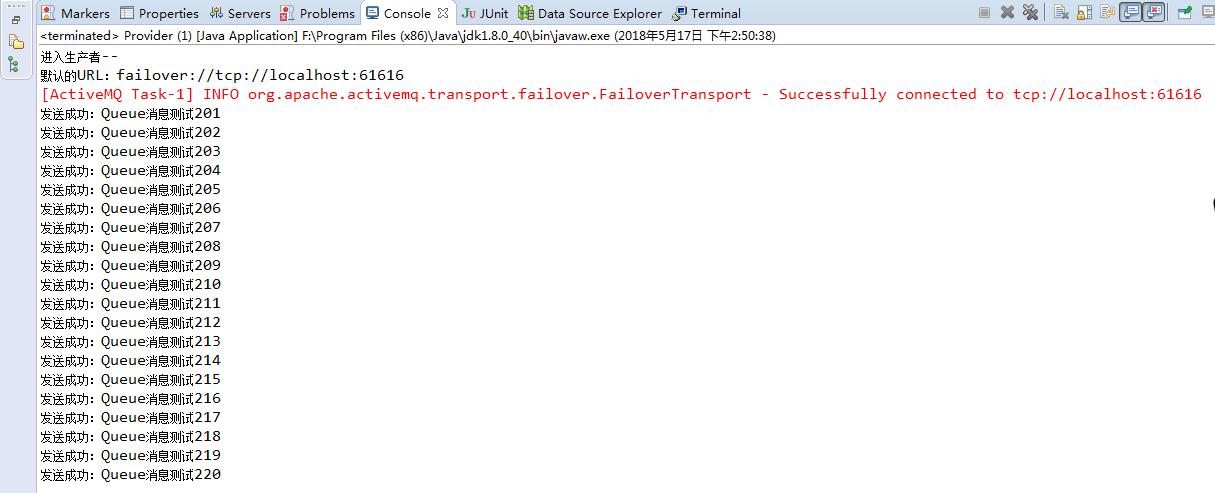
运行 Provider.java (发送消息到队列中), 出现如下结果:
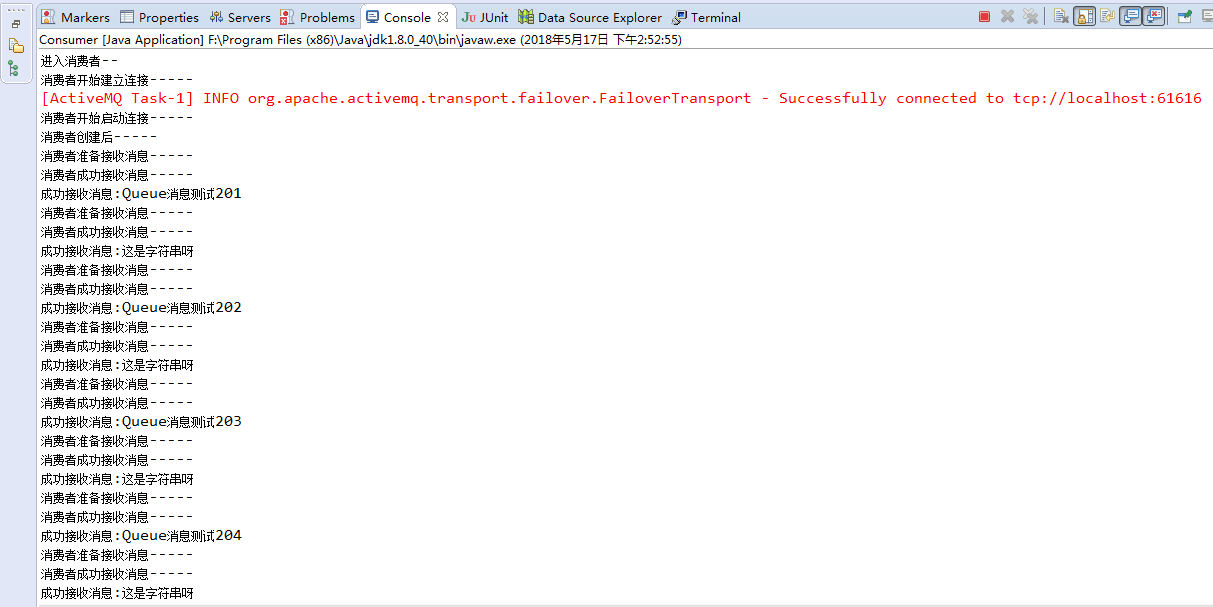
运行Consumer.java(从队列中取出消息) ,出现结果如下
注: 消息提供者(provider)可以不断的发送消息,消费者(consumer)一直会监听,然后读取。