版权声明:本文为博主原创文章,未经博主允许不得转载,如需帮助请qq联系1016258579,或者关注公众号 程序员日常锦集 ” 。 https://blog.csdn.net/weixin_38361347/article/details/87459871
springboot activemq(一)Queue(p2p)和Topic(发布订阅)
这里安装activemq就不再详细介绍。
安装 https://blog.csdn.net/weixin_38361347/article/details/83796570
导入依赖
<dependency>
    <groupId>org.springframework.boot</groupId>
    <artifactId>spring-boot-starter-activemq</artifactId>
</dependency>
注意发消息的端口是61616 , 采用tcp协议发送。
打开网页控制界面端口是8161,内部采用内嵌jetty服务器。
打开url是
http://127.0.0.1:8161/admin/
用户名密码默认为admin
###配置文件
spring.activemq.broker-url=tcp://127.0.0.1:61616
spring.activemq.in-memory=true
spring.activemq.pool.enabled=false
spring.activemq.password=admin
spring.activemq.user=admin
#springboot 默认开启点对点,订阅需要手动开启
#spring.jms.pub-sub-domain=true
###配置队列
 @Bean
    public Queue queue(){
        return new ActiveMQQueue("a.queue");
    }

    @Bean
    public Topic topic(){
        return new ActiveMQTopic("a.topic");
    }
首先来看point to point 简称p2p
消息队列
###设置队列模式
spring.jms.pub-sub-domain=false 默认就是false
###生产者
@Component
public class QueueSend {
    @Autowired
    JmsMessagingTemplate jmsMessagingTemplate;

    // 发送消息,destination是发送到的队列,message是待发送的消息
    public void send(Destination name, final  String message){
        jmsMessagingTemplate.convertAndSend(name,message);
    }
}
###消费者
@Component
public class QueueConsumer {
   @JmsListener(destination = "queue")
    public void receiveQueue(String text){
        System.out.println("QueueConsumer 接收到的消息:" + text);
    }
}
p2p 是点对点,一条消息只能有一个消费者进行消费。
receiveQueue1 接收到的消息:我是p2p消息。
控制台可以看到 2个消费者,入队1条,出队1条。

发布订阅
切记springboot默认支持p2p开启,发布订阅需要手动开启
spring.jms.pub-sub-domain=true
###生产者
@Component
public class TopicSend {

    @Autowired
    JmsMessagingTemplate jmsMessagingTemplate;

    // 发送消息,destination是发送到的队列,message是待发送的消息
    public void send(Destination name, final String message){
        jmsMessagingTemplate.convertAndSend(name,message);
    }

}
###消费者2个
@Component
public class TopicConsumer1 {

    @JmsListener(destination="a.topic")
    public void consumerMessage(String text){
        System.out.println("从TopicConsumer1 topic队列收到的回复报文为:"+text);
    }
}
@Component
public class TopicConsumer2 {

    @JmsListener(destination="topic")
    public void consumerMessage(String text){
        System.out.println("从TopicConsumer2 topic队列收到的回复报文为:"+text);
    }
}
如下:
从TopicConsumer1 topic队列收到的回复报文为:订阅消息。
从TopicConsumer2 topic队列收到的回复报文为:订阅消息。
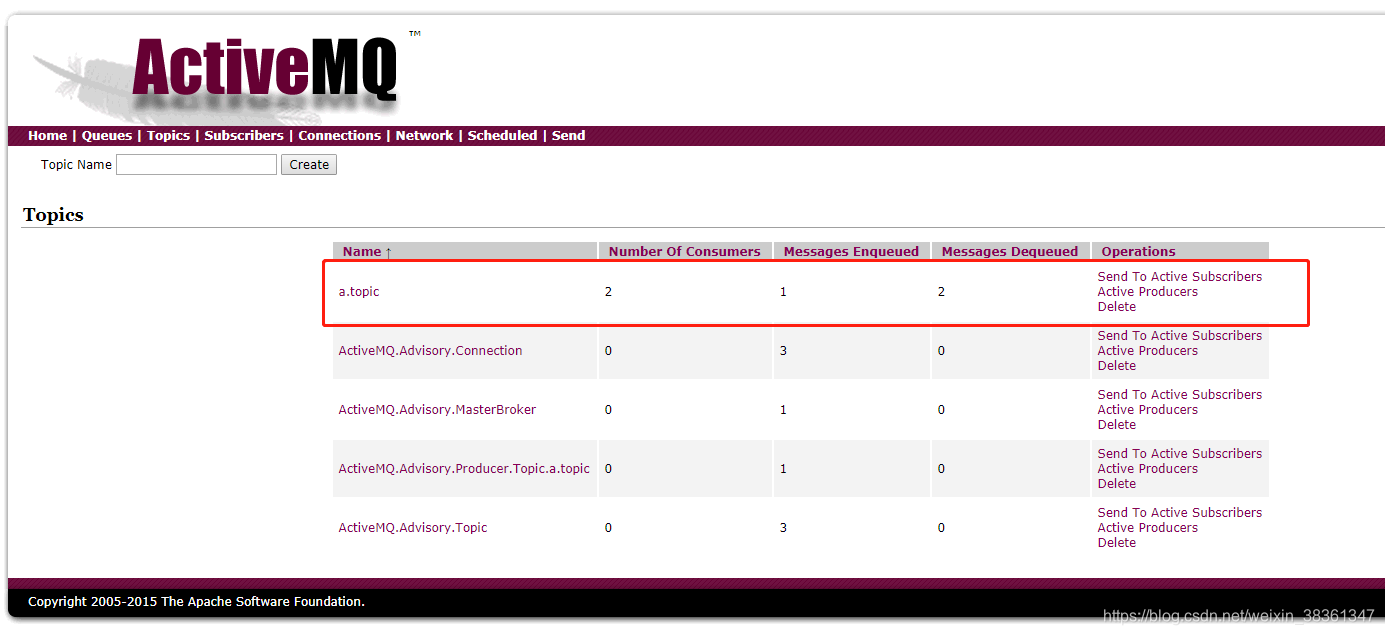
网页控制台可以看到
2个消费者,入对类1条消息,出队列2条消息!
订阅模式,发送一条消息,消费者都可以收到消息,所以是2两条。