车牌定位
开题
作为一个刚接触Python以及图像处理的小白,正好这次毕设题目是车牌识别,虽然毕设最终还是只能简单的实现部分车牌的识别,但还是希望能够将其记录下来,既是给自己做做笔记,也是希望能够给其他人一些帮助(因此在文章中可能会出现一些问题,希望大家指正并谅解)。说说正题——车牌识别主要分为三个模块:车牌定位、字符分割和字符识别。本篇文章主要是第一部分车牌定位部分的代码,部分代码参考自下面这位博主(非常感谢博主的分享):
链接: 车牌定位.
流程图
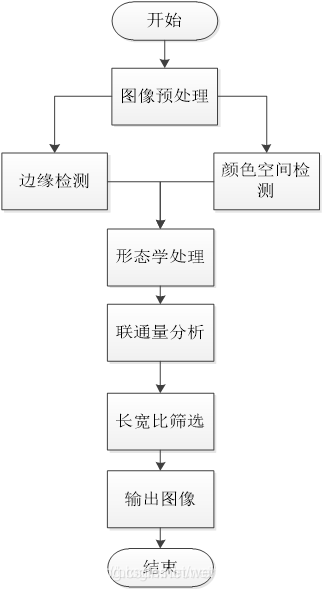
颜色空间模型采用HSV模型,边缘算子采用Sobel算子。首先,对输入的车牌图像进行高斯滤波、归一化等预处理,然后进行HSV变换,再进行灰度化、二值化处理;随后再对输入图像进行灰度化及二值化处理,并进行Sobel边缘算子计算,然后对得到的颜色检测图像与边缘检测图像进行互相筛选,从而得到最后的消除大部分噪声的车辆图像,然后即可根据我国车牌的特征,车牌长宽为440mm*140mm,其长宽比约为3:1,筛选出车牌图块位置,最后输出轮廓比最接近3:1的图块,即为定位后的车牌。
# coding=gbk
"""
车牌定位模块,尝试将Sobel边缘和基于颜色HSV的两种定位方法互相筛选,实现车牌定位
__author__ = 'kuang'
2019.04.20   7号宿舍楼
"""

import os
import time
import cv2 as cv
import numpy as np

#找出最有可能是车牌的位置
def getSatifyestBox(list_rate):
    for index, key in enumerate(list_rate):
        list_rate[index] = abs(key - 3)
    index = list_rate.index(min(list_rate))   #index函数作用是:若list_rate中存在index括号中的内容,则返回括号内字符串的索引值
    return index

def location(img):
    #读取图片并统一尺寸
    img_resize = cv.resize(img,(640,480),)
    #高斯模糊+中值滤波
    img_gaus = cv.GaussianBlur(img_resize,(5,5),0)          #高斯模糊
    img_med = cv.medianBlur(img_gaus,5)                     #中值滤波

    #HSV模型处理,直至二值化
    #转换为HSV模型
    img_hsv = cv.cvtColor(img_med,cv.COLOR_BGR2HSV)        #hsv模型
    lower_blue = np.array([100,40,50])
    higher_blue = np.array([140,255,255])
    mask = cv.inRange(img_hsv,lower_blue,higher_blue)    #掩膜操作
    img_res = cv.bitwise_and(img_med,img_med,mask=mask)

    #灰度化+二值化
    img_gray_h = cv.cvtColor(img_res,cv.COLOR_BGR2GRAY)    #转换了灰度化
    ret1,img_thre_h = cv.threshold(img_gray_h,0,255,cv.THRESH_BINARY+cv.THRESH_OTSU)

    #进行Sobel算子运算,直至二值化
    img_gray_s = cv.cvtColor(img_med,cv.COLOR_BGR2GRAY)

    #sobel算子运算
    img_sobel_x = cv.Sobel(img_gray_s,cv.CV_32F,1,0,ksize=3)    #x轴Sobel运算
    img_sobel_y = cv.Sobel(img_gray_s,cv.CV_32F,0,1,ksize=3)
    img_ab_y = np.uint8(np.absolute(img_sobel_y))
    img_ab_x = np.uint8(np.absolute(img_sobel_x))               #像素点取绝对值
    img_ab = cv.addWeighted(img_ab_x, 0.5, img_ab_y, 0.5,0)   #将两幅图像叠加在一起(按一定权值)
    #考虑再加一次高斯去噪
    img_gaus_1 = cv.GaussianBlur(img_ab,(5,5),0)          #高斯模糊

    #二值化操作
    ret2,img_thre_s = cv.threshold(img_gaus_1,0,255,cv.THRESH_BINARY+cv.THRESH_OTSU)     #正二值化

	#颜色空间与边缘算子的图像互相筛选
    #同时遍历两幅二值图片,若两者均为255,则置255
    img_1 = np.zeros(img_thre_h.shape,np.uint8)  #重新拷贝图片
    height = img_resize.shape[0]    #行数
    width = img_resize.shape[1]     #列数
    for i in range(height):
        for j in range(width):
            h = img_thre_h[i][j]
            s = img_thre_s[i][j]
            if h ==255 and s ==255 :
                img_1[i][j] = 255
            else:
                img_1[i][j] = 0
    # cv.imshow('threshold',img_1)
    # cv.waitKey(0)

    #二值化后的图像进行闭操作
    kernel = np.ones((14,18),np.uint8)
    img_close = cv.morphologyEx(img_1,cv.MORPH_CLOSE,kernel)    #闭操作
    img_med_2 = cv.medianBlur(img_close,5)
    # cv.imshow('close',img_med_2)
    # cv.waitKey(0)

    #查找轮廓
    regions = []         #区域
    list_rate = []
    img_input = img_med_2.copy()
    contours,hierarchy = cv.findContours(img_input,cv.RETR_TREE,cv.CHAIN_APPROX_SIMPLE)
    #   筛选面积最小的
    for contour in contours:
        #计算该轮廓的面积
        area = cv.contourArea(contour)
        #面积小的都筛选掉
        if area < 2000:
            continue
        #轮廓近似,epsilon,是从轮廓到近似轮廓的最大距离。是一个准确率参数,好的epsilon的选择可以得到正确的输出。True决定曲线是否闭合。
        epslion = 1e-3 * cv.arcLength(contour,True)
        approx = cv.approxPolyDP(contour,epslion,True)            #曲线折线化
        #找到最小的矩形,该矩形可能有方向
        rect = cv.minAreaRect(contour)
        #box是四个点的坐标
        box = cv.boxPoints(rect)
        box = np.int0(box)
        #计算高和宽
        height = abs(box[0][1] - box[2][1])
        width = abs(box[0][0] - box[2][0])
        #车牌正常情况下长高比为2-5之间(精确一点可为(2.2,3.6))
        ratio = float(width) / float(height)
        if ratio > 2 and ratio < 5:
            regions.append(box)
            list_rate.append(ratio)
    #输出车牌的轮廓
    print('[INF0]:Detect %d license plates' % len(regions))    #输出疑似车牌图块的数量
    index = getSatifyestBox(list_rate)
    region = regions[index]
    #用绿线画出这些找到的轮廓
    #重新申请空间拷贝,因为drawcontours会改变原图片
    img_2 = np.zeros(img_resize.shape,np.uint8)
    img_2 = img_resize.copy()
    cv.drawContours(img_2, [region], 0, (0, 255, 0), 2)
    # cv.imshow('result',img_2)
    # cv.waitKey(0)

    #定位后需对车牌图像做后面的字符分割等处理,因此需要将车牌图块单独截取出来,截取轮廓
    Xs = [i[0] for i in region]
    YS = [i[1] for i in region]
    x1 = min(Xs)
    x2 = max(Xs)
    y1 = min(YS)
    y2 = max(YS)
    height_1 = y2 - y1
    width_1 = x2 - x1
    img_crop = img_resize[y1:y1+height_1,x1:x1+width_1]
    # cv.imshow('resultcut',img_crop)
    # cv.waitKey(0)


	#后面是自己的一些想法,希望能够对截取到的车牌图块再细致处理一下,使其仅保留车牌部分,但作用貌似也不大(苦笑)
    #假设再进行一次HSV
    img_hsv_1 = cv.cvtColor(img_crop,cv.COLOR_BGR2HSV)        #hsv模型
    lower_blue_1 = np.array([100,90,90])
    higher_blue_1 = np.array([140,255,255])
    mask_1 = cv.inRange(img_hsv_1,lower_blue_1,higher_blue_1)    #掩膜操作
    img_res_1 = cv.bitwise_and(img_crop,img_crop,mask=mask_1)

    #灰度化+二值化
    img_gray_1 = cv.cvtColor(img_res_1,cv.COLOR_BGR2GRAY)    #转换了灰度化
    ret3,img_thre_1 = cv.threshold(img_gray_1,0,255,cv.THRESH_BINARY+cv.THRESH_OTSU)

    height_2 = img_thre_1.shape[0]      #获得行数
    width_2 = img_thre_1.shape[1]       #获得列数
    white_min = []
    white_max = []
    a = 0
    b = 0
    #从每行开始遍历,记录每行第一个及最后一个白色像素点的列数
    for i in range(height_2):
        for j in range(width_2):
            h = img_thre_1[i,j]
            if h == 255:
                a = j
                white_min.append(a)
                break
    a = min(white_min)
    for q in range(height_2-1,-1,-1):
        for w in range(width_2-1,-1,-1):
            ps = img_thre_1[q,w]
            if ps == 255:
                b = w
                white_max.append(b)
                break
    b = max(white_max)
    white_min1 = []
    white_max1 = []
    c = 0
    d = 0
    #从每一列开始遍历,记录每一行第一个白色像素点及最后一个像素点的行数
    for i in range(width_2):
        for j in range(height_2):
            h = img_thre_1[j,i]
            if h == 255:
                c = j
                white_max1.append(c)
                break
    c = min(white_max1)
    for q in range(width_2-1,-1,-1):
        for w in range(height_2-1,-1,-1):
            ps = img_thre_1[w,q]
            if ps == 255:
                d = w
                white_min1.append(d)
                break
    d = max(white_min1)
    img_cut = img_crop[c:d,a:b]
    # cv.imshow('final',img_cut)
    # cv.waitKey(0)
    return img_cut

if __name__ == "__main__":
    img = cv.imread("XXX.jpg")     #输入自己的图片
    cv.imshow("plate",img)
    cv.waitKey(0)
    img_p = location(img)
    cv.imshow("plate",img_p)
    cv.waitKey(0)
采用颜色边缘对车牌进行定位,在复杂环境下效果不是很好,只能是初学者用来练练手,如果诸位在现实应用中涉及到车牌识别,可以去参考这位博主分享的第三方库HyperLPR的使用,HyperLPR的使用仅几行代码,且效果更佳:
链接: HyperLPR的使用.
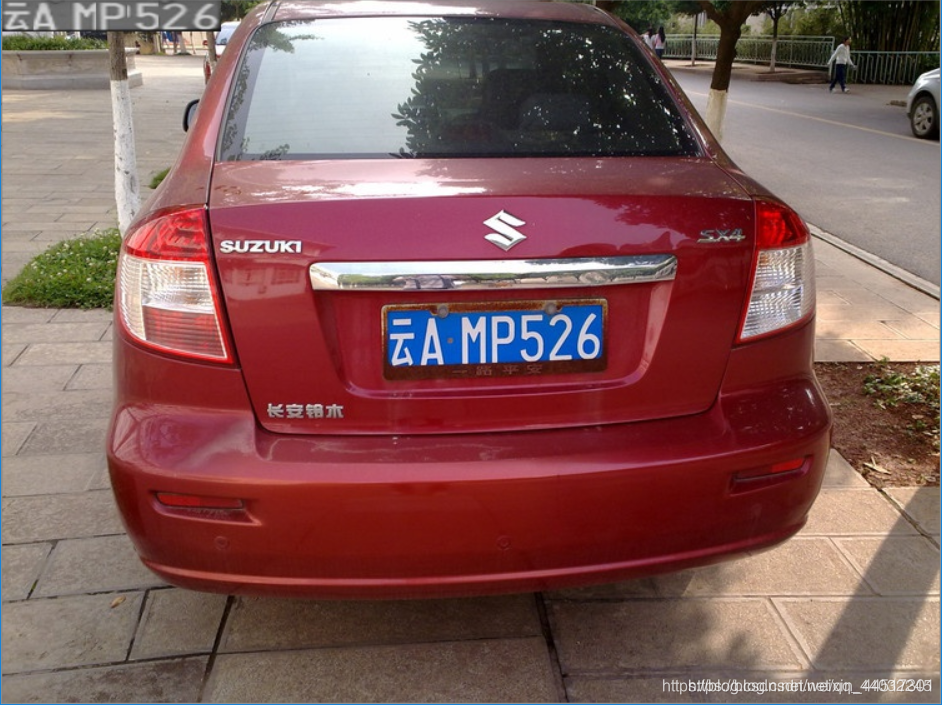
效果:
字符分割
流程图
字符分割的流程图如下:
首先需要对前面定位到的车牌图块进行灰度化、二值化等预处理。


然后需要对一些有车牌边框的等噪声进行筛选,从而消除大部分噪声。借助一个简单方法即可:首先遍历图像每一行的像素值,并记录每一行像素值(白到黑、黑到白)跳变的次数。而车牌一般由7个字符组成,因此每行像素值的跳变次数应不小于14次,因此,若某行跳变次数小于10次(考虑到部分车牌倾斜的情况),则置零整行,即可消除部分噪声的干扰了。

有一些省份汉字的部首和偏旁是分离开的,因此需要再进行闭操作,使得每个字符内部连通

最后通过垂直投影法即可分割出7个完整的字符。算法步骤大致为:首先遍历每一列的的像素并统计,然后定义第0列为开始位,从左到右判断之后的每一列的白色像素数是否大于一个阈值,若大于,继续判断下一列,直到白色像素值低于某一阈值,则该列为结束位,依次循环,从而分割出每个字符。

# coding=gbk
"""
字符分割模块——垂直投影法
__author__ = 'kuang'
2019.04.25   7号宿舍楼
"""

import cv2 as cv
import numpy as np

#创建一个调用函数,用来得出分割字符的终点横坐标
def find_end(start_,black,black_max):
    width = 136       #前面归一化后的宽度值
    segmentation_spacing = 0.95                                #判断阈值,可修改
    end_ = start_ + 1
    for g in range(start_+1,width-1):
        if black[g] > segmentation_spacing * black_max:
            end_ = g
            break
        if g == 134 :
            end_ = g
            break
    return end_

#创建一个二级调用函数
def find_endl(start_1,black,black_max):
    width = 136    #前面归一化后的宽度值
    segmentation_spacing_1 = 0.75                              #二级判断阈值
    end_1 = start_1 + 1
    for r in range(start_1+1,width-1):
        if black[r] > segmentation_spacing_1 * black_max:
            end_1 = r
            break
    return end_1

#创建一个函数,期望实现将切割后的图像移到中央
def expand(img):
    img_1 = img
    height = img_1.shape[0]
    width = img_1.shape[1]
    img_2 = np.zeros((36,36),np.uint8)
    for i in range(0,36):
        for j in range(0,36):
            if j < 9 :
                img_2[i,j] = 0
            elif j < width + 9:
                img_2[i,j] = img_1[i,j-9]
            else:
                img_2[i,j] = 0
    # cv.imshow('df',img_2)
    # cv.waitKey(0)
    return img_2


#读取图像,并显示图像,将图像归一化,宽为136,高为36
def cut(img):
    img_resize = cv.resize(img,(136,36),interpolation=cv.INTER_AREA)            #图像归一化
    #灰度化+二值化,这一步主要是尝试
    img_gray_1 = cv.cvtColor(img_resize,cv.COLOR_BGR2GRAY)
    ret1,img_thre_1 = cv.threshold(img_gray_1,0,255,cv.THRESH_BINARY+cv.THRESH_OTSU)

    img_gaus = cv.GaussianBlur(img_resize,(3,5),0)          #高斯模糊
    img_gray = cv.cvtColor(img_gaus,cv.COLOR_BGR2GRAY)
    ret,img_thre = cv.threshold(img_gray,0,255,cv.THRESH_BINARY+cv.THRESH_OTSU)        #正二值化,采用OTSU最优值

    #除去长横线的噪声干扰
    height = img_thre.shape[0]                                     #读取行数36
    width = img_thre.shape[1]                                      #读取列数136
    sum_1 = 0                                                     #发生跳变
    sum_2 = 0                                                    #一长段未发生跳变
    sum_3 = []                                                   #记录每一行像素的跳变次数
    sum_4 = []
    #记录跳变次数
    for a in range(height):
        s1 = 0
        for b in range(width-1):
            s2 = img_thre[a,b]
            s3 = img_thre[a,b+1]
            if s2 != s3 :
                s1 = s1 + 1
        sum_3.append(s1)
    print(sum_3)
    #将干扰的噪点的像素值置0
    img_threC = img_thre
    for i in range(height):
        sum_1 = 0
        sum_2 = 0
        for j in range(width-1):
            s4 = img_thre[i,j]
            s5 = img_thre[i,j+1]
            if s4 != s5 :                               #判断像素是否发生跳变
                sum_1 = sum_1 + 1
                sum_2 = 0
            else :
                sum_2 = sum_2 + 1
            if sum_2 != 0 :
                if int(width/sum_2) < 5 :         #未跳变的线段长超过了总长的1/5
                    sum_1 = 0
                    for c in range(width-1) :                       #将干扰行像素全部置零
                        img_threC.itemset((i,c),0)
                break
    for k in range(height):                      #存在跳变次数小于7的行数消除该行像素值
        if sum_3[k] < 10 :
            for x in range(width):
                img_threC.itemset((k,x),0)

    #记录消除后的跳变次数
    for d in range(height):
        s6 = 0
        for e in range(width-1):
            s7 = img_threC[d,e]
            s8 = img_threC[d,e+1]
            if s7 != s8 :
                s6 = s6 + 1
        sum_4.append(s6)
    print(sum_4)

    #仍然两幅图片对比,相同置一
    img_x = np.zeros(img_thre.shape,np.uint8)  #重新拷贝图片
    height_x = img_resize.shape[0]    #行数
    width_x = img_resize.shape[1]     #列数
    for i in range(height_x):
        for j in range(width_x):
            h_x = img_threC[i][j]
            s_x = img_thre_1[i][j]
            if h_x ==255 and s_x ==255 :
                img_x[i][j] = 255
            else:
                img_x[i][j] = 0
    # cv.imshow('threshold',img_x)
    # cv.waitKey(0)

    #对消除噪声后的图片进行闭操作
    kernel = cv.getStructuringElement(cv.MORPH_RECT,(3,4))          #设置开闭操作卷积核大小3*4  后一个应该为宽度
    img_close = cv.morphologyEx(img_threC,cv.MORPH_CLOSE,kernel)    #闭操作

    #采用投影法,获得需裁剪的字符的横坐标的开始和结束
    segmentation_spacing = 0.95                                #判断阈值,可修改
    segmentation_spacing_1 = 0.85                              #二级判断阈值,用来解决一些字符粘连的问题
    white = []                                                #记录每一列的白色像素总和
    black = []                                                #记录每一列的黑色像素总和
    white_max = 0                                             #仅保存每列,取列中白色最多的像素总数
    black_max = 0                                             #仅保存每列,取列中黑色最多的像素总数
    #循环计算每一列的黑白色像素总和
    for q in range(width):
        w_count = 0                                           #这一列白色总数
        b_count = 0                                           #这一列黑色总数
        for w in range(height):
            h = img_close[w,q]
            if h == 0:
                b_count = b_count + 1
            else :
                w_count = w_count + 1
        white_max = max(white_max,w_count)
        black_max = max(black_max,b_count)
        white.append(w_count)
        black.append(b_count)

    #分割字符
    n = 0
    start = 0
    end = 1
    a = 1
    while n < width-1 :
        n = n + 1
        if white[n] > (1-segmentation_spacing)*white_max :
            start = n
            end = find_end(start,black,black_max)
            if end - start > 3 and end - start <= 18 :
                if end - start < 8:
                    print(start-4,end+4)
                    img_cut = img_x[0:height,start-4:end+4]
                    img_cut1 = expand(img_cut)
                    img_final = cv.resize(img_cut1,(32,32),interpolation=cv.INTER_AREA)   #将裁剪后的字符归一化32*32大小
                    cv.imwrite("D:\project1\\test\\%s.bmp"% a,img_final)
                    print("保存:%s"%a)
                    a = a + 1
                else:
                    print(start,end)
                    img_cut = img_x[0:height,start:end]
                    img_cut1 = expand(img_cut)
                    img_final = cv.resize(img_cut1,(32,32),interpolation=cv.INTER_AREA)
                    cv.imwrite("D:\project1\\test\\%s.bmp"% a,img_final)
                    print("保存:%s"%a)
                    a = a + 1
                # cv.imshow("cutchar",img_final)
                # cv.waitKey(0)
            if end - start > 18 :
                end = find_endl(start,black,black_max)
                print(start,end)
                img_cut = img_x[0:height,start:end]
                img_cut1 = expand(img_cut)
                img_final = cv.resize(img_cut1,(32,32),interpolation=cv.INTER_AREA)
                cv.imwrite("D:\project1\\test\\%s.bmp"% a,img_final)
                print("保存:%s"%a)
                a = a + 1
                # cv.imshow("cutchar",img_final)
                # cv.waitKey(0)
            n = end


if __name__ == "__main__":
    img = cv.imread("XXX.jpg")                     #读取图像
    #cv.imshow("image",img)                           #显示图像
    #cv.waitKey(0)
    #imgp = pl.location(img)
    cut(img)
总结
使用这种方法(感觉是一个简易的垂直投影法)基本能够分割出每个字符。但是仍旧会存在一些问题:
1、在一些高亮的车牌情况下,二值化之后会使多个字符相连接:

2、在一些倾斜严重的情况下,并不能有效的实现分割。
字符识别
在前面两篇博客中分别介绍了车牌定位以及字符分割的代码实现,那么在这篇文章中,我主要想介绍一下车牌识别系统的最后一个模块:字符识别。字符识别可以说是整个系统的核心部分了,这一部分可以有很多中实现方法:模板匹配、SVM以及人工神经网络等方法。本系统采用的是卷积神经网络算法(LeNet-5模型)来进行字符的识别。
车牌字符数据集
在进行CNN网络模型训练前,需要收集大量的数据集,并对其进行一些预处理。在对网上进行了大量的收刮之后,总共收集到了约4万张数据样本,车牌数据集的下载链接:
模型的训练
本系统主要采用两个模型分别进行省份和数字/字母的识别,首先是省份的训练代码:
# coding=gbk
"""
汉字训练代码模块(LeNet-5)
__author__ = 'kuang'
2019.5.4     7号宿舍楼
"""
#载入模块
import sys
import os
import time
import random
import numpy as np
import tensorflow as tf
import cv2 as cv
os.environ['TF_CPP_MIN_LOG_LEVEL'] = '2'       #设置警告等级

#设置基本参数
SIZE = 1024
WIDTH = 32
HEIGHT = 32
NUM_CLASSES = 31    #总共是31个省份
iterations = 1000

#设置存储模型的地址
SAVER_DIR = "XXX"  #自己的路径
PROVINCES = ("川","鄂","赣","甘","贵","桂","黑","沪","冀","津","京","吉","辽","鲁","蒙","闽","宁","青","琼","陕","苏","晋","皖","湘","新","豫","渝","粤","云","藏","浙")
nProvinceIndex = 0
time_begin = time.time()

#定义输入节点,对应于图像像素值矩阵集合和图像标签(即所代表的数字)
x = tf.placeholder(tf.float32,shape=[None,SIZE])             #None表示batch size的大小
y_ = tf.placeholder(tf.float32,shape=[None,NUM_CLASSES])     #输出标签的占位
x_image = tf.reshape(x,[-1,WIDTH,HEIGHT,1])                  #生成一个四维的数组

#定义卷积函数
def conv_layer(inputs,W,b,conv_strides,kernel_size,pool_strides,padding):
    L1_conv = tf.nn.conv2d(inputs,W,strides=conv_strides,padding=padding)                          #卷积操作
    L1_relu = tf.nn.relu(L1_conv + b)                                                                #激活函数RELU
    return tf.nn.max_pool(L1_relu,ksize=kernel_size,strides=pool_strides,padding='SAME')

#定义全连接函数
def full_connect(inputs,W,b):
    return tf.nn.relu(tf.matmul(inputs,W)+b)

def average(seq):
    return float(sum(seq)) / len(seq)

#训练模型
if __name__ == "__main__":
    #第一次遍历图片目录是为了获取图片总数
    input_count = 0
    for i in range(0,31):
        dir = 'XXX\\train\\%s\\' % i    #自己的路径
        for root,dirs,files in os.walk(dir):
            for filename in files:
                input_count = input_count + 1
    #定义对应维数和各维长度的数组
    input_images = np.array([[0]*SIZE for i in range(input_count)])      #生成一个input_count行,SIZE列的全零二维数组
    input_labels = np.array([[0]*NUM_CLASSES for i in range(input_count)])    #生成一个input_count行,NUM_CLASSES列的全零二维数组
    #第二次遍历图片目录是为了生成图片数据和标签
    index = 0
    for i in range(0,31):
        dir = 'XXX\\train\\%s\\' % i
        a = 0
        for root,dirs,files in os.walk(dir):
            for filename in files:
                filename = dir + filename
                img = cv.imread(filename,0)
                print(filename)
                print(a)
                #cv.imshow('threshold',img)
                #cv.waitKey(0)
                height = img.shape[0]       #行数
                width = img.shape[1]        #列数
                a = a + 1
                for h in range(0,height):
                    for w in range(0,width):
                        m = img[h][w]
                        if m > 150:
                            input_images[index][w+h*width] = 1
                        else:
                            input_images[index][w+h*width] = 0
                input_labels[index][i] = 1
                index = index + 1
    #第一次遍历图片目录是为了获得图片总数
    val_count = 0
    for i in range(0,31):
        dir = 'XXX\\train\\%s\\' % i
        for root,dirs,files in os.walk(dir):
            for filename in files:
                val_count = val_count + 1
    #定义对应维数和各维长度的数组
    val_images = np.array([[0]*SIZE for i in range(val_count)])      #生成一个input_count行,SIZE列的全零二维数组
    val_labels = np.array([[0]*NUM_CLASSES for i in range(val_count)])    #生成一个input_count行,NUM_CLASSES列的全零二维数组
    #第二次遍历图片目录是为了生成图片数据和标签
    index = 0
    for i in range(0,31):
        dir = 'XXX\\train\\%s\\' % i
        for root,dirs,files in os.walk(dir):
            for filename in files:
                filename = dir + filename
                img = cv.imread(filename,0)
                height = img.shape[0]       #行数
                width = img.shape[1]        #列数
                for h in range(0,height):
                    for w in range(0,width):
                        m = img[h][w]
                        if m > 150:
                            val_images[index][w+h*width] = 1
                        else:
                            val_images[index][w+h*width] = 0
                val_labels[index][i] = 1
                index = index + 1
    with tf.Session() as sess:
        #第一个卷积层
        W_conv1 = tf.Variable(tf.truncated_normal([5,5,1,12],stddev=0.1),name="W_conv1")
        b_conv1 = tf.Variable(tf.constant(0.1,shape=[12]),name="b_conv1")                    #生成偏置项,并初始化
        conv_strides = [1,1,1,1]                         #行,列的卷积步长均为1
        kernel_size = [1,2,2,1]                          #池化层卷积核的尺寸为2*2
        pool_strides = [1,2,2,1]                         #池化行,列步长为2
        L1_pool = conv_layer(x_image,W_conv1,b_conv1,conv_strides,kernel_size,pool_strides,padding='SAME')   #第一层卷积池化的输出 ,x_image为输入(后文代码中输入)

        #第二个卷积层
        W_conv2 = tf.Variable(tf.truncated_normal([5,5,12,24],stddev=0.1),name="W_conv2")
        b_conv2 = tf.Variable(tf.constant(0.1,shape=[24]),name="b_conv2")
        conv_strides = [1,1,1,1]
        kernel_size = [1,2,2,1]
        pool_strides = [1,2,2,1]
        L2_pool = conv_layer(L1_pool,W_conv2,b_conv2,conv_strides,kernel_size,pool_strides,padding="SAME")

        #全连接层
        W_fc1 = tf.Variable(tf.truncated_normal([8*8*24,512],stddev=0.1),name="W_fc1")
        b_fc1 = tf.Variable(tf.constant(0.1,shape=[512]),name="b_fc1")
        h_pool2_flat = tf.reshape(L2_pool,[-1,8*8*24])                 #将第二次池化的二维特征图排列成一维的一个数组 全连接相当于一维的数组
        h_fc1 = full_connect(h_pool2_flat,W_fc1,b_fc1)                   #进行全连接操作

        #dropout
        keep_prob = tf.placeholder(tf.float32)
        h_fc1_drop = tf.nn.dropout(h_fc1,keep_prob)

        #readout层
        W_fc2 = tf.Variable(tf.truncated_normal([512,NUM_CLASSES],stddev=0.1),name="W_fc2")
        b_fc2 = tf.Variable(tf.constant(0.1,shape=[NUM_CLASSES]),name="b_fc2")

        #定义优化器和训练OP
        y_conv = tf.matmul(h_fc1_drop,W_fc2) + b_fc2      #最后的输出层,因为是全连接,相当于每个神经元与权重相乘再加偏移
        cross_entropy = tf.reduce_mean(tf.nn.softmax_cross_entropy_with_logits(labels=y_,logits=y_conv))           #交叉熵损失函数
        train_step = tf.train.AdamOptimizer((1e-5)).minimize(cross_entropy)
        correct_prediction = tf.equal(tf.argmax(y_conv,1),tf.argmax(y_,1))
        accuracy = tf.reduce_mean(tf.cast(correct_prediction,tf.float32))

        #初始化saver
        saver = tf.train.Saver()
        sess.run(tf.global_variables_initializer())                                 #初始化所有变量
        time_elapsed = time.time() - time_begin                                     #运行时间
        print("读取图片文件耗费时间:%d秒" % time_elapsed)
        time_begin = time.time()
        print("一共读取了%s个训练图像,%s个标签"%(input_count,input_count))

        #设置每次训练操作的输入个数和迭代次数,这里为了支持任意图片总数,定义了一个余数remainder,譬如,如果每次训练训练操作的输入个数为60,图片总数为150张,则前面两次各输入60张,最后一次输入30张(余数30)
        batch_size = 64      #每次训练的图片数
        iterations = iterations     #迭代次数
        batches_count = int(input_count/batch_size)
        remainder = input_count % batch_size
        print("训练数据集分成%s批,前面每批%s个数据,最后一批%s个数据" %(batches_count+1,batch_size,remainder))

        #执行训练迭代
        for it in range(iterations):
            #这里的关键是要把输入数组转为np.array
            sum_loss = []
            for n in range(batches_count):
                loss, out = sess.run([cross_entropy, train_step], feed_dict = {x:input_images[n*batch_size:(n+1)*batch_size],y_:input_labels[n*batch_size:(n+1)*batch_size],keep_prob:0.5})   #feed_dict相当于一次喂进去的数据,x表示输入,前面已经将输入的图片转化为input_image数组形式了
                sum_loss.append(loss)
            if remainder > 0:
                start_index = batches_count * batch_size
                loss, out  =sess.run([cross_entropy, train_step], feed_dict = {x:input_images[start_index:input_count-1],y_:input_labels[start_index:input_count-1],keep_prob:0.5})
                sum_loss.append(loss)
            avg_loss = average(sum_loss)


            #每完成5次迭代,判断准确度是否已达到100%,达到则退出迭代循环
            iterate_accuracy = 0
            if it % 5 == 0:
                loss1 , iterate_accuracy = sess.run([cross_entropy,accuracy],feed_dict = {x : val_images,y_ : val_labels,keep_prob : 1.0})
                print('第%d次训练迭代:准确率 %0.5f%% ' % (it,iterate_accuracy*100) + '    损失值为:%s' % loss + '    测试损失值:%s' % loss1)
                if iterate_accuracy >= 0.9999999:
                    break

        #完成训练,并输出训练时间
        print('完成训练')
        time_elapsed = time.time() - time_begin
        print("训练耗费时间:%d秒" % time_elapsed)
        time_begin = time.time()

        #保存训练结果
        if not os.path.exists(SAVER_DIR) :
            print('不存在训练数据保存目录,现在创建保存目录')
            os.makedirs(SAVER_DIR)
        saver_path = saver.save(sess,"%smodel.ckpt"%(SAVER_DIR))
        print("保存路径为:",saver_path)
然后是数字/字母的训练代码:
# coding=gbk
"""
数字/字母训练代码模块(LeNet-5)
__author__ = 'kuang'
2019.5.4     7号宿舍楼
"""
#载入模块
import sys
import os
import time
import random
import numpy as np
import tensorflow as tf
import cv2 as cv
os.environ['TF_CPP_MIN_LOG_LEVEL'] = '2'       #设置警告等级

#设置基本参数
SIZE = 1024
WIDTH = 32
HEIGHT = 32
NUM_CLASSES = 34    #总共是34个数字字母
iterations = 1000

#设置保存的路径
SAVER_DIR = XXX\\train_saver\\numbers\\"
LETTERS_DIGITS = ("A","B","C","D","E","F","G","H","J","K","L","M","N","P","Q","R","S","T","U","V","W","X","Y","Z","0","1","2","3","4","5","6","7","8","9")
#license_num = []
time_begin = time.time()

#定义输入节点,对应于图像像素值矩阵集合和图像标签(即所代表的数字)
x = tf.placeholder(tf.float32,shape=[None,SIZE])    #None表示batch size的大小
y_ = tf.placeholder(tf.float32,shape=[None,NUM_CLASSES])     #输出标签的占位
x_image = tf.reshape(x,[-1,WIDTH,HEIGHT,1])                  #对图像重新定义尺寸

#定义卷积函数
def conv_layer(inputs,W,b,conv_strides,kernel_size,pool_strides,padding):
    L1_conv = tf.nn.conv2d(inputs,W,strides=conv_strides,padding=padding)                          #卷积操作
    L1_relu = tf.nn.relu(L1_conv + b)                                                                #激活函数RELU
    return tf.nn.max_pool(L1_relu,ksize=kernel_size,strides=pool_strides,padding='SAME')

#定义全连接函数
def full_connect(inputs,W,b):
    return tf.nn.relu(tf.matmul(inputs,W)+b)

def average(seq):
    return float(sum(seq)) / len(seq)

#训练模型
if __name__ == "__main__":
    #第一次遍历图片目录是为了获取图片总数
    input_count = 0
    for i in range(31,65):
        dir = 'XXX\\train\\%s\\' % i
        for root,dirs,files in os.walk(dir):
            for filename in files:
                input_count = input_count + 1
    #定义对应维数和各维长度的数组
    input_images = np.array([[0]*SIZE for i in range(input_count)])      #生成一个input_count行,SIZE列的全零二维数组
    input_labels = np.array([[0]*NUM_CLASSES for i in range(input_count)])    #生成一个input_count行,NUM_CLASSES列的全零二维数组
    #第二次遍历图片目录是为了生成图片数据和标签
    index = 0
    for i in range(31,65):
        dir = 'XXX\\train\\%s\\' % i
        a = 0
        for root,dirs,files in os.walk(dir):
            for filename in files:
                filename = dir + filename
                img = cv.imread(filename,0)
                print(filename)
                print(a)
                #cv.imshow('threshold',img)
                #cv.waitKey(0)
                height = img.shape[0]       #行数
                width = img.shape[1]        #列数
                a = a + 1
                for h in range(0,height):
                    for w in range(0,width):
                        m = img[h][w]
                        if m > 150:
                            input_images[index][w+h*width] = 1
                        else:
                            input_images[index][w+h*width] = 0
                input_labels[index][i-31] = 1
                index = index + 1
    #第一次遍历图片目录是为了获得图片总数
    val_count = 0
    for i in range(31,65):
        dir = 'XXX\\train\\%s\\' % i
        for root,dirs,files in os.walk(dir):
            for filename in files:
                val_count = val_count + 1
    #定义对应维数和各维长度的数组
    val_images = np.array([[0]*SIZE for i in range(val_count)])      #生成一个input_count行,SIZE列的全零二维数组
    val_labels = np.array([[0]*NUM_CLASSES for i in range(val_count)])    #生成一个input_count行,NUM_CLASSES列的全零二维数组
    #第二次遍历图片目录是为了生成图片数据和标签
    index = 0
    for i in range(31,65):
        dir = 'XXX\\train\\%s\\' % i
        for root,dirs,files in os.walk(dir):
            for filename in files:
                filename = dir + filename
                img = cv.imread(filename,0)
                height = img.shape[0]       #行数
                width = img.shape[1]        #列数
                for h in range(0,height):
                    for w in range(0,width):
                        m = img[h][w]
                        if m > 150:
                            val_images[index][w+h*width] = 1
                        else:
                            val_images[index][w+h*width] = 0
                val_labels[index][i-31] = 1
                index = index + 1

    with tf.Session() as sess:
        #第一个卷积层
        W_conv1 = tf.Variable(tf.truncated_normal([5,5,1,12],stddev=0.1),name="W_conv1")
        b_conv1 = tf.Variable(tf.constant(0.1,shape=[12]),name="b_conv1")                    #生成偏置项,并初始化
        conv_strides = [1,1,1,1]                         #行,列的卷积步长均为1
        kernel_size = [1,2,2,1]                          #池化层卷积核的尺寸为2*2
        pool_strides = [1,2,2,1]                         #池化行,列步长为2
        L1_pool = conv_layer(x_image,W_conv1,b_conv1,conv_strides,kernel_size,pool_strides,padding='SAME')   #第一层卷积池化的输出 ,x_image为输入(后文代码中输入)

        #第二个卷积层
        W_conv2 = tf.Variable(tf.truncated_normal([5,5,12,24],stddev=0.1),name="W_conv2")
        b_conv2 = tf.Variable(tf.constant(0.1,shape=[24]),name="b_conv2")
        conv_strides = [1,1,1,1]
        kernel_size = [1,2,2,1]
        pool_strides = [1,2,2,1]
        L2_pool = conv_layer(L1_pool,W_conv2,b_conv2,conv_strides,kernel_size,pool_strides,padding="SAME")

        #全连接层
        W_fc1 = tf.Variable(tf.truncated_normal([8*8*24,512],stddev=0.1),name="W_fc1")
        b_fc1 = tf.Variable(tf.constant(0.1,shape=[512]),name="b_fc1")
        h_pool2_flat = tf.reshape(L2_pool,[-1,8*8*24])                 #将第二次池化的二维特征图排列成一维的一个数组 全连接相当于一维的数组
        h_fc1 = full_connect(h_pool2_flat,W_fc1,b_fc1)                   #进行全连接操作

        #dropout
        keep_prob = tf.placeholder(tf.float32)
        h_fc1_drop = tf.nn.dropout(h_fc1,keep_prob)

        #readout层
        W_fc2 = tf.Variable(tf.truncated_normal([512,NUM_CLASSES],stddev=0.1),name="W_fc2")
        b_fc2 = tf.Variable(tf.constant(0.1,shape=[NUM_CLASSES]),name="b_fc2")

        #定义优化器和训练OP
        y_conv = tf.matmul(h_fc1_drop,W_fc2) + b_fc2      #最后的输出层,因为是全连接,相当于每个神经元与权重相乘再加偏移
        #global_step = tf.Variable(0,trainable=False)
        #learing_rate = tf.train.exponential_decay(0.1,global_step,100,0.96,staircase=False)
        cross_entropy = tf.reduce_mean(tf.nn.softmax_cross_entropy_with_logits(labels=y_,logits=y_conv))
        train_step = tf.train.AdamOptimizer((1e-5)).minimize(cross_entropy)
        correct_prediction = tf.equal(tf.argmax(y_conv,1),tf.argmax(y_,1))
        accuracy = tf.reduce_mean(tf.cast(correct_prediction,tf.float32))

        #初始化saver
        saver = tf.train.Saver()
        sess.run(tf.global_variables_initializer())                                 #初始化所有变量
        time_elapsed = time.time() - time_begin                                     #运行时间
        print("读取图片文件耗费时间:%d秒" % time_elapsed)
        time_begin = time.time()
        print("一共读取了%s个训练图像,%s个标签"%(input_count,input_count))

        #设置每次训练操作的输入个数和迭代次数,这里为了支持任意图片总数,定义了一个余数remainder,譬如,如果每次训练训练操作的输入个数为60,图片总数为150张,则前面两次各输入60张,最后一次输入30张(余数30)
        batch_size = 64      #每次训练的图片数
        iterations = iterations     #迭代次数
        batches_count = int(input_count/batch_size)
        remainder = input_count % batch_size
        print("训练数据集分成%s批,前面每批%s个数据,最后一批%s个数据" %(batches_count+1,batch_size,remainder))

        #执行训练迭代
        for it in range(iterations):
            #这里的关键是要把输入数组转为np.array
            sum_loss = []
            for n in range(batches_count):
                loss, out = sess.run([cross_entropy, train_step], feed_dict = {x:input_images[n*batch_size:(n+1)*batch_size],y_:input_labels[n*batch_size:(n+1)*batch_size],keep_prob:0.5})   #feed_dict相当于一次喂进去的数据,x表示输入,前面已经将输入的图片转化为input_image数组形式了
                sum_loss.append(loss)
            if remainder > 0:
                start_index = batches_count * batch_size
                loss, out  =sess.run([cross_entropy, train_step], feed_dict = {x:input_images[start_index:input_count-1],y_:input_labels[start_index:input_count-1],keep_prob:0.5})
                sum_loss.append(loss)
            avg_loss = average(sum_loss)
            #每完成5次迭代,判断准确度是否已达到100%,达到则退出迭代循环
            iterate_accuracy = 0
            if it % 5 == 0:
                loss1 , iterate_accuracy = sess.run([cross_entropy,accuracy], feed_dict = {x : val_images,y_ : val_labels,keep_prob : 1.0})
                print('第%d次训练迭代:准确率 %0.5f%% ' % (it,iterate_accuracy*100) + '    损失值为:%s' % avg_loss + '    测试损失值:%s' % loss1)
                if iterate_accuracy >= 0.9999999:
                    break

        #完成训练,并输出训练时间
        print('完成训练')
        time_elapsed = time.time() - time_begin
        print("训练耗费时间:%d秒" % time_elapsed)
        time_begin = time.time()

        #保存训练结果
        if not os.path.exists(SAVER_DIR) :
            print('不存在训练数据保存目录,现在创建保存目录')
            os.makedirs(SAVER_DIR)
        saver_path = saver.save(sess,"%smodel.ckpt"%(SAVER_DIR))
        print("保存路径为:",saver_path)
两个模型的调用
训练完成后即可进行测试,多模型加载代码如下:
# coding=gbk
"""
多模型恢复模块(测试)
__author__ = 'kuang'
2019.5.10 7号宿舍楼
"""
import tensorflow as tf
import numpy as np
import cv2 as cv
import sys
import os
import random
os.environ['TF_CPP_MIN_LOG_LEVEL'] = '2' #设置警告等级
#定义卷积函数
def conv_layer(inputs,W,b,conv_strides,kernel_size,pool_strides,padding):
L1_conv = tf.nn.conv2d(inputs,W,strides=conv_strides,padding=padding) #卷积操作
L1_relu = tf.nn.relu(L1_conv + b) #激活函数RELU
return tf.nn.max_pool(L1_relu,ksize=kernel_size,strides=pool_strides,padding='SAME')
#定义全连接函数
def full_connect(inputs,W,b):
return tf.nn.relu(tf.matmul(inputs,W)+b)
#定义第一个预测函数
def predicts():
PROVINCES = ("川","鄂","赣","甘","贵","桂","黑","沪","冀","津","京","吉","辽","鲁","蒙","闽","宁","青","琼","陕","苏","晋","皖","湘","新","豫","渝","粤","云","藏","浙")
nProvinceIndex = 0
SAVER_DIR = "XXX\\train_saver\\province\\"
#新建一个图
g1 = tf.Graph()
with g1.as_default():
x = tf.placeholder(tf.float32,shape=[None,1024]) #None表示batch size的大小,这里可以是任何数,因为不知道待训练的图片数,SIZE指图片的大小
y_ = tf.placeholder(tf.float32,shape=[None,31]) #输出标签的占位
x_image = tf.reshape(x,[-1,32,32,1]) #生成一个四维的数组
sess1 = tf.Session(graph=g1)
saver = tf.train.import_meta_graph("%smodel.ckpt.meta"%(SAVER_DIR))
#model_file = "%smodel.ckpt"%(SAVER_DIR)
model_file = tf.train.latest_checkpoint(SAVER_DIR) #找出所有模型中最新的模型
saver.restore(sess1,model_file) #恢复模型,相当于加载模型
#第一个卷积层
W_conv1 = sess1.graph.get_tensor_by_name("W_conv1:0")
b_conv1 = sess1.graph.get_tensor_by_name("b_conv1:0")
conv_strides = [1,1,1,1]
kernel_size = [1,2,2,1]
pool_strides = [1,2,2,1]
L1_pool = conv_layer(x_image,W_conv1,b_conv1,conv_strides,kernel_size,pool_strides,padding='SAME')
print("第一个卷积层")
#第二个卷积层
W_conv2 = sess1.graph.get_tensor_by_name("W_conv2:0")
b_conv2 = sess1.graph.get_tensor_by_name("b_conv2:0")
conv_strides = [1,1,1,1]
kernel_size = [1,2,2,1]
pool_strides = [1,2,2,1]
L2_pool = conv_layer(L1_pool,W_conv2,b_conv2,conv_strides,kernel_size,pool_strides,padding='SAME')
#全连接层
W_fc1 = sess1.graph.get_tensor_by_name("W_fc1:0")
b_fc1 = sess1.graph.get_tensor_by_name("b_fc1:0")
h_pool2_flat = tf.reshape(L2_pool,[-1,8*8*24])
h_fc1 = full_connect(h_pool2_flat,W_fc1,b_fc1)
#dropout
keep_prob = tf.placeholder(tf.float32)
h_fc1_drop = tf.nn.dropout(h_fc1,keep_prob)
#readout层
W_fc2 = sess1.graph.get_tensor_by_name("W_fc2:0")
b_fc2 = sess1.graph.get_tensor_by_name("b_fc2:0")
#定义优化器和训练op
conv = tf.nn.softmax(tf.matmul(h_fc1_drop,W_fc2) + b_fc2)
for n in range(1,2):
path = "XXX\\test\\%s.bmp" % (n) #测试图的路径
img = cv.imread(path,0)
#cv.imshow('threshold',img)
#cv.waitKey(0)
height = img.shape[0] #行数
width = img.shape[1] #列数
img_data = [[0]*1024 for i in range(1)] #创建一个数组,用于将输入的图片转换成数组形式
for h in range(0,height):
for w in range(0,width):
m = img[h][w]
if m > 150:
img_data[0][w+h*width] = 1
else:
img_data[0][w+h*width] = 0
result = sess1.run(conv,feed_dict = {x:np.array(img_data),keep_prob:1.0})
#用于输出概率最大的3类
max1 = 0
max2 = 0
max3 = 0
max1_index = 0
max2_index = 0
max3_index = 0
for j in range(31):
if result[0][j] > max1:
max1 = result[0][j]
max1_index = j
continue
if (result[0][j]>max2) and (result[0][j]<=max1):
max2 = result[0][j]
max2_index = j
continue
if (result[0][j]>max3) and (result[0][j]<=max2):
max3 = result[0][j]
max3_index = j
continue
nProvinceIndex = max1_index #最大概率的类
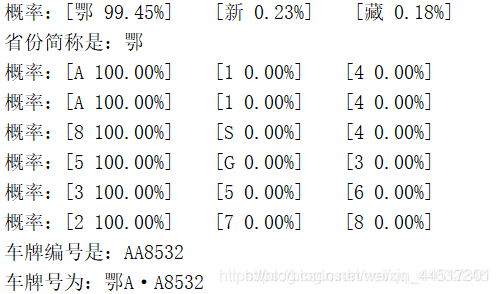
print("概率:[%s %0.2f%%] [%s %0.2f%%] [%s %0.2f%%]" % (PROVINCES[max1_index],max1*100,PROVINCES[max2_index],max2*100,PROVINCES[max3_index],max3*100))
print("省份简称是:%s" % PROVINCES[nProvinceIndex])
return PROVINCES[nProvinceIndex],nProvinceIndex
sess1.close()
#定义第二个预测函数
def predictn():
LETTERS_DIGITS = ("A","B","C","D","E","F","G","H","J","K","L","M","N","P","Q","R","S","T","U","V","W","X","Y","Z","0","1","2","3","4","5","6","7","8","9")
license_num = ""
SAVER_DIR = "XXX\\train_saver\\numbers\\"
print("进入调用")
g2 = tf.Graph()
with g2.as_default():
x = tf.placeholder(tf.float32,shape=[None,1024]) #None表示batch size的大小,这里可以是任何数,因为不知道待训练的图片数,SIZE指图片的大小
y_ = tf.placeholder(tf.float32,shape=[None,34]) #输出标签的占位
x_image = tf.reshape(x,[-1,32,32,1]) #生成一个四维的数组
sess2 = tf.Session(graph=g2)
saver = tf.train.import_meta_graph("%smodel.ckpt.meta"%(SAVER_DIR))
model_file = tf.train.latest_checkpoint(SAVER_DIR) #找出所有模型中最新的模型
saver.restore(sess2,model_file)
#第一个卷积层
W_conv1 = sess2.graph.get_tensor_by_name("W_conv1:0")
b_conv1 = sess2.graph.get_tensor_by_name("b_conv1:0")
conv_strides = [1,1,1,1]
kernel_size = [1,2,2,1]
pool_strides = [1,2,2,1]
L1_pool = conv_layer(x_image,W_conv1,b_conv1,conv_strides,kernel_size,pool_strides,padding='SAME')
#第二个卷积层
W_conv2 = sess2.graph.get_tensor_by_name("W_conv2:0")
b_conv2 = sess2.graph.get_tensor_by_name("b_conv2:0")
conv_strides = [1,1,1,1]
kernel_size = [1,2,2,1]
pool_strides = [1,2,2,1]
L2_pool = conv_layer(L1_pool,W_conv2,b_conv2,conv_strides,kernel_size,pool_strides,padding='SAME')
#全连接层
W_fc1 = sess2.graph.get_tensor_by_name("W_fc1:0")
b_fc1 = sess2.graph.get_tensor_by_name("b_fc1:0")
h_pool2_flat = tf.reshape(L2_pool,[-1,8*8*24])
h_fc1 = full_connect(h_pool2_flat,W_fc1,b_fc1)
#dropout
keep_prob = tf.placeholder(tf.float32)
h_fc1_drop = tf.nn.dropout(h_fc1,keep_prob)
#readout层
W_fc2 = sess2.graph.get_tensor_by_name("W_fc2:0")
b_fc2 = sess2.graph.get_tensor_by_name("b_fc2:0")
#定义优化器和训练op
conv = tf.nn.softmax(tf.matmul(h_fc1_drop,W_fc2) + b_fc2)
#想尝试将城市代码和车牌后五位一起识别,因此可以将3-8改为2-8
for n in range(2,8):
path = "XXX\\test\\%s.bmp" % (n)
img = cv.imread(path,0)
height = img.shape[0]
width = img.shape[1]
img_data = [[0]*1024 for i in range(1)]
for h in range(0,height):
for w in range(0,width):
m = img[h][w]
if m > 150:
img_data[0][w+h*width] = 1
else:
img_data[0][w+h*width] = 0
result = sess2.run(conv,feed_dict = {x:np.array(img_data),keep_prob:1.0})
max1 = 0
max2 = 0
max3 = 0
max1_index = 0
max2_index = 0
max3_index = 0
for j in range(34):
if result[0][j] > max1:
max1 = result[0][j]
max1_index = j
continue
if (result[0][j]>max2) and (result[0][j]<=max1):
max2 = result[0][j]
max2_index = j
continue
if (result[0][j]>max3) and (result[0][j]<=max2):
max3 = result[0][j]
max3_index = j
continue
license_num = license_num + LETTERS_DIGITS[max1_index]
print("概率:[%s %0.2f%%] [%s %0.2f%%] [%s %0.2f%%]" % (LETTERS_DIGITS[max1_index],max1*100,LETTERS_DIGITS[max2_index],max2*100,LETTERS_DIGITS[max3_index],max3*100))
print("车牌编号是:%s" % license_num)
return license_num
sess2.close()
if __name__ == "__main__":
a,b = predicts()
c = predictn()
print("车牌号为:" + a + c[0]+ "·" + c[1:6] )
测试结果
总结
在训练之后对模型进行测试,模型基本能够识别出部分省份、字母等。但是在一些数字、字母(相近的特征)上,模型并不能很好的进行识别,其目前存在的问题主要有:
1、模型的识别率不高,并且其与前面两个模块的进行有直接的联系,三个模块误差累积,导致最后识别效果不佳。
2、由于汉字和字母、数字一起识别其识别率过低,因此本文采用了的两个模型,但是两个模型的模型恢复时长过长,并不适合于实时检测的要求。
以上就是本小白的一些拙见,希望各位大佬能够给小弟提出一些建议与意见来进行改进。
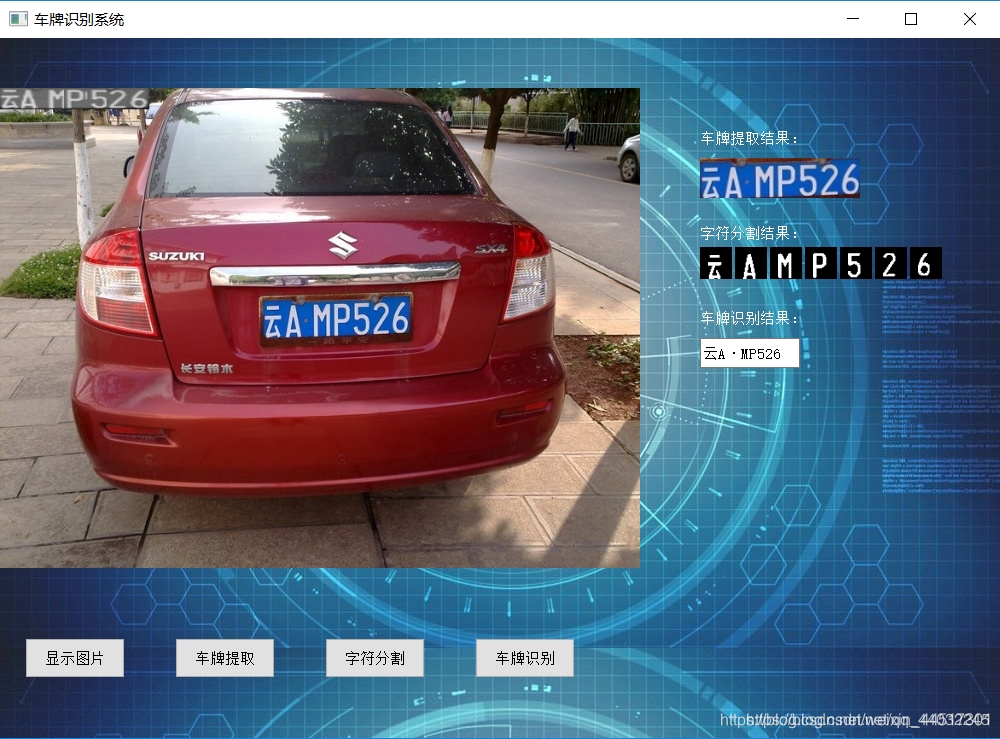
车牌识别界面
车牌识别系统设计完成后,最后再使用Pyqt5设计一个简易的车牌识别界面,全部代码如下:
#coding=gbk
"""
车牌识别系统界面(qt)
__author__ = kuang
2019.5.20    7号宿舍楼
"""
import sys
from PyQt5.QtWidgets import QWidget, QPushButton, QApplication, QLabel, QHBoxLayout, QVBoxLayout, QLineEdit, QFileDialog
from PyQt5 import QtGui
from PIL import Image

import test1
import plate as pl
import cut
import cv2 as cv


class Example(QWidget):

    def __init__(self,parent=None):
        super(Example,self).__init__(parent)

        self.initUI() #界面绘制交给InitUi方法

    def initUI(self):
        #定义label读取图片显示原图
        self.lb1 = QLabel(self)
        self.lb1.setGeometry(0,50,640,480)

        #定义车牌定位后的图片
        self.lb21 = QLabel(self)
        self.lb21.setGeometry(700,50,100,100)
        self.lb21.setText('车牌提取结果:')
        self.lb21.setStyleSheet("color:white")

        #设置车牌定位结果的位置
        self.lb2 = QLabel(self)
        self.lb2.setGeometry(700,120,160,40)

        #分割字符显示
        self.lb22 = QLabel(self)
        self.lb22.setGeometry(700,145,100,100)
        self.lb22.setText('字符分割结果:')
        self.lb22.setStyleSheet("color:white")

        self.lb31 = QLabel(self)
        self.lb31.setGeometry(700,175,100,100)
        self.lb32 = QLabel(self)
        self.lb32.setGeometry(735,175,100,100)
        self.lb33 = QLabel(self)
        self.lb33.setGeometry(770,175,100,100)
        self.lb34 = QLabel(self)
        self.lb34.setGeometry(805,175,100,100)
        self.lb35 = QLabel(self)
        self.lb35.setGeometry(840,175,100,100)
        self.lb36 = QLabel(self)
        self.lb36.setGeometry(875,175,100,100)
        self.lb37 = QLabel(self)
        self.lb37.setGeometry(910,175,100,100)

        #定义文本框
        self.lb23 = QLabel(self)
        self.lb23.setGeometry(700,230,100,100)
        self.lb23.setText('车牌识别结果:')
        self.lb23.setStyleSheet("color:white")

        self.editLine1 = QLineEdit(self)
        self.editLine1.setGeometry(700,300,100,30)

        #定义按钮
        button1 = QPushButton('显示图片',self)
        button1.setGeometry(25,600,100,40)
        button1.clicked.connect(self.button1_click)

        button2 = QPushButton('车牌提取',self)
        button2.setGeometry(175,600,100,40)
        button2.clicked.connect(self.button2_click)

        button4 = QPushButton('字符分割',self)
        button4.setGeometry(325,600,100,40)
        button4.clicked.connect(self.button4_click)

        button3 = QPushButton('车牌识别',self)
        button3.setGeometry(475,600,100,40)
        button3.clicked.connect(self.button3_click)

        #设置背景
        window_pale = QtGui.QPalette()
        window_pale.setBrush(self.backgroundRole(),   QtGui.QBrush(QtGui.QPixmap("back.jpg")))
        self.setPalette(window_pale)

        #设置窗口的位置和大小
        self.setGeometry(200, 100, 1000, 700)
        #设置窗口的标题
        self.setWindowTitle('车牌识别系统')
        #显示窗口
        self.show()

    def loadfile(self):
        imgName, imgType = QFileDialog.getOpenFileName(self, "打开图片", "D://project1//.idea//", "*.jpg;;*.png;;All Files(*)")
        print(imgName)
        return imgName

    def button1_click(self):
        imgName = self.loadfile()
        img = cv.imread(imgName)
        #print (img.size)
        out = cv.resize(img,(640,480),)
        cv.imwrite("new.jpg",out)
        jpg = QtGui.QPixmap('new.jpg')
        self.lb1.setPixmap(jpg)

    def button2_click(self):
        img = cv.imread('new.jpg')
        imgp = pl.location(img)
        cut.cut(imgp)
        out = cv.resize(imgp,(160,40),)
        cv.imwrite('newchepai.jpg',out)
        jpg1 = QtGui.QPixmap('newchepai.jpg')
        self.lb2.setPixmap(jpg1)

    def button4_click(self):
        jpg = QtGui.QPixmap('D:/project1/test/1.bmp')
        self.lb31.setPixmap(jpg)
        jpg1 = QtGui.QPixmap('D:/project1/test/2.bmp')
        self.lb32.setPixmap(jpg1)
        jpg2 = QtGui.QPixmap('D:/project1/test/3.bmp')
        self.lb33.setPixmap(jpg2)
        jpg3 = QtGui.QPixmap('D:/project1/test/4.bmp')
        self.lb34.setPixmap(jpg3)
        jpg4 = QtGui.QPixmap('D:/project1/test/5.bmp')
        self.lb35.setPixmap(jpg4)
        jpg5 = QtGui.QPixmap('D:/project1/test/6.bmp')
        self.lb36.setPixmap(jpg5)
        jpg6 = QtGui.QPixmap('D:/project1/test/7.bmp')
        self.lb37.setPixmap(jpg6)

    def button3_click(self):
        PROVINCES = ("川","鄂","赣","甘","贵","桂","黑","沪","冀","津","京","吉","辽","鲁","蒙","闽","宁","青","琼","陕","苏","晋","皖","湘","新","豫","渝","粤","云","藏","浙")
        a,b = test1.predicts()
        c = test1.predictn()
        self.editLine1.setText(PROVINCES[b] +  c[0] + "·" + c[1:6])

if __name__ == '__main__':
    #创建应用程序和对象
    app = QApplication(sys.argv)
    ex = Example()
    ex.show()
    sys.exit(app.exec_())