汽车车牌识别系统实现(二)-- 车牌定位
前言
本人大四计算机视觉处理方面菜鸟一枚,因个人兴趣和毕设的缘故,故而想学习计算机视觉方面的内容,有不正确的地方还等各位大神批评指正。
图像预处理
照相机获取到汽车车牌图像时,绝大多数情况下,图像里只存在一个车牌的情况是不太现实的,一幅图像里存在建筑物、树、其它汽车等等是很正常的;而且绝大多数都会存在噪声点,这种情况下就会对车牌定位和识别造成极大程度的干扰!
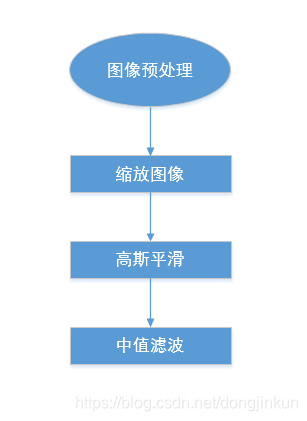
高斯平滑、中值滤波的原理网上有很多博客都介绍的非常清楚了,在这里就不多说了,直接上代码!
** Note:这里只提醒一句,大家一定要分清是白底黑字还是黑底白字,当时我在学的时候就吃了不少亏,这点非常重要!**
#对图像进行缩放处理
if img_width > MAX_WIDTH:
    resize_rate = MAX_WIDTH / img_width
    img = cv2.resize(img,(MAX_WIDTH,int(img_hight * resize_rate)),interpolation=cv2.INTER_AREA)
# cv_show('img_resize',img)

# 高斯平滑
img_aussian = cv2.GaussianBlur(img,(5,5),1)
# cv_show('img_aussian',img_aussian)

#中值滤波
img_median = cv2.medianBlur(img_aussian,3)
# cv_show('img_median',img_median)
车牌特点
我们研究的对象是蓝牌白字车牌,其它车牌暂时还不能识别。说到这里,顺便说明一下蓝牌白字车牌的颜色信息,对于正常曝光的图像而言,蓝色车牌的三个通道值大约为Blue=138,Green=63,Red=23。除了颜色信息外,车牌形状为矩形,具有固定的长宽比3:1。(这一段摘自https://blog.csdn.net/qq_39960119/article/details/83930112)
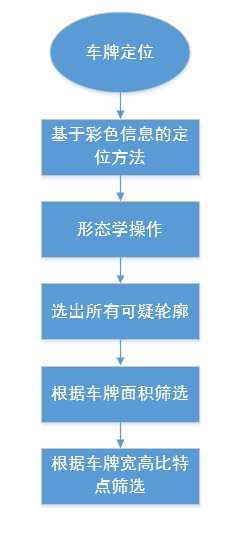
车牌定位
车牌定位通常也称为车牌提取,其目的是从含有车牌的图像中找到车牌区域。车牌定位的重要性不言而喻,作为车牌识别的第一个步骤,车牌区域的定位成功与否是完成车牌识别系统的根基也是首要决定因素。本系统采用基于彩色信息的定位方法,该方法有利有弊,利是能对车牌区域进行快速精确的定位,弊是光线强度和天气对定位效果影响蛮大的,但是对于新手来说,该方法又显得较简单、较容易上手。
代码刚刚完成,很乱,后期会整理以及函数化。我尽可能地多注释,大家也看的方便,有看不懂的可以评论留言。
#分离通道
img_B = cv2.split(img_median)[0]
img_G = cv2.split(img_median)[1]
img_R = cv2.split(img_median)[2]
# print(img_B)
# print(img_G)
# print(img_R)
for i in range(img_median.shape[:2][0]):
for j in range(img_median.shape[:2][1]):
if abs(img_B[i,j] - Blue) < THRESHOLD and abs(img_G[i,j] - Green) <THRESHOLD and abs(img_R[i,j] - Red) < THRESHOLD:
img_median[i][j][0] = 255
img_median[i][j][1] = 255
img_median[i][j][2] = 255
else:
img_median[i][j][0] = 0
img_median[i][j][1] = 0
img_median[i][j][2] = 0
cv_show('img_median',img_median)
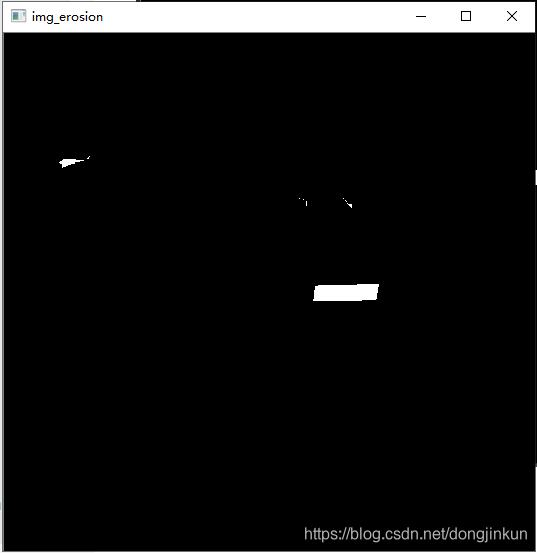
kernel = np.ones((3,3),np.uint8)
img_dilate = cv2.dilate(img_median,kernel,iterations = 5) #膨胀操作
img_erosion = cv2.erode(img_dilate,kernel,iterations = 5) #腐蚀操作
cv_show('img_erosion',img_erosion)
img1 = cv2.cvtColor(img_erosion,cv2.COLOR_RGB2GRAY)
# cv_show('img1',img1)
image, contours, hierarchy = cv2.findContours(img1,cv2.RETR_TREE,cv2.CHAIN_APPROX_SIMPLE)
# for i in range(len(contours)):
# print(contours[i])
car_contours = []
for cnt in contours: #TODO:此处需要一个异常处理(因为有可能/0)
# 框选 生成最小外接矩形 返回值(中心(x,y), (宽,高), 旋转角度)rect[0]:矩形中心点坐标;rect[1]:矩形的高和宽;rect[2]:矩形的旋转角度
rect = cv2.minAreaRect(cnt)
# print('宽高:',rect[1])
area_width, area_height = rect[1]
#计算最小矩形的面积,初步筛选
area = rect[1][0] * rect[1][1] #最小矩形的面积
if area > MIN_AREA:
# 选择宽大于高的区域
if area_width < area_height:
area_width, area_height = area_height, area_width
wh_ratio = area_width / area_height
# print('宽高比:',wh_ratio)
# 要求矩形区域长宽比在2到5.5之间,2到5.5是车牌的长宽比,其余的矩形排除
if wh_ratio > 2 and wh_ratio < 5.5:
car_contours.append(rect) # rect是minAreaRect的返回值,根据minAreaRect的返回值计算矩形的四个点
box = cv2.boxPoints(rect) # box里面放的是最小矩形的四个顶点坐标
box = np.int0(box) # 取整
# for i in range(len(box)):
# print('最小矩形的四个点坐标:', box[i])
# 获取四个顶点坐标
left_point_x = np.min(box[:, 0])
right_point_x = np.max(box[:, 0])
top_point_y = np.min(box[:, 1])
bottom_point_y = np.max(box[:, 1])
left_point_y = box[:, 1][np.where(box[:, 0] == left_point_x)][0]
right_point_y = box[:, 1][np.where(box[:, 0] == right_point_x)][0]
top_point_x = box[:, 0][np.where(box[:, 1] == top_point_y)][0]
bottom_point_x = box[:, 0][np.where(box[:, 1] == bottom_point_y)][0]
vertices = np.array([[top_point_x, top_point_y], [bottom_point_x, bottom_point_y], [left_point_x, left_point_y],[right_point_x, right_point_y]])
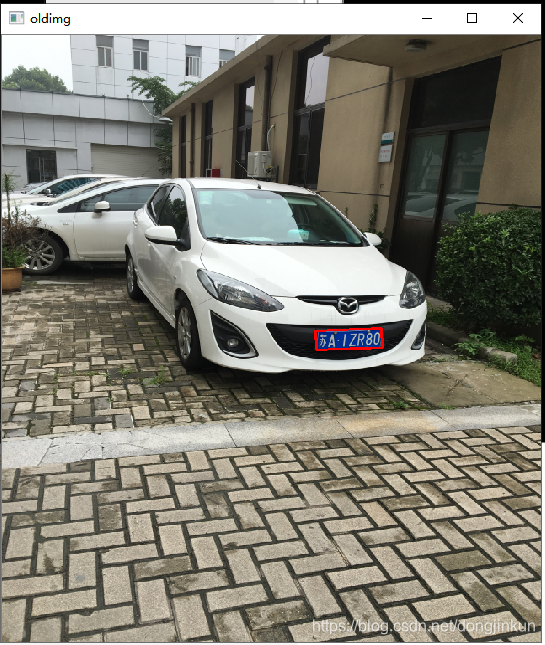
oldimg = cv2.drawContours(img, [box], 0, (0, 0, 255), 2)
# print(car_contours)
cv_show('oldimg', oldimg)
预处理及车牌定位全部代码
** 环境OK的话,应该复制上就能运行!**
import numpy as np
import cv2
import argparse
from matplotlib import pyplot as plt
Blue = 138
Green = 63
Red = 23
THRESHOLD = 50
ANGLE = -45
MIN_AREA = 2000
LICENSE_WIDTH = 440
LICENSE_HIGH = 140
#绘图展示(后期放入工具类中)
def cv_show(name,img):
cv2.namedWindow(name,0)
print(img.shape)
cv2.imshow(name,img)
cv2.waitKey(0)
cv2.destroyAllWindows()
MAX_WIDTH = 640
# 设置参数
parser = argparse.ArgumentParser()
parser.add_argument("-i", "--image", required=True,help="path to input image") #image是变量名
args = vars(parser.parse_args())
#读取原图像
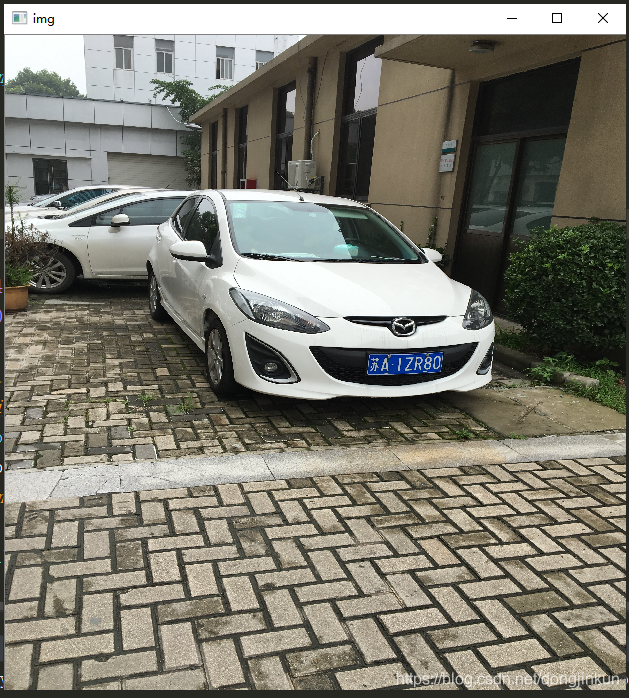
img = cv2.imread(args["image"])
cv_show('img',img)
img_hight, img_width = img.shape[:2]
#-------------------------------预处理--------------------------------------
#对图像进行缩放处理
if img_width > MAX_WIDTH:
resize_rate = MAX_WIDTH / img_width
img = cv2.resize(img,(MAX_WIDTH,int(img_hight * resize_rate)),interpolation=cv2.INTER_AREA)
# cv_show('img_resize',img)
# 高斯平滑
img_aussian = cv2.GaussianBlur(img,(5,5),1)
# cv_show('img_aussian',img_aussian)
#中值滤波
img_median = cv2.medianBlur(img_aussian,3)
# cv_show('img_median',img_median)
# print('width:',img_median.shape[:2][0])
# print('h',img_median.shape[:2][1])
#------------------------------车牌定位-------------------------------------
#分离通道
img_B = cv2.split(img_median)[0]
img_G = cv2.split(img_median)[1]
img_R = cv2.split(img_median)[2]
# print(img_B)
# print(img_G)
# print(img_R)
for i in range(img_median.shape[:2][0]):
for j in range(img_median.shape[:2][1]):
if abs(img_B[i,j] - Blue) < THRESHOLD and abs(img_G[i,j] - Green) <THRESHOLD and abs(img_R[i,j] - Red) < THRESHOLD:
img_median[i][j][0] = 255
img_median[i][j][1] = 255
img_median[i][j][2] = 255
else:
img_median[i][j][0] = 0
img_median[i][j][1] = 0
img_median[i][j][2] = 0
cv_show('img_median',img_median)
kernel = np.ones((3,3),np.uint8)
img_dilate = cv2.dilate(img_median,kernel,iterations = 5) #膨胀操作
img_erosion = cv2.erode(img_dilate,kernel,iterations = 5) #腐蚀操作
cv_show('img_erosion',img_erosion)
img1 = cv2.cvtColor(img_erosion,cv2.COLOR_RGB2GRAY)
# cv_show('img1',img1)
image, contours, hierarchy = cv2.findContours(img1,cv2.RETR_TREE,cv2.CHAIN_APPROX_SIMPLE)
# for i in range(len(contours)):
# print(contours[i])
car_contours = []
for cnt in contours: #TODO:此处需要一个异常处理(因为有可能/0)
# 框选 生成最小外接矩形 返回值(中心(x,y), (宽,高), 旋转角度)rect[0]:矩形中心点坐标;rect[1]:矩形的高和宽;rect[2]:矩形的旋转角度
rect = cv2.minAreaRect(cnt)
# print('宽高:',rect[1])
area_width, area_height = rect[1]
#计算最小矩形的面积,初步筛选
area = rect[1][0] * rect[1][1] #最小矩形的面积
if area > MIN_AREA:
# 选择宽大于高的区域
if area_width < area_height:
area_width, area_height = area_height, area_width
wh_ratio = area_width / area_height
# print('宽高比:',wh_ratio)
# 要求矩形区域长宽比在2到5.5之间,2到5.5是车牌的长宽比,其余的矩形排除
if wh_ratio > 2 and wh_ratio < 5.5:
car_contours.append(rect) # rect是minAreaRect的返回值,根据minAreaRect的返回值计算矩形的四个点
box = cv2.boxPoints(rect) # box里面放的是最小矩形的四个顶点坐标
box = np.int0(box) # 取整
# for i in range(len(box)):
# print('最小矩形的四个点坐标:', box[i])
# 获取四个顶点坐标
left_point_x = np.min(box[:, 0])
right_point_x = np.max(box[:, 0])
top_point_y = np.min(box[:, 1])
bottom_point_y = np.max(box[:, 1])
left_point_y = box[:, 1][np.where(box[:, 0] == left_point_x)][0]
right_point_y = box[:, 1][np.where(box[:, 0] == right_point_x)][0]
top_point_x = box[:, 0][np.where(box[:, 1] == top_point_y)][0]
bottom_point_x = box[:, 0][np.where(box[:, 1] == bottom_point_y)][0]
vertices = np.array([[top_point_x, top_point_y], [bottom_point_x, bottom_point_y], [left_point_x, left_point_y],[right_point_x, right_point_y]])
oldimg = cv2.drawContours(img, [box], 0, (0, 0, 255), 2)
# print(car_contours)
cv_show('oldimg', oldimg)
运行结果
实验了几张图像,效果还不错!
1、读取原图像
2、预处理及基于彩色信息定位方法后

3、形态学操作后
4、车牌定位及根据特点筛选后
下一篇开始讲图片矫正!