源码地址:
https://github.com/pony-maggie/spring-security-learn
第一章我们基于内存中的用户信息实现了有一个基本的登入功能,不过实际的项目中用户信息一般都是存在数据库中的。所以本章我们来实现一个比较接近真实项目的登入登出,同时引入
UserDetailsService的概念。
UserDetailsService和UserDetail
思考一下,如果不用框架,我们自己要实现一个用户登录认证会怎么做?
其实也不难,思路就是根据提交上来的用户名和密码,从数据库中查找这个账号的信息进行对比。再进一步,可能还包含一些额外的信息,比如用户是否被锁定等。这些基础的功能框架大部分都已经帮我们做好了,我们只要实现一些细节(实现UserDetailsService接口)就可以了。
图片来自网络
官方是这么说的:
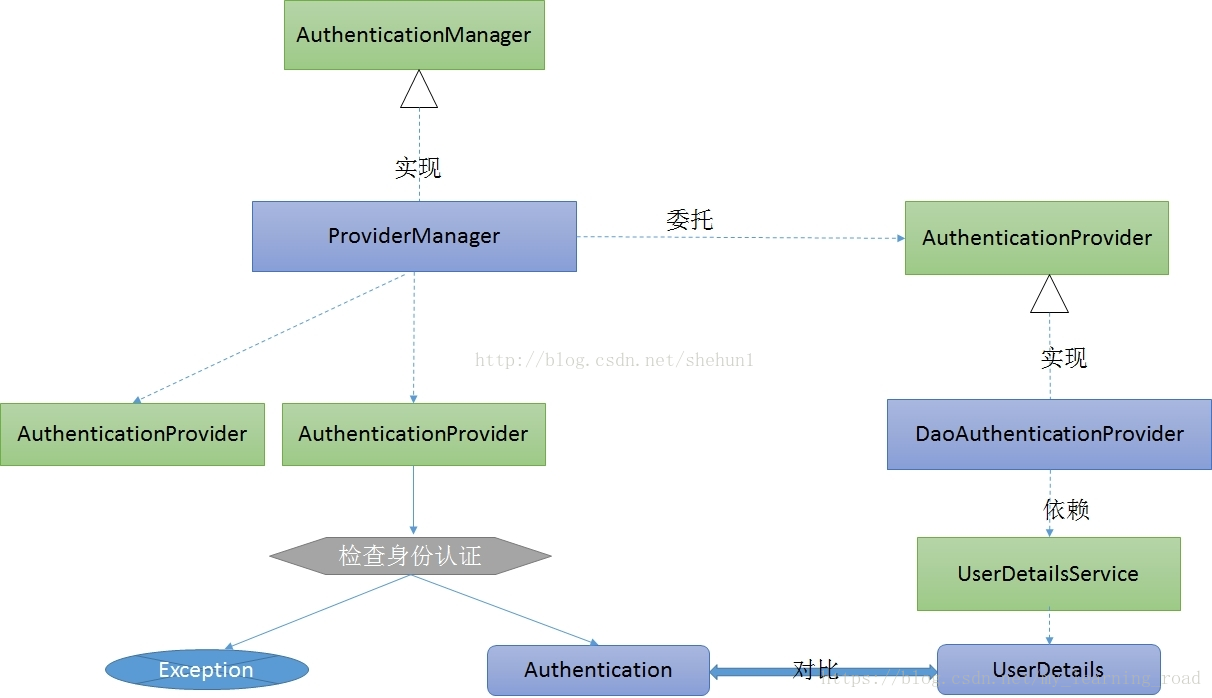
The AuthenticationManager is just an interface, so the implementation can be anything we choose, but how does it work in practice? What if we need to check multiple authentication databases or a combination of different authentication services such as a database and an LDAP server?
The default implementation in Spring Security is called ProviderManager and rather than handling the authentication request itself, it delegates to a list of configured AuthenticationProvider s, each of which is queried in turn to see if it can perform the authentication. Each provider will either throw an exception or return a fully populated Authentication object. Remember our good friends, UserDetails and UserDetailsService? If not, head back to the previous chapter and refresh your memory. The most common approach to verifying an authentication request is to load the corresponding UserDetails and check the loaded password against the one that has been entered by the user. This is the approach used by the DaoAuthenticationProvider (see below). The loaded UserDetails object - and particularly the GrantedAuthority s it contains - will be used when building the fully populated Authentication object which is returned from a successful authentication and stored in the SecurityContext.
它的大概意思是,
Spring Security中进行身份验证的是AuthenticationManager接口,ProviderManager是它的一个默认实现,但它并不用来处理身份认证,而是委托给AuthenticationProvider,每个AuthenticationProvider会轮流检查身份认证。检查后或者返回Authentication对象或者抛出异常。
最常用的验证身份的方法就是加载UserDetails,看看是否和用户输入的账号、密码、权限等信息匹配。此步骤由DaoAuthenticationProvider(它利用UserDetailsService验证用户名、密码和授权)处理。包含 GrantedAuthority 的 UserDetails对象在构建 Authentication对象时填入数据。
所以实现UserDetailsService接口是我们一个核心的工作。
准备数据库
数据库里我们准备了一张用户信息表,存放用户的账户信息(用户名,密码等)。准备了两条测试数据
zhangsan/12345678
lisi/11111111
数据库操作使用的是spring data JPA ORM框架,这个知识点不在本章的讲述范围内,请自行查阅。
实现UserDetailsService
public class MyUserDetailsService implements UserDetailsService {

    @Autowired
    private UserRepository userRepository;

    @Override
    public UserDetails loadUserByUsername(String name) throws UsernameNotFoundException {
        MyUser user = userRepository.findByUsername(name);
        if(user == null){
            throw new UsernameNotFoundException(name);
        }
        String password = user.getPassword();
        String encode = new BCryptPasswordEncoder().encode(password);
        Collection<GrantedAuthority> authList = getAuthorities();

        return new User(name, encode, true, true, true, true,authList);
    }

    private Collection<GrantedAuthority> getAuthorities(){
        List<GrantedAuthority> authList = new ArrayList<GrantedAuthority>();
        //这里添加的角色,实际项目中应该根据用户信息从数据库中获取,这里为了简单起见直接赋值。
        authList.add(new SimpleGrantedAuthority("ROLE_ADMIN"));
        //也可以继续添加其它角色
        return authList;
    }

}
代码很简单,UserDetailsService的loadUserByUsername方法,通过username来获取user信息,这个信息被封装在
UserDetails对象,然后spring security用这个对象进行身份验证。
User是系统自带的UserDetails实现类,我们也可以自己定义一个UserDetails实现类。UserDetails包含用户名,密码,权限还有四个状态,其中任何一个为false都会报异常。因为我们的数据库里的用户信息没有状态字段,这里就用true填充即可。
注意密码我们是传入的加密后的结果
添加注销的操作
spring security在实现注销功能的大概流程是:
- 使得HTTP session失效(如果invalidate-session属性被设置为true)
- 清空remember me
- 清除SecurityContex
- 将页面重定向至logout-success-url指明的URL。
首先是要在配置退出的逻辑,
   protected void configure(HttpSecurity http) throws Exception {

           http.authorizeRequests()
                   .anyRequest()
                   .authenticated()
                   .and()
                   .formLogin().loginPage("/login").defaultSuccessUrl("/user").permitAll()
                   .and().logout().permitAll()
                   .logoutSuccessHandler(logoutSuccessHandler())
   //                .logoutSuccessUrl("/login")
                   .and()
                   .csrf().disable();

       }
logoutSuccessHandler接口定义了注销之后的操作方法,这个接口不一定要实现,我这里的实现只是简单打印日志,并且重定向到login登录页。
    @Bean
        LogoutSuccessHandler logoutSuccessHandler(){
            return  new LogoutSuccessHandler() {
                @Override
                public void onLogoutSuccess(HttpServletRequest httpServletRequest, HttpServletResponse httpServletResponse, Authentication authentication) throws IOException, ServletException {
                    System.out.println("你退出了登录");
                    httpServletResponse.sendRedirect("/login");
                }
            };
        }
简单的场景下,logoutSuccessHandler一般不需要写,spring security支持通过logoutSuccessUrl快捷的指明注销后跳转的页面(需要注意的是对应的URL应当是不需要登录就可以访问的),如果指定了LogoutSuccessHandler,logoutSuccessUrl() 会被忽略。
在REST API的场景下,一般我们都是需要定义logoutSuccessHandler的。这种场景下当注销成功后,不是重定向到一个URL,而是需要提供一个JSON格式的纯文本 HTTP 状态码返回。
接着我们再首页和用户页的html文件中加入注销的操作,
<body>
        <div>
            这是首页
        </div>
        <form action="/logout" method="post">
            <button type="submit">注销</button>
        </form>
    </body>
这里可能会有疑问,controller并没有定义logout处理入口,会不会报错呢? 其实spring security已经帮我们默认处理了名为logout的退出操作。 当然我们也可以通过logoutUrl配置自定义注销的处理入口。
另外需要注意的是,因为前面登录页是用的自定义页面,注销的处理需要指明使用POST,否则会报错。
测试
启动工程,进行如下测试:
- 访问首页,http://localhost:9090,需要授权,会自动跳入登录页:http://localhost:9090/login
- 从登录页输入用户名和密码(看数据库里的信息),进入用户主页
- 点击注销按钮,进入login页面
