前言
这篇文章将会讲如何用RuoYi框架做一个简单的新闻系统。
RuoYi官网:http://ruoyi.vip/
RuoYi文档:http://doc.ruoyi.vip/
RuoYi源码下载:https://gitee.com/y_project/RuoYi
非常感谢RuoYi框架的作者无私开源!
一、需求
做一个简单的新闻系统。
每一篇新闻有:所属菜单、标题、内容(内容包含图片和文字)、创建日期、作者。
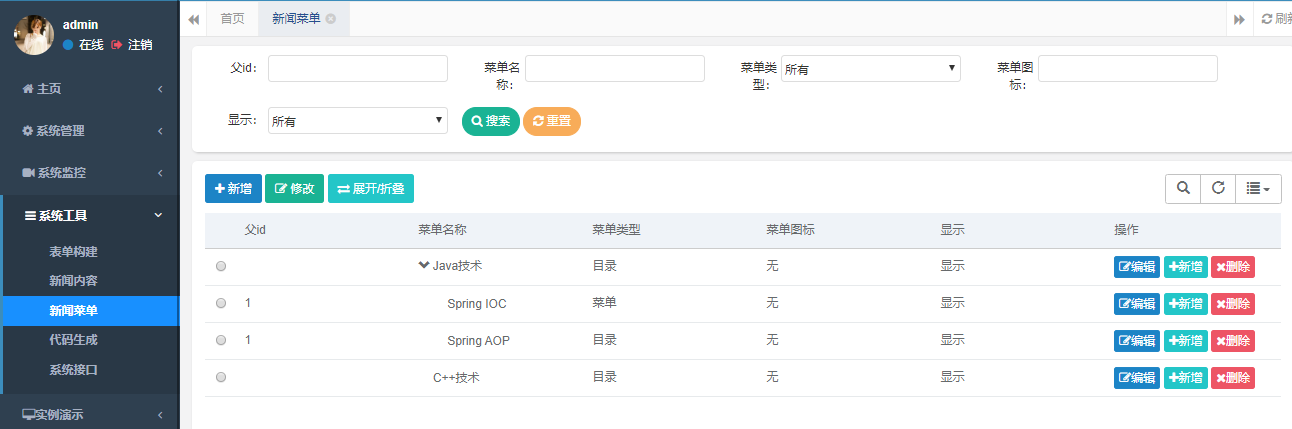
新闻菜单有(树表):菜单名称、菜单类型、菜单图标、菜单是否展示
二、数据库设计
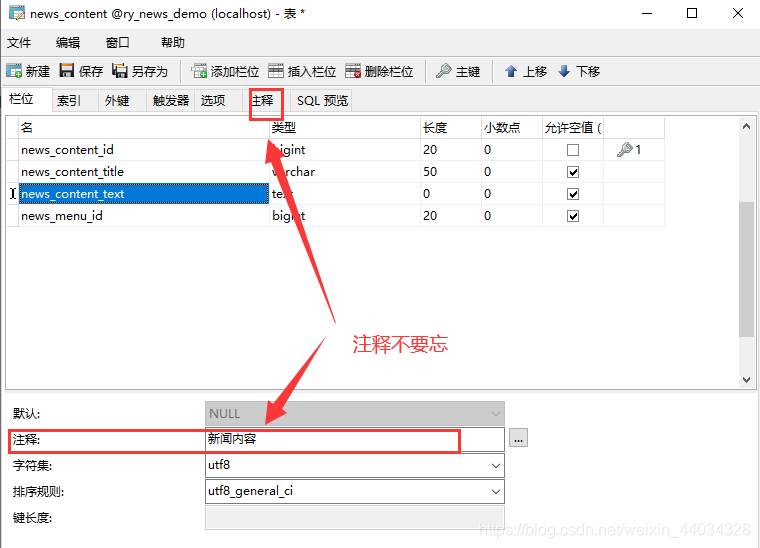
注释不要忘记,代码生成的时候会用到注释!(注释时请不要加上我括号里面解释的内容)
1.新闻菜单表(树表)
- news_menu_id:编号
- news_menu_parent_id:父id
- news_menu_name:菜单名称
- news_menu_type:菜单类型(菜单有两种类型一种是D(directory目录),另一种是菜单M(menu菜单))
- news_menu_icon:菜单图标(菜单的图标,存放的是url地址。)
- news_menu_visibel:显示(菜单是否展示,1代表展示,0代表不展示)
记得在表注释中加上 新闻菜单表

1.新闻内容表
- news_content_id:编号
- news_content_title:新闻标题
- news_content_text:新闻内容
- news_menu_id:所属菜单id(一定是M菜单类型的id)
记得在表注释中加上 新闻内容表
三、运行RuoYi项目
如果运行遇到问题推荐去看RuoYi的官方文档
RuoYi文档环境部署:http://doc.ruoyi.vip/ruoyi/document/hjbs.html#%E5%87%86%E5%A4%87%E5%B7%A5%E4%BD%9C
1.创建数据库,运行sql文件
sql文件在RuoYi项目sql目录下,名字分别是:quartz.sql 和 ry_20191122.sql。

2.启动运行RuoYi项目
我用的是IDEA,用Eclipse的同学需要把每一个模块都导入到Eclipse工作区间中。
记得修改数据库连接池文件中的用户名和密码!
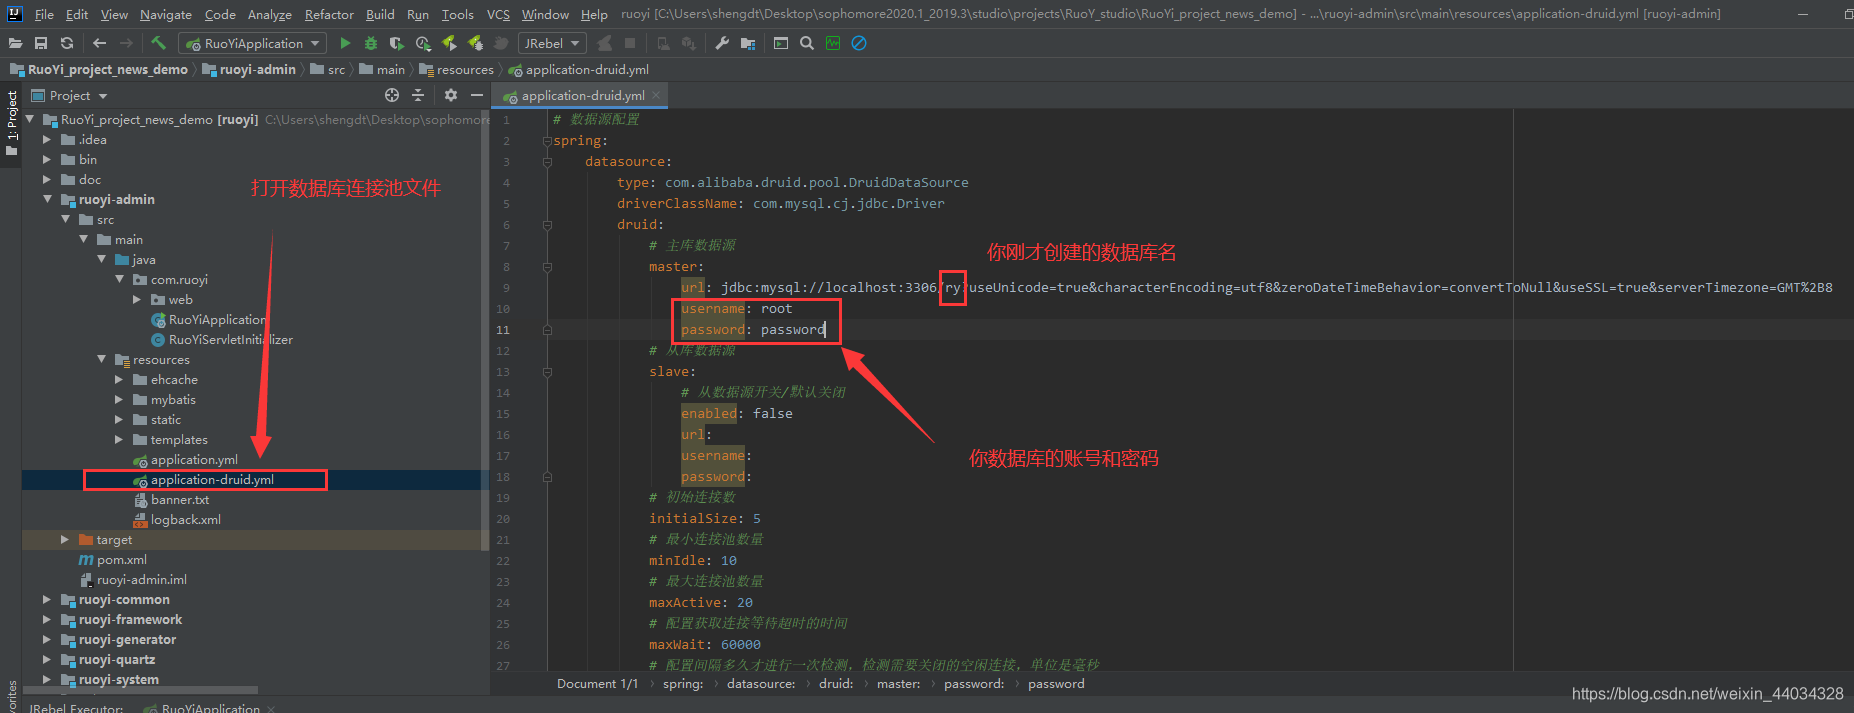
右键 RuoYiApplication 点击 run。
启动成功!
四、生成代码
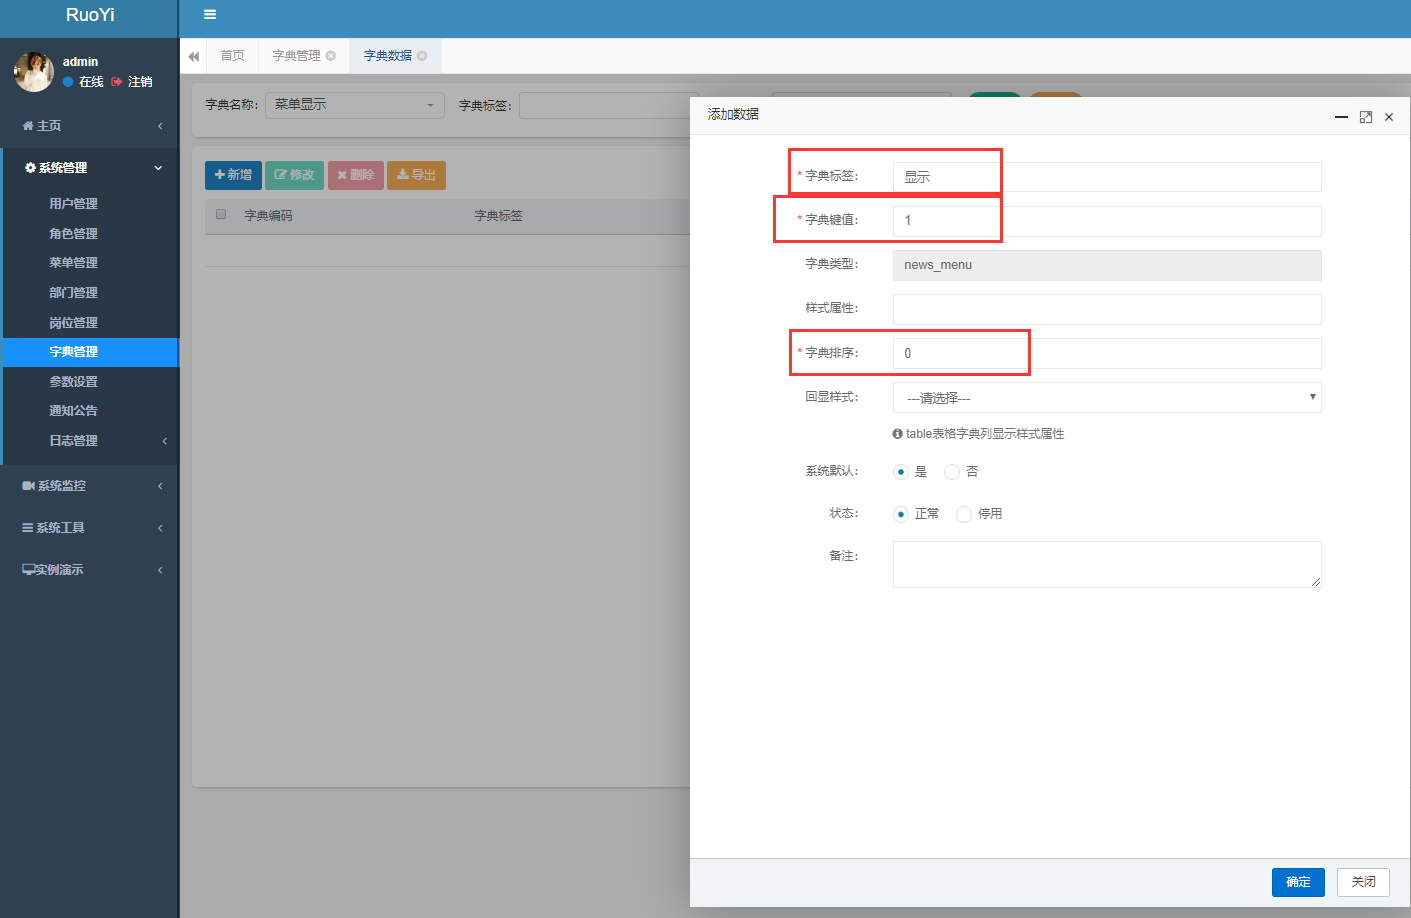
1.添加字典(菜单显示)
注:增加字典是为了一会儿需要用到字典。
点击:系统管理 - 字典管理 - 新增

点击列表

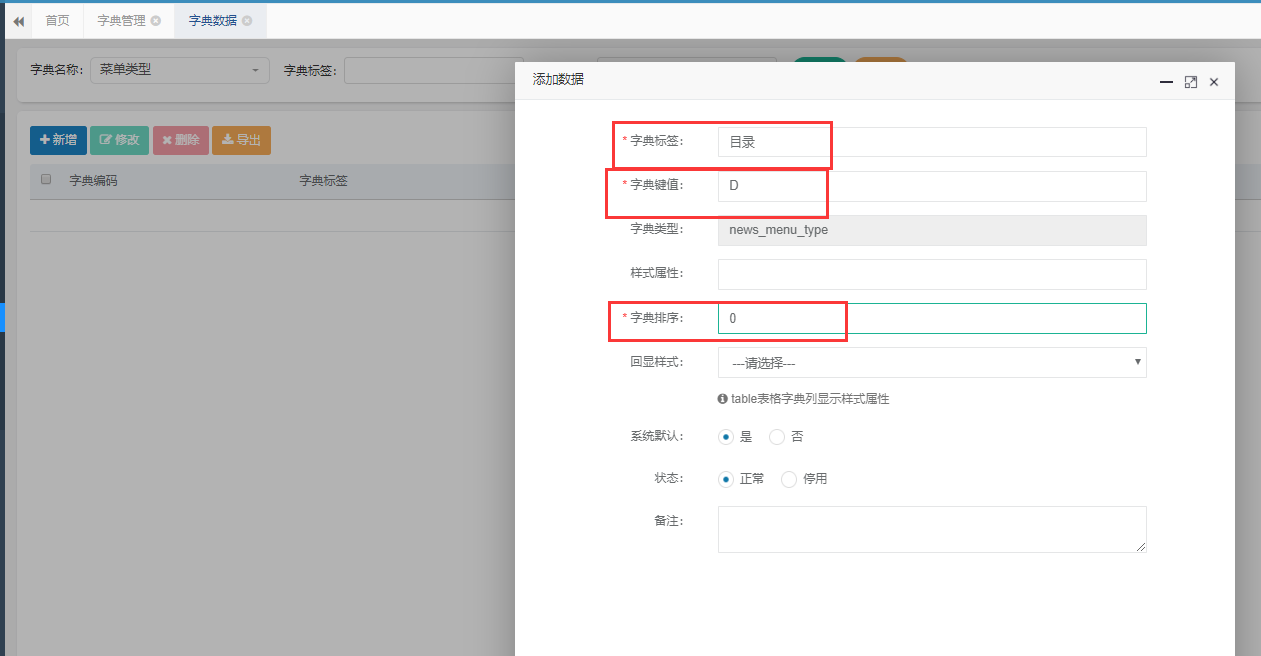
点击新增,增加字典数据(添加菜单显示字典)
点击新增,增加字典数据(添加菜单显示字典)

2.添加字典(菜单类型)
注:增加字典是为了一会儿需要用到字典。
同上方法,添加菜单类型的字典。
点击:系统管理 - 字典管理 - 新增
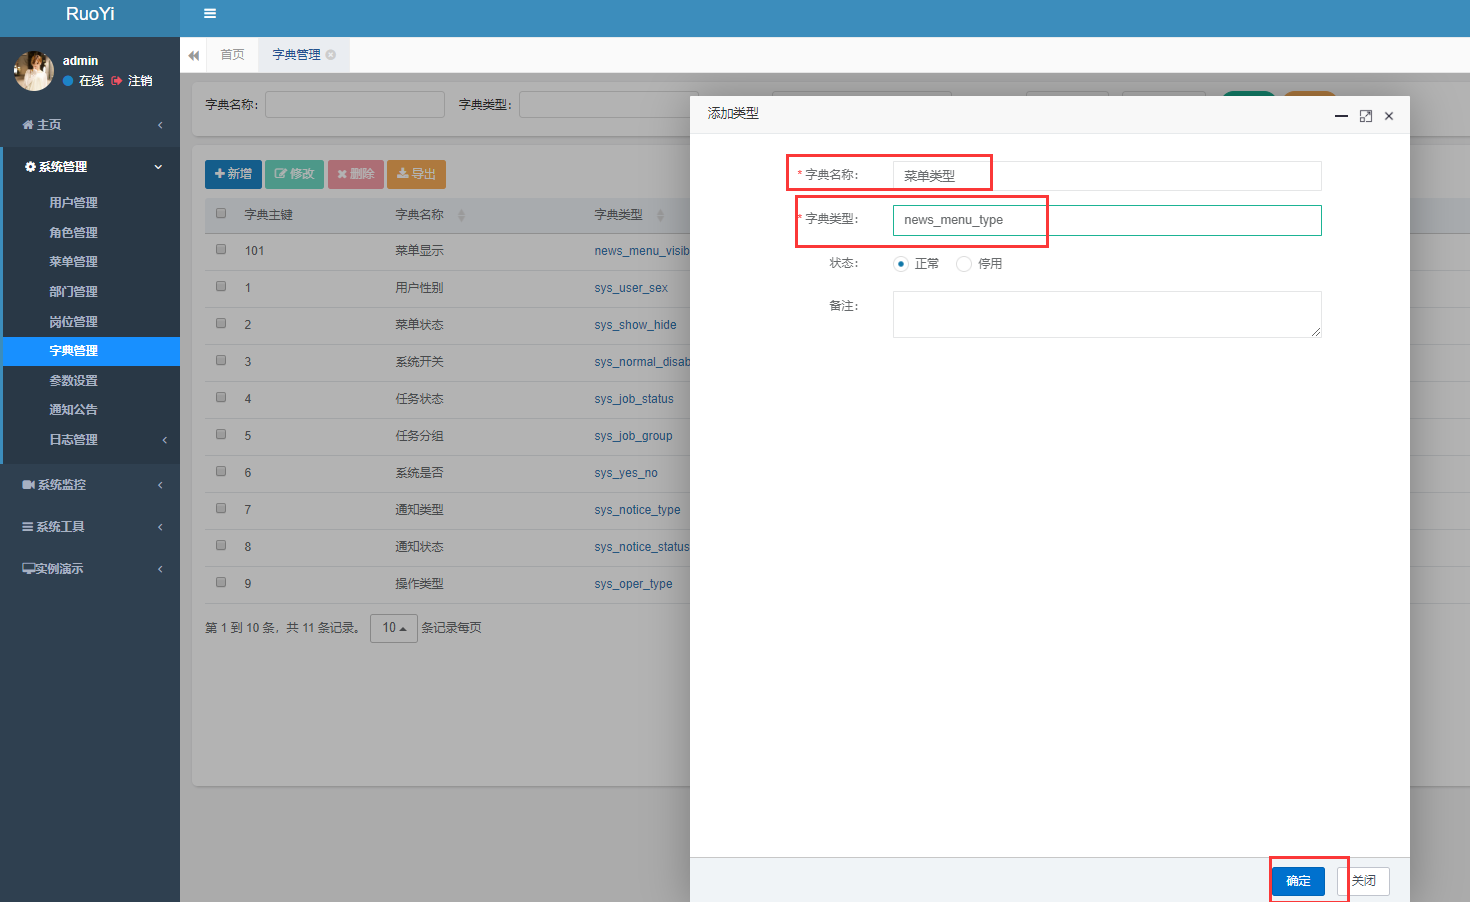
点击列表

点击新增,增加字典数据(添加菜单类型字典),添加好后点击确认。
D代表directory目录
点击新增,增加字典数据(添加菜单类型字典),添加好后点击确认。
M代表menu菜单

2.代码生成
点击 系统工具 - 代码生成 。然后点击 导入,勾选刚创建的两个表(news_content和news_menu表),点击确定。

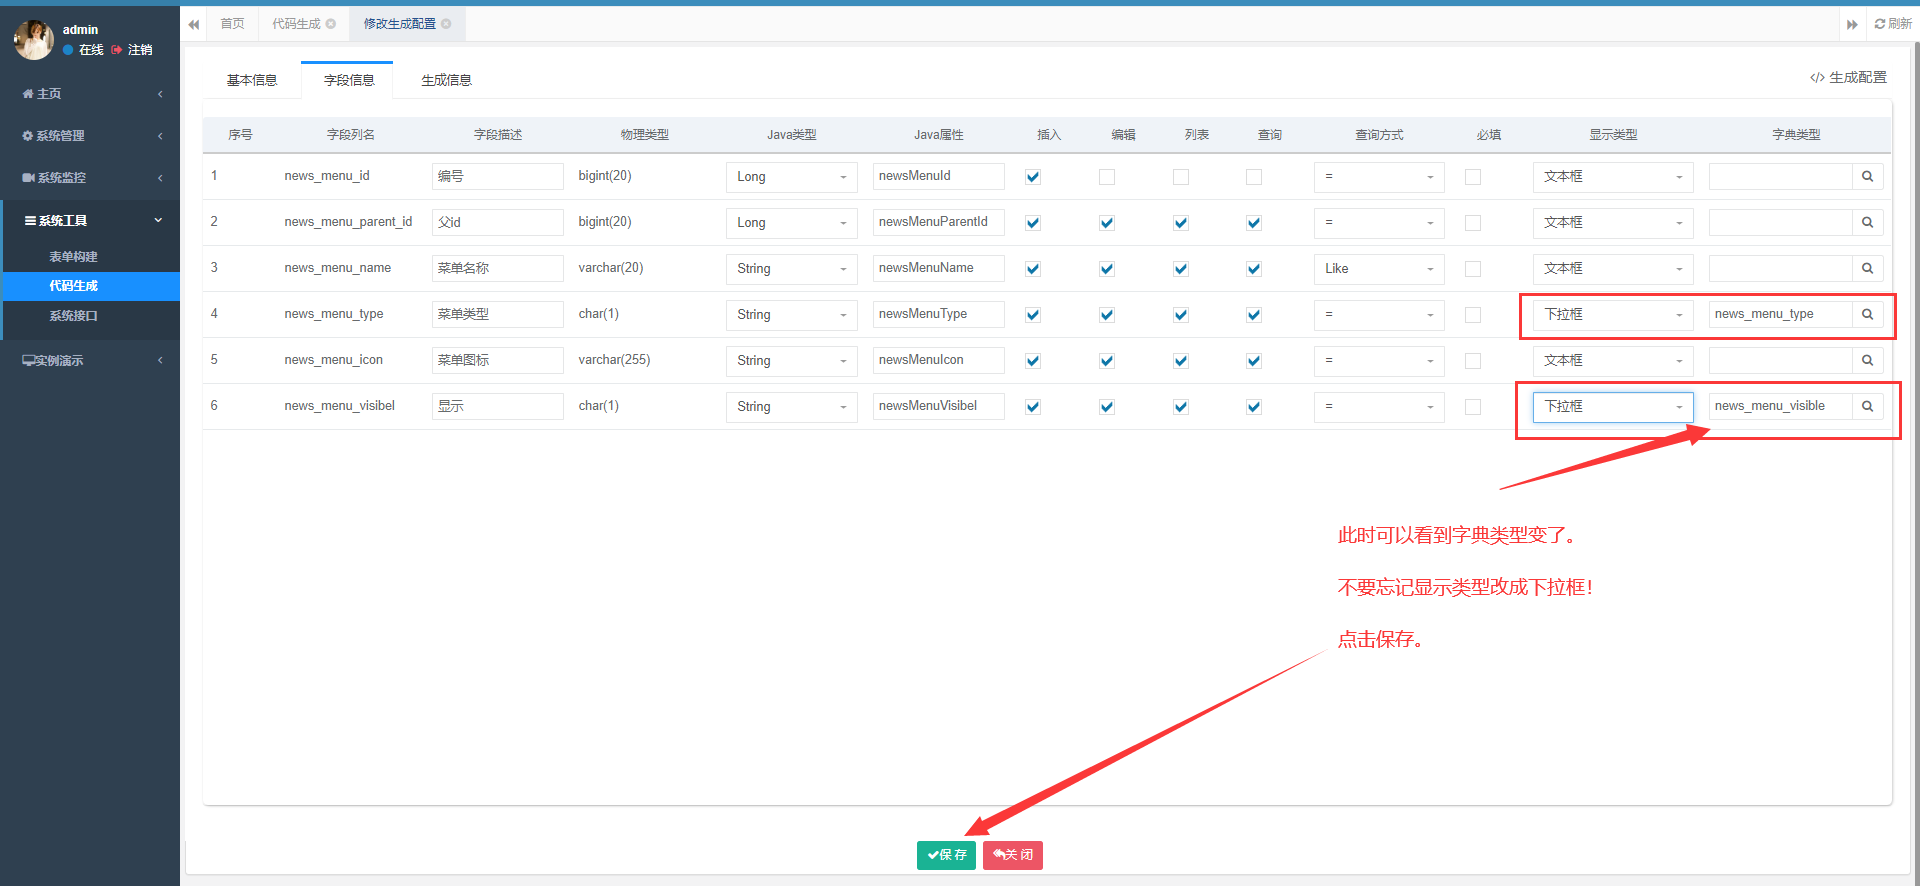
2.1 修改生成配置(字段信息)
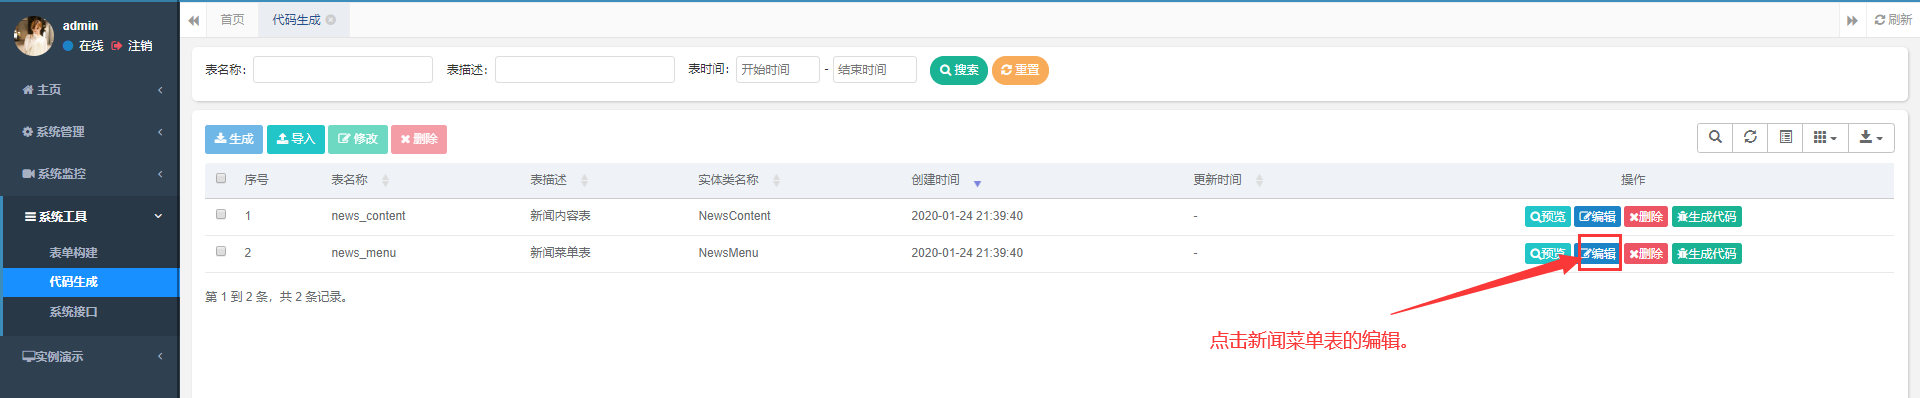
点击 新闻菜单表 的编辑,用来修改生成配置。
点击字段 news_menu_visibel 的字典类型,然后选择字典类型。(这就是我们刚刚新增的字典!)选择好后点击确认。

菜单类型同理。选择字典。

2.2 修改生成配置(生成信息)
点击 新闻内容表 的编辑,修改生成配置。

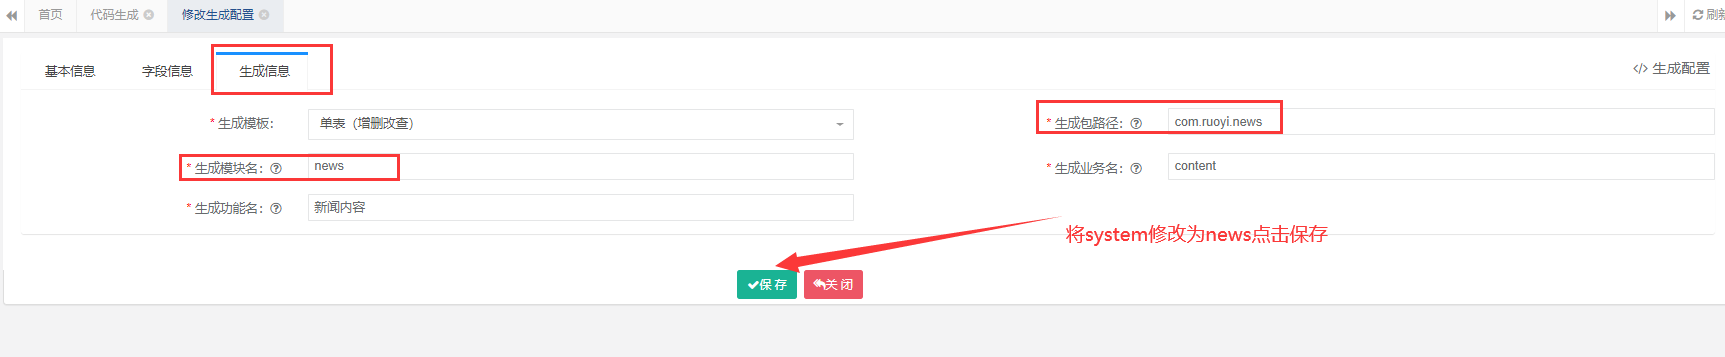
2.3 修改生成配置(生成信息)
点击 新闻菜单表 的编辑,修改生成配置。

修改为树表,其他信息也按照图片填写完整

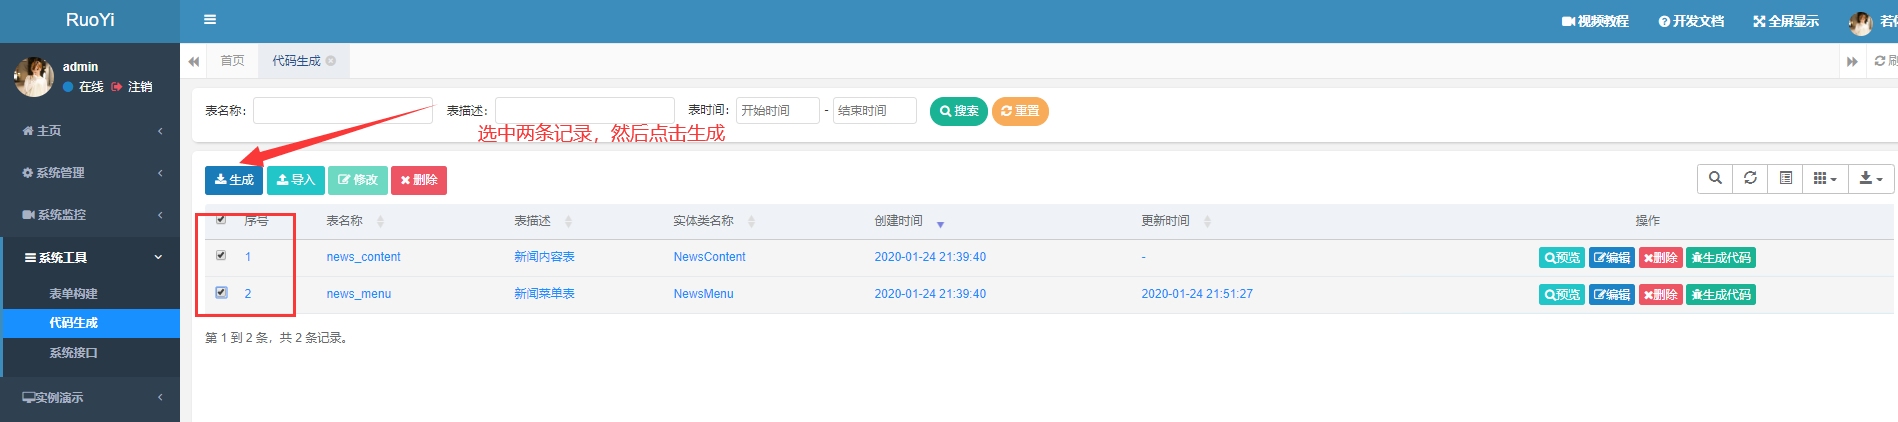
2.4 代码生成
选中刚才导入的两条记录,然后点击生成。
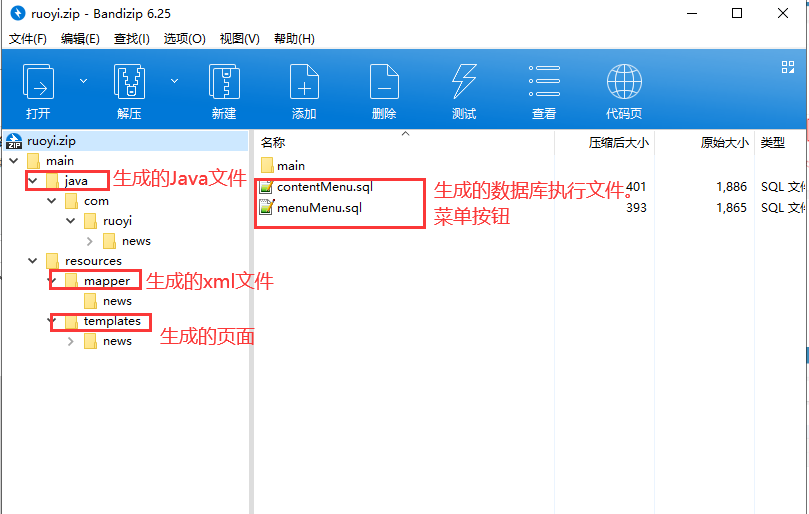
网站将会自动生成一个zip压缩包,里面就是生成的代码。一会儿直接复制粘贴到项目里面,然后重启项目即可。

压缩包中生成的代码文件夹解释:
五、粘贴生成代码
1.执行sql文件
将下面两个生成的sql文件到数据库中执行。
运行sql文件
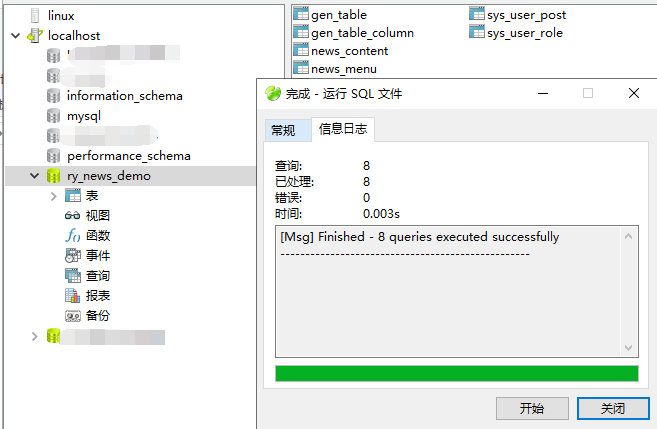
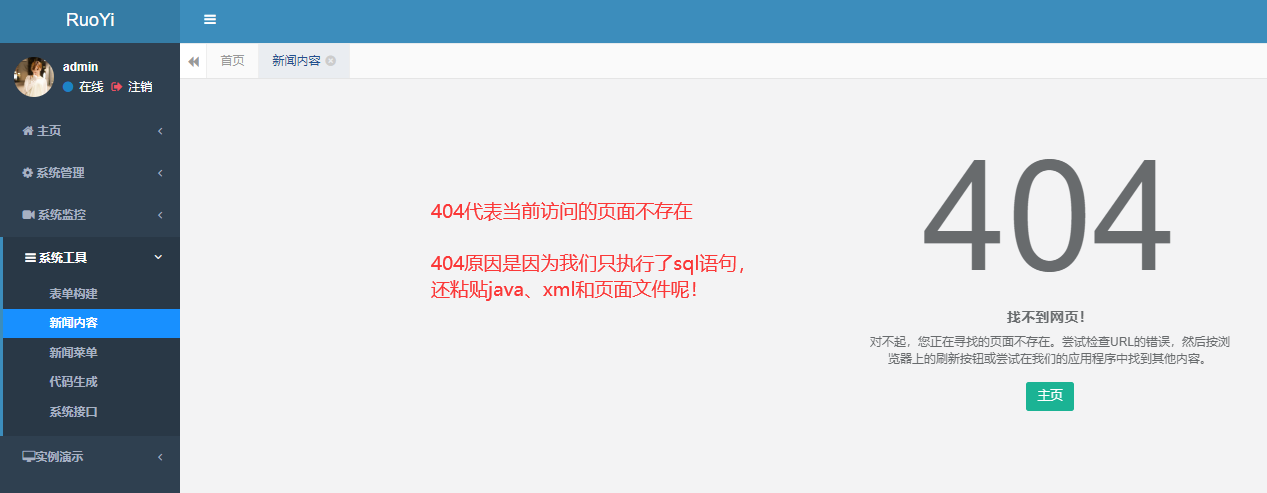
sql文件运行成功后,刷新页面应该可以看到 系统工具 中多出两个菜单了,分别是 新闻内容 和 新闻菜单
(404是因为我们还没粘贴java、xml和页面文件呢!)
2.粘贴生成代码
粘贴生成的代码到项目中。(注意,请去IDE中粘贴,就是你开发的界面中粘贴。)


然后重启项目,运行。
注意:此时如果提示你某个类不存在,请检查是否粘贴完整。如果确认是粘贴完整的,请重启IDE,因为多半是IDE卡了。重启下IDE就不会再报错了。
六、熟悉项目(新闻内容 + 新闻菜单)
运行成功!

此时项目已经完成了简单的增删改查 + 导出。你需要做的就是熟悉项目。比如上面那个 新闻内容 页面是属于什么页面的。调用的是什么接口,点击添加修改又是什么页面。这些是你需要了解的。
随便添加几个数据,查看一下。
等熟悉完页面后就可以去修改页面代码,改成我们想要的页面了。
七、修改页面及代码
1.修改新闻菜单页面
1.1 修改新增页面(add.html)
修改templates - news - menu文件夹下的add.html
新增页面参考代码:
<!DOCTYPE html>
<html lang="zh" xmlns:th="http://www.thymeleaf.org" >
<head>
<th:block th:include="include :: header('新增新闻菜单')" />
<!-- 文件上传css导入 -->
<th:block th:include="include :: bootstrap-fileinput-css"/>
</head>
<body class="white-bg">
<div class="wrapper wrapper-content animated fadeInRight ibox-content">
<form class="form-horizontal m" id="form-menu-add">
<div class="form-group">
<label class="col-sm-3 control-label">父id:</label>
<div class="col-sm-8">
<div class="input-group">
<input id="treeId" name="newsMenuParentId" type="hidden" th:value="${newsMenu?.newsMenuId}"/>
<input class="form-control" type="text" onclick="selectMenuTree()" id="treeName" readonly="true" th:value="${newsMenu?.newsMenuName}">
<span class="input-group-addon"><i class="fa fa-search"></i></span>
</div>
</div>
</div>
<div class="form-group">
<label class="col-sm-3 control-label">菜单名称:</label>
<div class="col-sm-8">
<input name="newsMenuName" class="form-control" type="text" required maxlength="20">
</div>
</div>
<div class="form-group">
<label class="col-sm-3 control-label">菜单类型:</label>
<div class="col-sm-8">
<select name="newsMenuType" class="form-control m-b" th:with="type=${@dict.getType('news_menu_type')}">
<option th:each="dict : ${type}" th:text="${dict.dictLabel}" th:value="${dict.dictValue}"></option>
</select>
</div>
</div>
<div class="form-group">
<label class="col-sm-3 control-label">显示:</label>
<div class="col-sm-8">
<select name="newsMenuVisibel" class="form-control m-b" th:with="type=${@dict.getType('news_menu_visible')}">
<option th:each="dict : ${type}" th:text="${dict.dictLabel}" th:value="${dict.dictValue}"></option>
</select>
</div>
</div>
<!-- 注释原本的菜单图标输入框 -->
<!--<div class="form-group">
<label class="col-sm-3 control-label">菜单图标:</label>
<div class="col-sm-8">
<input name="newsMenuIcon" class="form-control" type="text">
</div>
</div>-->
<!-- 使用RuoYi框架自带的文件上传(页面:实例演示 - 表单 - 文件上传。源码:templates - demo - form - upload.html) -->
<div class="form-group">
<label class="col-sm-3 control-label">图标:</label>
<div class="col-sm-8">
<img id="menuIconImg" src="/news/default_images/dir.png" alt="图标加载失败" style="width-max: 100px;max-height: 50px;margin-right: 50px">
<button class="btn btn-primary" type="button" onclick="uploadIconBtn(this)" id="uploadButton">
<i class="fa fa-upload"></i> <span class="bold" id="uploadSpan">上传</span>
</button>
</div>
</div>
<div class="form-group" id="uploadDiv">
<label class="font-noraml">图标上传</label>
<div class="file-loading">
<input class="file" type="file" name="newsMenuIconFile" id="fileinput" data-min-file-count="1" data-theme="fas">
</div>
</div>
<div id="hiddenData" style="visibility: hidden">
<!--用来存放上传成功的图片的input-->
</div>
</form>
</div>
<th:block th:include="include :: footer" />
<script type="text/javascript">
var prefix = ctx + "news/menu"
$("#form-menu-add").validate({
focusCleanup: true
});
function submitHandler() {
if ($.validate.form()) {
$.operate.save(prefix + "/add", $('#form-menu-add').serialize());
}
}
/*新闻菜单-新增-选择父部门树*/
function selectMenuTree() {
var options = {
title: '新闻菜单选择',
width: "380",
url: prefix + "/selectMenuTree/" + $("#treeId").val(),
callBack: doSubmit
};
$.modal.openOptions(options);
}
function doSubmit(index, layero){
var body = layer.getChildFrame('body', index);
$("#treeId").val(body.find('#treeId').val());
$("#treeName").val(body.find('#treeName').val());
layer.close(index);
}
</script>
<!-- 默认上传图标div隐藏 -->
<script>
/* hide uploadDiv */
$(function() {
var div = $("#uploadDiv");
div.hide();
});
/* click the id is uploadIconBtn button to display the id is uploadDiv div*/
function uploadIconBtn(btn) {
var $span = $("#uploadSpan");
var uploadDiv = $("#uploadDiv");
// console.log($span[0].innerText);
if ($span[0].innerText == "上传") {
uploadDiv.show();
$span[0].innerText = "取消上传";
} else {
uploadDiv.hide();
$span[0].innerText = "上传";
}
}
</script>
<!-- 图片上传 -->
<script type="text/javascript">
$(function() {
$("#fileinput").fileinput({
uploadUrl: '/news/menu/menuIconUpload',
maxFileCount: 1,
maxFileSize: 1024*3,
allowedFileTypes: 'jpg,png',
initialPreviewAsData: true,
overwriteInitial: true,
initialPreview: [
"/news/default_images/dir.png"
]
}).on("fileuploaded", function (event, data, previewId, index) {
// 图片上传成功
var previewImage = $(".file-preview-image")[0]; // 获取预览图片
$("#menuIconImg")[0].src = previewImage.src; // 预览图片在id为menuIconImg中显示
// 获取/news/menu/menuIconUpload接口返回的数据。
var fileStoragePath = data.response.fileStoragePath;
var genFilename = data.response.genFilename;
var URL = fileStoragePath + "\\" +genFilename;
console.dir("图片上传成功!URL:"+URL);
// 隐藏不必要的div和按钮
$("#uploadDiv").hide(); // 隐藏取div
$("#uploadButton").hide(); // 隐藏上传按钮
$.modal.msgSuccess("图片上传成功!"); // 提示框
$("#hiddenData").append('<input type="text" value="'+URL+'" name="newsMenuIcon">'); // 创建一个input存储URL
})
});
</script>
<!-- 文件上传js导入(一定要放在最后面) -->
<th:block th:include="include :: bootstrap-fileinput-js"/>
</body>
</html>
同时将打开NewsMenuController.java文件。末尾加上两个方法,用于菜单图标上传。
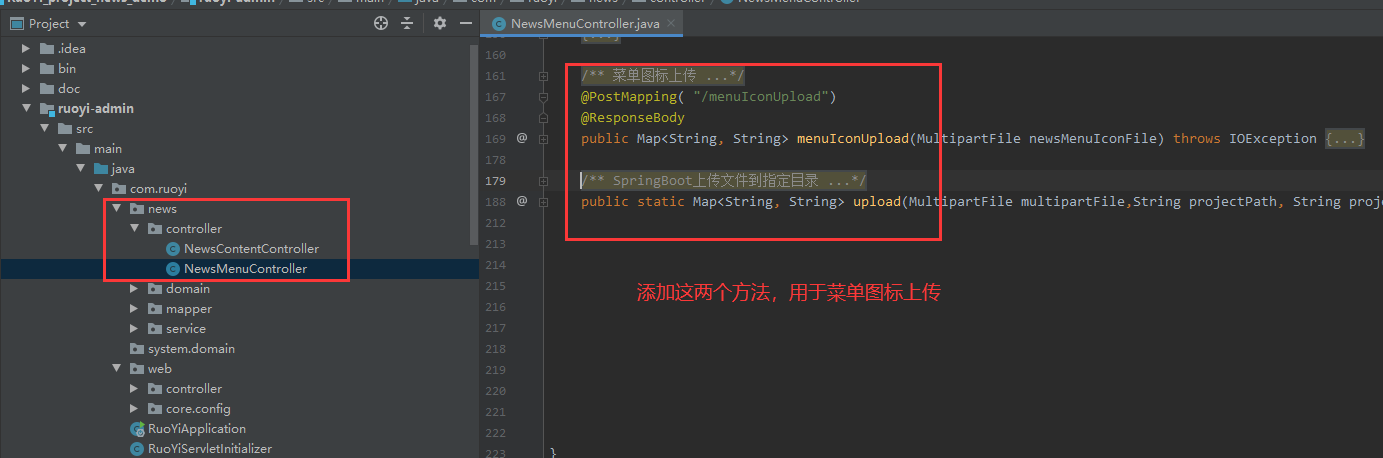
参考代码,如下(用于菜单图标上传的):
	/**
     * 菜单图标上传
     * @param newsMenuIconFile 上传的文件
     * @return 上传的文件的URL
     * @throws IOException
     */
    @PostMapping( "/menuIconUpload")
    @ResponseBody
    public Map<String, String> menuIconUpload(MultipartFile newsMenuIconFile) throws IOException {
        System.out.println("文件:"+newsMenuIconFile.getOriginalFilename()+"正在上传!");
        String projectPath = System.getProperty("user.dir"); // 项目路径
        String projectStaticPath = "\\ruoyi-admin"+"\\src\\main\\resources\\static"; // 项目到静态资源文件路径
        String fileStoragePath = "\\news\\default_images"; // static下的路径
        // return file info by map
        Map<String, String> map = upload(newsMenuIconFile, projectPath, projectStaticPath, fileStoragePath);
        return map;
    }

    /**
     * SpringBoot上传文件到指定目录
     * @param multipartFile 需要上传的文件
     * @param projectPath 当前项目路径
     * @param projectStaticPath 当前项目到静态资源文件路径(从当前项目开始:如:存放在当前项目的"\\ruoyi-admin\\src\\main\\resources\\static"静态资源文件夹下)
     * @param fileStoragePath 文件存放路径(从静态资源文件夹开始,如:存放在static的"\\news\\default_images"文件夹下)
     * @return 存放文件路劲信息的map
     * @throws IOException
     */
    public static Map<String, String> upload(MultipartFile multipartFile,String projectPath, String projectStaticPath, String fileStoragePath) throws IOException {
        // String projectPath = System.getProperty("user.dir"); // 项目路径
        // String projectStaticPath = "\\ruoyi-admin"+"\\src\\main\\resources\\static"; // 项目到静态资源文件路径
        // String fileStoragePath = "\\news\\default_images"; // static下的路径
        String completedFilePath = projectPath + projectStaticPath + fileStoragePath; // 完整文件路径
        // mk dir
        File fileDir = new File(completedFilePath);
        if (!fileDir.exists()) {
            fileDir.mkdirs();
        }
        // mk file
        String time = System.currentTimeMillis()+"";
        int random = (int) (Math.random()*1000); // 生成一个[0,999]的随机数
        String genFilename = time+random+".png";
        File file = new File(completedFilePath + "\\"+ genFilename);
        // upload file
        multipartFile.transferTo(file); // 将multipartFile存入创建好的file中
        // return file path info by map
        Map<String, String> map = new HashMap<>();
        map.put("completedFilePath", completedFilePath);
        map.put("fileStoragePath", fileStoragePath);
        map.put("genFilename", genFilename);
        return map;
    }
效果图:
点击选择,选择图片进行上传。

1.2 修改修改页面(add.html)
将修改页面中菜单图片的input标签改成img标签,用于显示图片。
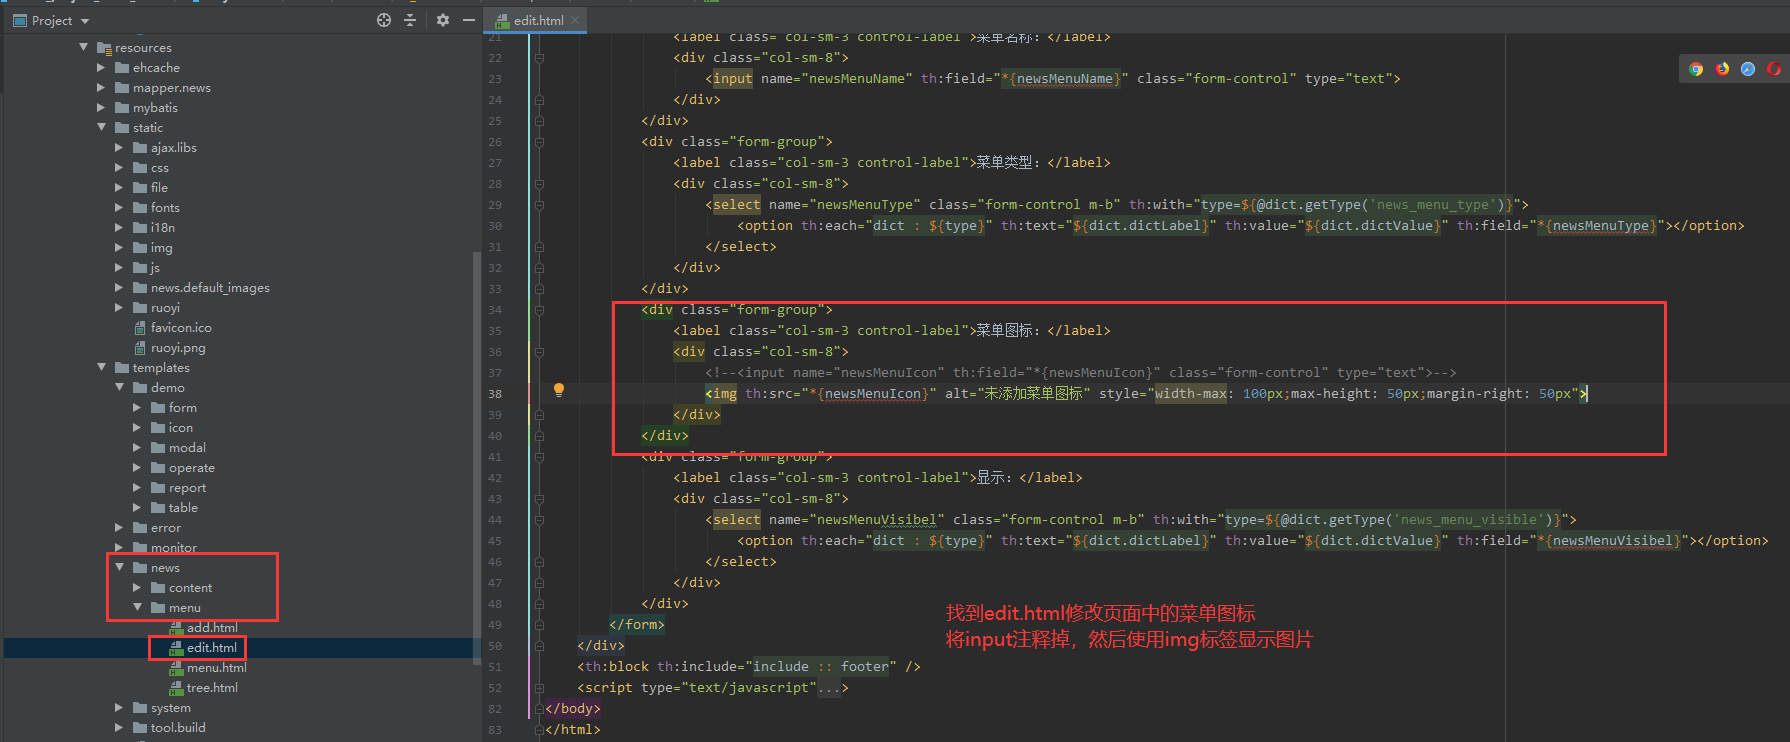
参考代码:
			<div class="form-group">
                <label class="col-sm-3 control-label">菜单图标:</label>
                <div class="col-sm-8">
                    <!--<input name="newsMenuIcon" th:field="*{newsMenuIcon}" class="form-control" type="text">-->
                    <img th:src="*{newsMenuIcon}" alt="未添加菜单图标" style="width-max: 100px;max-height: 50px;margin-right: 50px">
                </div>
            </div>
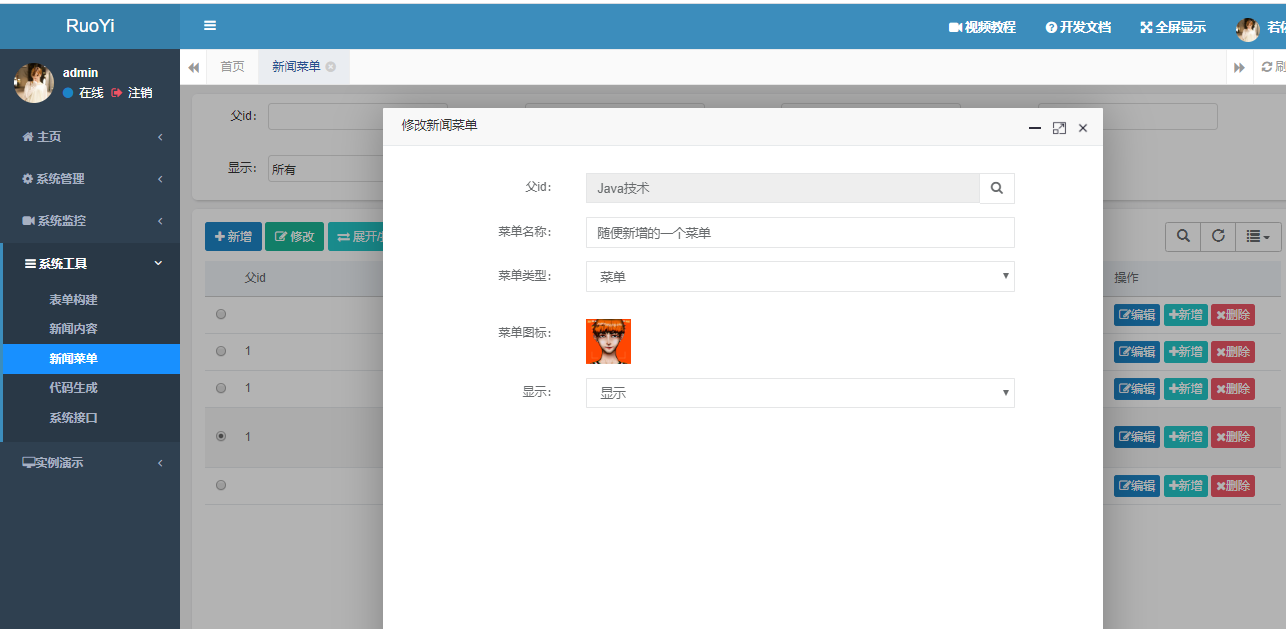
效果图:
同时,找到下面这个div,然后在input中添加两个属性。

1.3 修改查找页面(menu.html)
找到menu.html页面,修改js代码,增加一个属性formatter,值为一个函数(用于显示菜单图标)
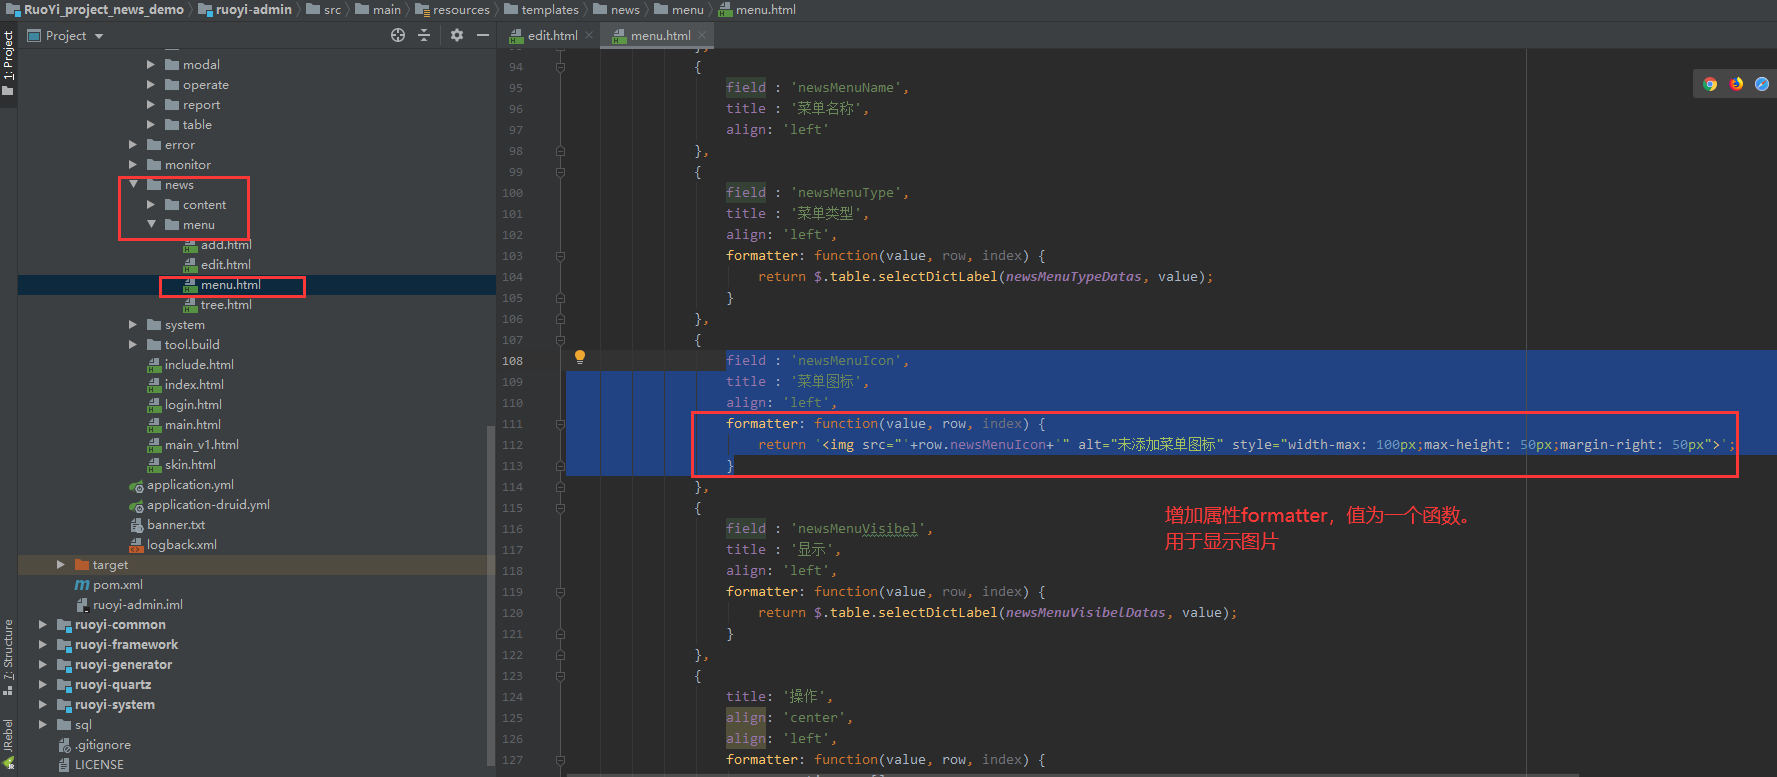
参考代码:
				{
                    field : 'newsMenuIcon',
                    title : '菜单图标',
                    align: 'left',
                    formatter: function(value, row, index) {
                        return '<img src="'+row.newsMenuIcon+'" alt="未添加菜单图标" style="width-max: 100px;max-height: 50px;margin-right: 50px">';
                    }
                },
效果图:
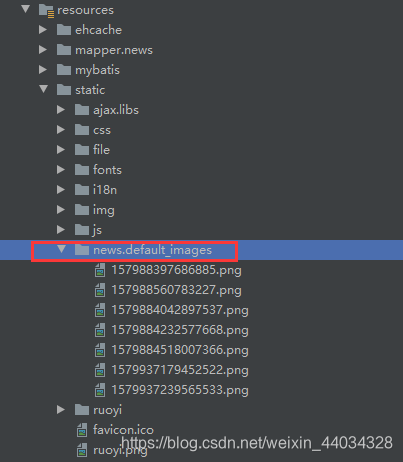
注:图片上传可能需要一段时间,等一小段时间就上传成功了,当然你也可以到项目中刷新一下,看项目文件夹有没有新增图片(红色框框中的文件夹是图片上传目录的文件夹,在刚刚粘贴的代码中有指定为这个文件夹。)
2.修改新闻内容页面
2.1 修改添加页面(add.html)
将使用 实例演示 - 表单 - 富文本编辑器 进行文章内容的编写。同时将 所属菜单id 改成 所属菜单。
参考代码:
<!DOCTYPE html>
<html lang="zh" xmlns:th="http://www.thymeleaf.org" >
<head>
    <th:block th:include="include :: header('新增新闻内容')" />
    <!-- 富文本编辑器css导入 -->
    <th:block th:include="include :: summernote-css" />
</head>
<body class="white-bg">
    <div class="wrapper wrapper-content animated fadeInRight ibox-content">
        <form class="form-horizontal m" id="form-content-add">
            <!--<div class="form-group">
                <label class="col-sm-3 control-label">所属菜单id:</label>
                <div class="col-sm-8">
                    <input name="newsMenuId" class="form-control" type="text">
                </div>
            </div>-->
            <!-- 注释掉原本的所属菜单id,将所属菜单id改为所属菜单 -->
            <div class="form-group">
                <label class="col-sm-3 control-label">所属菜单:</label>
                <div class="col-sm-8">
                    <div class="input-group">
                        <input id="treeId" name="newsMenuId" type="hidden" th:value="${newsMenu?.newsMenuId}"/>
                        <input class="form-control" type="text" onclick="selectMenuTree()" id="treeName" readonly="true" th:value="${newsMenu?.newsMenuName}">
                        <span class="input-group-addon"><i class="fa fa-search"></i></span>
                    </div>
                </div>
            </div>
            <div class="form-group">
                <label class="col-sm-3 control-label">新闻标题:</label>
                <div class="col-sm-8">
                    <input name="newsContentTitle" class="form-control" type="text" required>
                </div>
            </div>
            <!--<div class="form-group">
                <label class="col-sm-3 control-label">新闻内容:</label>
                <div class="col-sm-8">
                    <input name="newsContentText" class="form-control" type="text">
                </div>
            </div>-->
            <!-- 注释掉原本的input标签,新闻内容的input标签改为富文本编辑器 -->
            <div class="row">
                <div class="col-sm-12">
                    <div class="ibox float-e-margins">
                        <div class="ibox-title">
                            <h5>新闻内容:</h5>
                        </div>
                        <div class="ibox-content no-padding">
                            <!-- class为summernote的标签改为textarea,同时加上name用于接受数据 -->
                            <textarea class="summernote" name="newsContentText" required>
                                <h2>若依后台管理系统</h2>
                                <p>ruoyi是一个完全响应式,基于Bootstrap3.3.6最新版本开发的扁平化主题,她采用了主流的左右两栏式布局,使用了Html5+CSS3等现代技术,她提供了诸多的强大的可以重新组合的UI组件,并集成了最新的jQuery版本(v2.1.1),当然,也集成了很多功能强大,用途广泛的就jQuery插件,她可以用于所有的Web应用程序,如<b>网站管理后台</b>,<b>网站会员中心</b>,<b>CMS</b>,<b>CRM</b>,<b>OA</b>等等,当然,您也可以对她进行深度定制,以做出更强系统。</p>
                                <p>
                                    <b>当前版本:</b>v4.1.0
                                </p>
                                <p>
                                    <span class="label label-warning">免费开源</span>
                                </p>
                            </textarea>
                        </div>
                    </div>
                </div>
            </div>
        </form>
    </div>
    <th:block th:include="include :: footer" />
    <script type="text/javascript">
        var prefix = ctx + "news/content"
        $("#form-content-add").validate({
            focusCleanup: true
        });

        function submitHandler() {
            if ($.validate.form()) {
                $.operate.save(prefix + "/add", $('#form-content-add').serialize());
            }
        }

        /*新闻菜单-新增-选择父部门树*/
        function selectMenuTree() {
            var prefix = ctx + "news/menu";
            var options = {
                title: '新闻菜单选择',
                width: "380",
                url: prefix + "/selectMenuTree/" + $("#treeId").val(),
                callBack: doSubmit
            };
            $.modal.openOptions(options);
        }

        function doSubmit(index, layero){
            var body = layer.getChildFrame('body', index);
            $("#treeId").val(body.find('#treeId').val());
            $("#treeName").val(body.find('#treeName').val());
            layer.close(index);
        }
    </script>
    <!-- 富文本编辑器js导入 -->
    <th:block th:include="include :: summernote-js" />
    <!-- 富文本编辑器js代码 -->
    <script>
        $(document).ready(function () {
            $('.summernote').summernote({
                lang: 'zh-CN'
            });
        });
    </script>
</body>
</html>
效果图:

2.1 修改修改页面(edit.html)
让修改页面同上面新增页面一样。
<!DOCTYPE html>
<html lang="zh" xmlns:th="http://www.thymeleaf.org" >
<head>
    <th:block th:include="include :: header('修改新闻内容')" />
    <!-- 富文本编辑器css导入 -->
    <th:block th:include="include :: summernote-css" />
</head>
<body class="white-bg">
    <div class="wrapper wrapper-content animated fadeInRight ibox-content">
        <form class="form-horizontal m" id="form-content-edit" th:object="${newsContent}">
            <input name="newsContentId" th:field="*{newsContentId}" type="hidden">
            <!--<div class="form-group">
                <label class="col-sm-3 control-label">所属菜单id:</label>
                <div class="col-sm-8">
                    <input name="newsMenuId" th:field="*{newsMenuId}" class="form-control" type="text">
                </div>
            </div>-->
            <!-- 注释掉原本的所属菜单id,将所属菜单id改为所属菜单 -->
            <div class="form-group">
                <label class="col-sm-3 control-label">所属菜单:</label>
                <div class="col-sm-8">
                    <div class="input-group">
                        <input id="treeId" name="newsMenuId" type="hidden" th:value="${newsMenu?.newsMenuId}"/>
                        <input class="form-control" type="text" onclick="selectMenuTree()" id="treeName" readonly="true" th:value="${newsMenu?.newsMenuName}">
                        <span class="input-group-addon"><i class="fa fa-search"></i></span>
                    </div>
                </div>
            </div>
            <div class="form-group">
                <label class="col-sm-3 control-label">新闻标题:</label>
                <div class="col-sm-8">
                    <input name="newsContentTitle" th:field="*{newsContentTitle}" class="form-control" type="text">
                </div>
            </div>
            <!--<div class="form-group">
                <label class="col-sm-3 control-label">新闻内容:</label>
                <div class="col-sm-8">
                    <input name="newsContentText" th:field="*{newsContentText}" class="form-control" type="text">
                </div>
            </div>-->
            <!-- 注释掉原本的input标签,新闻内容的input标签改为富文本编辑器 -->
            <div class="row">
                <div class="col-sm-12">
                    <div class="ibox float-e-margins">
                        <div class="ibox-title">
                            <h5>新闻内容:</h5>
                        </div>
                        <div class="ibox-content no-padding">
                            <textarea class="summernote" name="newsContentText" required>
                                [[*{newsContentText}]]
                            </textarea>
                        </div>
                    </div>
                </div>
            </div>
        </form>
    </div>
    <th:block th:include="include :: footer" />
    <script type="text/javascript">
        var prefix = ctx + "news/content";
        $("#form-content-edit").validate({
            focusCleanup: true
        });

        function submitHandler() {
            if ($.validate.form()) {
                $.operate.save(prefix + "/edit", $('#form-content-edit').serialize());
            }
        }

        /*新闻内容-新增-所属菜单树*/
        function selectMenuTree() {
            var prefix = ctx + "news/menu";
            var options = {
                title: '新闻菜单选择',
                width: "380",
                url: prefix + "/selectMenuTree/" + $("#treeId").val(),
                callBack: doSubmit
            };
            $.modal.openOptions(options);
        }

        function doSubmit(index, layero){
            var body = layer.getChildFrame('body', index);
            $("#treeId").val(body.find('#treeId').val());
            $("#treeName").val(body.find('#treeName').val());
            layer.close(index);
        }
    </script>
    <!-- 富文本编辑器js导入 -->
    <th:block th:include="include :: summernote-js" />
    <!-- 富文本编辑器js代码 -->
    <script>
        $(document).ready(function () {
            $('.summernote').summernote({
                lang: 'zh-CN'
            });
        });
    </script>
</body>
</html>
效果图

八、总结
以上就是使用RuoYi框架进行学习的一个超简单新闻系统(只有后台页面),里面可能有很多的不足,毕竟目的只是为了简单。
虽说是简单化的(省去了很多),但是也占了很大的篇幅。
希望我的分享可以帮助到你。
最后:感谢你看完了这篇文章,如果对你有帮助欢迎给我点个赞,也非常欢迎关注我。
源码下载
链接:https://pan.baidu.com/s/1PLV_QL5NCY2vi14HosJVWg
提取码:or3s
