文章目录
- Texture
- GLSL
- pipline
- vertex shader
- primitive assembly
- geometry shader
- rasterization stage
- fragment shader
- lpha test and blending
- First Rectangle
- difference between *glDrawArrays* and *glDrawElements*
- linking vertices attributes
- VAO, VBO, EBO
- demo example
- First Window
- Concepts
- Additional resources
- Explanation of Nouns
此博客为学习笔记,参考:https://learnopengl-cn.github.io/
Texture
Texture Coordinate
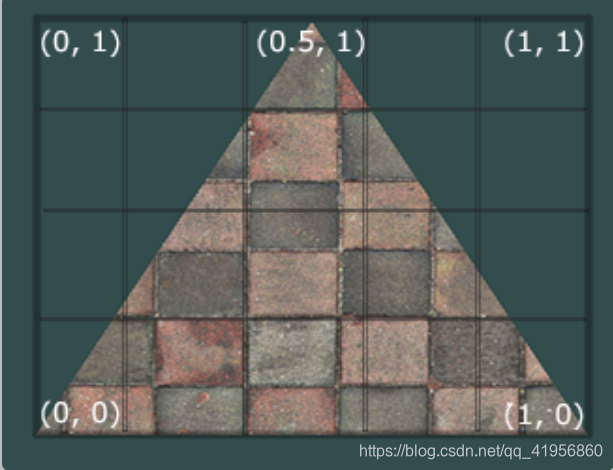
- 坐标轴:s - t - r
- 纹理坐标范围是(0, 0) ~ (1, 1), 如果大于此范围,需要 wrap,小于此范围,则相当于截取
Texture Wrapping
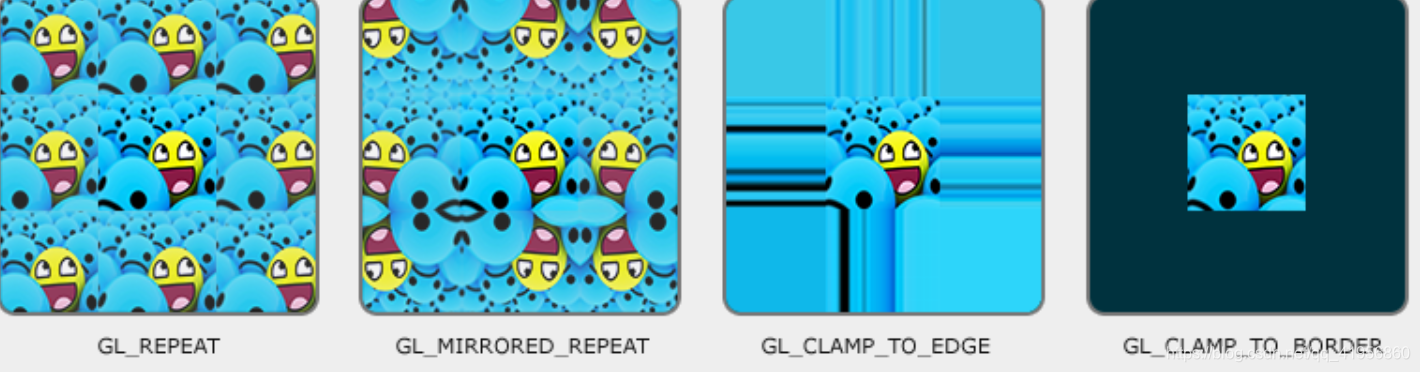
- Each of the aforementioned options can be set per coordinate axis (s, t (and r if you’re using 3D textures) equivalent to x,y,z) with the glTexParameter* function:
glTexParameteri(GL_TEXTURE_2D, GL_TEXTURE_WRAP_S, GL_MIRRORED_REPEAT);
glTexParameteri(GL_TEXTURE_2D, GL_TEXTURE_WRAP_T, GL_MIRRORED_REPEAT);
- If we choose the GL_CLAMP_TO_BORDER option we should also specify a border color. This is done using the fv equivalent of the glTexParameter function with GL_TEXTURE_BORDER_COLOR as its option where we pass in a float array of the border’s color value:
float borderColor[] = { 1.0f, 1.0f, 0.0f, 1.0f };
glTexParameterfv(GL_TEXTURE_2D, GL_TEXTURE_BORDER_COLOR, borderColor);
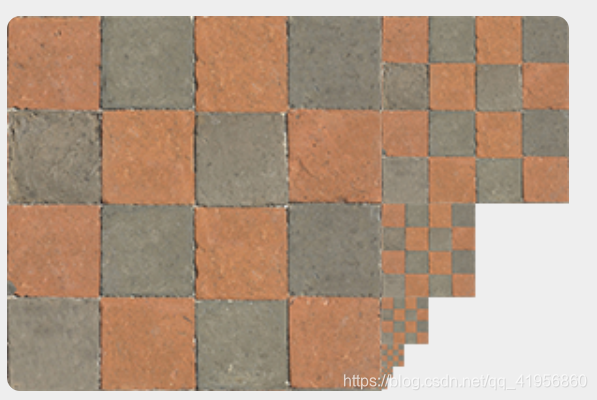
Texture Filtering
- Texture filtering can be set for magnifying and minifying operations (when scaling up or downwards) so you could for example use nearest neighbor filtering when textures are scaled downwards and linear filtering for upscaled textures. We thus have to specify the filtering method for both options via glTexParameter*. The code should look similar to setting the wrapping method:
glTexParameteri(GL_TEXTURE_2D, GL_TEXTURE_MIN_FILTER, GL_NEAREST);
glTexParameteri(GL_TEXTURE_2D, GL_TEXTURE_MAG_FILTER, GL_LINEAR);
mipmaps
- a collection of texture images where each subsequent texture is twice as small compared to the previous one.
-
Creating a collection of mipmapped textures for each texture image is cumbersome to do manually, but luckily OpenGL is able to do all the work for us with a single call to glGenerateMipmaps after we’ve created a texture.
When switching between mipmaps levels during rendering OpenGL might show some artifacts like sharp edges visible between the two mipmap layers. Just like normal texture filtering, it is also possible to filter between mipmap levels using NEAREST and LINEAR filtering for switching between mipmap levels. To specify the filtering method between mipmap levels we can replace the original filtering methods with one of the following four options:
- GL_NEAREST_MIPMAP_NEAREST: takes the nearest mipmap to match the pixel size and uses nearest neighbor interpolation for texture sampling.
- GL_LINEAR_MIPMAP_NEAREST: takes the nearest mipmap level and samples using linear interpolation.
- GL_NEAREST_MIPMAP_LINEAR: linearly interpolates between the two mipmaps that most closely match the size of a pixel and samples via nearest neighbor interpolation.
- GL_LINEAR_MIPMAP_LINEAR: linearly interpolates between the two closest mipmaps and samples the texture via linear interpolation.
Just like texture filtering we can set the filtering method to one of the 4 aforementioned methods using glTexParameteri
glTexParameteri(GL_TEXTURE_2D, GL_TEXTURE_MIN_FILTER, GL_LINEAR_MIPMAP_LINEAR);
// mag filter can't use mipmaps
glTexParameteri(GL_TEXTURE_2D, GL_TEXTURE_MAG_FILTER, GL_LINEAR);
workflow
- vertex shader: pass texture coordinate to fragment shader
#version 330 core
layout (location=0) in vec3 aPos;
layout (location=2) in vec2 aTexCoord;

out vec2 TexCoord;
void main(){
	gl_Position = vec4(aPos, 1.0);
	TexCoord = aTexCoord;
}
- fragment shader: use sampler and texture to get fragcolor
#version 330 core

out vec4 FragColor;
uniform sampler2D texture1;
uniform sampler2D texture2;
uniform float mixvalue;
in vec2 TexCoord;
void main(){
	// linearly interpolate between both textures (80% container, 20% awesomeface)
	FragColor = mix(texture(texture1, TexCoord), texture(texture2,vec2(1.0 -  TexCoord.x, TexCoord.y)), mixvalue);
}
- create texture
	unsigned int texture1, texture2;
	glGenTextures(1, &texture1);
	glBindTexture(GL_TEXTURE_2D, texture1);
	// set the texture wrapping parameters
	glTexParameteri(GL_TEXTURE_2D, GL_TEXTURE_WRAP_S, GL_CLAMP_TO_EDGE);	// set texture wrapping to GL_REPEAT (default wrapping method)
	glTexParameteri(GL_TEXTURE_2D, GL_TEXTURE_WRAP_T, GL_CLAMP_TO_EDGE);	// GL_REAPAT  GL_MIRRORED_REPEAT GL_CLAMP_TO_EDGE
	// set texture filtering parameters
	glTexParameteri(GL_TEXTURE_2D, GL_TEXTURE_MIN_FILTER, GL_LINEAR); // GL_LINEAR, GL_NEAREST
	glTexParameteri(GL_TEXTURE_2D, GL_TEXTURE_MAG_FILTER, GL_LINEAR);
	// load image, create texture and generate mipmaps
	int width, height, nrChannels;
	stbi_set_flip_vertically_on_load(true); // tell stb_image.h to flip loaded texture's on the y-axis.
	// The FileSystem::getPath(...) is part of the GitHub repository so we can find files on any IDE/platform; replace it with your own image path.
	unsigned char *data = stbi_load("container.jpg", &width, &height, &nrChannels, 0);
	if (data)
	{
		glTexImage2D(GL_TEXTURE_2D, 0, GL_RGB, width, height, 0, GL_RGB, GL_UNSIGNED_BYTE, data);
		glGenerateMipmap(GL_TEXTURE_2D);
	}
	else
	{
		std::cout << "Failed to load texture" << std::endl;
	}
	stbi_image_free(data);
glTexImage2D:
glTexImage2D(GL_TEXTURE_2D, 0, GL_RGB, width, height, 0, GL_RGB, GL_UNSIGNED_BYTE, data);
glGenerateMipmap(GL_TEXTURE_2D);
- The second argument specifies the mipmap level for which we want to create a texture for if you want to set each mipmap level manually, but we’ll leave it at the base level which is 0.
- The third argument tells OpenGL in what kind of format we want to store the texture. Our image has only RGB values so we’ll store the texture with RGB values as well.
- The 7th and 8th argument specify the format and datatype of the source image. We loaded the image with RGB values and stored them as chars (bytes) so we’ll pass in the corresponding values.
Once glTexImage2D is called, the currently bound texture object now has the texture image attached to it. However, currently it only has the base-level of the texture image loaded and if we want to use mipmaps we have to specify all the different images manually (by continually incrementing the second argument) or, we could call glGenerateMipmap after generating the texture. This will automatically generate all the required mipmaps for the currently bound texture.
- setting uniform
ourShader.use();
glUniform1i(glGetUniformLocation(ourShader.ID, "texture1"), 0);
- bind textures on corresponding texture units
glActiveTexture(GL_TEXTURE0);
glBindTexture(GL_TEXTURE_2D, texture1);
glActiveTexture(GL_TEXTURE1);
glBindTexture(GL_TEXTURE_2D, texture2);
Using glUniform1i we can actually assign a location value to the texture sampler so we can set multiple textures at once in a fragment shader. This location of a texture is more commonly known as a texture unit. The default texture unit for a texture is 0 which is the default active texture unit
说明
glUniform1i(glGetUniformLocation(ourShader.ID, “texture1”), 0);
glActiveTexture(GL_TEXTURE0); glBindTexture(GL_TEXTURE_2D, texture1);
这两段是配套的,先给shader中的采样器texture1 设置纹理单元 TEXTURE0,再将纹理单元TEXTURE0与实际的纹理texture1绑定。也就是把 实际纹理texture1 绑定给了 shader 中的采样器 texture1
GLSL
变量
- 命名方式:
| 符号 | 含义 |
|---|---|
| vecn | 包含n个float分量的默认向量 |
| bvecn | 包含n个bool分量的向量 |
| ivecn | 包含n个int分量的向量 |
| uvecn | 包含n个unsigned int分量的向量 |
| dvecn | 包含n个double分量的向量 |
| - | vec的分量为 x, y, z, w |
- 重组(swizzling)
如:
vec2 vect = vec2(0.5, 0.7);
vec4 result = vec4(vect, 0.0, 0.0);
vec4 otherResult = vec4(result.xyz, 1.0);

vec2 someVec;
vec4 differentVec = someVec.xyxx;
vec3 anotherVec = differentVec.zyw;
vec4 otherVec = someVec.xxxx + anotherVec.yxzy;
pass parameters through loacation
//vertexShaderSource
#version 330 core
out vec4 FragColor;
in vec3 myColor;
void main(){
	FragColor = vec4(myColor, 1.0);
}
//fragmentShaderSource
#version 330 core
layout (location=0) in vec3 aPos;
layout (location=1) in vec3 aColor;
out vec3 myColor;
void main()
{
	gl_Position = vec4(aPos.x, aPos.y, aPos.z, 1.0);
	myColor = aColor;
}
- then, store data in vertices
	GLfloat vertices[] = { -0.5, -0.5,0, 1.0, 0.0, 0.0,
						0.5, -0.5,0, 0.0, 1.0, 0.0,
						0, 0.5,0 , 0.0, 0.0, 1.0};
- next, use glVertexAttribPointer to pass data into opengl
	glVertexAttribPointer(POSITION_ATTRIB, 3, GL_FLOAT, false, sizeof(float) * 6, (void*)0);
	glEnableVertexAttribArray(POSITION_ATTRIB);

	glVertexAttribPointer(1, 3, GL_FLOAT, false, sizeof(float) * 6, (void*)(sizeof(float) * 3));
	glEnableVertexAttribArray(1);
pass parameters through uniform
如果你声明了一个uniform却在GLSL代码中没用过,编译器会静默移除这个变量,导致最后编译出的版本中并不会包含它,这可能导致几个非常麻烦的错误,记住这点!
导致 glGetUniformLocation 时出现错误
- uniform variable - global
- first ,shader code
// vertex
#version 330 core

layout (location=0) in vec3 aPos;
void main()
{
	gl_Position = vec4(aPos.x, aPos.y, aPos.z, 1.0);
}
// fragment
#version 330 core

out vec4 FragColor;
uniform vec3 myColor;
void main(){
	FragColor = vec4(myColor, 1.0);
}
- then, we can change the uinifor variable in our program through glGetUniformLocation, glUniform4f
        glUseProgram(shaderProgram);
        float timeValue = glfwGetTime();
        float greenValue = sin(timeValue) / 2.0f + 0.5f;
        int vertexColorLocation = glGetUniformLocation(shaderProgram, "ourColor");
        glUniform4f(vertexColorLocation, 0.0f, greenValue, 0.0f, 1.0f);
pipline
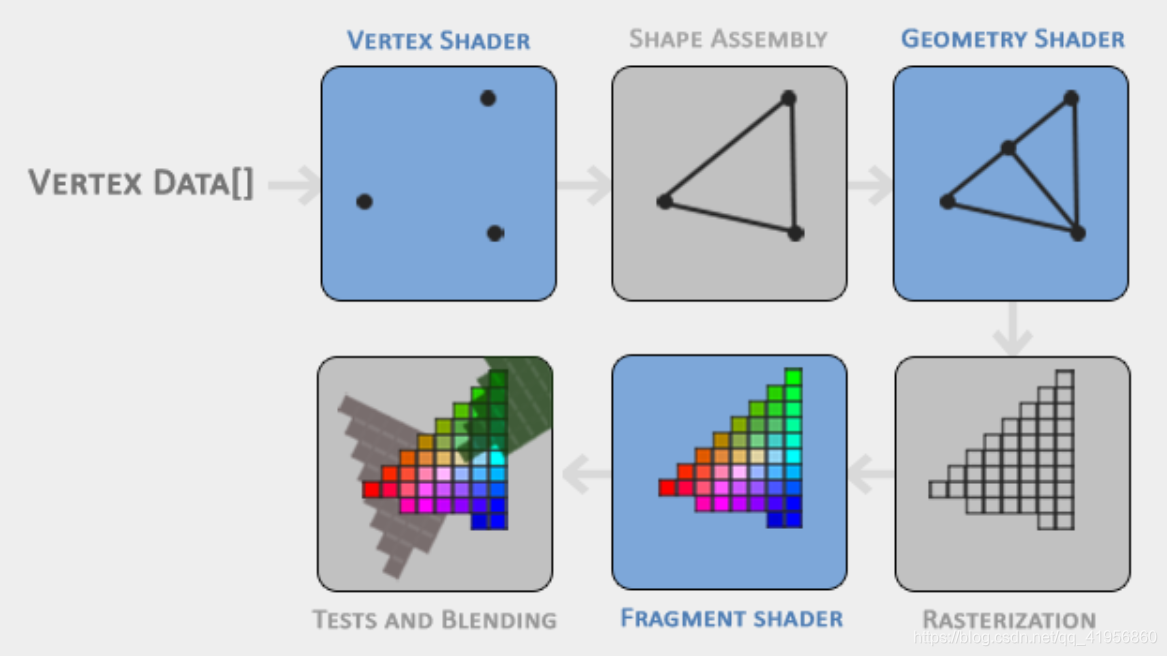
vertex shader
- The main purpose of the vertex shader is to transform 3D coordinates into different 3D coordinates (more on that later) and the vertex shader allows us to do some basic processing on the vertex attributes.
Normalized Device Coordinates (NDC)
Your NDC coordinates will then be transformed to screen-space coordinates via the viewport transform using the data you provided with glViewport. The resulting screen-space coordinates are then transformed to fragments as inputs to your fragment shader.
primitive assembly
- The primitive assembly stage takes as input all the vertices (or vertex if GL_POINTS is chosen) from the vertex shader that form a primitive and assembles all the point(s) in the primitive shape given: GL_POINTS, GL_TRIANGLES and GL_LINE_STRIP.
geometry shader
- The geometry shader takes as input a collection of vertices that form a primitive and has the ability to generate other shapes by emitting new vertices to form new (or other) primitive(s). In this example case, it generates a second triangle out of the given shape.
rasterization stage
- It maps the resulting primitive(s) to the corresponding pixels on the final screen, resulting in fragments for the fragment shader to use. Before the fragment shaders run, clipping is performed. Clipping discards all fragments that are outside your view, increasing performance.
fragment shader
- to calculate the final color of a pixel and this is usually the stage where all the advanced OpenGL effects occur.
lpha test and blending
- This stage checks the corresponding depth (and stencil) value (we’ll get to those later) of the fragment and uses those to check if the resulting fragment is in front or behind other objects and should be discarded accordingly. The stage also checks for alpha values (alpha values define the opacity of an object) and blends the objects accordingly.
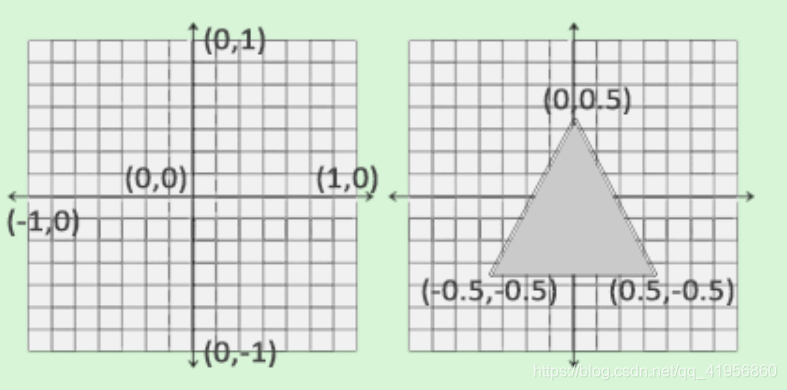
First Rectangle
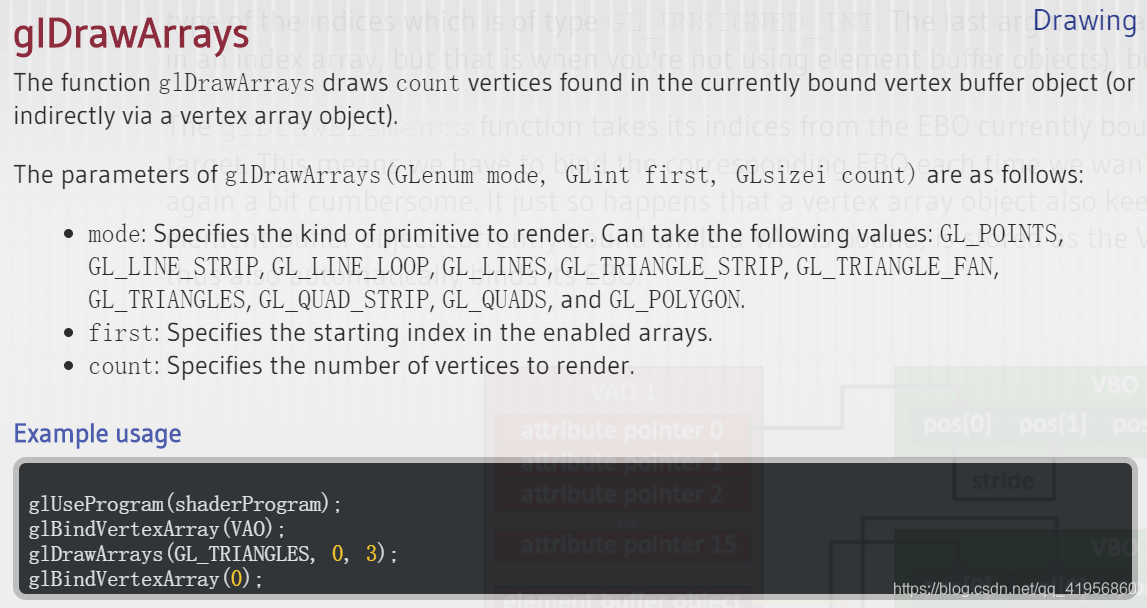
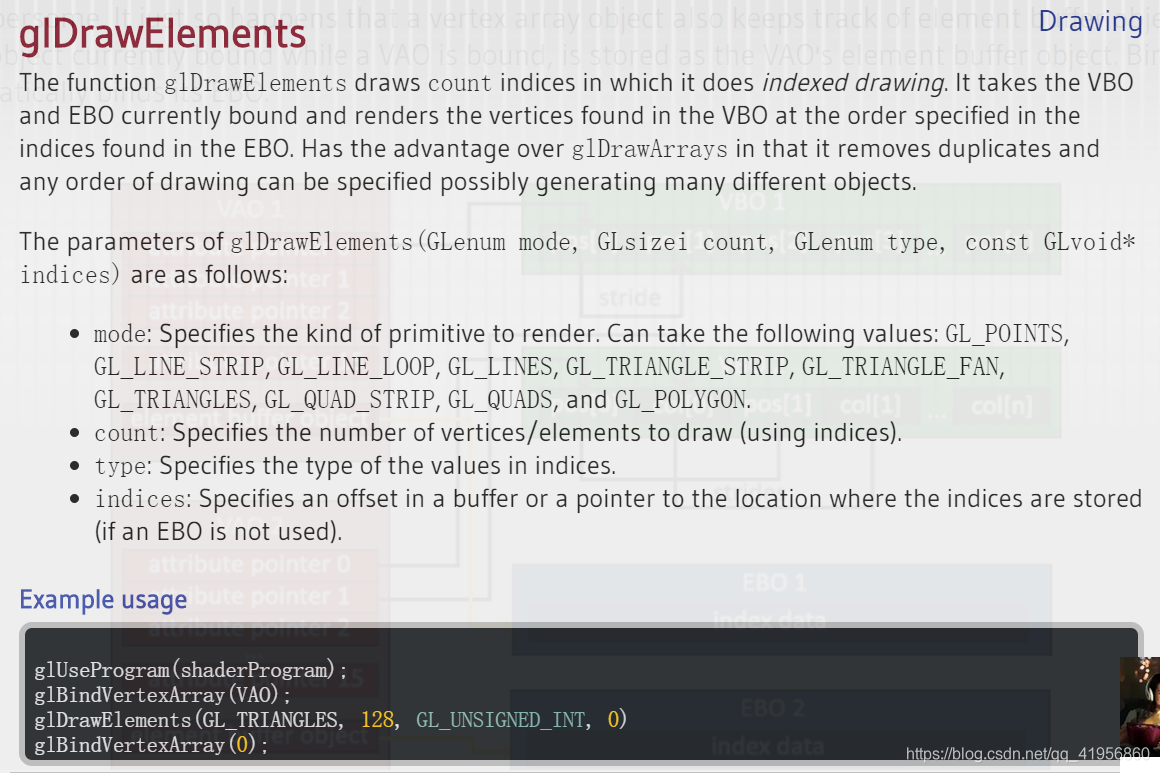
difference between glDrawArrays and glDrawElements
- glDrawArrays(GL_TRIANGLES, 0, 6);
- glDrawElements(GL_TRIANGLES, 6, GL_UNSIGNED_INT, 0);
linking vertices attributes
glVertexAttribPointer(0, 3, GL_FLOAT, GL_FALSE, 3 * sizeof(float), (void*)0);
glEnableVertexAttribArray(0);
The function glVertexAttribPointer has quite a few parameters so let’s carefully walk through them:
- The first parameter specifies which vertex attribute we want to configure. Remember that we specified the location of the position vertex attribute in the vertex shader with layout (location = 0). This sets the location of the vertex attribute to 0 and since we want to pass data to this vertex attribute, we pass in 0.
- The next argument specifies the size of the vertex attribute. The vertex attribute is a vec3 so it is composed of 3 values.
- The third argument specifies the type of the data which is GL_FLOAT (a vec* in GLSL consists of floating point values).
- The next argument specifies if we want the data to be normalized. If we’re inputting integer data types (int, byte) and we’ve set this to GL_TRUE, the integer data is normalized to 0 (or -1 for signed data) and 1 when converted to float. This is not relevant for us so we’ll leave this at GL_FALSE.
- The fifth argument is known as the stride and tells us the space between consecutive vertex attributes. Since the next set of position data is located exactly 3 times the size of a float away we specify that value as the stride. Note that since we know that the array is tightly packed (there is no space between the next vertex attribute value) we could’ve also specified the stride as 0 to let OpenGL determine the stride (this only works when values are tightly packed). Whenever we have more vertex attributes we have to carefully define the spacing between each vertex attribute but we’ll get to see more examples of that later on.
- The last parameter is of type void* and thus requires that weird cast. This is the offset of where the position data begins in the buffer. Since the position data is at the start of the data array this value is just 0. We will explore this parameter in more detail later on
VAO, VBO, EBO

demo example
// Create two shader programs where the second program uses a different fragment shader that outputs the color yellow; draw both triangles again where one outputs the color yellow :
#include <glad/glad.h>
#include <GLFW/glfw3.h>
#include <iostream>
// step1:	create vertexShader fragmentShader
// step2:	create program and link shader to it
// step3:	create VAO, VBO, VEO and storage data into it
// step4:	draw
void mglfwinit();
void mglwindow(GLFWwindow* & window);
void mgladinit();
void framebuffer_size_callback(GLFWwindow* window, int width, int height);
void processInput(GLFWwindow *window);
void checkerror(int handle, int type);
// settings
const unsigned int SCR_WIDTH = 1000;
const unsigned int SCR_HEIGHT = 600;
const int VERTEX_COMPILE_ERROR = 1;
const int FRAGMENT_COMPILE_ERROR = 2;
const int PROGRAM_LINK_ERROR = 3;
const int POSITION_ATTRIB = 0;
// 1.1.1 vertex shader
const char* vertexShaderSource =
	"#version 330 core\n"
	"layout (location=0) in vec3 aPos;\n"
	"void main()\n"
	"{\n"
	"	gl_Position = vec4(aPos.x, aPos.y, aPos.z, 1.0);\n"
	"}\0";
// 1.2.1 fragment shader
const char* fragmentShaderSource =
	"#version 330 core\n"
	"out vec4 FragColor;\n"
	"void main()\n"
	"{\n"
	"	FragColor = vec4(1.0, 0.5, 0.5, 1.0);\n"
	"}\0";
// secend fragment shader
const char* fragmentShaderSource2 =
"#version 330 core\n"
"out vec4 FragColor;\n"
"void main()\n"
"{\n"
"	FragColor = vec4(0.5, 0.5, 0, 1.0);\n"
"}\0";

int main()
{
	// 0.0 glfw init
	mglfwinit();

	// 0.1 glfw window creation
	// --------------------
	GLFWwindow* window = glfwCreateWindow(SCR_WIDTH, SCR_HEIGHT, "LearnOpenGL", NULL, NULL);
	mglwindow(window);


	// 0.2 glad: load all OpenGL function pointers
	// ---------------------------------------
	mgladinit();


	// 1.1.2 vertex shader
	int vertexShader = glCreateShader(GL_VERTEX_SHADER);
	glShaderSource(vertexShader, 1, &vertexShaderSource, NULL);		// why & ?????
	glCompileShader(vertexShader);
	checkerror(vertexShader, VERTEX_COMPILE_ERROR);

	// 1.2.2 fragment shader
	int fragmentShader = glCreateShader(GL_FRAGMENT_SHADER);
	glShaderSource(fragmentShader, 1, &fragmentShaderSource, NULL);
	glCompileShader(fragmentShader);
	checkerror(fragmentShader, FRAGMENT_COMPILE_ERROR);

	// 1.2.3 secend fragment shader
	int fragmentShader2 = glCreateShader(GL_FRAGMENT_SHADER);
	glShaderSource(fragmentShader2, 1, &fragmentShaderSource2, NULL);
	glCompileShader(fragmentShader2);
	checkerror(fragmentShader2, FRAGMENT_COMPILE_ERROR);

	// 2.1 create program
	int mProgram = glCreateProgram();
	int mProgram2 = glCreateProgram();
	// 2.2 link shader to the program
	glAttachShader(mProgram, vertexShader);
	glAttachShader(mProgram, fragmentShader);
	glLinkProgram(mProgram);
	checkerror(mProgram, PROGRAM_LINK_ERROR);

	glAttachShader(mProgram2, vertexShader);
	glAttachShader(mProgram2, fragmentShader2);
	glLinkProgram(mProgram2);
	// 2.3
	glDeleteShader(vertexShader);
	glDeleteShader(fragmentShader);
	glDeleteShader(fragmentShader2);

	// 3.1 prepare data, create VAO, VBO
	// vertex inputs
	GLfloat vertices[] = { -0.5, -0.5,0,
						0.5, -0.5,0,
						0, 0.5,0 };
	 GLfloat vertices2[] = {
				0.5, -0.5, 0,
				1, -0.5, 0,
				0.75, 0.5, 0};

	const int VERTICES_NUMBER = 3;
	// vertex array objects(VAO), vertex buffer objects (VBO),
	GLuint VAOs[2], VBOs[2];
	glGenVertexArrays(2, VAOs);
	glGenBuffers(2, VBOs);

	// first triangle
	glBindVertexArray(VAOs[0]);
	glBindBuffer(GL_ARRAY_BUFFER, VBOs[0]);
	glBufferData(GL_ARRAY_BUFFER, sizeof(vertices), vertices, GL_STATIC_DRAW);
	glVertexAttribPointer(POSITION_ATTRIB, 3, GL_FLOAT, false, sizeof(float) * 3, (void*)0);
	glEnableVertexAttribArray(POSITION_ATTRIB);

	// second triangle
	glBindVertexArray(VAOs[1]);
	glBindBuffer(GL_ARRAY_BUFFER, VBOs[1]);
	glBufferData(GL_ARRAY_BUFFER, sizeof(vertices2), vertices2, GL_STATIC_DRAW);
	glVertexAttribPointer(POSITION_ATTRIB, 3, GL_FLOAT, false, sizeof(float) * 3, (void*)0);
	glEnableVertexAttribArray(POSITION_ATTRIB);

	// 3.4 unbind VBO, VAO
	glBindBuffer(GL_ARRAY_BUFFER,0);
	glBindVertexArray(0);

	// render loop
	// -----------
	while (!glfwWindowShouldClose(window))
	{
		// input
		// -----
		processInput(window);

		// render
		// ------
		glClearColor(0.2f, 0.3f, 0.3f, 1.0f);
		glClear(GL_COLOR_BUFFER_BIT);

		// 4. draw
		glUseProgram(mProgram);
		glBindVertexArray(VAOs[0]);
		glDrawArrays(GL_TRIANGLES, 0, VERTICES_NUMBER);

		glUseProgram(mProgram2);
		glBindVertexArray(VAOs[1]);
		glDrawArrays(GL_TRIANGLES, 0, VERTICES_NUMBER);
		// glfw: swap buffers and poll IO events (keys pressed/released, mouse moved etc.)
		// -------------------------------------------------------------------------------
		glfwSwapBuffers(window);
		glfwPollEvents();
	}
	// 4.1 delete
	glDeleteVertexArrays(2, VAOs);
	glDeleteBuffers(2, VBOs);

	// glfw: terminate, clearing all previously allocated GLFW resources.
	// ------------------------------------------------------------------
	glfwTerminate();
	return 0;
}

// process all input: query GLFW whether relevant keys are pressed/released this frame and react accordingly
// ---------------------------------------------------------------------------------------------------------
void processInput(GLFWwindow *window)
{
	if (glfwGetKey(window, GLFW_KEY_ESCAPE) == GLFW_PRESS)
		glfwSetWindowShouldClose(window, true);
}

void mglfwinit()
{
	// glfw: initialize and configure
// ------------------------------
	glfwInit();
	glfwWindowHint(GLFW_CONTEXT_VERSION_MAJOR, 3);
	glfwWindowHint(GLFW_CONTEXT_VERSION_MINOR, 3);
	glfwWindowHint(GLFW_OPENGL_PROFILE, GLFW_OPENGL_CORE_PROFILE);

}

void mglwindow(GLFWwindow* &window)
{
	if (window == NULL)
	{
		std::cout << "Failed to create GLFW window" << std::endl;
		glfwTerminate();
		exit(-1);
	}
	glfwMakeContextCurrent(window);
	glfwSetFramebufferSizeCallback(window, framebuffer_size_callback);
}

void mgladinit()
{
	if (!gladLoadGLLoader((GLADloadproc)glfwGetProcAddress))
	{
		std::cout << "Failed to initialize GLAD" << std::endl;
		exit(-1);
	}
}

// glfw: whenever the window size changed (by OS or user resize) this callback function executes
// ---------------------------------------------------------------------------------------------
void framebuffer_size_callback(GLFWwindow* window, int width, int height)
{
	// make sure the viewport matches the new window dimensions; note that width and
	// height will be significantly larger than specified on retina displays.
	glViewport(0, 0, width, height);
}
// checkerror
void checkerror(int handle, int type) {
	int success;
	char infoLog[512];
	switch (type) {
	case VERTEX_COMPILE_ERROR:
		glGetShaderiv(handle, GL_COMPILE_STATUS, &success);
		if (!success) {
			glGetShaderInfoLog(handle, 512, NULL, infoLog);
			std::cout << "ERROR::SHADER::VERTEX::COMPILATION_FAILED\n" << infoLog << std::endl;
		}
		break;
	case FRAGMENT_COMPILE_ERROR:
		glGetShaderiv(handle, GL_COMPILE_STATUS, &success);
		if (!success) {
			glGetShaderInfoLog(handle, 512, NULL, infoLog);
			std::cout << "ERROR::SHADER::FRAGMENT::COMPILATION_FAILED\n" << infoLog << std::endl;
		}
		break;
	case PROGRAM_LINK_ERROR:
		glGetProgramiv(handle, GL_LINK_STATUS, &success);
		if (!success) {
			glGetProgramInfoLog(handle, 512, NULL, infoLog);
			std::cout << "ERROR::SHADER::PROGRAM::LINKING_FAILED\n" << infoLog << std::endl;
		}
		break;
	}

}
First Window
1. init
glfwInit();
"we can configure GLFW using glfwWindowHint,"
"the first argument of glfwWindowHint tells us what option we want to configure"
glfwWindowHint(GLFW_CONTEXT_VERSION_MAJOR, 3);
glfwWindowHint(GLFW_CONTEXT_VERSION_MINOR, 3);
glfwWindowHint(GLFW_OPENGL_PROFILE, GLFW_OPENGL_CORE_PROFILE);
- A list of all the possible options and its corresponding values can be found at GLFW’s window handling documentation
2. create new window
GLFWwindow* window = glfwCreateWindow(SCR_WIDTH, SCR_HEIGHT, "LearnOpenGL", NULL, NULL);
if (window == NULL)
{
    std::cout << "Failed to create GLFW window" << std::endl;
    glfwTerminate();
    return -1;
}
glfwMakeContextCurrent(window);
3. initialize GLAD
if (!gladLoadGLLoader((GLADloadproc)glfwGetProcAddress))
{
    std::cout << "Failed to initialize GLAD" << std::endl;
    return -1;
}
- We pass GLAD the function to load the adress of the OpenGL function pointers which is OS-specific. GLFW gives us glfwGetProcAddress that defines the correct function based on which OS we’re compiling for.
3. viewport
- Tell OpenGL the size of the rendering window so OpenGL knows how we want to display the data and coordinates with respect to the window.
Behind the scenes OpenGL uses the data specified via glViewport to transform the 2D coordinates it processed to coordinates on your screen. For example, a processed point of location (-0.5,0.5) would (as its final transformation) be mapped to (200,450) in screen coordinates. Note that processed coordinates in OpenGL are between -1 and 1 so we effectively map from the range (-1 to 1) to (0, 800) and (0, 600).
- However, the moment a user resizes the window the viewport should be adjusted as well. We can register a callback function on the window that gets called each time the window is resized
"register"
glfwSetFramebufferSizeCallback(window, framebuffer_size_callback);

"definitioni of callback"
void framebuffer_size_callback(GLFWwindow* window, int width, int height)
{
    glViewport(0, 0, width, height);
}
4.Ready my engine
while (!glfwWindowShouldClose(window))
	{
		// input
		// -----
		processInput(window);

		// render
		// ------
		glClearColor(0.2f, 0.3f, 0.3f, 1.0f);
		glClear(GL_COLOR_BUFFER_BIT);

		// glfw: swap buffers and poll IO events (keys pressed/released, mouse moved etc.)
		// -------------------------------------------------------------------------------
		glfwSwapBuffers(window);
		glfwPollEvents();
	}
	// process all input: query GLFW whether relevant keys are pressed/released this frame and react accordingly
// ---------------------------------------------------------------------------------------------------------
void processInput(GLFWwindow *window)
{
	if (glfwGetKey(window, GLFW_KEY_ESCAPE) == GLFW_PRESS)
		glfwSetWindowShouldClose(window, true);
}
5. terminate
glfwTerminate();
Concepts
Extensions
Whenever a graphics company comes up with a new technique or a new large optimization for rendering this is often found in an extension implemented in the drivers.
This way, a graphics developer can still use these new rendering techniques without having to wait for OpenGL to include the functionality in its future versions, simply by checking if the extension is supported by the graphics card. Often, when an extension is popular or very useful it eventually becomes part of future OpenGL versions.
State Machine
OpenGL is by itself a large state machine: a collection of variables that define how OpenGL should currently operate. The state of OpenGL is commonly referred to as the OpenGL context. When using OpenGL, we often change its state by setting some options, manipulating some buffers and then render using the current context.
When working in OpenGL we will come across several state-changing functions that change the context and several state-using functions that perform some operations based on the current state of OpenGL
Objects
An object in OpenGL is a collection of options that represents a subset of OpenGL’s state. For example, we could have an object that represents the settings of the drawing window; we could then set its size, how many colors it supports and so on. One could visualize an object as a C-like struct:
struct object_name {
    float  option1;
    int    option2;
    char[] name;
// create object  workflow
unsigned int objectId = 0;
glGenObject(1, &objectId);
// bind object to context
glBindObject(GL_WINDOW_TARGET, objectId);
// set options of object currently bound to GL_WINDOW_TARGET
glSetObjectOption(GL_WINDOW_TARGET, GL_OPTION_WINDOW_WIDTH, 800);
glSetObjectOption(GL_WINDOW_TARGET, GL_OPTION_WINDOW_HEIGHT, 600);
// set context target back to default
glBindObject(GL_WINDOW_TARGET, 0);
This little piece of code is a workflow you’ll frequently see when working in OpenGL. We first create an object and store a reference to it as an id (the real object data is stored behind the scenes). Then we bind the object to the target location of the context (the location of the example window object target is defined as GL_WINDOW_TARGET). Next we set the window options and finally we un-bind the object by setting the current object id of the window target to 0. The options we set are stored in the object referenced by objectId and restored as soon as we bind the object back to GL_WINDOW_TARGET.
proper noun
- 顶点数组对象:Vertex Array Object,VAO
- 顶点缓冲对象:Vertex Buffer Object,VBO
- 索引缓冲对象:Element Buffer Object,EBO或Index Buffer Object,IBO
Additional resources
- opengl.org: official website of OpenGL.
- OpenGL registry: hosts the OpenGL specifications and extensions for all OpenGL versions.
- GLFW: Window Guide: official GLFW guide on setting up and configuring a GLFW window.
- Building applications: provides great info about the compilation/linking process of your application and a large list of possible errors (plus solutions) that might come up.
- GLFW with Code::Blocks: building GLFW in Code::Blocks IDE.
- Running CMake: short overview of how to run CMake on both Windows and Linux.
- Writing a build system under Linux: an autotools tutorial by Wouter Verholst on how to write a build system in Linux, specifically targeted for these tutorials.
- Polytonic/Glitter: a simple boilerplate project that comes pre-configured with all relevant libraries; great for if you want a sample project for the LearnOpenGL tutorials without the hassle of having to compile all the libraries yourself.
Explanation of Nouns
- derivations
Derivations 派生物,
nilpotent derivations 幂零导子
theoretical derivations 理论推导
leftmost derivations 最左推导
- stunning
Stunning 绝色极好的内心感到震动或吃惊
词根:stun
adj. stunned 受惊的
adv. stunningly 绝妙地;令人震惊地;使人目瞪口呆地
n. 	stun 昏迷;打昏;惊倒;令人惊叹的事物
stunner 致昏迷的一击;绝妙的东西;出色的人
v.	stunned 使震惊;使不知所措(stun的过去式及过去分词形式)
vt.	stun 使震惊;打昏;给以深刻的印象
- stencil
