文章目录
Light caster
directional lights
- fine example of a directional light source is the sun as we know it. The sun is not infinitely far away from us, but it is so far away that we can perceive it as being infinitely far away in the lighting calculations. All the light rays from the sun are then modelled as parallel light rays as we can see in the following image:
struct Light {
    // vec3 position; // No longer necessery when using directional lights.
    vec3 direction;
	...
};
...
void main()
{
  vec3 lightDir = normalize(-light.direction);
  ...
}
point lights & Attenuation
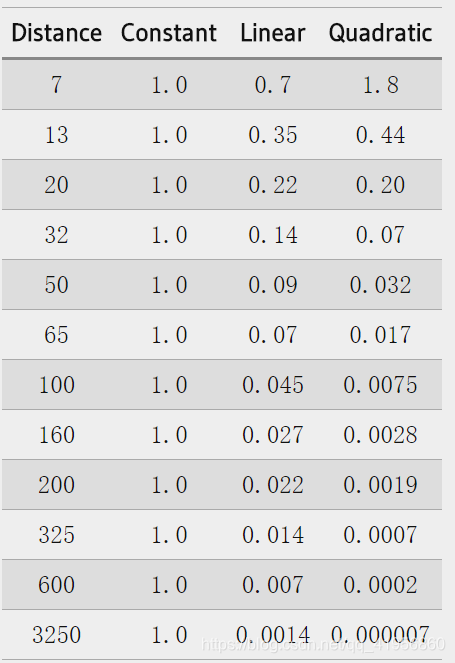
- he following formula calculates an attenuation value based on a fragment’s distance to the light source which we later multiply with the light’s intensity vector:
Here d represents the distance from the fragment to the light source. Then to calculate the attenuation value we define 3 (configurable) terms: a constant term Kc, a linear term Kl and a quadratic term Kq. - The following table shows some of the values these terms could take to simulate a realistic (sort of) light source that covers a specific radius (distance).
- implement the attenuation
struct Light {
	...
    float constant;
    float linear;
    float quadratic;
};
float distance    = length(light.position - FragPos);
float attenuation = 1.0 / (light.constant + light.linear * distance +
  		    light.quadratic * (distance * distance));
...
ambient  *= attenuation;
diffuse  *= attenuation;
specular *= attenuation;
spot lights & Smooth/Soft edges
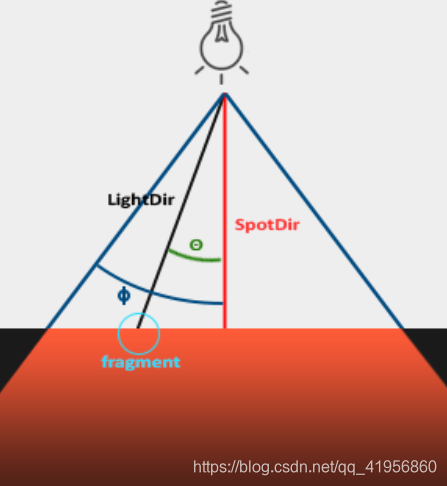
- cutoff angle
struct Light {
    vec3  position;
    vec3  direction;  //spotDir
    float cutOff;
    ...
};
...
float theta = dot(lightDir, normalize(-light.direction));
if(theta > light.cutOff)
{
  // do lighting calculations
}
else  // else, use ambient light so scene isn't completely dark outside the spotlight.
  color = vec4(light.ambient * vec3(texture(material.diffuse, TexCoords)), 1.0);
- Smooth/Soft edges
To create the effect of a smoothly-edged spotlight we want to simulate a spotlight having an inner and an outer cone. We can set the inner cone as the cone defined in the previous section, but we also want an outer cone that gradually dims the light from the inner to the edges of the outer cone.
We can calculate such a value using the following formula:
Here ϵ (epsilon) is the cosine difference between the inner (ϕ) and the outer cone (γ)
float theta     = dot(lightDir, normalize(-light.direction));
float epsilon   = light.cutOff - light.outerCutOff;
float intensity = clamp((theta - light.outerCutOff) / epsilon, 0.0, 1.0);
...
// we'll leave ambient unaffected so we always have a little light.
diffuse  *= intensity;
specular *= intensity;
...
lighting maps
Diffuse maps
- similar to texture
- effect:
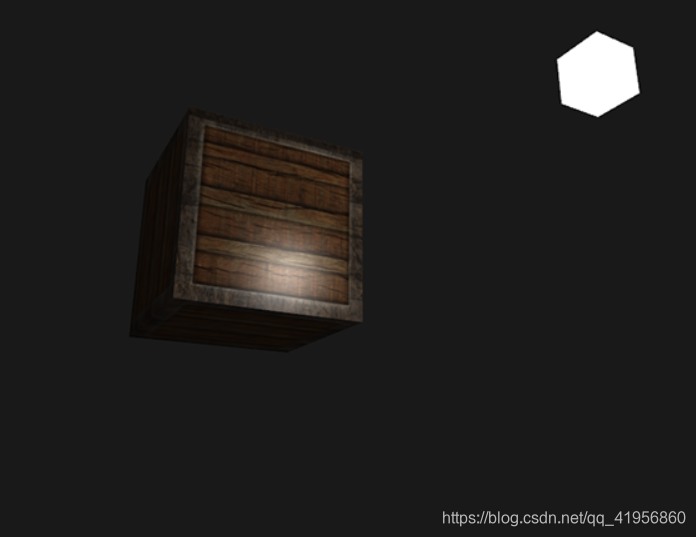
Specular maps
- effect:

demo code
"fragment shader"
#version 330 core
out vec4 FragColor;

struct Material {
    sampler2D diffuse;
    sampler2D specular;
    float shininess;
};
in vec2 TexCoords;
/*
struct Light {
    vec3 position;
    vec3 ambient;
    vec3 diffuse;
    vec3 specular;
};

in vec3 FragPos;
in vec3 Normal;

uniform vec3 viewPos;
uniform Material material;
uniform Light light;

void main()
{ */
    // ambient
    vec3 ambient = light.ambient * vec3(texture(material.diffuse, TexCoords));

    // diffuse
    // vec3 norm = normalize(Normal);
    // vec3 lightDir = normalize(light.position - FragPos);
    // float diff = max(dot(norm, lightDir), 0.0);
    vec3 diffuse = light.diffuse * diff * vec3(texture(material.diffuse, TexCoords));

    // specular
    //vec3 viewDir = normalize(viewPos - FragPos);
    //vec3 reflectDir = reflect(-lightDir, norm);
    //float spec = pow(max(dot(viewDir, reflectDir), 0), material.shininess);
    vec3 specular = light.specular * (spec * vec3(texture(material.specular, TexCoords)));

    vec3 result = ambient + diffuse + specular;
    //FragColor = vec4(result, 1.0);
}

"vertex shader"
...
layout (location = 2) in vec2 aTexCoords;
...
out vec2 TexCoords;
...
void main(){
	...
	TexCoords = aTexCoords;
}

"main"
...
unsigned int diffuseMap = loadTexture("container2.png");
unsigned int specularMap = loadTexture("container2_specular.png");
lightingShader.use();
lightingShader.setInt("material.diffuse", 0);
lightingShader.setInt("material.specular", 1);
while (!glfwWindowShouldClose(window))
{
	...
	// bind diffuse map
	glActiveTexture(GL_TEXTURE0);
	glBindTexture(GL_TEXTURE_2D, diffuseMap);
	// bind specular map
	glActiveTexture(GL_TEXTURE1);
	glBindTexture(GL_TEXTURE_2D, specularMap);

	// render the cube
	glBindVertexArray(cubeVAO);
	glDrawArrays(GL_TRIANGLES, 0, 36);
}
material
material properties
- When describing objects we can define a material color for each of the 3 lighting components: ambient, diffuse and specular lighting. By specifying a color for each of the components we have fine-grained control over the color output of the object. Now add a shininess component to those 3 colors and we have all the material properties we need:
#version 330 core
struct Material {
    vec3 ambient;
    vec3 diffuse;
    vec3 specular;
    float shininess;
};

uniform Material material;
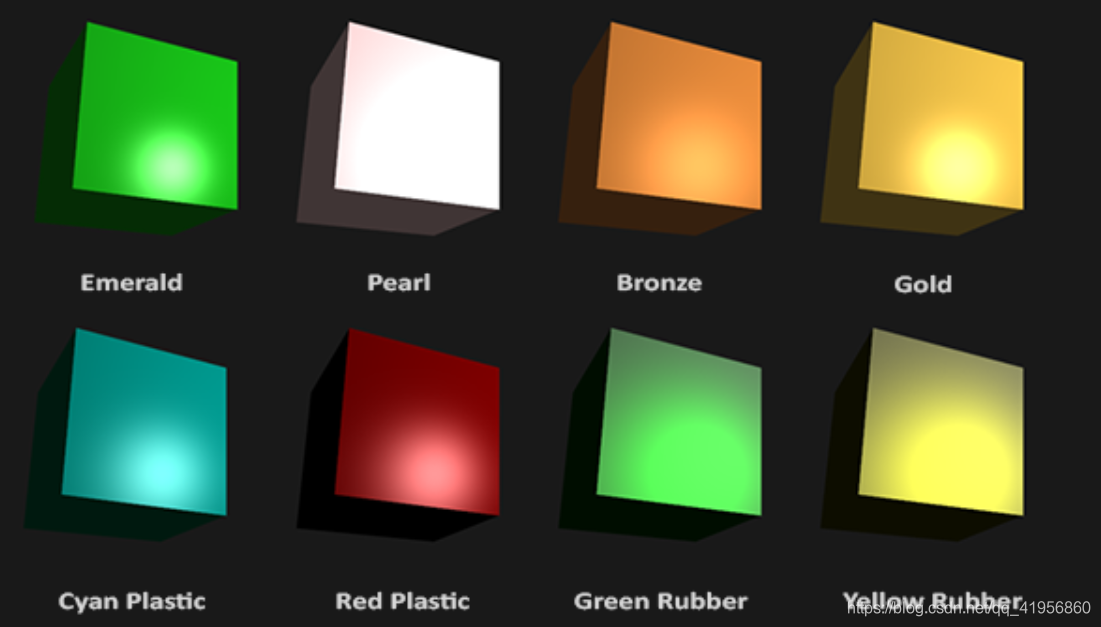
- With these 4 components that define an object’s material we can simulate many real-world materials. A table as found at devernay.free.fr shows several material properties that simulate real materials found in the outside world. The following image shows the effect several of these real world materials have on our cube:
Light properties
We can influence the diffuse and specular intensity of the light source in the same way. This is closely similar to what we did in the previous previous tutorial; you could say we already created some light properties to influence each lighting component individually. We’ll want to create something similar to the material struct for the light properties:
struct Light {
    vec3 position;

    vec3 ambient;
    vec3 diffuse;
    vec3 specular;
};

uniform Light light;
final code
// fragment shader
#version 330 core
out vec4 FragColor;

struct Material {
    vec3 ambient;
    vec3 diffuse;
    vec3 specular;
    float shininess;
};

struct Light {
    vec3 position;

    vec3 ambient;
    vec3 diffuse;
    vec3 specular;
};

in vec3 FragPos;
in vec3 Normal;

uniform vec3 viewPos;
uniform Material material;
uniform Light light;

void main()
{
    // ambient
    vec3 ambient = light.ambient * material.ambient;

    // diffuse
    vec3 norm = normalize(Normal);
    vec3 lightDir = normalize(light.position - FragPos);
    float diff = max(dot(norm, lightDir), 0.0);
    vec3 diffuse = light.diffuse * (diff * material.diffuse);

    // specular
    vec3 viewDir = normalize(viewPos - FragPos);
    vec3 reflectDir = reflect(-lightDir, norm);
    float spec = pow(max(dot(viewDir, reflectDir), 0), material.shininess);
    vec3 specular = light.specular * (spec * material.specular);

    vec3 result = ambient + diffuse + specular;
    FragColor = vec4(result, 1.0);
}

// main
		// emerald
	lightingShader.setVec3("material.ambient", 0.0215, 0.1745, 0.0215);
	lightingShader.setVec3("material.diffuse", 0.07568,	0.61424, 0.07568);
	lightingShader.setVec3("material.specular", 0.633, 0.727811, 0.633);
	lightingShader.setFloat("material.shininess", 32.0f);

	lightingShader.setVec3("light.ambient", 1.0f, 1.0f, 1.0f);
	lightingShader.setVec3("light.diffuse", 1.0f, 1.0f, 1.0f); // darken the light a bit to fit the scene
	lightingShader.setVec3("light.specular", 1.0f, 1.0f, 1.0f);
	lightingShader.setVec3("light.position", lightPos);
Phong lighting model
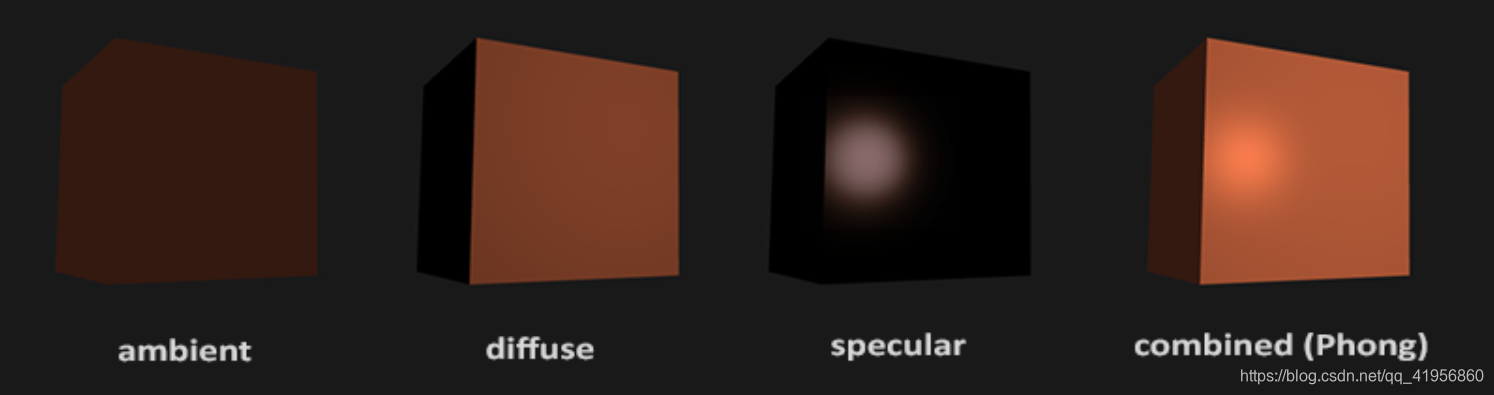
    vec3 result = (ambient + diffuse + specular) * objectColor;
    FragColor = vec4(result, 1.0);
Ambient lighting
even when it is dark there is usually still some light somewhere in the world (the moon, a distant light) so objects are almost never completely dark. To simulate this we use an ambient lighting constant that always gives the object some color.
    // ambient
    float ambientStrength = 0.1;
    vec3 ambient = ambientStrength * lightColor;
Diffuse lighting
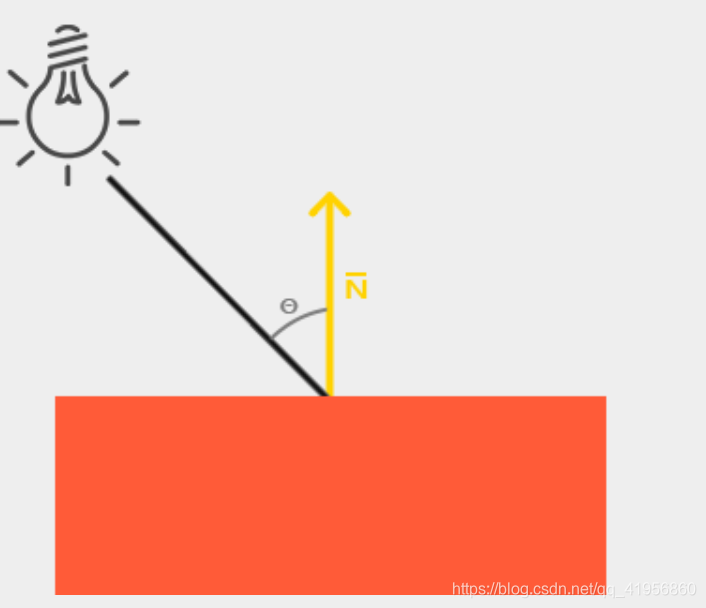
To the left we find a light source with a light ray targeted at a single fragment of our object. We then need to measure at what angle the light ray touches the fragment. If the light ray is perpendicular to the object’s surface the light has the greatest impact.
what do we need to calculate diffuse lighting?
- Normal vector: a vector that is perpendicular to the vertex’ surface.
- The directed light ray: a direction vector that is the difference vector between the light’s position and the fragment’s position. To calculate this light ray we need the light’s position vector and the fragment’s position vector.
    vec3 norm = normalize(Normal);
    vec3 lightDir = normalize(lightPos - FragPos);
    float diff = max(dot(norm, lightDir), 0.0);
    vec3 diffuse = diff * lightColor;
normal matrix
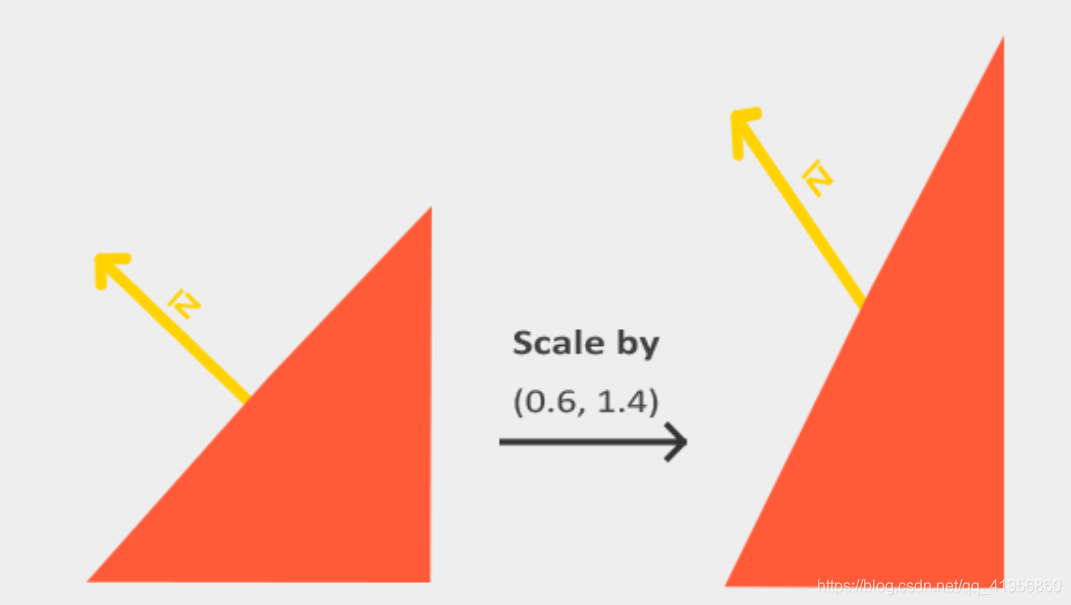
Normal = mat3(transpose(inverse(model))) * aNormal;
Specular lighting
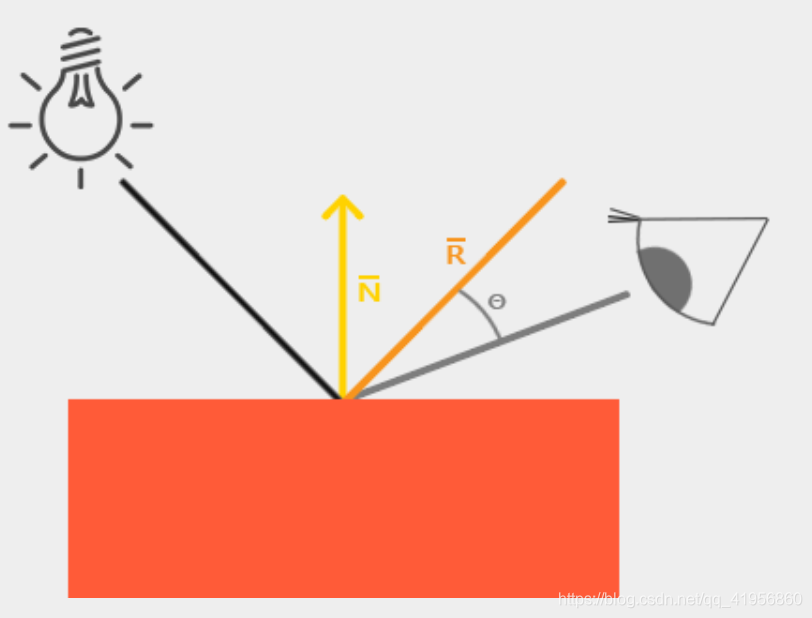
    float specularStrength = 0.5;
    vec3 viewDir = normalize(viewPos - FragPos);
    vec3 reflectDir = reflect(-lightDir, norm);
    float spec = pow(max(dot(viewDir, reflectDir), 0.0), 256);
    vec3 specular = specularStrength * spec * lightColor;
