引言:
之前我们使用BIO进行socket编程时,accept方法会一直阻塞,直到有客户端请求的到来,并返回socket进行相应的处理。整个过程是流水线的,处理完一个请求,才能去获取并处理后面的请求,当然也可以把获取socket和处理socket的过程分开,一个线程负责accept,一个线程池负责处理请求。
但NIO提供了更好的解决方案,采用选择器(Selector)返回已经准备好的socket,并按顺序处理,基于通道(Channel)和缓冲区(Buffer)来进行数据的传输。之前我们已经介绍了Buffer和Channel,那么下面我们来介绍在网络编程中非常重要的Selector
Selector
selector,具体是一个什么样的东西?
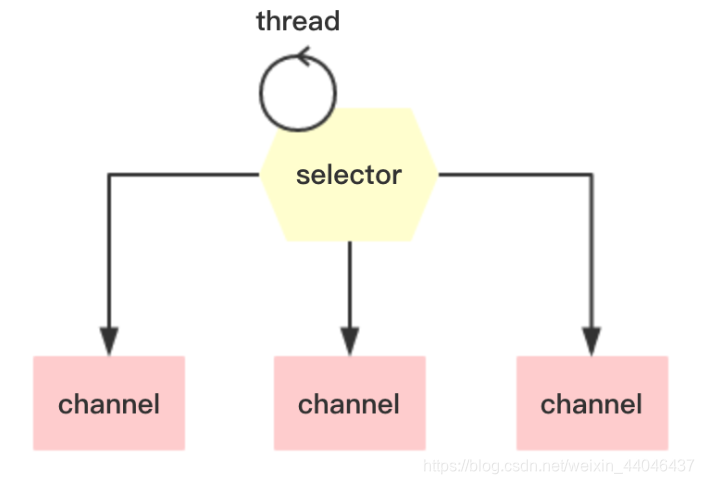
想想一个场景:在一个养鸡场,有这么一个人,每天的工作就是不停检查几个特殊的鸡笼,如果有鸡进来,有鸡出去,有鸡生蛋,有鸡生病等等,就把相应的情况记录下来,如果鸡场的负责人想知道情况,只需要询问那个人即可。
在这里,这个人就相当Selector,每个鸡笼相当于一个SocketChannel,每个线程通过一个Selector可以管理多个SocketChannel。
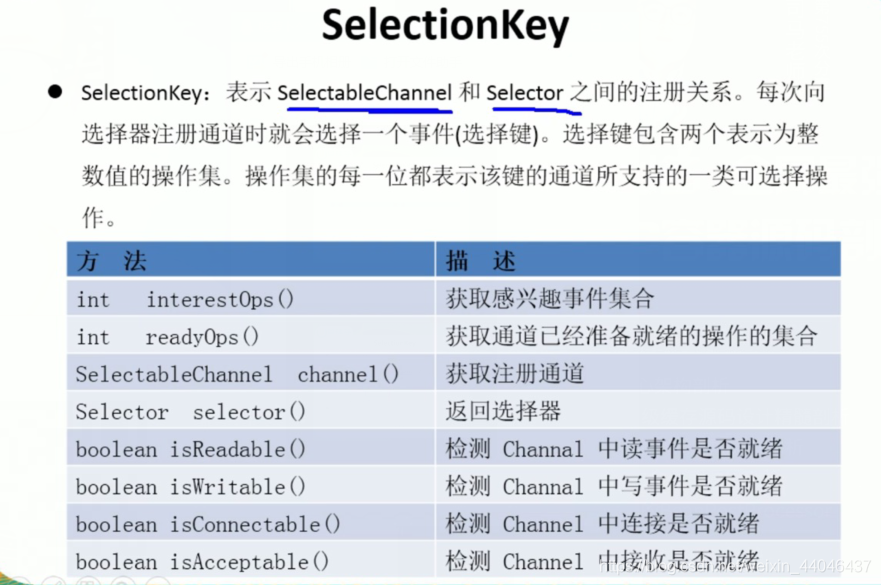
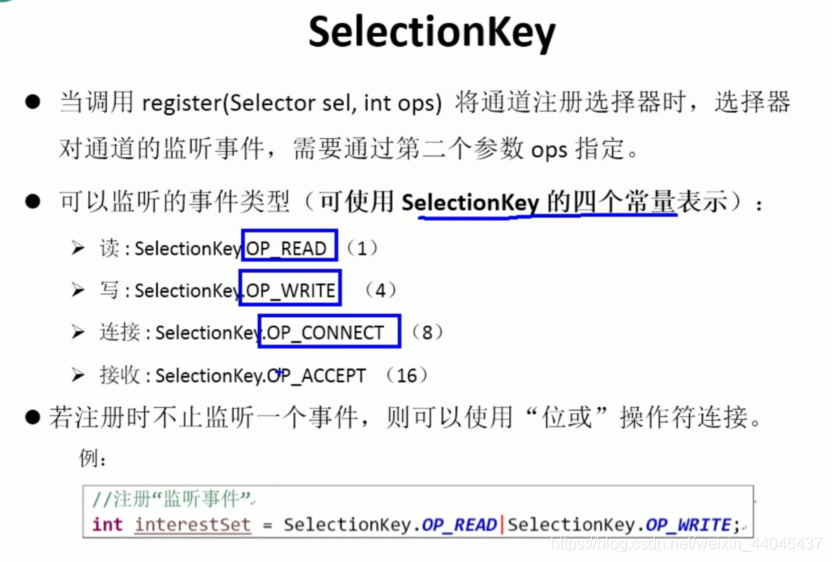
为了实现Selector管理多个SocketChannel,必须将具体的SocketChannel对象注册到Selector,并声明需要监听的事件(这样Selector才知道需要记录什么数据),一共有4种事件:
1、connect:客户端连接服务端事件,对应值为SelectionKey.OP_CONNECT(8)
2、accept:服务端接收客户端连接事件,对应值为SelectionKey.OP_ACCEPT(16)
3、read:读事件,对应值为SelectionKey.OP_READ(1)
4、write:写事件,对应值为SelectionKey.OP_WRITE(4)
下面我们来通过一个简单的网络聊天室来理解一下
TCP模式
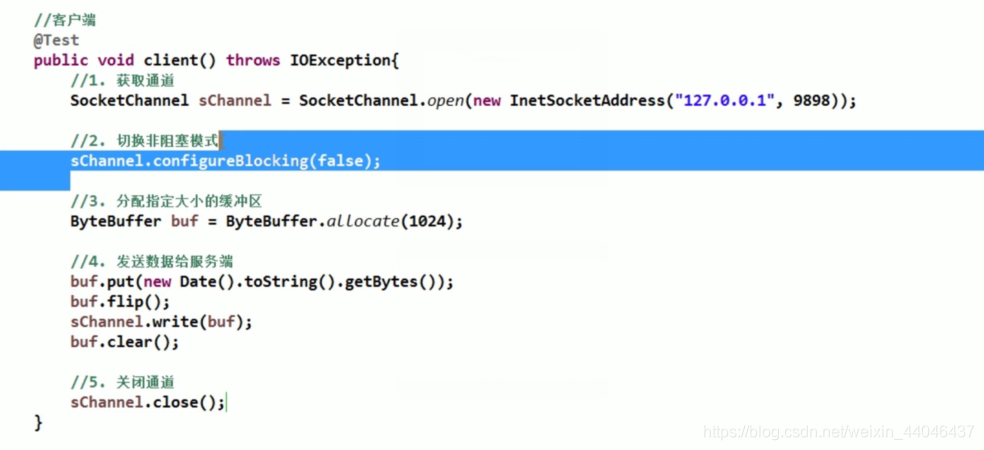
客户端
服务端
public  void  Server()  throws IOException{

        //获取通道
	ServerSocketChannel serverChannel = ServerSocketChannel.open();
	//切换非阻塞模式
	serverChannel.configureBlocking(false);
	//绑定连接
	serverChannel.socket().bind(new InetSocketAddress(9898));
	//获取选择器
	Selector selector = Selector.open();
	//将通道注册到选择器上,并且指定“监听器事件”
	serverChannel.register(selector, SelectionKey.OP_ACCEPT);
	//轮询式的获取选择器上已经“准备就绪事件”
	while(true){
	    int n = selector.select();
	    if (n == 0) continue;
	    //获取当前选择器中所有注册的“选择键(已就绪的监听事件)”
	    Iterator ite = this.selector.selectedKeys().iterator();
	    while(ite.hasNext()){
	         //获取准备就绪的事件
	        SelectionKey key = (SelectionKey)ite.next();
                //若“接收就绪”,
	        if (key.isAcceptable()){
	            //若“接受就绪”,获取客户端连接
	            SocketChannel clntChan = ((ServerSocketChannel) key.channel()).accept();
	            //切换非阻塞模式
	            clntChan.configureBlocking(false);
	            //将通道注册到选择器上
	            clntChan.register(key.selector(), SelectionKey.OP_READ, ByteBuffer.allocate(bufSize));
	        }
	        //若“读事件”准备就绪
	        if (key.isReadable()){
	             //获取当前读就绪的通道
	             SocketChannel clntChan = ((ServerSocketChannel) key.channel()).accept();
	             //读取数据
	             ByteBuffer buf = ByteBuffer.allocate(1024);
	             //
	             int len = 0 ;
	             while(len = clntChan.read(buf)> 0 ){
	             //切换到读模式
	             buf.flip();
	             System.out.println(new String(buf.array(),0,len));
	             buf.clear();
	             }
	        }
	        //若“写事件”准备就绪
	        if (key.isWritable() && key.isValid()){
	           //写和读差不多,都是个这意思
	        }
	        //连接失败
	        if (key.isConnectable()){
	            System.out.println("isConnectable = true");
	        }
	      ite.remove();
	    }
	}
}
服务端操作过程
- 创建ServerSocketChannel实例,并绑定指定端口;
- 创建Selector实例;
- 将serverSocketChannel注册到selector,并指定事件OP_ACCEPT,最底层的socket通过channel和selector建立关联;
- 如果没有准备好的socket,select方法会被阻塞一段时间并返回0;
- 如果底层有socket已经准备好,selector的select方法会返回socket的个数,而且selectedKeys方法会返回socket对应的事件(connect、accept、read or write);
- 根据事件类型,进行不同的处理逻辑;
在步骤3中,selector只注册了serverSocketChannel的OP_ACCEPT事件
6.1. 如果有客户端A连接服务,执行select方法时,可以通过serverSocketChannel获取客户端A的socketChannel,并在selector上注册socketChannel的OP_READ事件。
6.2如果客户端A发送数据,会触发read事件,这样下次轮询调用select方法时,就能通过socketChannel读取数据,同时在selector上注册该socketChannel的OP_WRITE事件,实现服务器往客户端写数据。
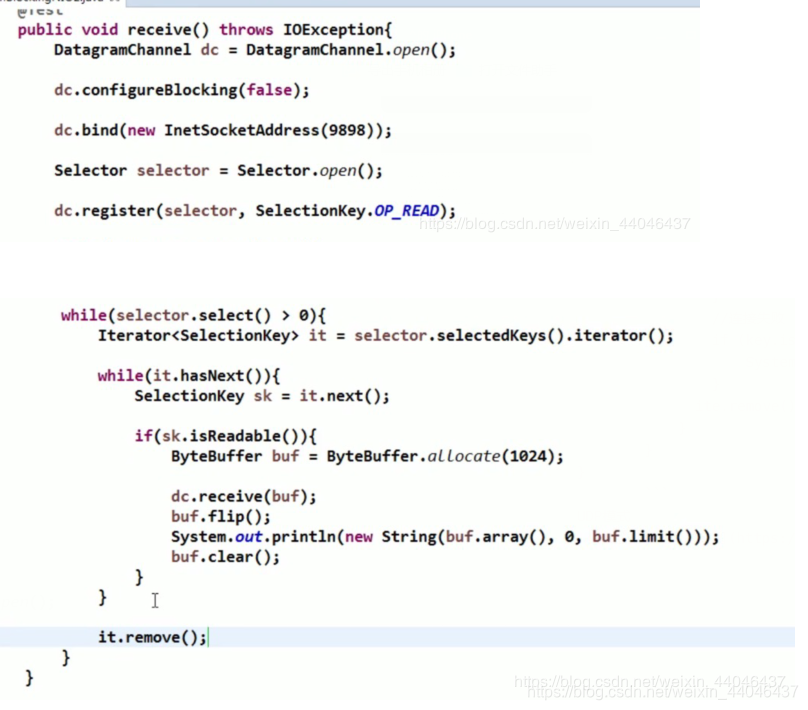
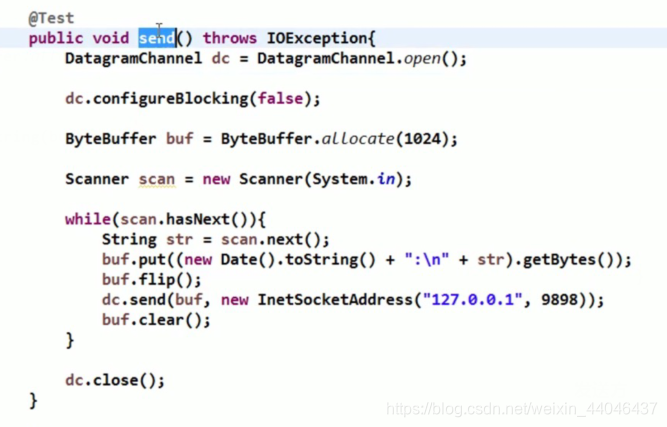
UDP模式
接收方
发送方
想必到这大家应该知道Selector是干什么的了吧,那接下来我们再来看一看Selector实现原理。
Selector实现原理
SocketChannel、ServerSocketChannel和Selector的实例初始化都通过SelectorProvider类实现,其中Selector是整个NIO Socket的核心实现。
public static SelectorProvider provider() {
    synchronized (lock) {
        if (provider != null)
            return provider;
        return AccessController.doPrivileged(
            new PrivilegedAction<SelectorProvider>() {
                public SelectorProvider run() {
                        if (loadProviderFromProperty())
                            return provider;
                        if (loadProviderAsService())
                            return provider;
                        provider = sun.nio.ch.DefaultSelectorProvider.create();
                        return provider;
                    }
                });
    }
}
注:SelectorProvider在windows和linux下有不同的实现,provider方法会返回对应的实现。
思考一:Selector如何做到同时管理多个socket?
Selector初始化时,会实例化PollWrapper、SelectionKeyImpl数组和Pipe。
WindowsSelectorImpl(SelectorProvider sp) throws IOException {
    super(sp);
    pollWrapper = new PollArrayWrapper(INIT_CAP);
    wakeupPipe = Pipe.open();
    wakeupSourceFd = ((SelChImpl)wakeupPipe.source()).getFDVal();

    // Disable the Nagle algorithm so that the wakeup is more immediate
    SinkChannelImpl sink = (SinkChannelImpl)wakeupPipe.sink();
    (sink.sc).socket().setTcpNoDelay(true);
    wakeupSinkFd = ((SelChImpl)sink).getFDVal();
    pollWrapper.addWakeupSocket(wakeupSourceFd, 0);
}
pollWrapper用Unsafe类申请一块物理内存pollfd,存放socket句柄fdVal和events,其中pollfd共8位,0-3位保存socket句柄,4-7位保存events。

pollWrapper提供了fdVal和event数据的相应操作,如添加操作通过Unsafe的putInt和putShort实现。
void putDescriptor(int i, int fd) {
    pollArray.putInt(SIZE_POLLFD * i + FD_OFFSET, fd);
}
void putEventOps(int i, int event) {
    pollArray.putShort(SIZE_POLLFD * i + EVENT_OFFSET, (short)event);
}
先看看serverChannel.register(selector, SelectionKey.OP_ACCEPT)是如何实现的
public final SelectionKey register(Selector sel, int ops, Object att)
    throws ClosedChannelException {
    synchronized (regLock) {
        SelectionKey k = findKey(sel);
        if (k != null) {
            k.interestOps(ops);
            k.attach(att);
        }
        if (k == null) {
            // New registration
            synchronized (keyLock) {
                if (!isOpen())
                    throw new ClosedChannelException();
                k = ((AbstractSelector)sel).register(this, ops, att);
                addKey(k);
            }
        }
        return k;
    }
}
- 如果该channel和selector已经注册过,则直接添加事件和附件。
- 否则通过selector实现注册过程。
protected final SelectionKey register(AbstractSelectableChannel ch,
      int ops,  Object attachment) {
    if (!(ch instanceof SelChImpl))
        throw new IllegalSelectorException();
    SelectionKeyImpl k = new SelectionKeyImpl((SelChImpl)ch, this);
    k.attach(attachment);
    synchronized (publicKeys) {
        implRegister(k);
    }
    k.interestOps(ops);
    return k;
}

protected void implRegister(SelectionKeyImpl ski) {
    synchronized (closeLock) {
        if (pollWrapper == null)
            throw new ClosedSelectorException();
        growIfNeeded();
        channelArray[totalChannels] = ski;
        ski.setIndex(totalChannels);
        fdMap.put(ski);
        keys.add(ski);
        pollWrapper.addEntry(totalChannels, ski);
        totalChannels++;
    }
}
- 前channel和selector为参数,初始化SelectionKeyImpl 对象selectionKeyImpl ,并添加附件attachment。
- 当前channel的数量totalChannels等于SelectionKeyImpl数组大小,对SelectionKeyImpl数组和pollWrapper进行扩容操作。
- totalChannels % MAX_SELECTABLE_FDS == 0,则多开一个线程处理selector。
- llWrapper.addEntry将把selectionKeyImpl中的socket句柄添加到对应的pollfd。
- interestOps(ops)方法最终也会把event添加到对应的pollfd。
所以,不管serverSocketChannel,还是socketChannel,在selector注册的事件,最终都保存在pollArray中。
接着,再来看看selector中的select是如何实现一次获取多个有事件发生的channel的,底层由selector实现类的doSelect方法实现,如下:
 protected int doSelect(long timeout) throws IOException {
        if (channelArray == null)
            throw new ClosedSelectorException();
        this.timeout = timeout; // set selector timeout
        processDeregisterQueue();
        if (interruptTriggered) {
            resetWakeupSocket();
            return 0;
        }
        // Calculate number of helper threads needed for poll. If necessary
        // threads are created here and start waiting on startLock
        adjustThreadsCount();
        finishLock.reset(); // reset finishLock
        // Wakeup helper threads, waiting on startLock, so they start polling.
        // Redundant threads will exit here after wakeup.
        startLock.startThreads();
        // do polling in the main thread. Main thread is responsible for
        // first MAX_SELECTABLE_FDS entries in pollArray.
        try {
            begin();
            try {
                subSelector.poll();
            } catch (IOException e) {
                finishLock.setException(e); // Save this exception
            }
            // Main thread is out of poll(). Wakeup others and wait for them
            if (threads.size() > 0)
                finishLock.waitForHelperThreads();
          } finally {
              end();
          }
        // Done with poll(). Set wakeupSocket to nonsignaled  for the next run.
        finishLock.checkForException();
        processDeregisterQueue();
        int updated = updateSelectedKeys();
        // Done with poll(). Set wakeupSocket to nonsignaled  for the next run.
        resetWakeupSocket();
        return updated;
    }
其中 subSelector.poll() 是select的核心,由native函数poll0实现,readFds、writeFds 和exceptFds数组用来保存底层select的结果,数组的第一个位置都是存放发生事件的socket的总数,其余位置存放发生事件的socket句柄fd。
private final int[] readFds = new int [MAX_SELECTABLE_FDS + 1];
private final int[] writeFds = new int [MAX_SELECTABLE_FDS + 1];
private final int[] exceptFds = new int [MAX_SELECTABLE_FDS + 1];
private int poll() throws IOException{ // poll for the main thread
     return poll0(pollWrapper.pollArrayAddress,
          Math.min(totalChannels, MAX_SELECTABLE_FDS),
             readFds, writeFds, exceptFds, timeout);
}
执行 selector.select() ,poll0函数把指向socket句柄和事件的内存地址传给底层函数。
- 之前没有发生事件,程序就阻塞在select处,当然不会一直阻塞,因为epoll在timeout时间内如果没有事件,也会返回;
- 有对应的事件发生,poll0方法就会返回;
- ocessDeregisterQueue方法会清理那些已经cancelled的SelectionKey;
- dateSelectedKeys方法统计有事件发生的SelectionKey数量,并把符合条件发生事件的SelectionKey添加到selectedKeys哈希表中,提供给后续使用。
注:在早期的JDK1.4和1.5 update10版本之前,Selector基于select/poll模型实现,是基于IO复用技术的非阻塞IO,不是异步IO。在JDK1.5 update10和linux core2.6以上版本,sun优化了Selctor的实现,底层使用epoll替换了select/poll (看视频上说因为epoll的存在,会使Linux上运行NIO模式程序比Windows快的多,但是我估计Windows不会这么捞吧,百度上说window上有个类似的IOCP,不知道有没有被使用)。
select(Windows系统函数):注册的socket事件由数组管理,长度有限制,轮询查找时需要遍历数组。
poll(Linux系统函数):注册的socket事件由链表实现,数量没有限制,遍历链表轮询查找。
epoll(Liunx core2.6以上版本系统的函数,Window上没有):基于事件驱动思想,采用reactor模式,通过事件回调,无需使用某种方式主动检查socket状态,被动接收就绪事件即可。
epoll原理
epoll是Linux下的一种IO多路复用技术,可以非常高效的处理数以百万计的socket句柄。
epoll内部实现大概如下:
-
epoll初始化时,会向内核注册一个文件系统,用于存储被监控的句柄文件,调用epoll_create时,会在这个文件系统中创建一个file节点。同时epoll会开辟自己的内核高速缓存区,以红黑树的结构保存句柄,以支持快速的查找、插入、删除。还会再建立一个list链表,用于存储准备就绪的事件。
-
当执行epoll_ctl时,除了把socket句柄放到epoll文件系统里file对象对应的红黑树上之外,还会给内核中断处理程序注册一个回调函数,告诉内核,如果这个句柄的中断到了,就把它放到准备就绪list链表里。所以,当一个socket上有数据到了,内核在把网卡上的数据copy到内核中后,就把socket插入到就绪链表里。
-
当epoll_wait调用时,仅仅观察就绪链表里有没有数据,如果有数据就返回,否则就sleep,超时时立刻返回。
好了,这个时候,我们应该也可以回答思考一的问题了
当我们将通道注册到选择器后,我们会加将socket的管理交给操作系统,当注册的Socket中发生行为后,操作系统会立即通知应用程序,这时候我们将这个socket连接取出来处理一下里面的数据就好了。
