Props(属性)
组件创建的时候会使用很多参数来绘制,这些参数就是props。
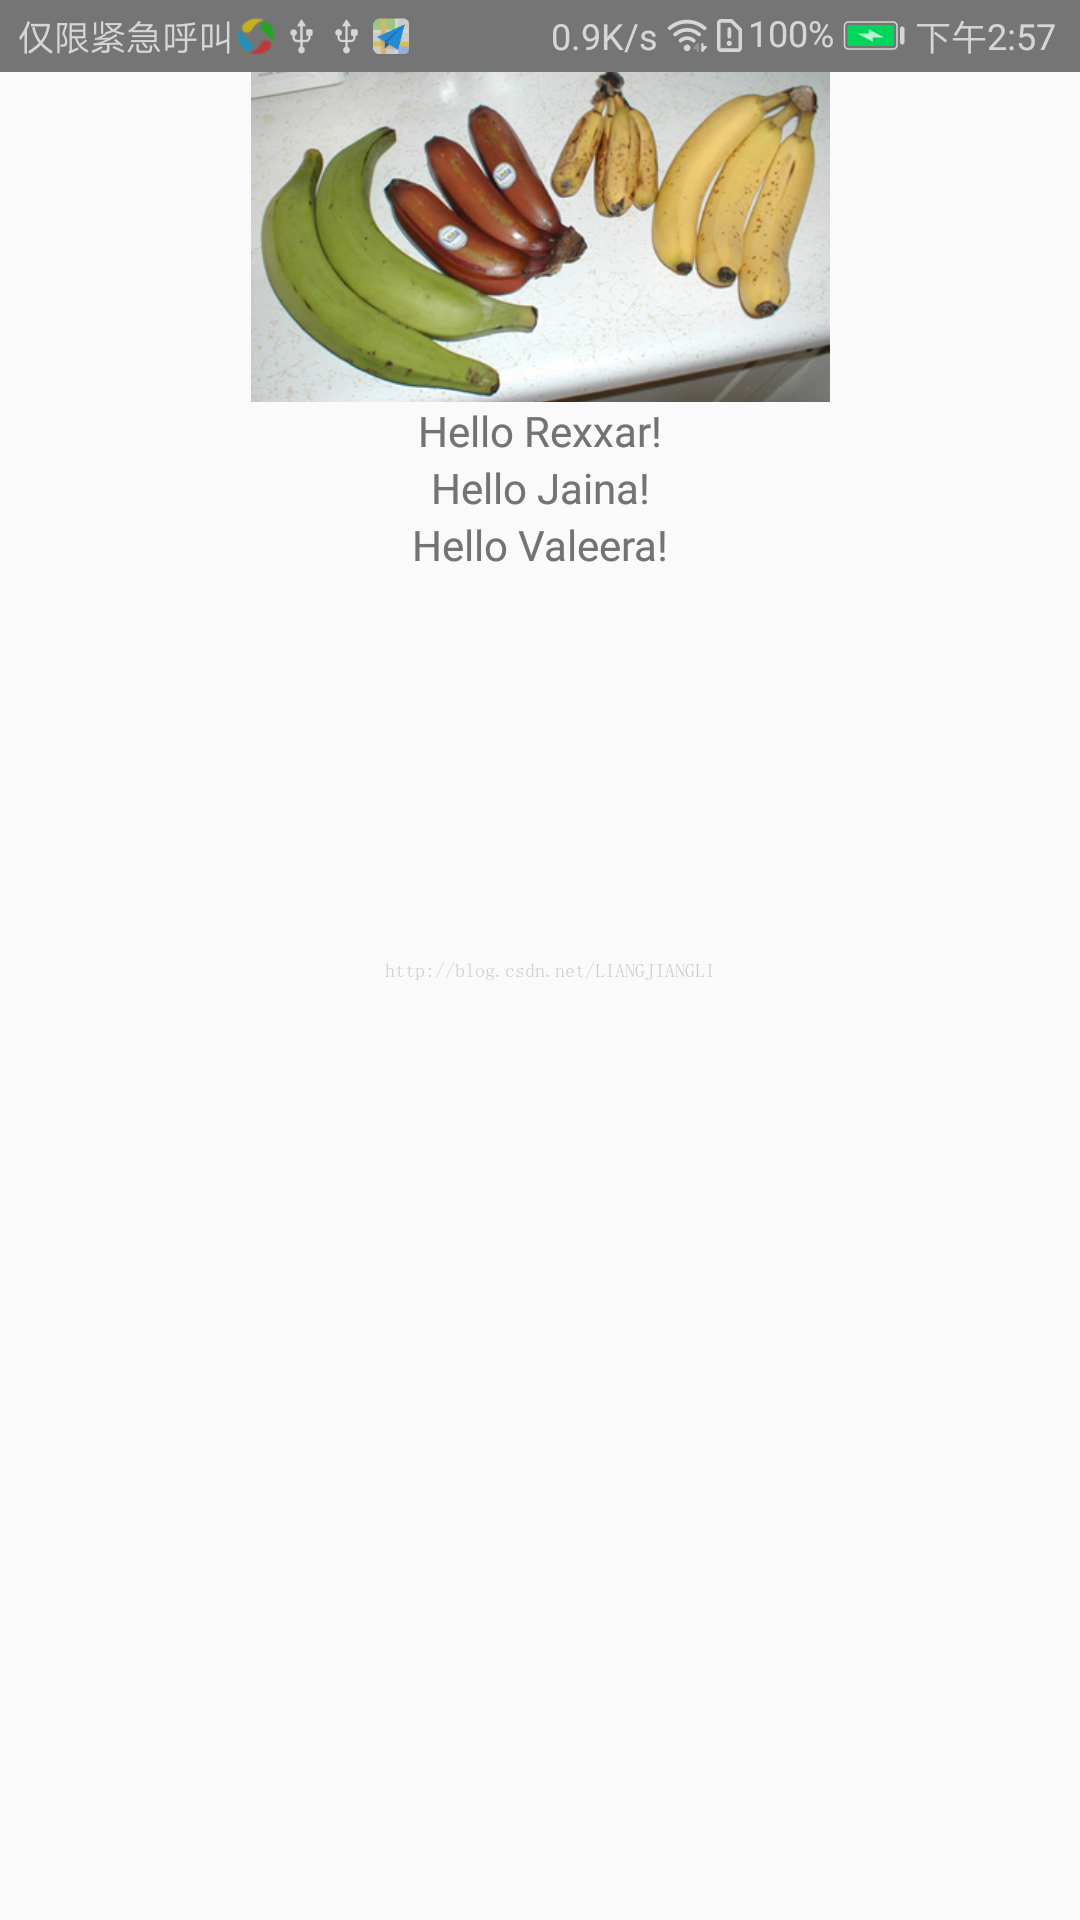
用法样例一:以Image为例,用prop来指定显示图片的地址,然后传给source
用法样例二:自定义的组件使用props
import React, {Component} from 'react';
import {AppRegistry, Image, Text, View} from 'react-native';

class Bananas extends Component {
    render() {
        //样例一
        let pic = {
            uri: 'https://upload.wikimedia.org/wikipedia/commons/d/de/Bananavarieties.jpg'
        };
        return (
            <View style={{alignItems: 'center'}}>
                <Image source={pic} style={{width: 193, height: 110}}/>
                <Greeting name='Rexxar'/>
                <Greeting name='Jaina'/>
                <Greeting name='Valeera'/>
            </View>
        );
    }
}
//样例二
class Greeting extends Component {
    render() {
        return (
            <Text>Hello {this.props.name}!</Text>
        );
    }
}
AppRegistry.registerComponent('reactnativeapp', () => Bananas);
运行截图:
State (状态)
props是在父组件中指定,而且一经指定,在被指定的组件的生命周期中则不再改变。 对于需要改变的数据,我们需要使用state,一般state在构造
import React, { Component } from 'react';
import { AppRegistry, Text, View } from 'react-native';

class Blink extends Component {
    constructor(props) {
        super(props);
        this.state = { showText: true };

        // 每1000毫秒对showText状态做一次取反操作
        setInterval(() => {
            this.setState(previousState => {
                return { showText: !previousState.showText };
            });
        }, 1000);
    }

    render() {
        // 根据当前showText的值决定是否显示text内容
        let display = this.state.showText ? this.props.text : ' ';
        return (
            <Text>{display}</Text>
        );
    }
}

class BlinkApp extends Component {
    render() {
        return (
            <View>
                <Blink text='I love to blink' />
                <Blink text='Yes blinking is so great' />
                <Blink text='Why did they ever take this out of HTML' />
                <Blink text='Look at me look at me look at me' />
            </View>
        );
    }
}
AppRegistry.registerComponent('reactnativeapp', () => BlinkApp);
style(样式)
样式名基本上是遵循了web上的CSS的命名,只是按照JS的语法要求使用了驼峰命名法。
style属性可以是一个普通的JavaScript对象。还可以传入一个数组——在数组后面的属性会覆盖前面的属性,这样你可以间接实现样式的继承。
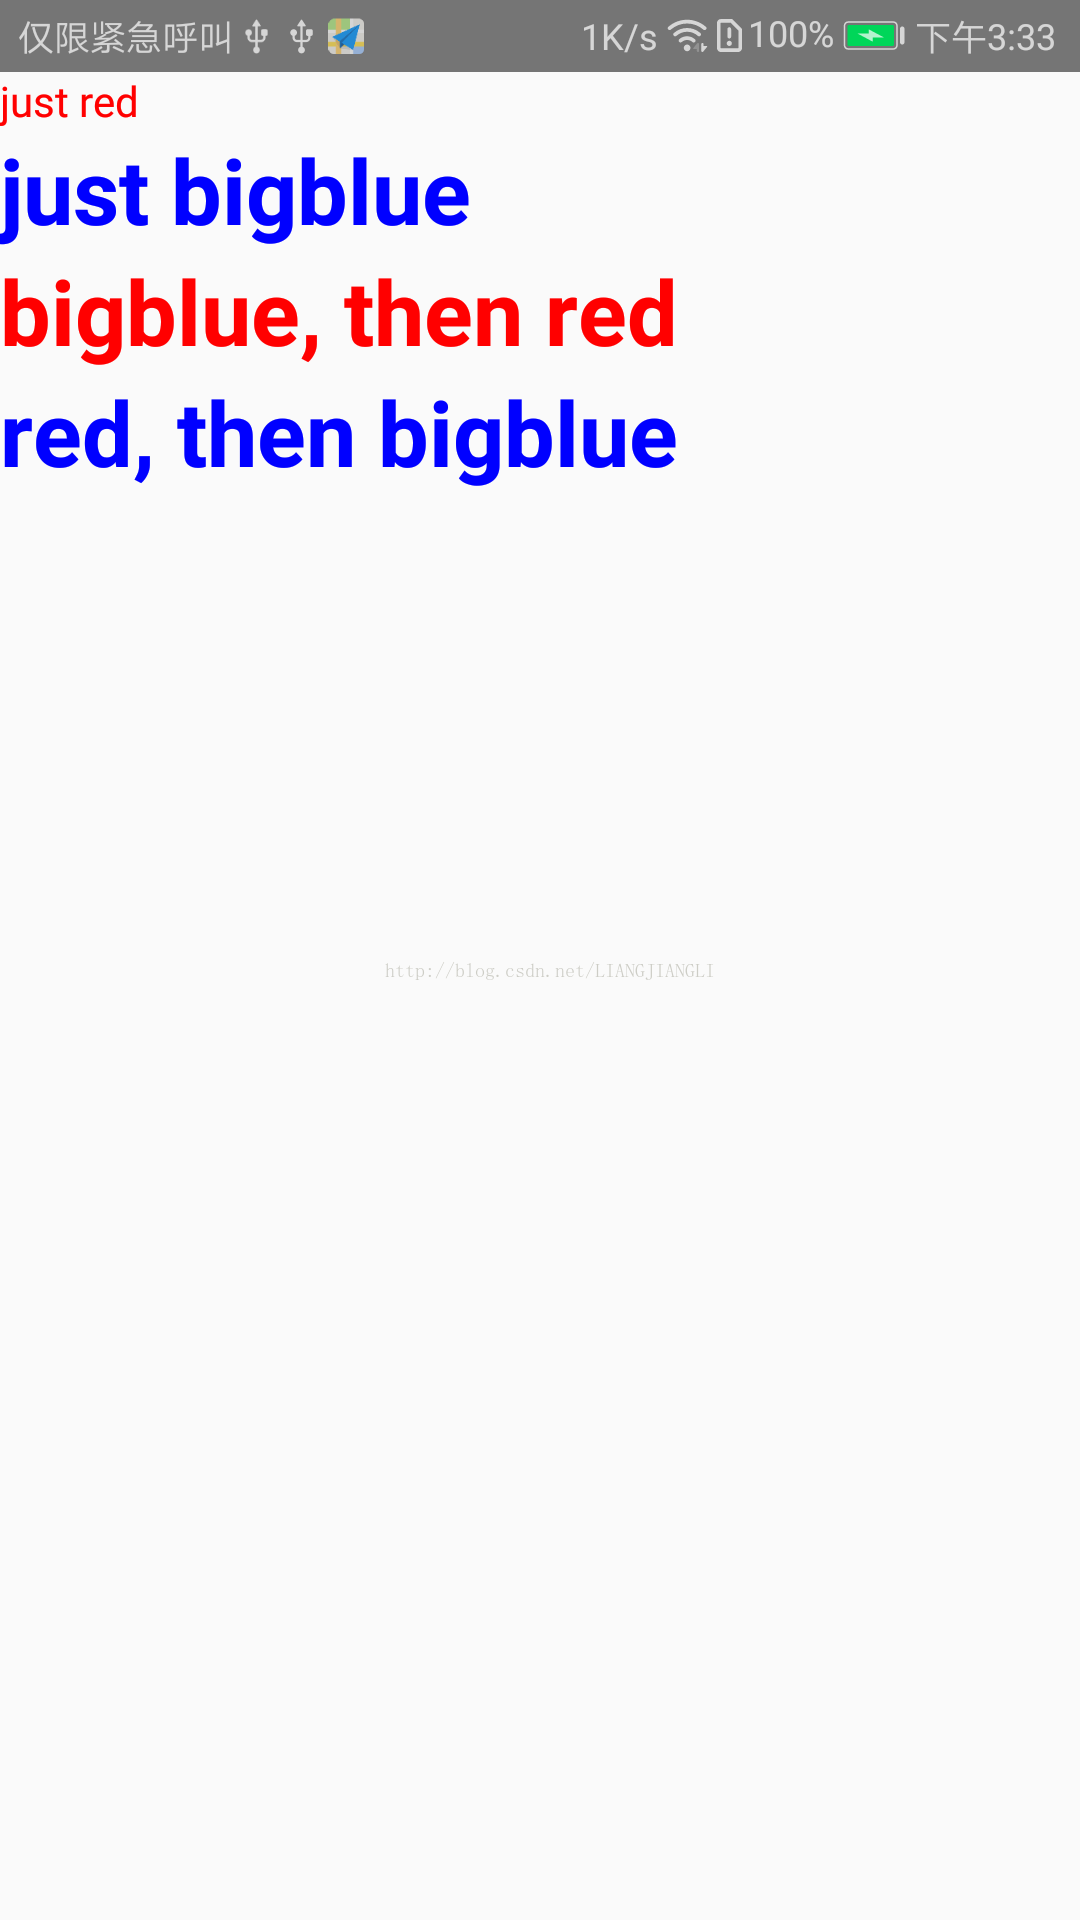
用法样例:StyleSheet.create来集中定义组件的样式
import React, {Component} from 'react';
import {AppRegistry, StyleSheet, Text, View} from 'react-native';

class LotsOfStyles extends Component {
    render() {
        return (
            <View>
                <Text style={styles.red}>just red</Text>
                <Text style={styles.bigblue}>just bigblue</Text>
                <Text style={[styles.bigblue, styles.red]}>bigblue, then red</Text>
                <Text style={[styles.red, styles.bigblue]}>red, then bigblue</Text>
            </View>
        );
    }
}
const styles = StyleSheet.create({
    bigblue: {
        color: 'blue',
        fontWeight: 'bold',
        fontSize: 30,
 },
    red: {
        color: 'red',
    },
});
AppRegistry.registerComponent('reactnativeapp', () => LotsOfStyles);
运行截图:
布局
Flex
flex相对于android布局的权重weight,flex:1代表撑满所有剩余的空间。如果父容器既没有固定的width和height,也没有设定flex,则父容器的尺寸为零。
Flexbox
使用flexbox规则来指定某个组件的子元素的布局
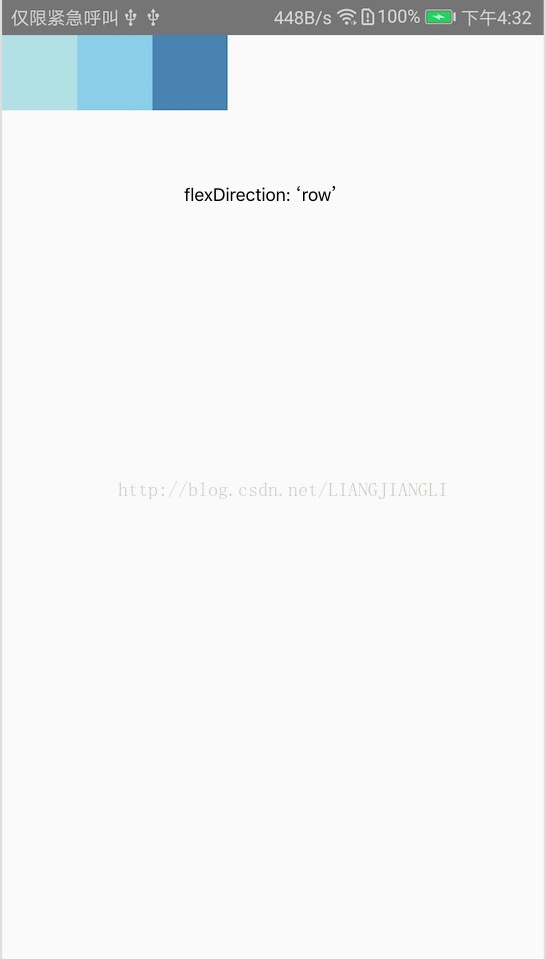
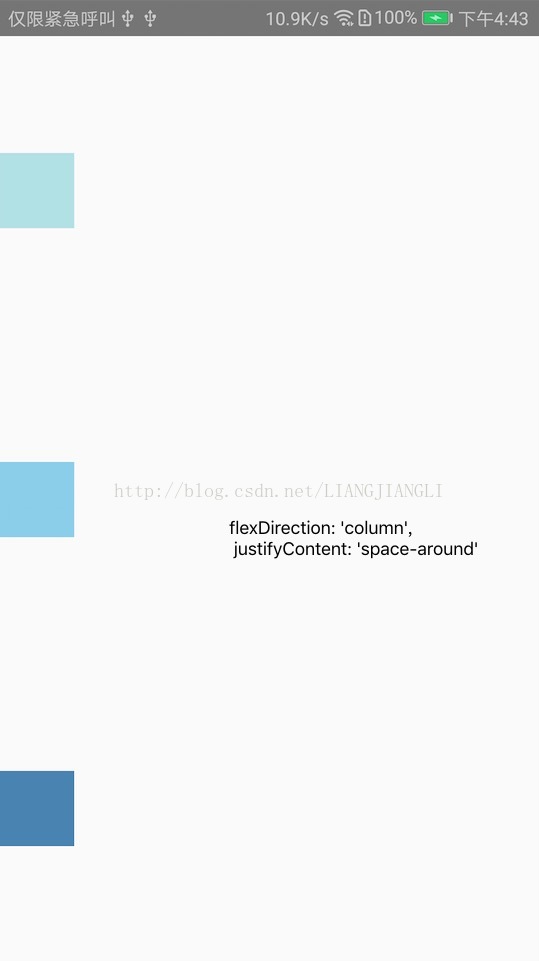
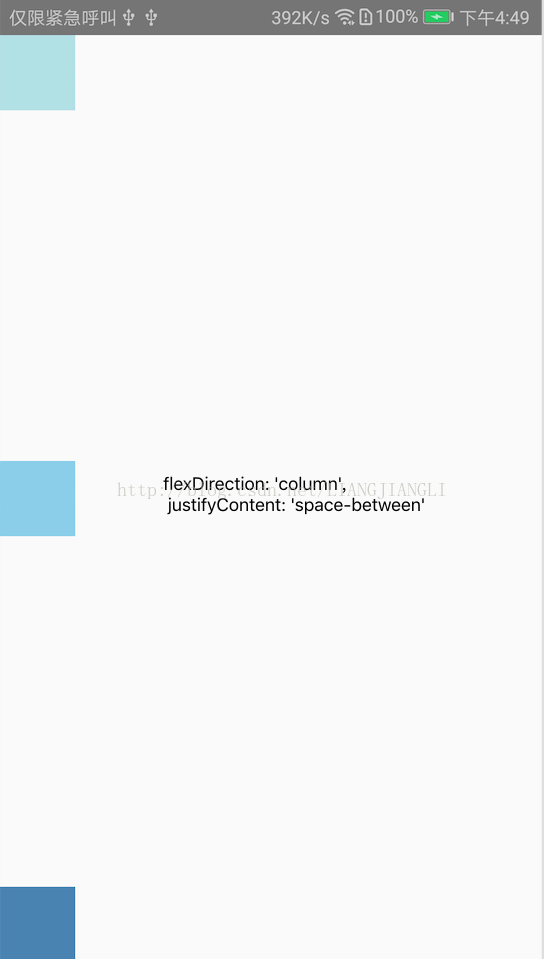
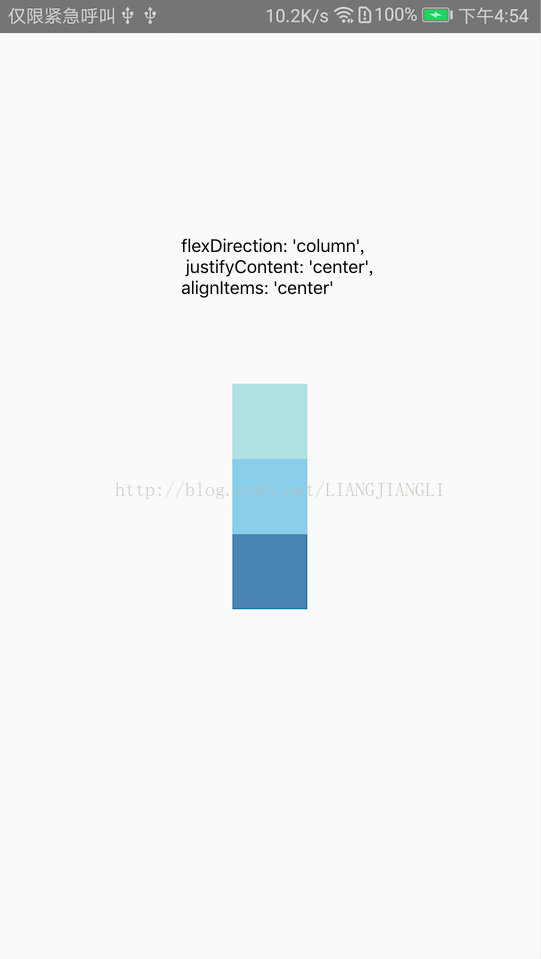
flexDirection 是指定主轴,子元素是沿着vertical轴(column),还是沿着horizontal轴(row)方向排列。
justifyContent 可以决定其子元素沿着主轴的排列方式。子元素是应该靠近主轴的起始端还是末尾段分布呢?亦或应该均匀分布?对应的这些可选项有:flex-start、center、flex-end、space-around以及space-between。
alignItems 可以决定其子元素沿着次轴(与主轴垂直的轴,比如若主轴方向为row,则次轴方向为column)的排列方式。子元素是应该靠近次轴的起始端还是末尾段分布呢?亦或应该均匀分布?对应的这些可选项有:flex-start、center、flex-end以及stretch。
注意:要使stretch选项生效的话,子元素在次轴方向上不能有固定的尺寸。以下面的代码为例:只有将子元素样式中的width: 50去掉之后,alignItems: 'stretch'才能生效。
import React, { Component } from 'react';
import { AppRegistry, View } from 'react-native';

class FlexDirectionBasics extends Component {
    render() {
        return (
            // 尝试把`flexDirection`改为`row`看看
            <View style={{flex: 1, flexDirection: 'column', justifyContent: 'center',
                alignItems: 'center'}}>
                <View style={{width: 50, height: 50, backgroundColor: 'powderblue'}} />
                <View style={{width: 50, height: 50, backgroundColor: 'skyblue'}} />
                <View style={{width: 50, height: 50, backgroundColor: 'steelblue'}} />
            </View>
        );
    }
};
AppRegistry.registerComponent('reactnativeapp', () => FlexDirectionBasics);
布局图解如下:


入门组件使用
TextInput
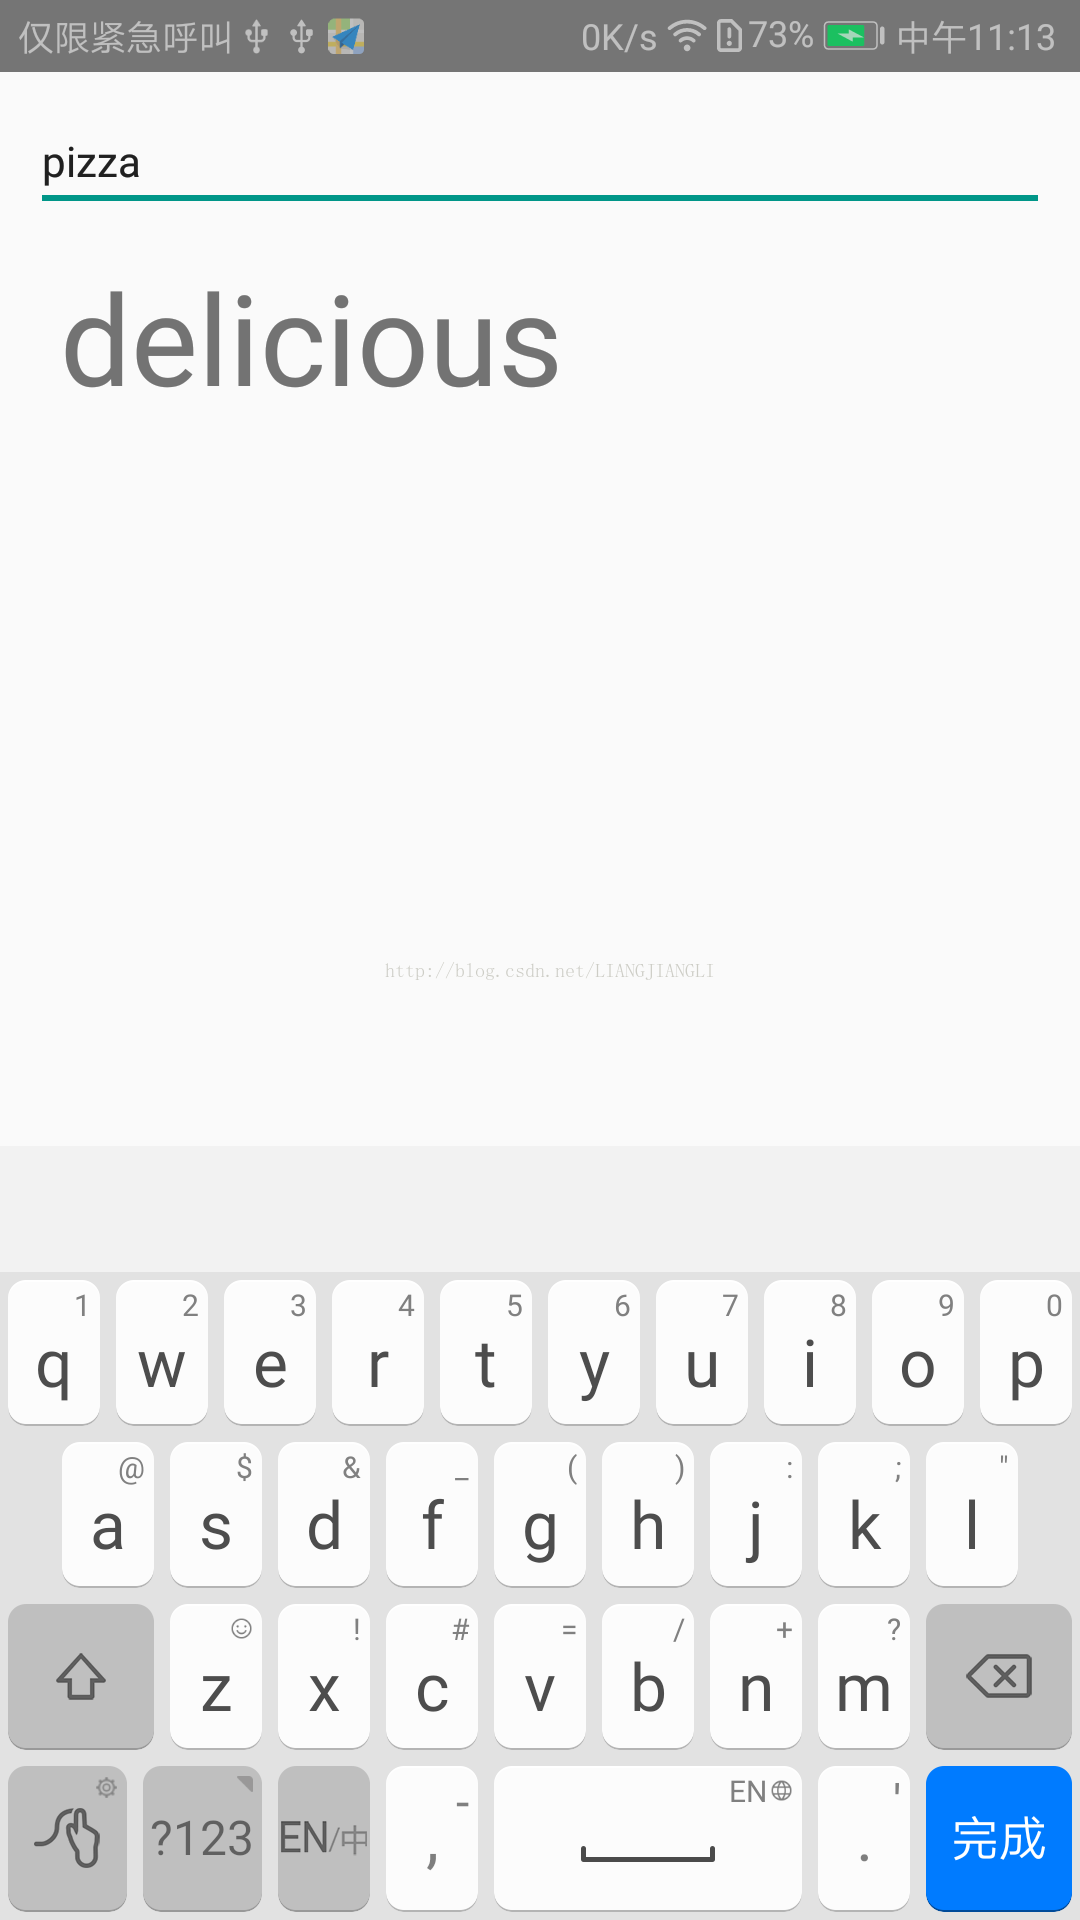
TextInput是一个允许用户输入文本的基础组件。它有一个名为onChangeText的属性,此属性接受一个函数,而此函数会在文本变化时被调用。另外还有一个名为onSubmitEditing的属性,会在文本被提交后(用户按下软键盘上的提交键)调用。
用法样例:监听用户输入,如果输入pizza单词就显示delicious,用户按下提交键后显示very delicious
import React, { Component } from 'react';
import { AppRegistry, Text, TextInput, View } from 'react-native';

class PizzaTranslator extends Component {
    constructor(props) {
        super(props);
        this.state = {text: ''};
    }

    render() {
        let display = this.state.text === 'pizza' ? 'delicious' : this.state.text === 'finish' ? 'very delicious' : ' ';
        return (
            <View style={{padding: 10}}>
                <TextInput
                    style={{height: 40}}
                    placeholder="Type here to translate!"
                    onChangeText={(text) => this.setState({text})}
                    multiline={false}
                    onSubmitEditing={(event) => this.setState({text:'finish'})}
                />

                <Text style={{padding: 10, fontSize: 42}}>{display}</Text>
            </View>
        );
    }
}
AppRegistry.registerComponent('reactnativeapp', () => PizzaTranslator);
运行截图:
ScrollView
ScrollView不仅可以垂直滚动,还能水平滚动(通过horizontal属性来设置)。
import React, { Component } from 'react';
import{ AppRegistry, ScrollView, Image, Text } from 'react-native'

class IScrolledDownAndWhatHappenedNextShockedMe extends Component {
    render() {
        return(
            <ScrollView>
                <Text style={{fontSize:96}}>Scroll me plz</Text>
                <Image source={require('../image/web.png')} />
                <Image source={require('../image/web.png')} />
                <Image source={require('../image/web.png')} />
                <Image source={require('../image/web.png')} />
                <Image source={require('../image/web.png')} />
                <Text style={{fontSize:96}}>If you like</Text>
                <Image source={require('../image/web.png')} />
                <Image source={require('../image/web.png')} />
                <Image source={require('../image/web.png')} />
                <Image source={require('../image/web.png')} />
                <Image source={require('../image/web.png')} />
                <Text style={{fontSize:96}}>Scrolling down</Text>
                <Image source={require('../image/web.png')} />
                <Image source={require('../image/web.png')} />
                <Image source={require('../image/web.png')} />
                <Image source={require('../image/web.png')} />
                <Image source={require('../image/web.png')} />
                <Text style={{fontSize:96}}>What's the best</Text>
                <Image source={require('../image/web.png')} />
                <Image source={require('../image/web.png')} />
                <Image source={require('../image/web.png')} />
                <Image source={require('../image/web.png')} />
                <Image source={require('../image/web.png')} />
                <Text style={{fontSize:96}}>Framework around?</Text>
                <Image source={require('../image/web.png')} />
                <Image source={require('../image/web.png')} />
                <Image source={require('../image/web.png')} />
                <Image source={require('../image/web.png')} />
                <Image source={require('../image/web.png')} />
                <Text style={{fontSize:80}}>React Native</Text>
            </ScrollView>
        );
    }
}
AppRegistry.registerComponent('reactnativeapp', () => IScrolledDownAndWhatHappenedNextShockedMe);
长列表
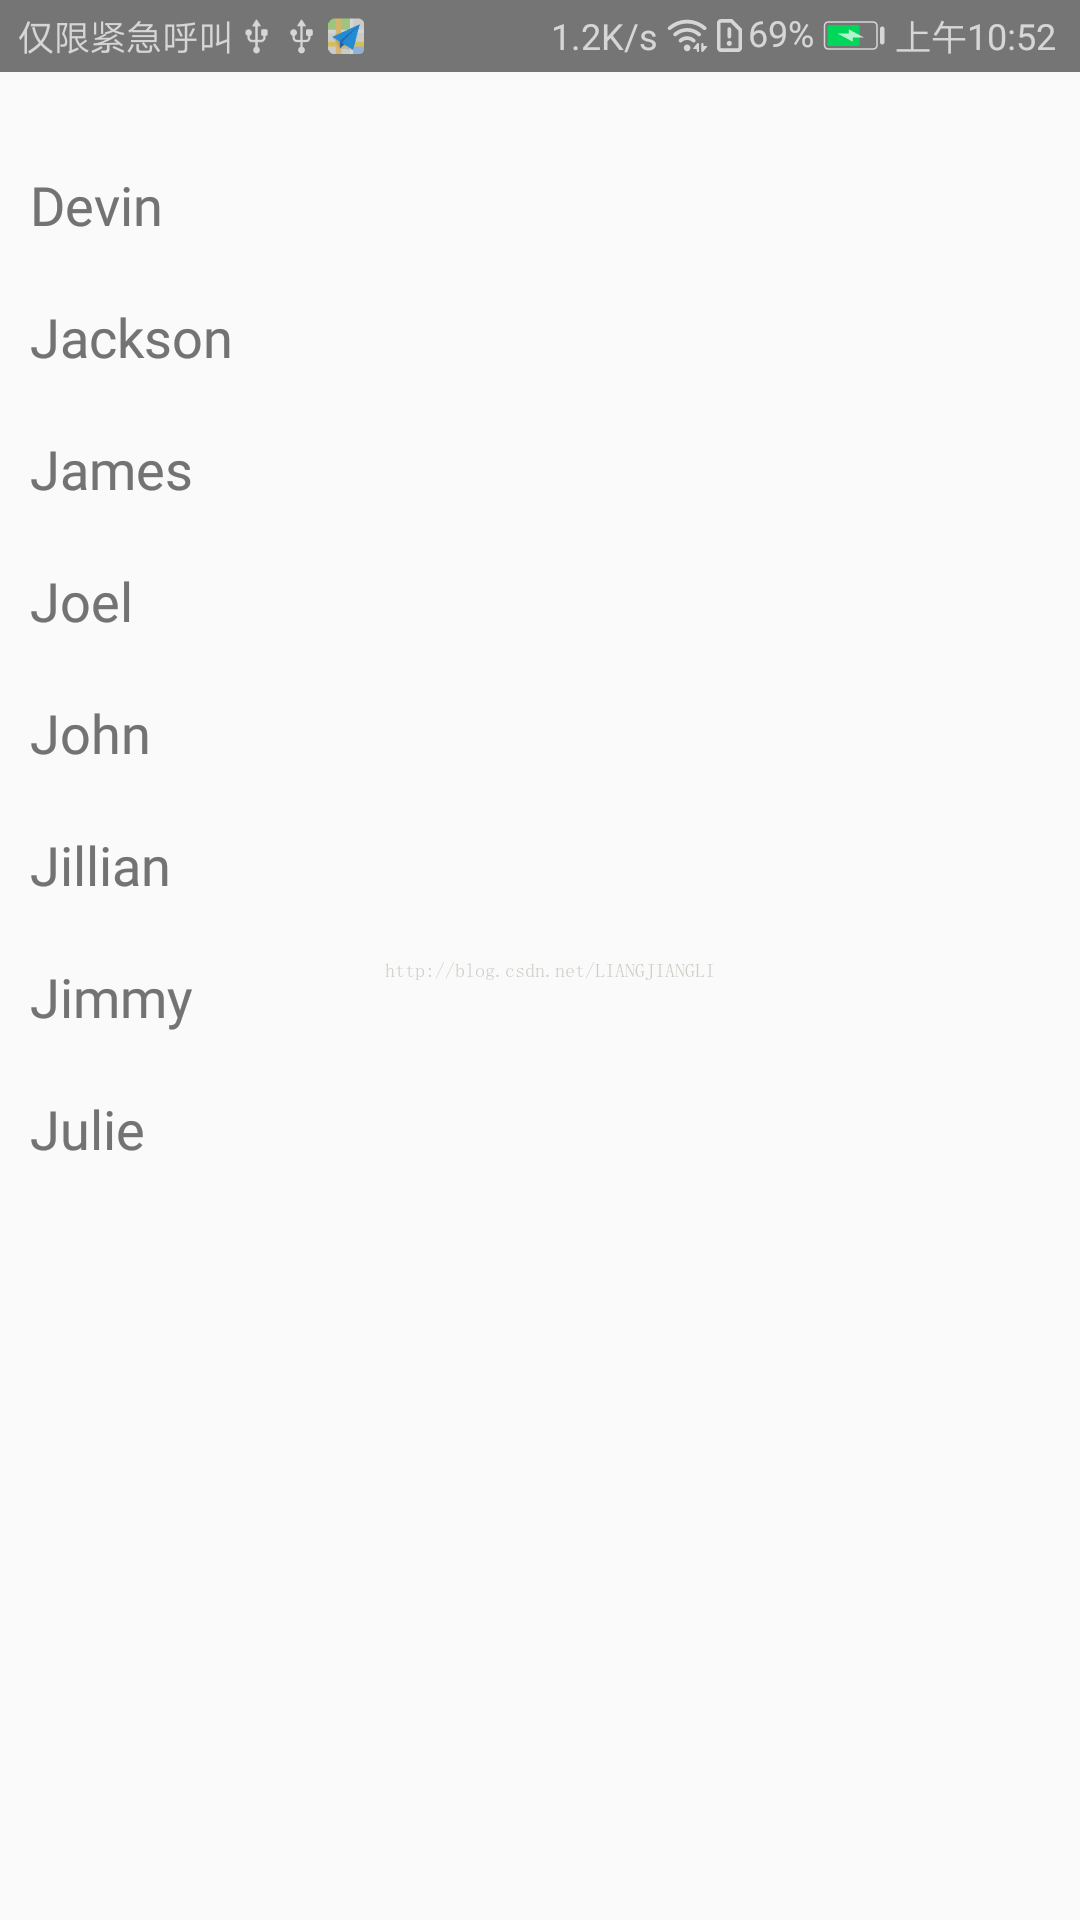
RN提供了几个适用于展示长列表数据的组件,一般而言我们会选用FlatList或是SectionList。
用法样例一:创建一个FlatList,使用data属性传入预设好的数据,然后通过renderItem渲染包含每一行数据的Text组件。
import React, { Component } from 'react';
import { AppRegistry, FlatList, StyleSheet, Text, View } from 'react-native';

export default class FlatListBasics extends Component {
    render() {
        return (
            <View style={styles.container}>
                    <FlatList
                        data={[
                            {key: 'Devin'},
                            {key: 'Jackson'},
                            {key: 'James'},
                            {key: 'Joel'},
                            {key: 'John'},
                            {key: 'Jillian'},
                            {key: 'Jimmy'},
                            {key: 'Julie'},
                        ]}
                        renderItem={({item}) => <Text style={styles.item}>{item.key}</Text>}
                    />
            </View>
        );
    }
}
const styles = StyleSheet.create({
    container: {
        flex: 1,
        paddingTop: 22
    },
    item: {
        padding: 10,
        fontSize: 18,
        height: 44,
    },
})
AppRegistry.registerComponent('reactnativeapp', () => FlatListBasics);
运行截图:
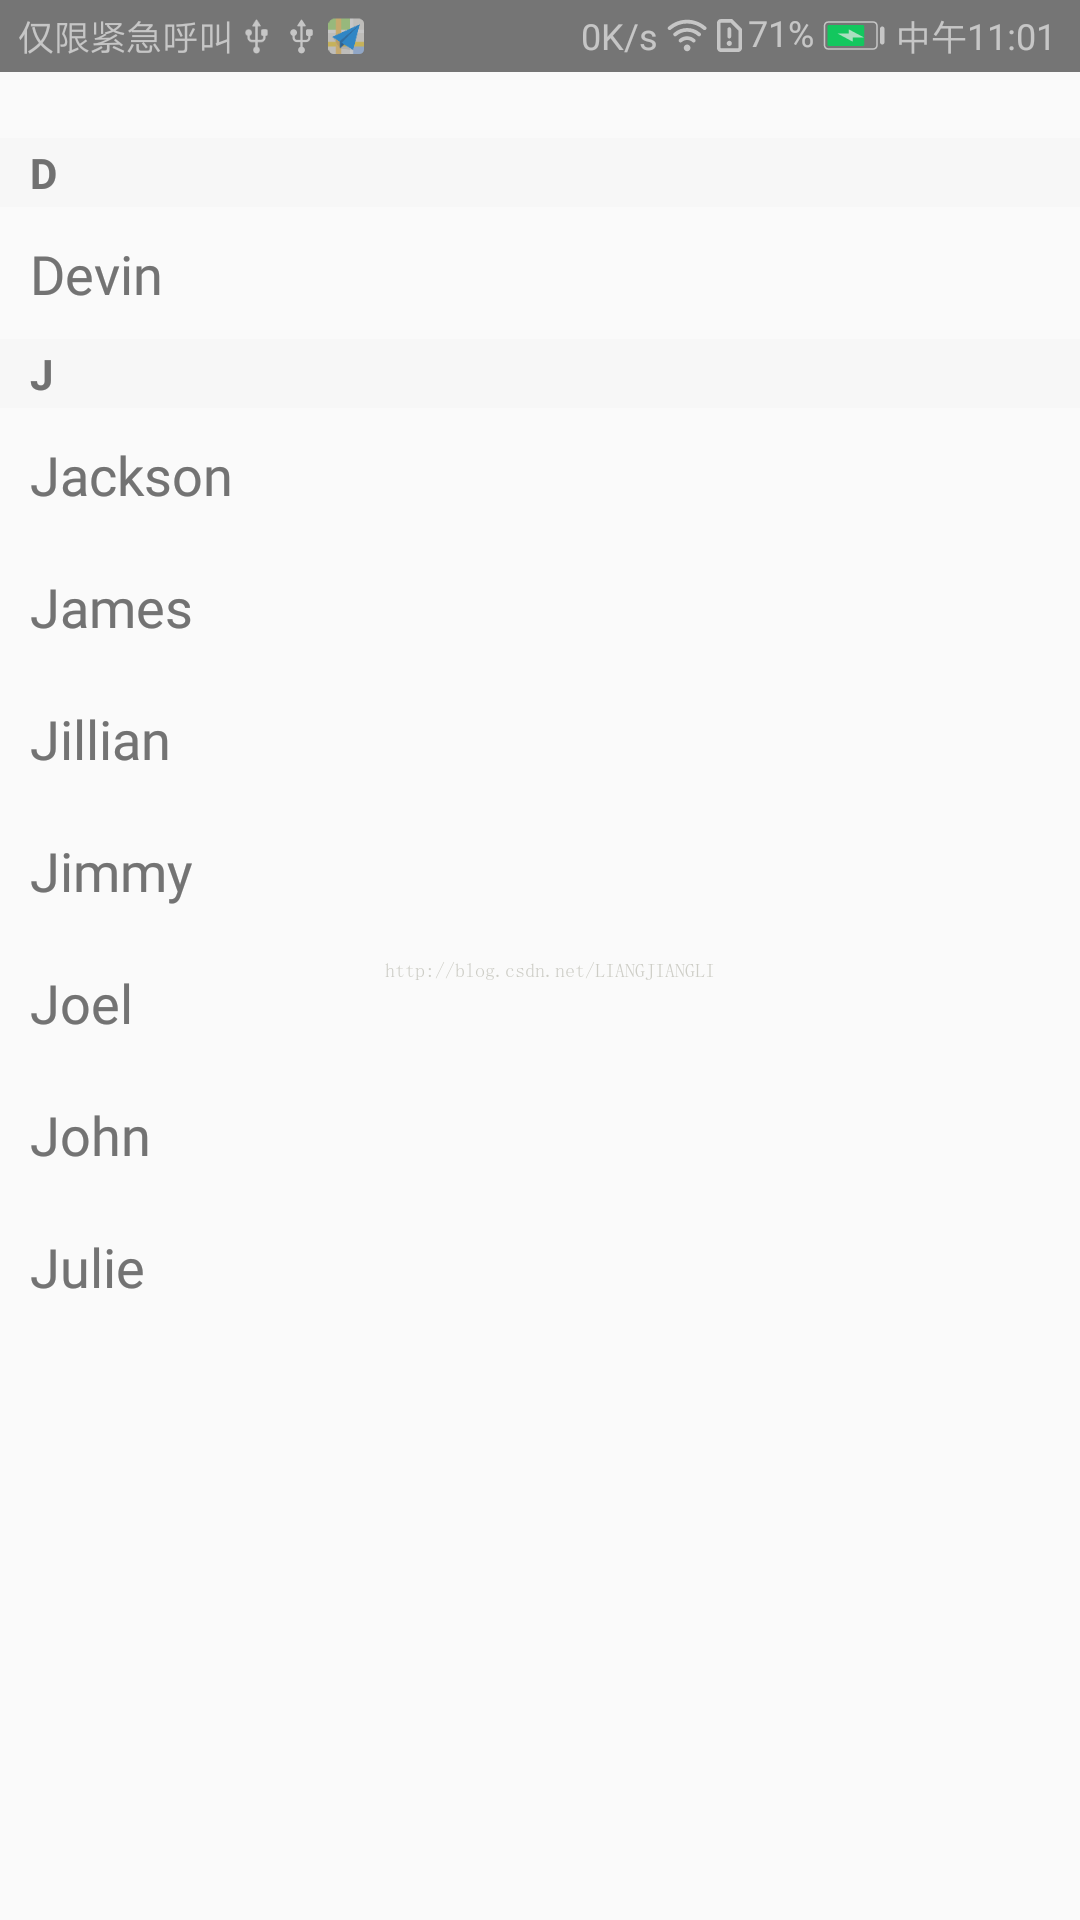
用法样例二:创建一个SectionList,使用属性sections预设好title和data数据,然后通过renderItem渲染包含每一行
data的Text组件,通过renderSectionHeader属性渲染title的Text组件。
import React, { Component } from 'react';
import { AppRegistry, SectionList, StyleSheet, Text, View } from 'react-native';

export default class SectionListBasics extends Component {
    render() {
        return (
            <View style={styles.container}>
                <SectionList
                    sections={[
                        {title: 'D', data: ['Devin']},
                        {title: 'J', data: ['Jackson', 'James', 'Jillian', 'Jimmy', 'Joel', 'John', 'Julie']},
                    ]}
                    renderItem={({item}) => <Text style={styles.item}>{item}</Text>}
                    renderSectionHeader={({section}) => <Text style={styles.sectionHeader}>{section.title}</Text>}
                />
            </View>
        );
    }
}

const styles = StyleSheet.create({
    container: {
        flex: 1,
        paddingTop: 22
    },
    sectionHeader: {
        paddingTop: 2,
        paddingLeft: 10,
        paddingRight: 10,
        paddingBottom: 2,
        fontSize: 14,
        fontWeight: 'bold',
        backgroundColor: 'rgba(247,247,247,1.0)',
    },
    item: {
        padding: 10,
        fontSize: 18,
        height: 44,
    },
})
AppRegistry.registerComponent('reactnativeapp', () => SectionListBasics);
运行截图:
网络
使用Fecth
RN提供了web标准一致的Fetch API ,用于满足开发者访问网络的需求。
用法样例:通过网络请求腾讯优图身份证识别,获取身份证信息
import React, {Component} from 'react';
import {
    AppRegistry,
    StyleSheet,
    Text,
    View,
    Image,
    Button
} from 'react-native';

export default class AndroidIos extends Component {
    constructor(props) {
        super(props);
        this.state = {
            name: '',
            id: '',
            address: '',
            uri: 'https://opentest.youtu.qq.com/content/img/product/ocr/ocr_id_02.jpg?v=2.0'
        };
    }
    onButtonPress = () => {
        //将网址作为参数传递给fetch
        fetch('http://api.youtu.qq.com/youtu/ocrapi/idcardocr', {
            //你可以指定header参数,或是指定使用POST方法,又或是提交数据等
            method: 'POST',
            headers: {
                'Accept': '*!/!*',
                'Content-Type': 'text/json',
                'user-agent': 'youtu-android-sdk',
                'Authorization': 'Zp0X4NG2VfmukwMYipvy/Ipp0fNhPTEwMDg3NjAyJms' +
                '9QUtJRDF2ZlJPYndmYU1DdWVGQU90UkNHUGcxS1daUjdLRjFuJmU9MTUwMj' +
                'k0MDQyNiZ0PTE1MDAzNDg0MjYmcj04MTMwNzQxOTgmdT04Mzk2NDMzOTg=',
            },
            body: JSON.stringify({
                'app_id': '10087602',
                'url': 'http://opentest.youtu.qq.com/content/img/product/ocr/ocr_id_02.jpg?v=2.0',
                'card_type': 0,
            })
            //处理服务器的响应数据
        }).then((response) => response.json())
            .then((responseJson) => {
                //var base64Icon = 'data:image/png;base64,' + responseJson.frontimage;
                this.setState({
                    name: responseJson.name,
                    id: responseJson.id,
                    address: responseJson.address,
                    //uri: base64Icon
                })
            })
            .catch((error) => {
                console.warn('fetch error')
            });
    };
    render() {
        return (
            <View style={styles.container}>
                <Image source={{uri: this.state.uri}}
                       style={styles.image}/>
                <Button title="请求网络" onPress={this.onButtonPress}/>
                <View style={styles.id}>
                    <Text>{this.state.name}</Text>
                    <Text>{this.state.id}</Text>
                    <Text>{this.state.address}</Text>
                </View>
            </View>
        );
    }
}

const styles = StyleSheet.create({
    container: {
        flex: 1,
        justifyContent: 'center',
        alignItems: 'center',
        backgroundColor: '#F5FCFF',
    },
    id: {
        flex: 1,
        flexDirection: 'column',
        backgroundColor: '#F5FCFF',
        marginTop: 20
    },
    image:{
        height: 200,
        width: 300,
        margin: 10,
    },
});
AppRegistry.registerComponent('reactnativeapp', () => AndroidIos);
运行截图:


最后,我把上面的基础学习的代码放在了github上,
地址:https://github.com/Eric0liang/RNProject,
apk下载地址:https://github.com/Eric0liang/RNProject/blob/master/app-release.apk?raw=true
对于如何生产集成到android studio并生产apk,可以参考另一篇博客 《 React Native集成到现有Android Studio项目》
