MySQL
1. 认识数据库
问:为什么需要数据库?
答:为数据的持久化存储;为方便数据的查找(读取)。数据库系统解决的问题是持久化存储,优化读写以及保证数据的有效性。
问:数据库的分类有哪些?
答:数据库的分类有:
- 关系型数据库:指采用了
关系模型来组织数据的数据库。关系模型指的就是二维表格模型,而一个关系型数据库就是由二维表及其之间的联系所组成的一个数据组织。主流的关系型数据库有:Oracle、Microsoft SQL Server、MySQL、PostgreSQL、SQLite、MariaDB(MySQL的一个分支) 、Microsoft Access、SAP。 - 非关系型数据库:指非关系型的,分布式的,以键值对存储且结构不固定,可以减少一些时间和空间的开销。非关系型数据库都是针对某些特定的应用需求,主要分为以下几类:
- 面向海量数据访问的面向文档数据库: MongoDB、Amazon DynamoDB、Couchbase等。
- 面向高性能并发读写的key-value数据库: Redis、Memcached等。
- 面向搜索数据内容的搜索引擎:Elasticsearch、Splunk、Solr、MarkLogic和Sphinx等。
- 面向可扩展性的分布式数据库:Cassandra、HBase等。
2. 关系型数据库
2.1 E-R图
当前物理数据库都是按照E-R模型进行设计的,
- E表示entry,实体
- R表示relationship,关系
- 实体:一个
实体转换为数据库中的一个表 - 关系:关系描述两个实体之间的对应规则,包括:
一对一 、一对多、 多对多
2.2 三个范式
经过研究和对使用中问题的总结,对设计数据库提出了一些规范,这些规范被称为范式
- 第一范式(1NF): 列不可拆分,即无重复的域。
- 第二范式(2NF): 唯一标识,即拥有实体的唯一标识(eg: 身份证、id号等)。
- 第三范式(3NF): 引用主键,即每列数据都与主键直接相关。
说明:关系型数据库有六种范式。一般说来,数据库只需满足第三范式(3NF)就行了。
【举例说明】:
- 下面关于数据库表的定义显然不符合为第一范式,因为联系方式这一列可以查分为:邮箱和电话
所以,符合第一范式的特点是:有主关键字、主键不能为空、主键不能重复,字段不可以再分。
| 学号 | 姓名 | 联系方式 |
|---|---|---|
| 201001 | 小红 | 邮箱:[email protected];电话:6666 |
| 201002 | 小明 | 邮箱:[email protected];电话:8888 |
- 下面关于数据库表的定义显然不符合为第二范式,因为字段姓名、性别、班级下的数据存在重复的可能,都不具备唯一标识
| 姓名 | 性别 | 班级 |
|---|---|---|
| 小红 | 女 | 20级01班 |
| 小明 | 男 | 20级01班 |
| 小红 | 男 | 20级02班 |
- 下面关于数据库表的定义显然不符合为第三范式,因为字段班级地址显然与班级编号有关(即为班级信息);而姓名、邮箱以及班级编号显然与学号有关(即为学生信息),非每列数据都与主键直接相关,故不符合第三范式。
| 学号 | 姓名 | 邮箱 | 班级编号 | 班级地址 |
|---|---|---|---|---|
| 201001 | 小红 | [email protected] | 1001 | A104 |
| 201002 | 小明 | [email protected] | 1002 | A102 |
3. MySQL安装和简介
开发环境:redhat + MariaDB
为什么选择MairaDB?
在2008年1月16号 MySQL被Sun公司收购。之后Sun公司被甲骨公司收购,甲骨文旗舰产品便是 Oracle。Oracle作为企业级应用软件,MySQL作为开源项目,所以MySQL的创始人Monty Widenius考虑到MySQL发展前景向Sun提交了辞呈,创办了MariaDB,而MariaDB与MySQL操作命令几乎是一致的
3.1 安装及配置MySQL
- 查看yum 软件仓
> su -
> yum serach mariadb
******差不多是下面这个鸭子******
============================= N/S matched: mariadb =============================
mariadb-bench.x86_64 : MariaDB benchmark scripts and data
mariadb-devel.i686 : Files for development of MariaDB/MySQL applications
mariadb-devel.x86_64 : Files for development of MariaDB/MySQL applications
mariadb-embedded.i686 : MariaDB as an embeddable library
mariadb-embedded.x86_64 : MariaDB as an embeddable library
mariadb-embedded-devel.i686 : Development files for MariaDB as an embeddable
                            : library
mariadb-embedded-devel.x86_64 : Development files for MariaDB as an embeddable
                              : library
mariadb-libs.i686 : The shared libraries required for MariaDB/MySQL clients
mariadb-libs.x86_64 : The shared libraries required for MariaDB/MySQL clients
mariadb-server.x86_64 : The MariaDB server and related files
mariadb.x86_64 : A community developed branch of MySQL
mariadb-test.x86_64 : The test suite distributed with MariaDB
- yum安装 MariaDB
> yum install mariadb-server.x86_64 -y
- 开启 MariaDB
> systemctl start mariadb
- 查看 MariaDB 是否正在 running
> systemctl status mariadb
- 配置安全登陆
# 键入命令后,按照提示进行操作即可
mysql_secure_installation
# 登陆命令 -u用户名 -p密码
mysql -uroot -p
3.2 允许远程登陆设置
- 关闭防火墙
systemctl stop firewalld
systemctl disable firewalld
- 服务端配置
# 登陆数据库
mysql -uroot -p
# 授权:允许以用户名为 root 密码为 redhat 登陆的所有ip(即root@'%')对 数据库.数据库表(*.*:表示所有数据库的所有数据库表)进行远程登陆
grant all on *.* to root@'%' identified by 'redhat';
# 查看允许登陆的主机
select Host,User,Password from mysql.user;
# 删除授权的用户 root@'%'
drop user root@'%';
- 客户端登陆
# 服务端的 ip:172.12.123.6
mysql -h 172.12.123.6 -uroot -predhat
4. MySQL数据库操作
4.1 数据库操作
- 创建数据库
create database db_name charset=utf8;
- 删除数据库
drop database db_name;
- 切换数据库
use db_name;
- 查看当前使用的数据库
select database();
- 查看当前所有的数据库
show databases;
4.2 表操作
一个数据库就是一个完整的业务单元,可以包含多张表,数据被存储在表中。
在表中为了更加准确的存储数据,保证数据的正确有效,可以在创建表的时候,为表添加一些强制性的验证, 包括数据字段的类型、约束。
常见的数据类型:
- 数字:int,decimal, float
- 字符串:varchar,text
- 日期:datetime
- 布尔:bool
常见的约束:
- 主键:primary key
- 非空:not null
- 惟一:unique
- 默认:default
- 外键:foreign key
- 自动增长:auto_increment
- 查看当前数据库中的所有表
show tables;
- 创建表 --> 创建id 列,name 列,gender 列,数据类型分别是:int、varchar、bit,及其约束包括:自增约束、主键约束、非空约束、默认值约束等
create table table_name(
	id int auto_increment primary key not null,
	name varchar(10) not null,
	gender bit default 1
	);
- 修改表 --> 即增加、修改、删除字段 --> add:增,modify:改,drop:删
alter table table_name add|modify|drop 列名 类型;
- 删除表
drop table table_name;
- 查看表结构
desc table_name;
- 更改表名称
rename table old_table_name to new_table_name;
- 查看表的创建语句
show create table table_name;
4.3 数据操作
- 查询
select * from table_name;
- 增加
# 1. 全列插入
insert into table_name values(0, '小红', 0);
# 2. 缺省插入
insert into table_name (name, gender) values('小明', 0);
# 3. 同时插入多条数据
insert into table_name values(10, '小白', 1), (11, '小黄', 1);
insert into table_name (name, gender) values('小蓝', 1), ('小刚', 0);
- 修改
update table_name set name='李建勋' where id=0;
- 删除 (物理的)
delete from table_name where id=1;
- 逻辑删除,本质上就是修改操作update,以防误删除的发生
# 添加 isdelete 字段,默认值为0,用于逻辑删除的标识
alter table table_name add isdelete bit default 0;
# isdelete=1,表示该数据是已删除的
update table_name isdelete=1 where id=10;
4.5 查询操作
4.5.1 查询基本语法
select * from table_name;
- from 关键字后面写表名,表示数据来源于是这张表
- select后面写表中的列名,如果是 * 则表示在结果中显示表中的所有列
- 在select后面的列名部分,可以使用as为列起别名,这个别名出现在结果集中
- 如果要查询多个列,之间使用逗号分隔
代码示例:
MariaDB [StuProject]> select * from students;
+-----+--------+------+---------------------+-------+
| sno | sname  | ssex | sbirthday           | class |
+-----+--------+------+---------------------+-------+
| 108 | 曾华   | 男   | 1977-09-01 00:00:00 | 95033 |
| 105 | 匡明   | 男   | 1975-10-02 00:00:00 | 95031 |
| 107 | 王丽   | 女   | 1976-01-23 00:00:00 | 95033 |
| 101 | 李军   | 男   | 1976-02-20 00:00:00 | 95033 |
| 109 | 王芳   | 女   | 1975-02-10 00:00:00 | 95031 |
| 103 | 陆君   | 男   | 1974-06-03 00:00:00 | 95031 |
+-----+--------+------+---------------------+-------+
6 rows in set (0.063 sec)

MariaDB [StuProject]> select sname as '姓名', class as '班级' from students;
+--------+--------+
| 姓名   | 班级   |
+--------+--------+
| 曾华   | 95033  |
| 匡明   | 95031  |
| 王丽   | 95033  |
| 李军   | 95033  |
| 王芳   | 95031  |
| 陆君   | 95031  |
+--------+--------+
6 rows in set (0.074 sec)
4.5.2 【重要】消除重复行
select distinct lie_ming from table_name;
代码示例:
MariaDB [StuProject]> select distinct ssex from students;
+------+
| ssex |
+------+
| 男   |
| 女   |
+------+
2 rows in set (0.001 sec)
4.5.3 按照条件进行查询
语法:使用 where 子句对表中的数据筛选,结果为 true 的行会出现在结果集中
select * from table_name where 条件;
条件中的优先级
- 小括号, not, 比较运算符, 逻辑运算符
- and比or先运算, 如果同时出现并希望先算or, 需要结合()使用
条件包括:
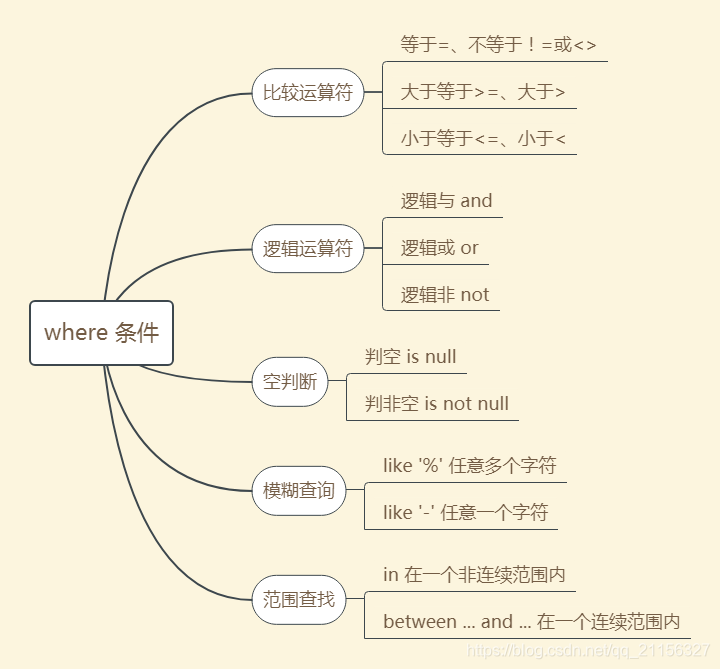
代码示例:
MariaDB [StuProject]> select * from students where sno>=105;
+-----+--------+------+---------------------+-------+
| sno | sname  | ssex | sbirthday           | class |
+-----+--------+------+---------------------+-------+
| 108 | 曾华   | 男   | 1977-09-01 00:00:00 | 95033 |
| 105 | 匡明   | 男   | 1975-10-02 00:00:00 | 95031 |
| 107 | 王丽   | 女   | 1976-01-23 00:00:00 | 95033 |
| 109 | 王芳   | 女   | 1975-02-10 00:00:00 | 95031 |
+-----+--------+------+---------------------+-------+
4 rows in set (0.072 sec)

MariaDB [StuProject]> select * from students where sno>=105 and sname='匡明';
+-----+--------+------+---------------------+-------+
| sno | sname  | ssex | sbirthday           | class |
+-----+--------+------+---------------------+-------+
| 105 | 匡明   | 男   | 1975-10-02 00:00:00 | 95031 |
+-----+--------+------+---------------------+-------+
1 row in set (0.001 sec)

MariaDB [StuProject]> select * from students where ssex is null;
Empty set (0.000 sec)

MariaDB [StuProject]> select * from students where sname like '王%';
+-----+--------+------+---------------------+-------+
| sno | sname  | ssex | sbirthday           | class |
+-----+--------+------+---------------------+-------+
| 107 | 王丽   | 女   | 1976-01-23 00:00:00 | 95033 |
| 109 | 王芳   | 女   | 1975-02-10 00:00:00 | 95031 |
+-----+--------+------+---------------------+-------+
2 rows in set (0.019 sec)

MariaDB [StuProject]> select * from students where sno in (101, 107);
+-----+--------+------+---------------------+-------+
| sno | sname  | ssex | sbirthday           | class |
+-----+--------+------+---------------------+-------+
| 107 | 王丽   | 女   | 1976-01-23 00:00:00 | 95033 |
| 101 | 李军   | 男   | 1976-02-20 00:00:00 | 95033 |
+-----+--------+------+---------------------+-------+
2 rows in set (0.026 sec)

MariaDB [StuProject]> select * from students where sno between 101 and 107;+-----+--------+------+---------------------+-------+
| sno | sname  | ssex | sbirthday           | class |
+-----+--------+------+---------------------+-------+
| 105 | 匡明   | 男   | 1975-10-02 00:00:00 | 95031 |
| 107 | 王丽   | 女   | 1976-01-23 00:00:00 | 95033 |
| 101 | 李军   | 男   | 1976-02-20 00:00:00 | 95033 |
| 103 | 陆君   | 男   | 1974-06-03 00:00:00 | 95031 |
+-----+--------+------+---------------------+-------+
4 rows in set (0.001 sec)
4.5.4 分组
什么是分组?
- 按照字段分组,表示此字段相同的数据会被放到一个组中
- 分组后,只能查询出相同的数据列,对于有差异的数据列无法出现在结果集中
- 可以对分组后的数据进行统计,做聚合运算
分组的一般语法:
select 列1,列2,聚合... from 表名
group by 列1,列2,列3...
having 列1,...,聚合...
代码示例:
- 统计个班级的人数
MariaDB [StuProject]> select * from students;
+-----+--------+------+---------------------+-------+
| sno | sname  | ssex | sbirthday           | class |
+-----+--------+------+---------------------+-------+
| 108 | 曾华   | 男   | 1977-09-01 00:00:00 | 95033 |
| 105 | 匡明   | 男   | 1975-10-02 00:00:00 | 95031 |
| 107 | 王丽   | 女   | 1976-01-23 00:00:00 | 95033 |
| 101 | 李军   | 男   | 1976-02-20 00:00:00 | 95033 |
| 109 | 王芳   | 女   | 1975-02-10 00:00:00 | 95031 |
| 103 | 陆君   | 男   | 1974-06-03 00:00:00 | 95031 |
+-----+--------+------+---------------------+-------+
6 rows in set (0.000 sec)

MariaDB [StuProject]> select class, count(*) as '班级人数' from students group by class;
+-------+--------------+
| class | 班级人数     |
+-------+--------------+
| 95031 |            3 |
| 95033 |            3 |
+-------+--------------+
2 rows in set (0.001 sec)
- 统计女生人数
MariaDB [StuProject]> select count(*) as '女生人数' from students
    -> group by ssex
    -> having ssex='女';
+--------------+
| 女生人数     |
+--------------+
|            2 |
+--------------+
1 row in set (0.001 sec)
【注意】having后面的条件运算符与where的是相同的,区别在于:
where 是对 from 后面指定的表进行数据筛选,属于对原始数据的筛选having 是对 group by 的结果进行筛选
4.5.5 聚合
- count(*):统计此列的总行数
- max(列):求此列的最大值
- min(列):求此列的最小值
- sum(列):求此列的和
- avg(列):求此列的平均值
代码示例:
MariaDB [StuProject]> select max(sbirthday) from students;
+---------------------+
| max(sbirthday)      |
+---------------------+
| 1977-09-01 00:00:00 |
+---------------------+
1 row in set (0.001 sec)
4.5.6 排序
排序的一般语法:
select * from table_name
order by 列1 asc|desc, 列2 asc|desc, ...
- 将行数据按照 列1 进行排序,如果某些行 列1 的值相同时,则按照 列2 排序,以此类推
- 默认按照列值从小到大排列
- asc 从小到大排列,即升序, desc 从大到小排序,即降序
代码示例:
MariaDB [StuProject]> select * from students order by sno;
+-----+--------+------+---------------------+-------+
| sno | sname  | ssex | sbirthday           | class |
+-----+--------+------+---------------------+-------+
| 101 | 李军   | 男   | 1976-02-20 00:00:00 | 95033 |
| 103 | 陆君   | 男   | 1974-06-03 00:00:00 | 95031 |
| 105 | 匡明   | 男   | 1975-10-02 00:00:00 | 95031 |
| 107 | 王丽   | 女   | 1976-01-23 00:00:00 | 95033 |
| 108 | 曾华   | 男   | 1977-09-01 00:00:00 | 95033 |
| 109 | 王芳   | 女   | 1975-02-10 00:00:00 | 95031 |
+-----+--------+------+---------------------+-------+
6 rows in set (0.003 sec)

MariaDB [StuProject]> select * from students order by sno asc;
+-----+--------+------+---------------------+-------+
| sno | sname  | ssex | sbirthday           | class |
+-----+--------+------+---------------------+-------+
| 101 | 李军   | 男   | 1976-02-20 00:00:00 | 95033 |
| 103 | 陆君   | 男   | 1974-06-03 00:00:00 | 95031 |
| 105 | 匡明   | 男   | 1975-10-02 00:00:00 | 95031 |
| 107 | 王丽   | 女   | 1976-01-23 00:00:00 | 95033 |
| 108 | 曾华   | 男   | 1977-09-01 00:00:00 | 95033 |
| 109 | 王芳   | 女   | 1975-02-10 00:00:00 | 95031 |
+-----+--------+------+---------------------+-------+
6 rows in set (0.001 sec)

MariaDB [StuProject]> select * from students order by class asc, sno;
+-----+--------+------+---------------------+-------+
| sno | sname  | ssex | sbirthday           | class |
+-----+--------+------+---------------------+-------+
| 103 | 陆君   | 男   | 1974-06-03 00:00:00 | 95031 |
| 105 | 匡明   | 男   | 1975-10-02 00:00:00 | 95031 |
| 109 | 王芳   | 女   | 1975-02-10 00:00:00 | 95031 |
| 101 | 李军   | 男   | 1976-02-20 00:00:00 | 95033 |
| 107 | 王丽   | 女   | 1976-01-23 00:00:00 | 95033 |
| 108 | 曾华   | 男   | 1977-09-01 00:00:00 | 95033 |
+-----+--------+------+---------------------+-------+
6 rows in set (0.001 sec)
4.5.7 分页(获取部分行)
当数据量过大时,在一页中查看数据是一件非常麻烦的事,所以:
select * from table_name
limit start, count
- 从 start 开始,获取 count 条数据
- start 默认索引从 0 开始
代码示例:
MariaDB [StuProject]> select * from students;
+-----+--------+------+---------------------+-------+
| sno | sname  | ssex | sbirthday           | class |
+-----+--------+------+---------------------+-------+
| 108 | 曾华   | 男   | 1977-09-01 00:00:00 | 95033 |
| 105 | 匡明   | 男   | 1975-10-02 00:00:00 | 95031 |
| 107 | 王丽   | 女   | 1976-01-23 00:00:00 | 95033 |
| 101 | 李军   | 男   | 1976-02-20 00:00:00 | 95033 |
| 109 | 王芳   | 女   | 1975-02-10 00:00:00 | 95031 |
| 103 | 陆君   | 男   | 1974-06-03 00:00:00 | 95031 |
+-----+--------+------+---------------------+-------+
6 rows in set (0.001 sec)

MariaDB [StuProject]> select * from students limit 2, 3;
+-----+--------+------+---------------------+-------+
| sno | sname  | ssex | sbirthday           | class |
+-----+--------+------+---------------------+-------+
| 107 | 王丽   | 女   | 1976-01-23 00:00:00 | 95033 |
| 101 | 李军   | 男   | 1976-02-20 00:00:00 | 95033 |
| 109 | 王芳   | 女   | 1975-02-10 00:00:00 | 95031 |
+-----+--------+------+---------------------+-------+
3 rows in set (0.001 sec)
【总结】
完整的 select 语句的一般书写格式总结:
select distinct * from table_name
where ...
group by ... having ...
order by ...
limit start, count;
注意: 实际使用中,只是语句中某些部分的组合,而不是全部
执行顺序为:
- from 表名
- where …
- group by …
- select distinct *
- having …
- order by …
- limit star, count
4.6 数据的备份和恢复
- 数据备份
su - # 切 root 用户
mysqldump -uroot -pmima db_name > beifen_db.sql;
- 数据恢复
mysqldump -uroot -pmima new_db_name < beifen_db.sql;
5. pymysql数据库编程
利用 pymysql 模块实现 mysql 与 Python 的交互,即利用 py 文件实现上述所有关于数据库的操作,主要流程:

代码示例1:对数据库中的数据进行操作,数据库中无返回值返回
import pymysql

# 1. 创建数据库连接
conn = pymysql.connect(host='localhost', port=3306, user='root', passwd='redhat',
                        db='StudentProject', charset='utf8', autocommit=True)
# 2. 创建游标
cur = conn.cursor()
sql = 'insert into table1(id, count) values(6, "888");'
# 3. 执行sql语句
cur.execute(sql)
# 4. 提交事务
conn.commit()
# 5. 关闭游标
cur.close()
# 6.关闭连接
conn.close()
【改进版代码示例1】即,利用 with + 上下文管理器 实现内存资源的自动管理
import pymysql

'''
原理:
首先,该 enter 和 exit 函数是 connect 类中定义的,也就是说其生成对象为上下文管理器,可配合 with 使用
其次,分析  enter 和 exit 函数得知。当“进入”文件管理器时,返回 cursor 游标对象;当“退出”文件管理器时,会自动进行事务提交
最后,利用 with 实现内存的自动管理,精简代码

def __enter__(self):
    """Context manager that returns a Cursor"""
    warnings.warn(
        "Context manager API of Connection object is deprecated; Use conn.begin()",
        DeprecationWarning)
    return self.cursor()

def __exit__(self, exc, value, traceback):
    """On successful exit, commit. On exception, rollback"""
    if exc:
        self.rollback()
    else:
        self.commit()
'''

# connect类包含魔术方法enter和exit所以,conn对象是一个上下文管理器,可以利用with进行操作
conn = pymysql.connect(host='localhost', port=3306, user='root', passwd='redhat',
                        db='StudentProject', charset='utf8', autocommit=True)
# enter方法返回一个游标对象
with conn as cur:
    sql = 'insert into table1(id, count) values(7, "888");'
    cur.execute(sql)
代码示例2:对数据库中的数据进行查询操作,需要将数据库中的数据返回以进一步处理或显示
import pymysql

# connect类包含魔术方法enter和exit所以,conn对象是一个上下文管理器,可以利用with进行操作
conn = pymysql.connect(host='localhost', port=3306, user='root', passwd='redhat',
                        db='StudentProject', charset='utf8', autocommit=True)
# enter方法返回一个游标对象
with conn as cur:
    query_sql = 'select * from users where name like "uesr%";'
    result = cur.execute(query_sql)
    print('符合条件的记录数:', result)

    # print(cur.fetchone())  # 打印第一条记录
    # print(cur.fetchmany(2)) # 打印第二、三条记录

    user_info = cur.fetchall()

from prettytable import PrettyTable
pt = PrettyTable(field_names=['id', 'name', 'passwd'])
for info in user_info:
    pt.add_row(info)
print(pt)
