文章目录

Jest Github地址
直接访问 https://github.com/searchbox-io/Jest ,把源码拉下来
搭建源码环境
我拉了个5.3.4的版本,最新版本为6.3.1 ,大同小异
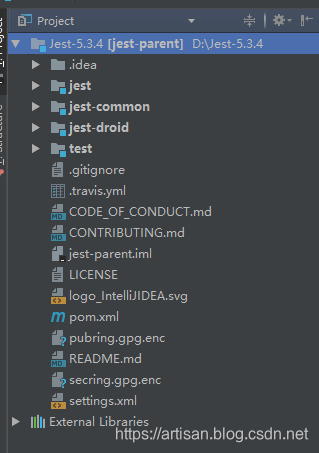
test 这个module是我自己写的测试集群代码,GitHub上是没有这个的 .
Jest配置ES集群
单例Client ,有个属性JestClient ,需要初始化。
package com.artisan.test;

import com.google.gson.GsonBuilder;
import io.searchbox.client.JestClient;
import io.searchbox.client.JestClientFactory;
import io.searchbox.client.config.HttpClientConfig;

import java.util.Arrays;
import java.util.concurrent.TimeUnit;

public class Client {
    // volatile修饰,确保内存可见
    private volatile static Client client = null;
    private static JestClient jestClient;

    /**
     * 私有构造函数
     */
    private Client() {
        initJestClient(); // 初始化JestClient
    }

    /**
     * 懒汉模式
     * double Check
     * @return
     */
    public static Client getInstance() {
        if (client == null) {
            synchronized (Client.class) {
                if (client == null) {
                    client = new Client();
                }
            }
        }
        return client;
    }

    /**
     * 获取JestClient
     * @return
     */
    public static JestClient getJestClient() {
        return jestClient;
    }


    private void initJestClient() {
        // 初始化的集群节点
        String[] serverUris = new String[]{"http://127.0.0.1:9200", "http://127.0.0.1:8200"};
        JestClientFactory factory = new JestClientFactory();
        // 设置HttpClientConfig
        factory.setHttpClientConfig(new HttpClientConfig
                .Builder(Arrays.asList(serverUris))
                .discoveryEnabled(true) // 节点发现,确保访问的节点都是存活的节点,达到高可用
                .discoveryFrequency(2000, TimeUnit.MILLISECONDS) // NodeChecker的执行频率,默认10S
                .gson(new GsonBuilder().setDateFormat("yyyy-MM-dd'T'HH:mm:ss").create())
                .multiThreaded(true)
                .readTimeout(10000)
                .build());
        // 返回jestClient
        jestClient = factory.getObject();
    }
}
测试类
package com.artisan.test;
import io.searchbox.client.JestResult;
import io.searchbox.core.Get;
import java.io.IOException;
public class JestClientTest {
/**
* 构造函数
*/
public JestClientTest() {
Client.getInstance();// 初始化Client
}
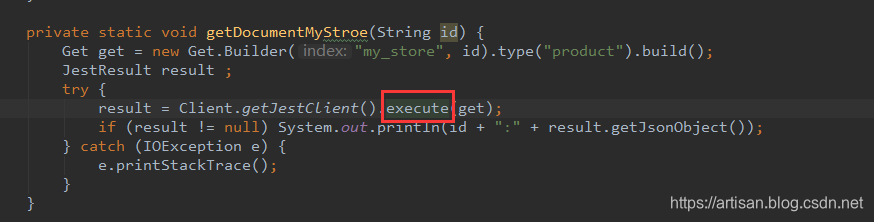
private static void getDocumentMyStroe(String id) {
Get get = new Get.Builder("my_store", id).type("product").build();
JestResult result ;
try {
result = Client.getJestClient().execute(get);
if (result != null) System.out.println(id + ":" + result.getJsonObject());
} catch (IOException e) {
e.printStackTrace();
}
}
public static void main(String[] args) throws Exception {
Thread.sleep(5000);// 先让NodeChecker运行,获取存活的节点,主线程这里先休眠5秒
for (int i = 0; i < Integer.MAX_VALUE; i++) {
Thread.sleep(2000);
getDocumentMyStroe("998");
}
}
}
Jest 配置ES集群,确保应用高可用的原理探究
来看看关键点.discoveryEnabled(true) 都干了啥?
初始化 JestClient
到 JestClientFactory#getObject() 方法 中看下 ,大致说下整个方法的逻辑:
public JestClient getObject() {
// 初始化 JestHttpClient
JestHttpClient client = new JestHttpClient();
if (httpClientConfig == null) {
log.debug("There is no configuration to create http client. Going to create simple client with default values");
httpClientConfig = new HttpClientConfig.Builder("http://localhost:9200").build();
}
client.setRequestCompressionEnabled(httpClientConfig.isRequestCompressionEnabled());
// 初始化的es集群节点
client.setServers(httpClientConfig.getServerList());
// 设置HttpClient、AsyncClient
final HttpClientConnectionManager connectionManager = getConnectionManager();
final NHttpClientConnectionManager asyncConnectionManager = getAsyncConnectionManager();
client.setHttpClient(createHttpClient(connectionManager));
client.setAsyncClient(createAsyncHttpClient(asyncConnectionManager));
// 设置自定义的Gson
Gson gson = httpClientConfig.getGson();
if (gson == null) {
log.info("Using default GSON instance");
} else {
log.info("Using custom GSON instance");
client.setGson(gson);
}
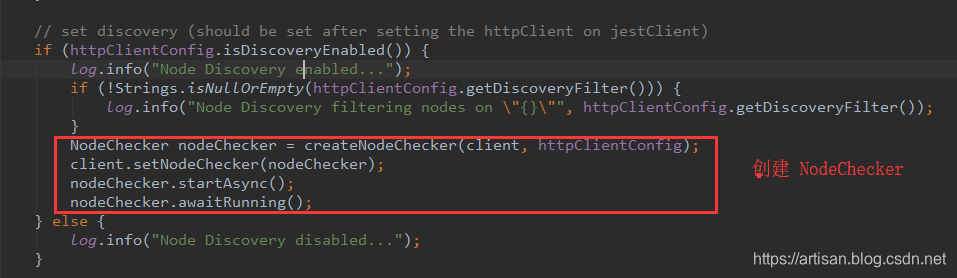
// 创建NodeChecker并启动Node Discovery
// set discovery (should be set after setting the httpClient on jestClient)
if (httpClientConfig.isDiscoveryEnabled()) {
log.info("Node Discovery enabled...");
if (!Strings.isNullOrEmpty(httpClientConfig.getDiscoveryFilter())) {
log.info("Node Discovery filtering nodes on \"{}\"", httpClientConfig.getDiscoveryFilter());
}
NodeChecker nodeChecker = createNodeChecker(client, httpClientConfig);
client.setNodeChecker(nodeChecker);
nodeChecker.startAsync();
nodeChecker.awaitRunning();
} else {
log.info("Node Discovery disabled...");
}
// 如果maxConnectionIdleTime大于0则会创建IdleConnectionReaper,进行Idle connection reaping (空闲线程回收)
// schedule idle connection reaping if configured
if (httpClientConfig.getMaxConnectionIdleTime() > 0) {
log.info("Idle connection reaping enabled...");
IdleConnectionReaper reaper = new IdleConnectionReaper(httpClientConfig, new HttpReapableConnectionManager(connectionManager, asyncConnectionManager));
client.setIdleConnectionReaper(reaper);
reaper.startAsync();
reaper.awaitRunning();
} else {
log.info("Idle connection reaping disabled...");
}
Set<HttpHost> preemptiveAuthTargetHosts = httpClientConfig.getPreemptiveAuthTargetHosts();
if (!preemptiveAuthTargetHosts.isEmpty()) {
log.info("Authentication cache set for preemptive authentication");
client.setHttpClientContextTemplate(createPreemptiveAuthContext(preemptiveAuthTargetHosts));
}
return client;
}
重点看下 discoveryEnable 设置为true的情况下,Jest的处理逻辑
NodeChecker 源码分析
NodeChecker继承了com.google.common.util.concurrent.AbstractScheduledService,
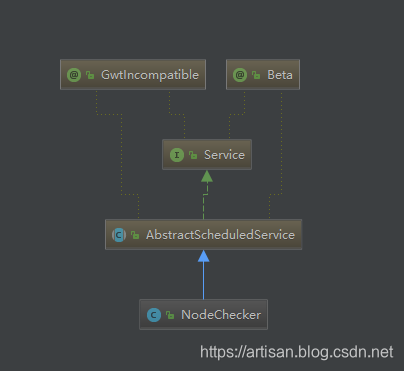
它的构造器根据clientConfig的discoveryFrequency及discoveryFrequencyTimeUnit了fixedDelayScheduler来执行node checker;
public NodeChecker(JestClient jestClient, ClientConfig clientConfig) {

       // 构建action ,可以根据前面HttpClientConfig#discoveryFilter(String discoveryFilter) 添加Node
        action = new NodesInfo.Builder()
                .withHttp()
                .addNode(clientConfig.getDiscoveryFilter())
                .build();
        this.client = jestClient;
        this.defaultScheme = clientConfig.getDefaultSchemeForDiscoveredNodes();

		// 根据discoveryFrequency(2000, TimeUnit.MILLISECONDS) 实例化一个定时任务出来 使用的Google Guava的包
        this.scheduler = Scheduler.newFixedDelaySchedule(
                0l,
                clientConfig.getDiscoveryFrequency(),
                clientConfig.getDiscoveryFrequencyTimeUnit()
        );

       // 初始化的根节点
        this.bootstrapServerList = ImmutableSet.copyOf(clientConfig.getServerList());

	   // 实例化 discoveredServerList  为空,后续使用
        this.discoveredServerList = new LinkedHashSet<String>();
    }
实现了runOneIteration方法,该方法主要是发送NodesInfo请求 GET /_nodes/_all/http
@Override
protected void runOneIteration() throws Exception {
JestResult result;
try {
result = client.execute(action);
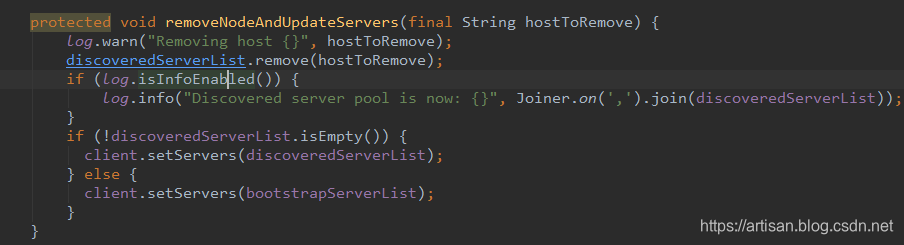
} catch (CouldNotConnectException cnce) {
// Can't connect to this node, remove it from the list
log.error("Connect exception executing NodesInfo!", cnce);
removeNodeAndUpdateServers(cnce.getHost());
return;
// do not elevate the exception since that will stop the scheduled calls.
// throw new RuntimeException("Error executing NodesInfo!", e);
} catch (Exception e) {
log.error("Error executing NodesInfo!", e);
client.setServers(bootstrapServerList);
return;
// do not elevate the exception since that will stop the scheduled calls.
// throw new RuntimeException("Error executing NodesInfo!", e);
}
if (result.isSucceeded()) {
LinkedHashSet<String> httpHosts = new LinkedHashSet<String>();
JsonObject jsonMap = result.getJsonObject();
JsonObject nodes = (JsonObject) jsonMap.get("nodes");
if (nodes != null) {
for (Entry<String, JsonElement> entry : nodes.entrySet()) {
JsonObject host = entry.getValue().getAsJsonObject();
JsonElement addressElement = null;
if (host.has("version")) {
int majorVersion = Integer.parseInt(Splitter.on('.').splitToList(host.get("version").getAsString()).get(0));
if (majorVersion >= 5) {
JsonObject http = host.getAsJsonObject("http");
if (http != null && http.has(PUBLISH_ADDRESS_KEY_V5))
addressElement = http.get(PUBLISH_ADDRESS_KEY_V5);
}
}
if (addressElement == null) {
// get as a JsonElement first as some nodes in the cluster may not have an http_address
if (host.has(PUBLISH_ADDRESS_KEY)) addressElement = host.get(PUBLISH_ADDRESS_KEY);
}
if (addressElement != null && !addressElement.isJsonNull()) {
String httpAddress = getHttpAddress(addressElement.getAsString());
if(httpAddress != null) httpHosts.add(httpAddress);
}
}
}
if (log.isDebugEnabled()) {
log.debug("Discovered {} HTTP hosts: {}", httpHosts.size(), Joiner.on(',').join(httpHosts));
}
discoveredServerList = httpHosts;
client.setServers(discoveredServerList);
} else {
log.warn("NodesInfo request resulted in error: {}", result.getErrorMessage());
client.setServers(bootstrapServerList);
}
}
- 请求成功的话 解析body,如果nodes下面有version,取第一位,判断大于等于5的话则取http节点下面的PUBLISH_ADDRESS_KEY_V5[publish_address]属性值,封装成http后添加到discoveredServerList ,供请求获取URL使用。(里面都是存活的节点),如果没有取到,则取
PUBLISH_ADDRESS_KEY[http_address]属性值,封装成http后添加到discoveredServerList。 - 请求抛出CouldNotConnectException则调用removeNodeAndUpdateServers方法移除该host;如果抛出其他的Exception则将client的servers重置为bootstrapServerList
发起请求的过程
执行的execute方法。Client.getJestClient 返回的是 JestClient接口

看下 JestHttpClient#execute
 /**
     * @throws IOException in case of a problem or the connection was aborted during request,
     *                     or in case of a problem while reading the response stream
     * @throws CouldNotConnectException if an {@link HttpHostConnectException} is encountered
     */
    @Override
    public <T extends JestResult> T execute(Action<T> clientRequest) throws IOException {
        return execute(clientRequest, null);
    }
继续
public <T extends JestResult> T execute(Action<T> clientRequest, RequestConfig requestConfig) throws IOException {
      // 获取 HttpUriRequest

        HttpUriRequest request = prepareRequest(clientRequest, requestConfig);
        CloseableHttpResponse response = null;
        try {
            response = executeRequest(request);
            return deserializeResponse(response, request, clientRequest);
        } catch (HttpHostConnectException ex) {
            throw new CouldNotConnectException(ex.getHost().toURI(), ex);
        } finally {
            if (response != null) {
                try {
                    response.close();
                } catch (IOException ex) {
                    log.error("Exception occurred while closing response stream.", ex);
                }
            }
        }
    }
重点来了
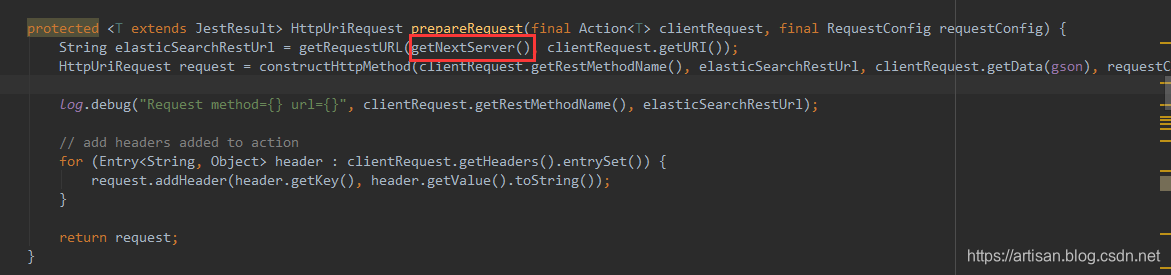
HttpUriRequest request = prepareRequest(clientRequest, requestConfig);
继续跟到prepareRequest
   protected <T extends JestResult> HttpUriRequest prepareRequest(final Action<T> clientRequest, final RequestConfig requestConfig) {
        String elasticSearchRestUrl = getRequestURL(getNextServer(), clientRequest.getURI());
        HttpUriRequest request = constructHttpMethod(clientRequest.getRestMethodName(), elasticSearchRestUrl, clientRequest.getData(gson), requestConfig);

        log.debug("Request method={} url={}", clientRequest.getRestMethodName(), elasticSearchRestUrl);

        // add headers added to action
        for (Entry<String, Object> header : clientRequest.getHeaders().entrySet()) {
            request.addHeader(header.getKey(), header.getValue().toString());
        }

        return request;
    }
重点: getNextServer()
/**
* @throws io.searchbox.client.config.exception.NoServerConfiguredException
*/
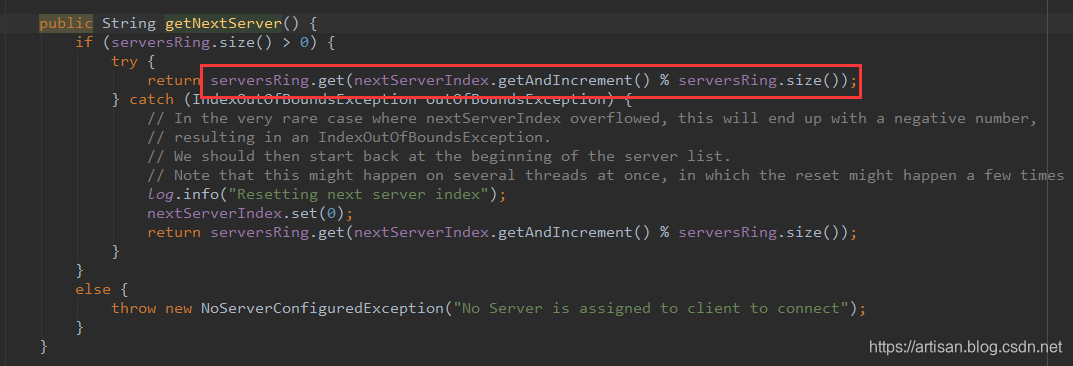
protected String getNextServer() {
return serverPoolReference.get().getNextServer();
}
继续
总结一下:
- JestHttpClient继承了AbstractJestClient,它的execute及executeAsync方法都调用了prepareRequest来构造HttpUriRequest;
- prepareRequest方法会先调用getNextServer方法来获取要请求的elasticSearchServer的地址;
- 而getNextServer方法则是调用的serverPoolReference.get().getNextServer()
- 看看 serverPoolReference 是个啥?
 private final AtomicReference<ServerPool> serverPoolReference =
            new AtomicReference<ServerPool>(new ServerPool(ImmutableSet.<String>of()));
- 再看看刚才NodeChecker 处理完成后调用的
client.setServers(discoveredServerList);
到 AbstractJestClient 类中看下 setServers方法
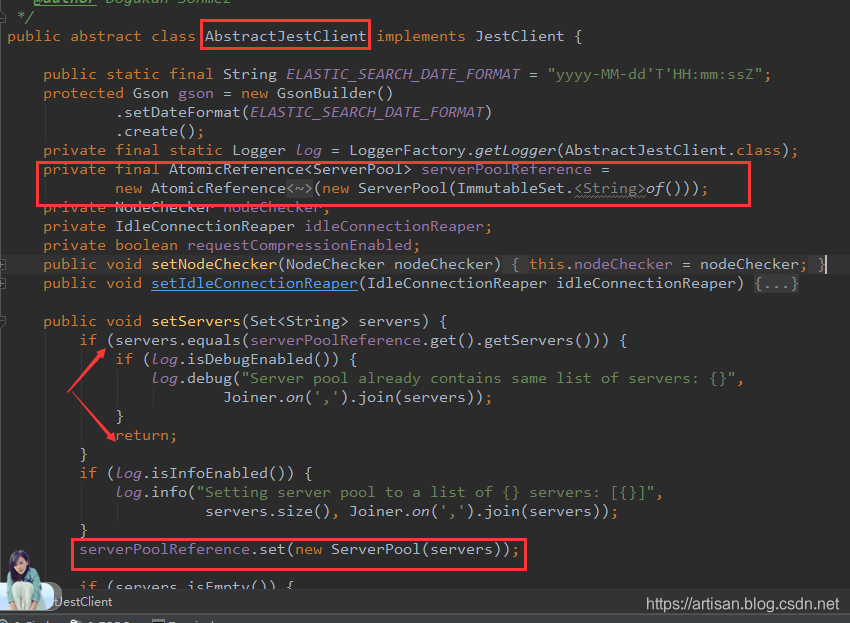
AbstractJestClient有一个serverPoolReference属性,AtomicReference,其泛型为ServerPool;setServers方法则是创建新的ServerPool,然后更新serverPoolReference
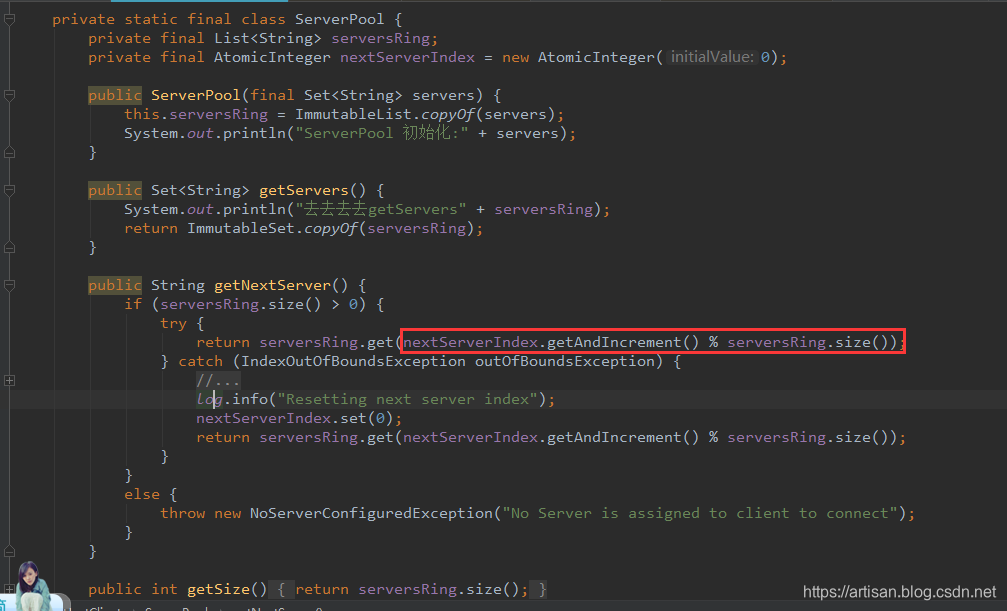
ServerPool有个AtomicInteger类型的nextServerIndex,getNextServer方法则是通过nextServerIndex.getAndIncrement() % serversRing.size()来确定取的serversRing这个List的index,其实现的是Round Robin策略;极端情况下出现IndexOutOfBoundsException的话,则会重置nextServerIndex为0,然后继续按Round Robin策略取下一个server
是不是就对上了? NodeChecker负责更新,execute则从里面取,所里取出来的都是 存活的节点。 这样就做到了动态的发现。
节点上线后,自动发送到该节点,节点挂掉后,能自动移除。 全称无需干预。
再说一点, NodeChecker有个执行频率, 确保这个执行完了以后,再请求ES。 举个例子,比如3个节点,你启动应用的时候,正好有一个节点是挂掉的,而且正常的业务请求正好请求到了这个坏的节点上,是不是就挂了。 如果NodeChecker执行完以后,那取出的节点肯定是都是存活的。
遇到的问题
说下背景, 老项目 升级 , 以前是 单个ES节点,所以 没有配置 集群,且Jest版本为Jdk1.7
初始化JestClient如下
  JestClientFactory factory = new JestClientFactory();
        factory.setHttpClientConfig(new  HttpClientConfi.Builder("http://127.0.0.1:9200")

.gson(new GsonBuilder().setDateFormat("yyyy-MM-dd'T'HH:mm:ss").create())
                .multiThreaded(true)
                .readTimeout(10000)
                .build());

        jestClient = factory.getObject();
配置连接集群的地址,最重要的一行代码,增加 .discoveryEnabled(true)
用的是2.4.0的版本, 升级到了5.3.4以后,去debug jest的源码的时候,打上的断点,总和是源码对不起来 … 结果是 IDEA 发布的Tomcat工程路径中 老的2.4.0的jar包还在原来的目录下面,导致Tomcat加载了2.4.0 jar包中的类,删除老的jar包,重新编译测试,通过。
做了几件事儿
- 升级JDK到1.8
- Jest 升级到 5.3.4
- 依赖的Guava升级到了19.0
- 应用启动的时候,初始化那个地方休眠了一下,让NodeChecker先跑起来,确保请求不会打到话的节点上。
感兴趣的同学,用我上面提供的测试代码测试即可。
