开发安卓APP的五种框架界面设计
开发安卓app,我们需要美观的界面,然后这些界面,我们必须要掌握的就是对应的框架布局,本次博客,我们将进行app界面的五种框架布局,并给出对应的界面设计的例子
(一)、线性布局框架
1、简单介绍如下:
2、实例如下:
计算器的布局
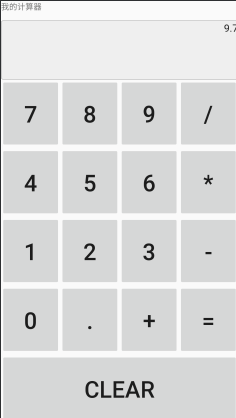
<?xml version="1.0" encoding="utf-8"?>
<LinearLayout xmlns:android="http://schemas.android.com/apk/res/android"
xmlns:tools="http://schemas.android.com/tools"
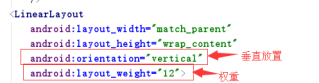
android:layout_width="match_parent"
android:layout_height="match_parent"
android:orientation="vertical"
android:layout_weight="12"
tools:context=".work1">
<TextView
android:layout_width="match_parent"
android:layout_height="wrap_content"
android:layout_weight="1"
android:text="@string/work1"/>
<EditText
android:layout_width="match_parent"
android:layout_height="wrap_content"
android:layout_weight="5"
android:text="9.7"
android:inputType="none"
android:gravity="right"
android:background="@drawable/edit_bg"/>
<LinearLayout
android:layout_width="match_parent"
android:layout_height="wrap_content"
android:orientation="horizontal"
android:layout_weight="3">
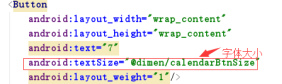
<Button
android:layout_width="match_parent"
android:layout_height="match_parent"
android:layout_weight="1"
android:textSize="@dimen/Size"
android:text="7"/>
<Button
android:layout_width="match_parent"
android:layout_height="match_parent"
android:textSize="@dimen/Size"
android:layout_weight="1"
android:text="8"/>
<Button
android:layout_width="match_parent"
android:layout_height="match_parent"
android:textSize="@dimen/Size"
android:layout_weight="1"
android:text="9"/>
<Button
android:layout_width="match_parent"
android:layout_height="match_parent"
android:textSize="@dimen/Size"
android:layout_weight="1"
android:text="/"/>
</LinearLayout>
<LinearLayout
android:layout_width="match_parent"
android:layout_height="wrap_content"
android:orientation="horizontal"
android:layout_weight="3">
<Button
android:layout_width="match_parent"
android:layout_height="match_parent"
android:layout_weight="1"
android:textSize="@dimen/Size"
android:text="4"/>
<Button
android:layout_width="match_parent"
android:layout_height="match_parent"
android:textSize="@dimen/Size"
android:layout_weight="1"
android:text="5"/>
<Button
android:layout_width="match_parent"
android:layout_height="match_parent"
android:textSize="@dimen/Size"
android:layout_weight="1"
android:text="6"/>
<Button
android:layout_width="match_parent"
android:layout_height="match_parent"
android:textSize="@dimen/Size"
android:layout_weight="1"
android:text="*"/>
</LinearLayout>
<LinearLayout
android:layout_width="match_parent"
android:layout_height="wrap_content"
android:orientation="horizontal"
android:layout_weight="3">
<Button
android:layout_width="match_parent"
android:layout_height="match_parent"
android:textSize="@dimen/Size"
android:layout_weight="1"
android:text="1"/>
<Button
android:layout_width="match_parent"
android:layout_height="match_parent"
android:textSize="@dimen/Size"
android:layout_weight="1"
android:text="2"/>
<Button
android:layout_width="match_parent"
android:layout_height="match_parent"
android:layout_weight="1"
android:textSize="@dimen/Size"
android:text="3"/>
<Button
android:layout_width="match_parent"
android:layout_height="match_parent"
android:layout_weight="1"
android:textSize="@dimen/Size"
android:text="-"/>
</LinearLayout>
<LinearLayout
android:layout_width="match_parent"
android:layout_height="wrap_content"
android:orientation="horizontal"
android:layout_weight="3">
<Button
android:layout_width="match_parent"
android:layout_height="match_parent"
android:layout_weight="1"
android:textSize="@dimen/Size"
android:text="0"/>
<Button
android:layout_width="match_parent"
android:layout_height="match_parent"
android:layout_weight="1"
android:textSize="@dimen/Size"
android:text="."/>
<Button
android:layout_width="match_parent"
android:layout_height="match_parent"
android:layout_weight="1"
android:textSize="@dimen/Size"
android:text="+"/>
<Button
android:layout_width="match_parent"
android:layout_height="match_parent"
android:layout_weight="1"
android:textSize="@dimen/Size"
android:text="="/>
</LinearLayout>
<Button
android:layout_width="match_parent"
android:layout_height="wrap_content"
android:text="CLEAR"
android:textSize="@dimen/Size"
android:layout_weight="3"/>
</LinearLayout>
(二)、框架布局框架
1、简单介绍如下:

2、实例如下:
播放视频的界面设计:

<?xml version="1.0" encoding="utf-8"?>
<LinearLayout xmlns:android="http://schemas.android.com/apk/res/android"
    xmlns:tools="http://schemas.android.com/tools"
    android:layout_width="match_parent"
    android:orientation="vertical"
    android:layout_weight="12"
    android:layout_height="match_parent"
    tools:context=".work2">
    <FrameLayout
        android:layout_width="match_parent"
        android:layout_height="match_parent">
        <ImageView
            android:layout_width="match_parent"
            android:layout_height="match_parent"
            android:layout_gravity="center"
            android:src="@drawable/view4"/>
        <ImageView
            android:layout_width="80dp"
            android:layout_height="80dp"
            android:id="@+id/play"
            android:layout_marginTop="480dp"
            android:layout_marginLeft="249dp"
            android:visibility="visible"
            android:src="@drawable/play"/>
    </FrameLayout>

</LinearLayout>
(三)、表格布局框架
1、简单介绍如下:
有多少个TableRow对象就有多少行,
列数等于最多子控件的TableRow的列数
直接在TableLayout加控件,控件会占据一行
TableLayout属性(也叫全局属性):*代表所有列
android:shrinkColumns -------设置可收缩的列,(内容过多,则收缩,扩展到第二行,控件没布满TableLayout时不起作用)
android:stretchColumns ------设置可伸展的列,(有空白则填充)
列可以同时具备stretchColumns及shrinkColumns属性
android:collapseColumns ------设置要隐藏的列(索引列从0开始)
内部控件属性:
android:layout_column -------该单元格在第几列显示
android:layout_span -------该单元格占据列数,默认为1
2、实例如下:

<?xml version="1.0" encoding="utf-8"?>
<LinearLayout xmlns:android="http://schemas.android.com/apk/res/android"
    xmlns:tools="http://schemas.android.com/tools"
    android:layout_width="match_parent"
    android:orientation="vertical"
    android:layout_weight="5"
    android:layout_height="match_parent"
    tools:context=".work4">
    <TableLayout
        android:layout_width="match_parent"
        android:layout_height="wrap_content"
        android:background="#FF4081"
        android:layout_weight="4"
        android:shrinkColumns="0,1,2">
        <Button
            android:text="我独占一行"/>
        <TableRow
            android:layout_weight="1">
            <Button
                android:layout_width="match_parent"
                android:layout_height="match_parent"
                android:text="0000000000000000"
                android:textSize="20dp"/>
            <Button
                android:layout_width="match_parent"
                android:layout_height="match_parent"
                android:text="1111111111111111"
                android:textSize="20dp"/>
            <Button
                android:layout_width="match_parent"
                android:layout_height="match_parent"
                android:text="2222222222222222"
                android:textSize="20dp"/>
        </TableRow>
        <TableRow
            android:layout_weight="1">
            <Button
                android:layout_width="match_parent"
                android:layout_height="match_parent"
                android:text="2222222222222222"
                android:textSize="20dp"/>
            <Button
                android:layout_width="match_parent"
                android:layout_height="wrap_content"
                android:layout_span="2"
                android:text="我占两列"
                android:textSize="20dp"/>
        </TableRow>
    </TableLayout>
    <TableLayout
        android:layout_width="match_parent"
        android:layout_height="wrap_content"
        android:background="#ffcd6b"
        android:shrinkColumns="0,1"
        android:stretchColumns="0,1">
        <TableRow>
            <Button
                android:layout_width="wrap_content"
                android:layout_height="wrap_content"
                android:text="填充一"/>
            <Button
                android:layout_width="wrap_content"
                android:layout_height="wrap_content"
                android:text="填充二"/>
            <Button
                android:layout_width="wrap_content"
                android:layout_height="wrap_content"
                android:text="普通三"/>
        </TableRow>
    </TableLayout>
    <TableLayout
        android:layout_width="match_parent"
        android:layout_height="wrap_content"
        android:shrinkColumns="0,1,2"
        android:layout_weight="5"
        android:stretchColumns="0,1,2">
        <TableRow>
            <ImageView
                android:layout_width="100dp"
                android:layout_height="100dp"
                android:src="@drawable/pto5"/>
            <ImageView
                android:layout_width="100dp"
                android:layout_height="100dp"
                android:src="@drawable/pto6"/>
            <ImageView
                android:layout_width="100dp"
                android:layout_height="100dp"
                android:src="@drawable/pto7"/>
        </TableRow>
    </TableLayout>
</LinearLayout>
(四)、绝对布局框架
1、简单介绍如下:

AbsoluteLayout(绝对布局)
又可以叫做坐标布局,可以直接指定子元素的绝对位置(xy)
由于手机屏幕尺寸差别比较大
使用绝对定位的适应性会比较差,在屏幕的适配上有缺陷
AbsoluteLayout子类控件的属性
android:layout_x=”35dip” 控制当前子类控件的x位置
android:layout_y=”40dip” 控制当前子类控件的y位置
2、实例如下:
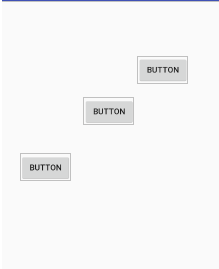
<?xml version="1.0" encoding="utf-8"?>
<AbsoluteLayout xmlns:android="http://schemas.android.com/apk/res/android"
    android:layout_width="match_parent" android:layout_height="match_parent">
    <Button
        android:id="@+id/button"
        android:layout_width="wrap_content"
        android:layout_height="wrap_content"
        android:layout_x="236dp"
        android:layout_y="94dp"
        android:text="Button" />
    <Button
        android:id="@+id/button2"
        android:layout_width="wrap_content"
        android:layout_height="wrap_content"
        android:layout_x="143dp"
        android:layout_y="166dp"
        android:text="Button" />
    <Button
        android:id="@+id/button3"
        android:layout_width="wrap_content"
        android:layout_height="wrap_content"
        android:layout_x="33dp"
        android:layout_y="263dp"
        android:text="Button" />
</AbsoluteLayout>
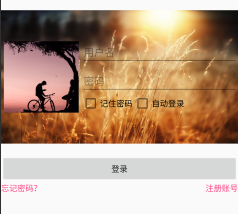
(五)、相对布局框架
1、简单介绍如下:
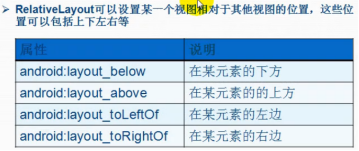
2、实例如下:
<?xml version="1.0" encoding="utf-8"?>
<LinearLayout xmlns:android="http://schemas.android.com/apk/res/android"
    xmlns:tools="http://schemas.android.com/tools"
    android:layout_width="match_parent"
    android:orientation="vertical"
    android:layout_weight="12"
    android:layout_height="wrap_content"
    tools:context=".work3">
    <RelativeLayout
        android:layout_width="match_parent"
        android:layout_weight="8"
        android:layout_height="wrap_content">
        <ImageView
            android:layout_width="match_parent"
            android:layout_height="wrap_content"
            android:id="@+id/back"
            android:src="@drawable/pto4" />
        <ImageView
            android:layout_width="130dp"
            android:layout_height="130dp"
            android:id="@+id/pto"
            android:layout_marginTop="70dp"
            android:layout_marginLeft="5dp"
            android:src="@drawable/pto"/>
        <EditText
            android:layout_width="match_parent"
            android:layout_height="wrap_content"
            android:id="@+id/edit"
            android:layout_marginTop="70dp"
            android:hint="@string/work31"
            android:layout_marginLeft="5dp"
            android:layout_toRightOf="@id/pto"/>
        <EditText
            android:layout_width="match_parent"
            android:layout_height="wrap_content"
            android:id="@+id/edit1"
            android:hint="@string/work32"
            android:inputType="textPassword"
            android:layout_marginTop="120dp"
            android:layout_marginLeft="5dp"
            android:layout_toRightOf="@id/pto"/>
        <CheckBox
            android:layout_width="90dp"
            android:layout_height="wrap_content"
            android:id="@+id/left"
            android:layout_toRightOf="@id/pto"
            android:layout_marginLeft="5dp"
            android:text="记住密码"
            android:layout_below="@+id/edit1"/>
        <CheckBox
            android:layout_width="90dp"
            android:layout_height="wrap_content"
            android:layout_below="@+id/edit1"
            android:id="@+id/right1"
            android:layout_toRightOf="@+id/left"
            android:text="自动登录"
           />
    </RelativeLayout>
     <Button
         android:layout_width="match_parent"
         android:layout_height="wrap_content"
         android:text="登录"/>
    <LinearLayout
        android:layout_width="match_parent"
        android:layout_height="wrap_content"
        android:orientation="horizontal">
        <TextView
            android:layout_width="match_parent"
            android:layout_weight="1"
            android:layout_height="wrap_content"
            android:textColor="#FF4081"
            android:text="忘记密码?"/>
        <TextView
            android:layout_width="match_parent"
            android:layout_weight="1"
            android:layout_height="wrap_content"
            android:textColor="#FF4081"
            android:gravity="right"
            android:text="注册账号"/>
    </LinearLayout>
</LinearLayout>
本次博客的页面布局框架就讲解到这里哦,感谢大家查看,记得点赞留言评论哦!
