一、什么是web应用安全,为了安全我们要做哪些事情?
保护web资源不受侵害(资源:用户信息、用户财产、web数据信息等)
对访问者的认证、授权,指定的用户才可以访问资源
访问者的信息及操作得到保护(xss csrf sql注入等)
开发中我们需要注意的项:
1. 【高危】网络关键数据传输加密
1. 【高危】站点使用https方式部署
2. 【高危】文件传输时,过滤与业务无关的文件类型
3. 【高危】接口开发,应预防泄露敏感数据
4. 【高危】预防url中带url跳转参数
5. 【中危】预防CSRF攻击
6. 【中危】预防短信恶意重发
7. 【中危】预防暴力破解图片验证码
8. 【低危】通过httponly预防xss盗取cookie信息
9. 【低危】设置http协议安全的报文头属性
......
二、为什么要聊spring security?
spring security在很多安全防护上很容易实现
理解spring security的抽象有助于养成面向对象思维
可以为理解spring security oauth2做铺垫
三、先搞清楚两大概念:认证、授权
Application security boils down to two more or less independent problems: authentication (who are you?) and authorization (what are you allowed to do?).(摘自spring官网 《Spring Security Architecture》)
简单点出发,认证和授权可以理解为登录和权限验证
认证
首先试想一下我们自己实现登陆,通常需要做些什么?
1.输入用户名密码、验证码提交给后端
2.用户名密码与数据库的进行匹配验证
3.验证前可以先把用户信息通过用户名查出来,看看用户状态是否可用等
4.传递到后端的密码可能需要加密后再与数据库里的密码进行匹配
5.数据库里的密码可能是加盐存储的,这样我们传递进来的密码还要进行加盐加密,加盐一般都是用户表里的数据,即还是可能要提前通过用户名查询用户信息(用户名加盐可以不用提前查库)
6.登录成功后,可以把用户信息存储到cookie,下次直接提取cookie信息进行登录(即remember-me登录)安全系数稍低,例如电商网站也可通过cookie登录查看订单列表,但是下单支付时还是要重新登录
7.可能网站有多个登录入口,多种登录方式,用户名密码方式、短信验证码方式等
8.登录成功后自动跳转到主页或者提示成功信息,登录失败跳转到失败页或者提示失败信息
9.退出登录功能,清空session
简单的进行抽象

认证拦截器、用户信息服务
【认证拦截器】我们用户名密码的认证可以做成一个filter也可以做成一个servlet
1.提取用户名密码参数信息
2.通过用户名获取用户信息,判断用户是否可用等
3.通过密码加密器把密码参数进行加密然后与查出来的密码进行匹配,判断是否认证通过
4.认证成功或者认证失败的后续处理
【用户信息服务】通过用户名获取用户信息,但是这个只是一个方法,需要提供一个userservice来存放
问题:
这里只是单单考虑用户名密码登录,如果现在要做手机号验证码登录呢?再加一个认证拦截器?
这样往后会衍生出很多个拦截器,如果是filter实现方式的话就会有多个filter,如果是servlet实现方式则会有多个servlet,如果从做成公用的中间件来提供使用的话,怎样才是最好的方式?
认证提供者
如果是做成中间件的话,占用用户的多个地址无疑是一个缺点
如果认证拦截器只使用一个,然后把认证这块的业务进行打包,抽象出一个【认证提供者】,其子类有【用户名密码认证提供者 】、【手机号验证码认证提供者】供我们使用,手机号验证码认证提供者同样可以使用【用户信息服务】【认证失败处理器】【认证成功处理器】
这样是否会更好?
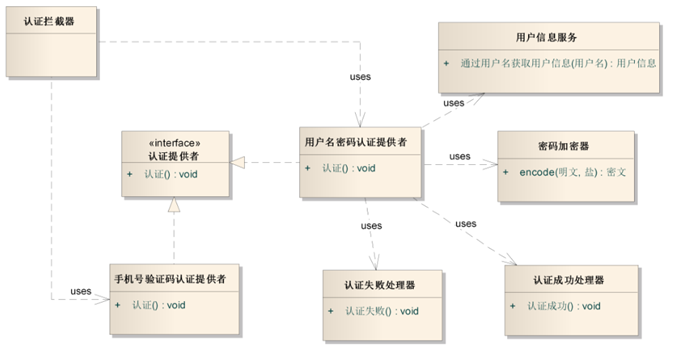
但是认证拦截器这里要做判断,要通过请求参数来判断使用哪种认证提供者
认证管理者
我们干脆把这个事情也抽象出来,让【认证管理者】去做这个事情,如下:
认证拦截器只需要一个认证管理者,认证管理者可以有0-n个认证提供者,为什么可以0个呢,因为认证管理者本身也可以干认证这个事情,只不过他可以交给对应的认证提供者也可以自己干这个事情
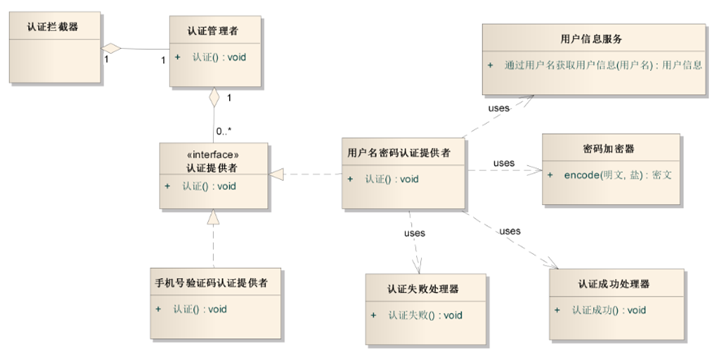
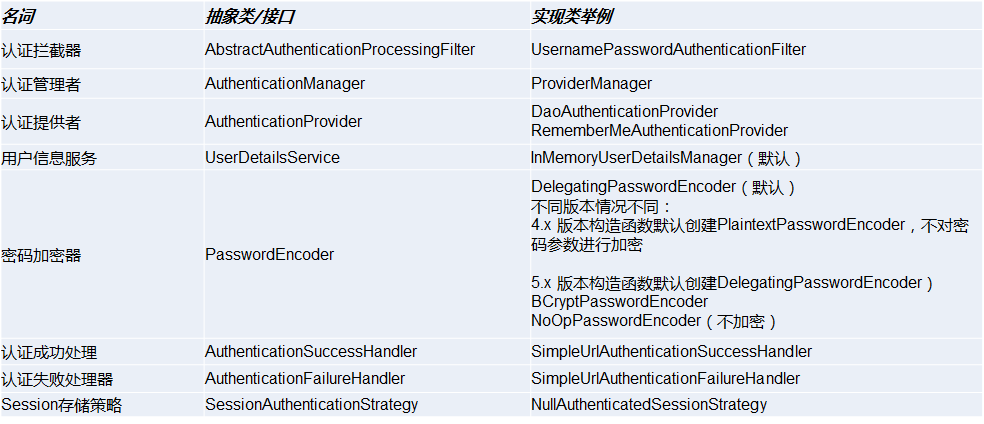
与spring security对号入座
授权
什么是授权(权限验证)?
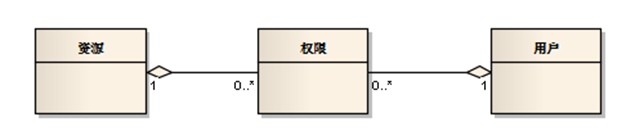
授权即判断用户是否有访问某资源的权限,资源对于我们web应用来说就是url,每一个controller里的action对应的request mapping的url
资源:web应用的每一个url
权限:用户能够访问某个资源的凭证,可以是一个变量字符,也可以是角色名,是用户与资源相关联的中间产物
试想一下我们自己实现权限验证,通常需要做些什么?
1.【授权拦截器】拦截需要授权的资源【受保护的资源】
2.【公开资源】放行静态资源文件和不用授权的页面,例如登录界面
3.有些资源可以某个角色能够访问,有些资源需要某个权限才可以访问
4.有些资源remember-me登录的能访问,有些资源必须重新输入密码登录才能访问,例5.如电商网站查看订单就不用重新登录,下单就需要,即划分了不同的安全级别
6.web界面上菜单按钮的显示与隐藏控制
授权拦截器
拦截所有请求还是只拦截受保护的资源请求?
方案一:只拦截受保护的资源请求
【授权拦截器】怎么拦截【受保护的资源】不拦截【公开资源】呢?
这还不简单,在项目启动时把受保护的资源动态添加到filter-mapping不就行了?
类似如下伪代码:
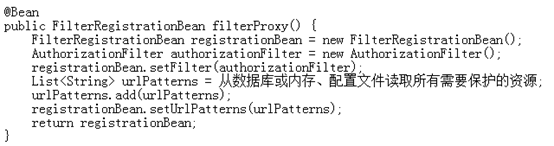
这样【公开资源】不被拦截、【受保护的资源】被拦截,一举两得!
但是问题来了,授权应用上线后运行正常,一段时间后,我们需要增加受保护的资源,比如子应用上线了,子应用是物理上另外一个单独的应用,通过nginx挂载在同域名/module1目录下,这时数据库增加资源配置后,但是filter不生效,因为filter在应用启动的时候已经注册了,这里没法增加urlpattern了,最简单的办法只能是重启授权应用
方案二:拦截所有资源请求
【授权拦截器】拦截所有请求/*,当请求过来时,只需要判断当前请求是否是【公开资源】(公开资源可以动态从配置取也可以从数据库去取),是则直接放行,不在公开资源范围则走授权流程
两个方案对比来说,在不考虑性能消耗的情况下(也消耗不了多少性能),无疑方案二更安全更适合扩展
spring security也是采用的方案二,在拦截所有请求后,可以动态的加载受保护的资源配置,再进行处理
授权拦截器拦截到资源请求后,要做的就是授权
1.通过当前请求的资源获取权限列表
2.获取用户的权限,我们需要从session持久化的地方去取用户的权限信息,有统一的地方去存取,后面我们会讲到,不在这里展开
循环资源的权限
循环用户的权限
判断用户是否拥有该资源的权限
资源对应权限是1对1
那么我们的系统就简单很多
直接通过资源获取到权限,然后判断用户是否有该权限则可以判断是否授权通过
资源对应权限是1对0
在用户登录情况下,我们是授权通过还是拒绝呢,这个取决于我们自己,可以通过配置去设定,spring security当然也是支持我们这么做的
FilterSecurityInterceptor.setRejectPublicInvocations(true) 默认是false
资源对应权限是1对多

那么授权这里我们应该需要这么干:
int hasAuthorities=0
循环资源的权限(5个)
   循环用户的权限,用户有该资源权限则hasAuthorities +1
最后得到的结果是:
资源对应权限个数是5
用户拥有权限个数是2
到底是能访问呢还是不能访问呢,即授权结果是通过还是不通过?
仔细看上图其实发现ROLE_开头的有两个,是同一类型的权限,其他3个是不同类型,按道理一个正常用户即是管理员又是新闻编辑角色的可能几乎不可能,正常来说一个用户只有一个角色,其他类型的权限也同理,如果按权限类型来分,应该是4类权限,那么用户就拥有2类,应该是 4:2才对
所里这里涉及到两个问题:
资源的权限应该按分类来进行计数(即ROLE开头的归为一类,不管资源拥有几个,只要用户有一个都计数1)
权限的分类:角色、操作、IP、认证模式等
授权的决策
一票通过,即用户拥有一类权限即通过
全票通过,即用户拥有所有权限分类才通过
少数服从多数,即用户拥有的权限分类必须大于没有的分类
例如对应上面的4:2,
一票通过:通过
全票通过:拒绝
少数服从多数:2=2 我们可以设置相同时的处理逻辑,通过或拒绝,spring security默认相同是通过
授权决策者、授权投票者
授权的决策我们交给【授权决策者】,投票我们交给【授权投票者】

与spring security对号入座

恭喜,你已经搞清楚filter chain中最关键的两个filter了
Security filter chain: [
...
AuthenticationProcessingFilter
...
FilterSecurityInterceptor
]
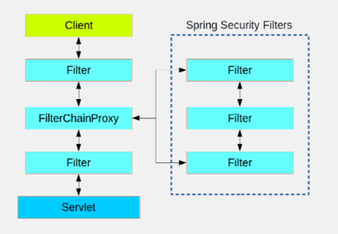
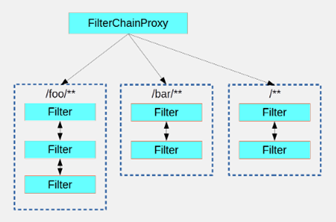
四、spring security的filter chain
filter chain的概念
关于filter chain的概念我们就不做多的解释,最下面的加载流程图里也有说明


@EnableWebSecurity(debug = true)
把debug日志打出来后,每次请求都可以看到完整的filterchain,方便我们去理解和吸收
Security filter chain: [
WebAsyncManagerIntegrationFilter
SecurityContextPersistenceFilter
HeaderWriterFilter
LogoutFilter
AuthenticationProcessingFilter
RequestCacheAwareFilter
SecurityContextHolderAwareRequestFilter
AnonymousAuthenticationFilter
SessionManagementFilter
ExceptionTranslationFilter
FilterSecurityInterceptor
]
如何使用filter chain中的filter
主要还是增加自己的实现,或者基于默认实现做一些配置 《Spring Security - Adding In Your Own Filters》
授之以渔比授之以鱼更加重要,所以这里只是简单的列举一些使用的例子,具体的原理还是要到源码中去自己品味摸索,每个filter自己的奥妙需要读者自己去体会
AuthenticationProcessingFilter
登陆(认证 Authentication)
AuthenticationProcessingFilter =》默认UsernamePasswordAuthenticationFilter 或者配置自己实现的filter,登录成功后会存储到session,如果是使用的spring-session-redis则会存储到redis
FilterSecurityInterceptor
权限验证(授权Authorization)
FilterSecurityInterceptor=》替换成自己实现的filter 如果没有则使用该filter
RememberMeAuthenticationFilter
protected void configure(HttpSecurity http) throws Exception {
    http.addFilterAt(rememberMeAuthenticationFilter(), RememberMeAuthenticationFilter.class)
}
private String REMEMBER_ME_KEY = "3a87d426-0789-46b1-91d9-61d1f953db17";

private RememberMeServices rememberMeServices() {
    return new TokenBasedRememberMeServices(REMEMBER_ME_KEY, customUserDetailService()) {{
        setAlwaysRemember(true);//不需要前端传递参数 remember-me=(true/on/yes/1 四个值都可以)
    }};
}

//这里可以跟认证的filter公用一个认证管理者(认证管理者会判断当前authenticationRequest去判断适用哪个provider),也可以建一个新的,然后只添加rememberme认证的provider
private RememberMeAuthenticationFilter rememberMeAuthenticationFilter() throws Exception {
    return new RememberMeAuthenticationFilter(this.customAuthenticationManager(), this.rememberMeServices());
}

private AuthenticationManager customAuthenticationManager() throws Exception {
    CustomDaoAuthenticationProvider authenticationProvider = new CustomDaoAuthenticationProvider();
    authenticationProvider.setUserDetailsService(this.customUserDetailService());
    authenticationProvider.setPasswordEncoder(new BCryptPasswordEncoder());
    List<AuthenticationProvider> providers = new ArrayList<>();
    providers.add(authenticationProvider);
    providers.add(new RememberMeAuthenticationProvider(REMEMBER_ME_KEY));
    return new ProviderManager(providers);
}
RequestCacheAwareFilter
在security调用链中用户可能在没有登录的情况下访问被保护的页面,这时候用户会被跳转到登录页,登录之后,springsecurity会自动跳转到之前用户访问的保护的页面
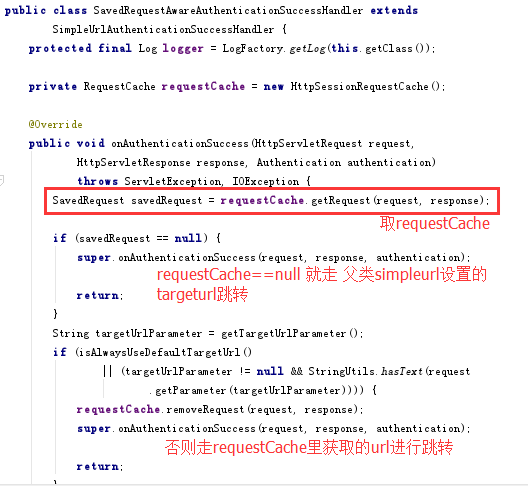
SavedRequestAwareAuthenticationSuccessHandler extends SimpleUrlAuthenticationSuccessHandler
会先从requestCache去取,如果有上面的操作(例如未登录访问某页面,会记录到session),就会取session获得url,然后跳转过去,如果requestcache取不到,就会执行
super.onAuthenticationSuccess,即SimpleUrlAuthenticationSuccessHandler的跳转到登录成功页
想要关闭访问缓存?可以
一、全局配置里禁用掉
http.requestCache().requestCache(new NullRequestCache())
二、设置成功处理handler直接使用SimpleUrlAuthenticationSuccessHandler,
而不是SavedRequestAwareAuthenticationSuccessHandler
CustomUsernamePasswordAuthenticationFilter mu = new CustomUsernamePasswordAuthenticationFilter();
mu.setAuthenticationSuccessHandler(new SavedRequestAwareAuthenticationSuccessHandler(){{
    setDefaultTargetUrl("/login/success");
}};);
把这里登录成功的处理handler改为如下SimpleUrlAuthenticationSuccessHandler,simpleurl就不会去取requestCache
mu.setAuthenticationSuccessHandler(new SimpleUrlAuthenticationSuccessHandler(){{
    setDefaultTargetUrl("/login/success");
}};);
ConcurrentSessionFilter
protected void configure(HttpSecurity http) throws Exception {
    http
    .addFilterAt(new ConcurrentSessionFilter(this.sessionRegistry()),ConcurrentSessionFilter.class)
}
@Bean
public SessionRegistry sessionRegistry(){
//如果是分布式系统,多台机器,这里还要改成SpringSessionBackedSessionRegistry使用springsession存储,而不是存储在内存里
    return new SessionRegistryImpl();
}
private CustomUsernamePasswordAuthenticationFilter loginFilter() throws Exception {
    CustomUsernamePasswordAuthenticationFilter mu = new CustomUsernamePasswordAuthenticationFilter();
    List<SessionAuthenticationStrategy> list=new ArrayList();
    //从内存取所有sessionid,并过期掉访问时间最早的
    list.add(new ConcurrentSessionControlAuthenticationStrategy(this.sessionRegistry()));//策略的先后顺序没有关系,spring会帮我们做好逻辑
    //保存当前sessionid至内存
    list.add(new RegisterSessionAuthenticationStrategy(this.sessionRegistry()));
    mu.setSessionAuthenticationStrategy(new CompositeSessionAuthenticationStrategy(list));
    ...
}
CsrfFilter
csrffilter默认不会拦截的请求类型:TRACE HEAD GET OPTIONS
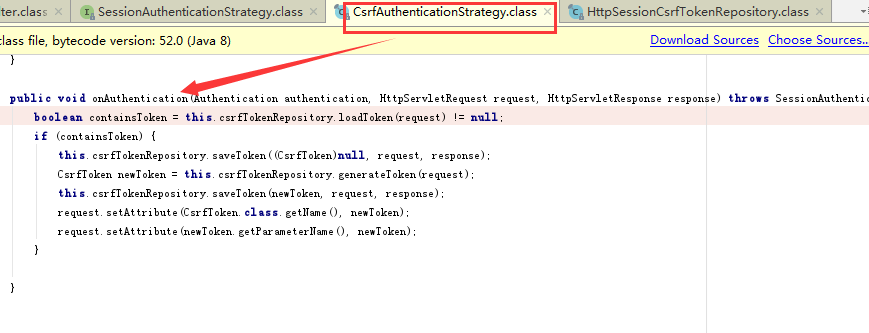
protected void configure(HttpSecurity http) throws Exception {
    http.csrf().disable();//注释掉默认的
    http.addFilterAt(new CsrfFilter(csrfTokenRepository()),CsrfFilter.class);
}
//这里security默认开启csrf配置也是一样的,需要注意分布式环境时token的存储问题
@Bean
public CsrfTokenRepository csrfTokenRepository() {
    return new LazyCsrfTokenRepository(new HttpSessionCsrfTokenRepository());
}
//自己的loginfilter默认SessionAuthenticationStrategy是null,所以自己实现filter需要注册上去,如果是security默认的认证filter则会自动注入进去strategy不用我们操心
private CustomUsernamePasswordAuthenticationFilter loginFilter() throws Exception {
    CustomUsernamePasswordAuthenticationFilter mu = new CustomUsernamePasswordAuthenticationFilter();
    List<SessionAuthenticationStrategy> list=new ArrayList();
    //登录成功后重新生成csrf token,否则登录成功后token也不会变
    list.add(new CsrfAuthenticationStrategy(csrfTokenRepository()));
    mu.setSessionAuthenticationStrategy(new CompositeSessionAuthenticationStrategy(list));
    ...
}
首先得get请求一个页面,后台才会把token存到session供后面post时使用,不过这个csrftoken在访问第一个get页面后生成后都不会再改变了,需要注意这一点;
只有每次登录成功后才会变!
AuthenticationProcessingFilter里面的SessionAuthenticationStrategy包含 CsrfAuthenticationStrategy. 会去设置新的csrftoken
如何使用token
csrfToken=((CsrfToken)ApplicationContextUtil.getBean(CsrfTokenRepository.class)).loadToken(request)
csrfToken.getHeaderName()
csrfToken.getParameterName()
csrfToken.getToken()
或
((CsrfToken)request.getAttribute("_csrf")).getHeaderName()
((CsrfToken)request.getAttribute("_csrf")).getParameterName()
((CsrfToken)request.getAttribute("_csrf")).getToken()
或
<meta name="_csrf" content="${_csrf.token}"/>
<meta name="_csrf_header" content="${_csrf.headerName}"/>
<script>
    var token = $("meta[name='_csrf']").attr("content");
    var header = $("meta[name='_csrf_header']").attr("content");
    $.ajaxSetup({
        beforeSend: function (xhr) {
            if(header && token ){
                xhr.setRequestHeader(header, token);
            }
        }}
    );
</script>
BasicAuthenticationFilter
该filter在ConcurrentSessionFilter后面,说明他不会走同时登录次数限制的逻辑
构造UsernamePasswordAuthenticationToken然后调用authenticationManager进行身份认证
属性里有RememberMeServices,说明可以走rememberme cookie自动登录逻辑
LogoutFilter
logoutfilter 注意,只能post请求才可以
该filter会调用logouthandlers.logout
把 remembermeservices里的cookie设置过期
把 csrftokenrepository token设置为null
把 session.invalidate SecurityContext.setAuthentication((Authentication)null) SecurityContextHolder.clearContext();
ExceptionTranslationFilter
关于授权的所有异常抛出统一都是在ExceptionTranslationFilter
包括认证异常、授权异常
认证异常:指的是匿名或者未认证的用户访问了需要认证的资源
授权异常:当前用户没有访问该资源的权限
protected void configure(HttpSecurity http) throws Exception {
http.exceptionHandling().authenticationEntryPoint(customAuthenticationEntryPoint).accessDeniedHandler(customAccessDeniedHandler);
}
@Component
public class CustomAuthenticationEntryPoint implements AuthenticationEntryPoint {
    protected final Log logger = LogFactory.getLog(getClass());

    @Override
    public void commence(HttpServletRequest httpServletRequest, HttpServletResponse response, AuthenticationException ex) throws IOException, ServletException {
        logger.warn("请重新登录后访问,"+ex.getMessage());
        logger.warn(JSONObject.toJSON(ex));
        RespEntity respEntity = RespUtil.toRespEntity(RespUtil.ACCESS_DENIED, "请重新登录后访问",null);
        response.setCharacterEncoding("UTF-8");
        response.setContentType("text/plain;charset=utf-8");
        PrintWriter writer = response.getWriter();
        writer.println( JSONObject.toJSONString(respEntity));
    }
}

@Component
public class CustomAccessDeniedHandler implements AccessDeniedHandler {
    protected final Log logger = LogFactory.getLog(getClass());

    @Override
    public void handle(HttpServletRequest request, HttpServletResponse response, AccessDeniedException accessDeniedException) throws IOException, ServletException {
        logger.warn("请重新登录后访问,"+accessDeniedException.getMessage());
        logger.warn(JSONObject.toJSON(accessDeniedException));
        RespEntity respEntity = RespUtil.toRespEntity(RespUtil.ACCESS_DENIED, "请重新登录后访问", null);
        response.setCharacterEncoding("UTF-8");
        response.setContentType("text/plain;charset=utf-8");
        PrintWriter writer = response.getWriter();
        writer.println( JSONObject.toJSONString(respEntity));
    }
}
关于session-fixation attacks
在登录成功后要更换sessionid,默认的认证filter会帮我们加进去
private CustomUsernamePasswordAuthenticationFilter loginFilter() throws Exception {
    CustomUsernamePasswordAuthenticationFilter mu = new CustomUsernamePasswordAuthenticationFilter();
    List<SessionAuthenticationStrategy> list=new ArrayList();
    //登录成功后更换新的sessionid
    list.add(new ChangeSessionIdAuthenticationStrategy());
    mu.setSessionAuthenticationStrategy(new CompositeSessionAuthenticationStrategy(list));
    ...
}
默认的认证filter的session认证strategy有4个(会随着开启csrf concurrentsession而增加strategy,不开则不加)

模拟:
建立一个springboot站点(不使用spring security)
@RestController
public class TestController {
    @GetMapping("/login")
    public String login(@RequestParam(name = "userName",required = false) String userName, HttpServletRequest request) {
        request.getSession().setAttribute("userName",userName);
        return "sessionid:"+request.getSession().getId()+";userName:"+userName; } @GetMapping("/user") public String getOrder( HttpServletRequest request) { return "sessionid:"+request.getSession().getId()+";userName:"+request.getSession().getAttribute("userName"); } }
1.攻击者先访问 login地址,得到sessionid
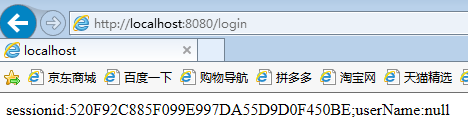
2.被攻击者访问地址
http://localhost:8080/login;jsessionid=520F92C885F099E997DA55D9D0F450BE

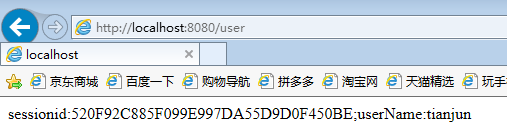
3.被攻击者访问地址后模拟get登录(后面附带参数)
http://localhost:8080/login;jsessionid=520F92C885F099E997DA55D9D0F450BE?userName=tianjun

4.攻击者可以以用户正常认证方式进行操作和窃取用户信息
五、源码相关
重要的还是搞清楚如何进行抽象,为什么这样去抽象?
如下是spring bean加载流程(右键新标签打开可查看大图)
